
Choose a different version or distribution
Introduction
Before we begin talking about how to create Python Virtual Environment on Ubuntu 22.04, let's briefly understand – What is Python Virtual Environment?
A Python Virtual Environment is a self-contained directory that houses a specific Python interpreter and libraries, separate from the system's default Python installation. This tool allows you to manage dependencies and packages for different projects, ensuring each project has its own isolated environment.
By using virtual environments, you can avoid conflicts between project requirements and maintain project-specific dependencies. Setting up and activating a virtual environment is a common practice for Python developers to create clean, project-specific spaces for smoother and more efficient development.
In this tutorial, you will create a Python Virtual Environment on Ubuntu 22.04. We will also address a few FAQs on how to create a Python Virtual Environment on Ubuntu 22.04.
Download Python 3
To update the packages to the most recent releases, let's update the package index and execute the following command:
sudo apt update && sudo apt upgrade -y
To force an update, press the -y key. To verify, the Python version, follow these steps:
python3 --version
Output

Python 3.10.6
Installing python3-pip is the next step towards managing Python packages. Let's employ the integrated command:
sudo apt install python3-pip -y
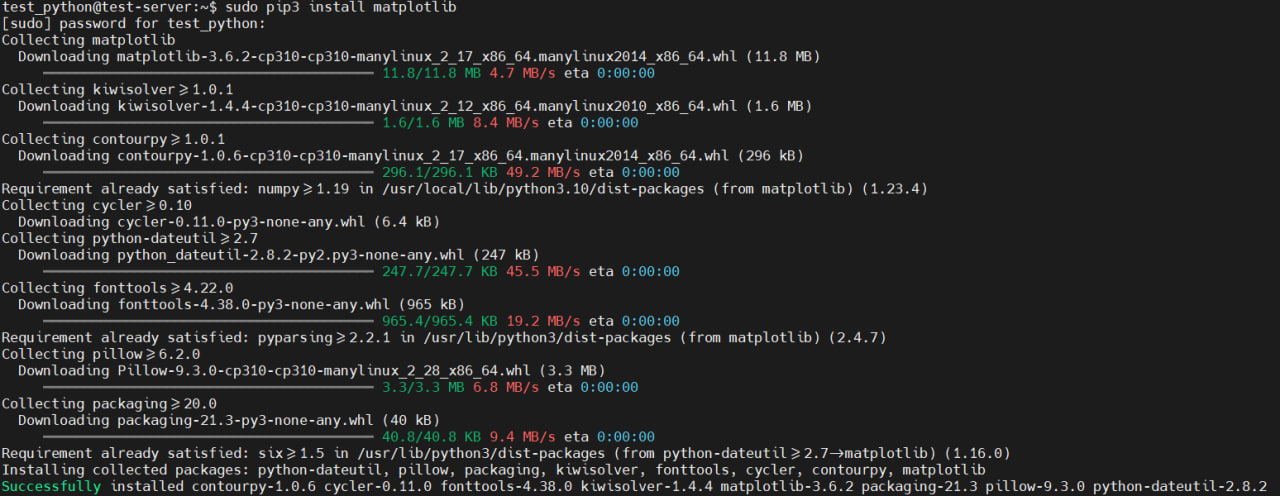
The following command must be executed in order to install the matplotlib library:
pip3 install matplotlib
You must install a number of packages in order to ensure the dependability of the software environment.
sudo apt install build-essential libssl-dev libffi-dev python3-dev
The initial phase is now finished. The most recent pip3 package management system is installed, and we have updated the package index and outdated packages.
Setting up a virtual environment
When compared to operating in a primary development environment, a virtual development environment hosted on a production server is thought to be an excellent solution. You can edit the main development environment's files without causing any damage when you work in a virtual environment.
As many virtual environments as we require can be created. On our server, every virtual environment is set up in a separate directory. Files needed to initialize the virtual environment are contained in the directories. The installed venv (virtual environment) package is used to deploy the virtual environment:
sudo apt install python3-venv -y
Next, let's make the test directory:
mkdir test && cd test
To create a virtual environment called test_env, navigate to the first directory and execute the following command:
python3 -m venv test_env

The virtual environment is configured by the generated files to function independently of our host files. The following commands will activate the environment; the deactivate command must be used to turn it off.
source test_env/bin/activate
Use this command to stop the virtual environment:
deactivate

As you can see in the figure, following launch, a message appears in front of the username (test_env) indicating that all commands are carried out in a virtual environment. You should then think about executing a regular Python code.
Testing the virtual environment
Following activation, a file with the .py extension must be created:
vim hello.py
print("Hello World!")
To run the program, do the following:
python3 hello.py
This marks the end of the stage, and we will use the deactivate command to finish working in the virtual environment and go back to the real world.
FAQs to Create a Python Virtual Environment on Ubuntu 22.04
How do I create a Python virtual environment on Ubuntu 22.04?
You create a Python virtual environment by setting up a separate space where Python programs can exist without affecting the system-wide Python environment.
How do I activate a Python virtual environment on Ubuntu 22.04?
Activating a Python virtual environment involves switching to the isolated Python environment you have created for a specific project.
Can I install packages within a Python virtual environment on Ubuntu 22.04?
Yes, you can install Python packages within the virtual environment, ensuring they are contained within that specific environment.
Is it possible to specify different Python versions in virtual environments on Ubuntu 22.04?
Virtual environments allow you to use different Python versions for various projects, preventing version conflicts.
How do I deactivate a Python virtual environment on Ubuntu 22.04?
Deactivating a Python virtual environment means switching back to the system's default Python environment.
Is it advisable to share Python virtual environments on Ubuntu 22.04 with others?
Sharing virtual environments is not recommended due to variations in system configurations. Instead, share requirements files for package installation.
Can I rename a Python virtual environment on Ubuntu 22.04?
Renaming virtual environments is not a direct operation. It's recommended to create a new virtual environment with the desired name and migrate your project to the new environment.
Conclusion
We hope this tutorial helped you understand how to create a Python Virtual Environment on Ubuntu 22.04.
If you have any queries, please leave a comment below, and we’ll be happy to respond to them for sure.