
Introduction
Before we start talking about dig command in linux, let's first understand-What is Dig Command ?
Dig (Domain Information Groper) is a command-line tool that may be used to query DNS name servers.
You can use the dig command to get information about various DNS entries, such as host addresses, mail exchanges, and name servers. Because of its flexibility and ease of use, it is the most often used tool among system administrators for diagnosing DNS problems.
Through practical examples and extensive explanations of the most frequent dig settings, this tutorial demonstrates how to utilize the dig utility.
Installing dig
Type the following command to see if the dig command is available on your system:
dig -v
You will get an output like below:
Output

DiG 9.11.3-1ubuntu1.1-Ubuntu
The program above will print "dig: command not found" if dig is not installed on your system. The dig tool can be installed through the package management of your distro.
Install dig on Ubuntu and Debian
sudo apt update && sudo apt install dnsutils
Install dig on CentOS and Fedora
sudo yum install bind-utils
Install dig on Arch Linux
sudo pacman -S bind-tools
Understanding the dig Output
The dig command is somewhat verbose in its most basic version, when used to query a single host (domain) without any further parameters.
On the linux.org domain, we'll execute the following example:
dig linux.org
You will get an output like below:
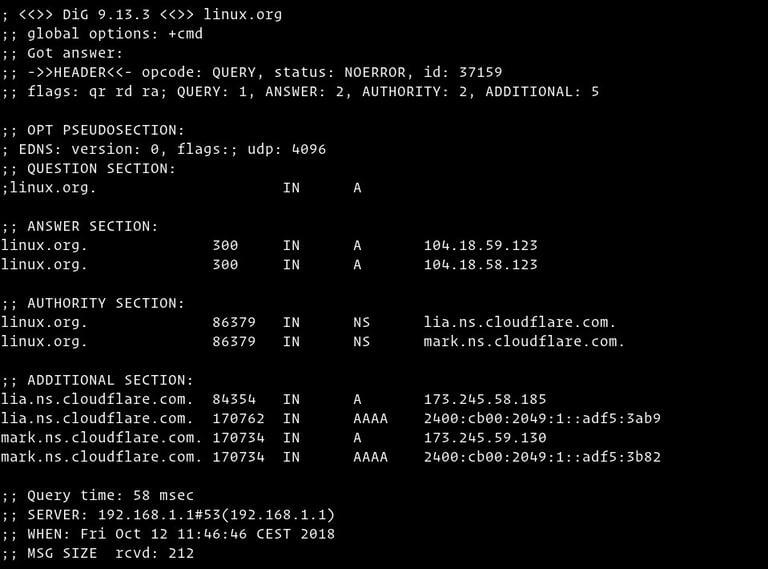
Let's go over the output of the dig command section by section:
- The installed
digversion and the query domain name are printed on the first line of the report. The global options are shown on the second line (by default, only cmd).
; <<>> DiG 9.13.3 <<>> linux.org
;; global options: +cmd
Use the +nocmd option if you don't want those lines included in the output. This should be the first option after the dig command.
2. The next section contains technical information on the authority's response (DNS server). The opcode (dig's action) and the action's status are displayed in the header. In this case, the status is NOERROR, indicating that the query was successfully served by the requesting authority.
;; Got answer:
;; ->>HEADER<<- opcode: QUERY, status: NOERROR, id: 37159
;; flags: qr rd ra; QUERY: 1, ANSWER: 2, AUTHORITY: 2, ADDITIONAL: 5
The +nocomments option can be used to delete this part, as well as the headers of several other sections.
3. Only newer versions of the dig tool display the "OPT" pseudo section. More information on DNS Extension Mechanisms (EDNS) can be found here.
;; OPT PSEUDOSECTION:
; EDNS: version: 0, flags:; udp: 4096
Use the +noedns option to remove this portion from the output.
4. Dig displays the query in the "QUESTION" area (question). Dig requests the A record by default.
;; QUESTION SECTION:
;linux.org.			IN	A
The +noquestion option can be used to turn off this part.
5. We get an answer to our question in the "ANSWER" area. As previously stated, dig will request the A record by default. We can observe that the domain linux.org is associated with the IP address 104.18.59.123.
;; ANSWER SECTION:
linux.org.		300	IN	A	104.18.59.123
linux.org.		300	IN	A	104.18.58.123
Although you should not normally turn off the answer, the +noanswer option can be used to eliminate this portion from the output.
6. The "AUTHORITY" element specifies which server(s) are in charge of responding to DNS queries for the domain in question.
;; AUTHORITY SECTION:
linux.org.		86379	IN	NS	lia.ns.cloudflare.com.
linux.org.		86379	IN	NS	mark.ns.cloudflare.com.
The +noauthority option can be used to turn off this piece of the output.
7. The IP addresses of the authoritative DNS servers listed in the authority section are listed in the "ADDITIONAL" section.
;; ADDITIONAL SECTION:
lia.ns.cloudflare.com.	84354	IN	A	173.245.58.185
lia.ns.cloudflare.com.	170762	IN	AAAA	2400:cb00:2049:1::adf5:3ab9
mark.ns.cloudflare.com.	170734	IN	A	173.245.59.130
mark.ns.cloudflare.com.	170734	IN	AAAA	2400:cb00:2049:1::adf5:3b82
The +noadditional option turns off the reply's additional part.
8. The final component of the dig output contains query statistics.
;; Query time: 58 msec
;; SERVER: 192.168.1.1#53(192.168.1.1)
;; WHEN: Fri Oct 12 11:46:46 CEST 2018
;; MSG SIZE  rcvd: 212
With the +nostats option, you may turn off this feature.
Printing Only the Answer
In most cases, you'll only want a brief response to your dig question.
1. Get a Short Answer
Use the +short option to receive a quick response to your query:
dig linux.org +short
104.18.59.123
104.18.58.123
Only the IP addresses of the A record will be included in the output.
2. Get a Detailed Answer
Turn off all the results with the +noall option and then turn on only the answer section with the +answer option for a more detailed answer.
dig linux.org +noall +answer
Output

; <<>> DiG 9.13.3 <<>> linux.org +noall +answer
;; global options: +cmd
linux.org.		67	IN	A	104.18.58.123
linux.org.		67	IN	A	104.18.59.123
Query Specific Name Server
Dig uses the servers provided in the /etc/resolv.conf file by default if no name server is supplied.
Use the @ (at) symbol followed by the name server IP address or hostname to identify a name server against which the query will be run.
For example, to get information about the linux.org domain from the Google name server (8.8.8.8), type:
dig linux.org @8.8.8.8
Output

; <<>> DiG 9.13.3 <<>> linux.org @8.8.8.8
;; global options: +cmd
;; Got answer:
;; ->>HEADER<<- opcode: QUERY, status: NOERROR, id: 39110
;; flags: qr rd ra; QUERY: 1, ANSWER: 2, AUTHORITY: 0, ADDITIONAL: 1

;; OPT PSEUDOSECTION:
; EDNS: version: 0, flags:; udp: 512
;; QUESTION SECTION:
;linux.org.			IN	A

;; ANSWER SECTION:
linux.org.		299	IN	A	104.18.58.123
linux.org.		299	IN	A	104.18.59.123

;; Query time: 54 msec
;; SERVER: 8.8.8.8#53(8.8.8.8)
;; WHEN: Fri Oct 12 14:28:01 CEST 2018
;; MSG SIZE  rcvd: 70
Query a Record Type
By attaching the record type to the end of any acceptable DNS query, Dig allows you to perform it. We'll show you how to search for the most common records, such as A (IP address), CNAME (canonical name), TXT (text record), MX (mail exchanger), and NS (name server) (name servers).
1. Querying A records
Use the a option to receive a list of all the address(es) for domain name:
dig +nocmd google.com a +noall +answer
Output

google.com.		128	IN	A	216.58.206.206
Dig will request the A record if no DNS record type is supplied, as you may know. Without specifying the 'an' option, you can query the a record.
2. Querying CNAME records
Use the cname option to find the alias domain name:
dig +nocmd mail.google.com cname +noall +answer
Output

mail.google.com.	553482	IN	CNAME	googlemail.l.google.com.
3. Querying TXT records
To get all the TXT records for a certain domain, use the txt option:
dig +nocmd google.com txt +noall +answer
Output

google.com.		300	IN	TXT	"facebook-domain-verification=22rm551cu4k0ab0bxsw536tlds4h95"
google.com.		300	IN	TXT	"v=spf1 include:_spf.google.com ~all"
google.com.		300	IN	TXT	"docusign=05958488-4752-4ef2-95eb-aa7ba8a3bd0e"
4. Querying MX records
Use the mx option to receive a list of all the mail servers for a certain domain:
dig +nocmd google.com mx +noall +answer
google.com.		494	IN	MX	30 alt2.aspmx.l.google.com.
google.com.		494	IN	MX	10 aspmx.l.google.com.
google.com.		494	IN	MX	40 alt3.aspmx.l.google.com.
google.com.		494	IN	MX	50 alt4.aspmx.l.google.com.
google.com.		494	IN	MX	20 alt1.aspmx.l.google.com.
5. Querying NS records
Use the ns option to find the authoritative name servers for our domain:
dig +nocmd google.com ns +noall +answer
google.com.		84527	IN	NS	ns1.google.com.
google.com.		84527	IN	NS	ns2.google.com.
google.com.		84527	IN	NS	ns4.google.com.
google.com.		84527	IN	NS	ns3.google.com.
6. Querying All Records
To receive a list of all DNS records for a single domain, use the any option:
dig +nocmd google.com any +noall +answer
Output

google.com.		299	IN	A	216.58.212.14
google.com.		299	IN	AAAA	2a00:1450:4017:804::200e
google.com.		21599	IN	NS	ns2.google.com.
google.com.		21599	IN	NS	ns1.google.com.
google.com.		599	IN	MX	30 alt2.aspmx.l.google.com.
google.com.		21599	IN	NS	ns4.google.com.
google.com.		599	IN	MX	50 alt4.aspmx.l.google.com.
google.com.		599	IN	MX	20 alt1.aspmx.l.google.com.
google.com.		299	IN	TXT	"docusign=05958488-4752-4ef2-95eb-aa7ba8a3bd0e"
google.com.		21599	IN	CAA	0 issue "pki.goog"
google.com.		599	IN	MX	40 alt3.aspmx.l.google.com.
google.com.		3599	IN	TXT	"facebook-domain-verification=22rm551cu4k0ab0bxsw536tlds4h95"
google.com.		21599	IN	NS	ns3.google.com.
google.com.		599	IN	MX	10 aspmx.l.google.com.
google.com.		3599	IN	TXT	"v=spf1 include:_spf.google.com ~all"
google.com.		59	IN	SOA	ns1.google.com. dns-admin.google.com. 216967258 900 900 1800 60
Reverse DNS Lookup
The -x option is used to find the hostname associated with a given IP address.
To run a reverse lookup on 208.118.235.148, for example, type:
dig -x 208.118.235.148 +noall +answer
The IP address 208.118.235.148 is associated with the hostname wildebeest.gnu.org, as shown in the report below.
Output

; <<>> DiG 9.13.3 <<>> -x 208.118.235.148 +noall +answer
;; global options: +cmd
148.235.118.208.in-addr.arpa. 245 IN	PTR	wildebeest.gnu.org.
Bulk Queries
If you wish to query numerous domains, put them all in a file (one per line) and use the -f option with the file name.
The domains provided in the domains.txt file are queried in the following example.
lxer.com
linuxtoday.com
tuxmachines.org
dig -f domains.txt +short
Output

108.166.170.171
70.42.23.121
204.68.122.43
The .digrc File
The behavior of the dig command can be modified by providing per-user options in the $HOME/.digrc file.
If the user's home directory contains a .digrc file, the options given in it take precedence over the command line arguments.
If you simply want to see the answer portion, for example, open your text editor and make the following ~/.digrc file:
+nocmd +noall +answer
FAQs on Dig Command in Linux
How do I use the dig command in Linux?
To use the digcommand, simply provide the domain name or DNS record you want to query as an argument. For example: dig example.com.
What information does the dig command provide?
The dig command provides various information about DNS records, including the IP address associated with a domain, authoritative name servers, mail server records, and additional details such as TTL (time to live).
Can the dig command query specific types of DNS records?
Yes, the dig command can query specific types of DNS records using the -t option followed by the record type. For example: dig -t MX example.com to query the mail server (MX) records for example.com.
How can I check if a domain name is resolving correctly using the dig command?
By running dig <domain-name>, such as dig example.com, the dig command will display the IP address associated with the domain name if it resolves correctly.
Can I specify a custom DNS server to use with the dig command?
Yes, you can use the @ option followed by the IP address or hostname of the DNS server you want to query. For example: dig example.com @8.8.8.8 to query the DNS server at 8.8.8.8 for example.com.
Can the dig command perform a reverse DNS lookup (IP to domain name)?
Yes, the dig command can perform a reverse DNS lookup by querying the PTR record for a given IP address. Use the -x option followed by the IP address. For example: dig -x 192.0.2.1 to perform a reverse DNS lookup.
What is the significance of the TTL (time to live) displayed by the dig command?
TTL represents the time duration that DNS information is valid and can be cached. It indicates how long a DNS resolver should consider the retrieved information before checking for updates by querying the authoritative DNS server again.
Conclusion
To conclude, the dig command in Linux serves as an indispensable tool for various DNS-related tasks and troubleshooting. Its capabilities to query DNS servers, retrieve specific DNS records, and execute advanced options make it an invaluable asset for network administrators and Linux users.
If you have any queries, please leave a comment below and we’ll be happy to respond to them.