Introduction
Before we begin talking about how to change and secure default phpMyAdmin login URL, let's briefly understand – What is phpMyAdmin Login URL?
The phpMyAdmin login URL is the web address used to access phpMyAdmin, a popular tool for managing MySQL databases. It provides a web-based interface to perform various database tasks. The login URL is where users enter their credentials to gain access to their databases.
With an intuitive interface, phpMyAdmin simplifies database management tasks, such as creating, modifying, or deleting databases, tables, and records. It also allows users to run SQL queries and manage user permissions. By using the phpMyAdmin login URL, users can efficiently interact with their databases and make necessary changes.
In this tutorial, you will understand how to change and secure default phpMyAdmin login URL. We will also address a few FAQs on how to change and secure default phpMyAdmin login URL.
How to Change and Secure Default phpMyAdmin Login URL
By default, the login page of phpmyadmin is located at http://<ip address>/phpmyadmin. The first thing that you will want to do is change that URL. This will not necessarily stop attackers from targeting your server, but will lower the risks of a successful break-in.
This is known as security through obscurity and while some people would argue that it is not a safe measure, it has been known to both discourage attackers and to prevent break-ins.
Note: Make sure you have a working LAMP or LEMP setup with PhpMyAdmin installed on your system.
To do it in Apache or Nginx Web servers, follow the instructions as explained below:
Change PhpMyAdmin Login Page in Apache
Open the /etc/httpd/conf.d/phpMyAdmin.conf on RHEL-based distributions, or /etc/phpmyadmin/apache.conf on Debian-based editions, and comment out the line(s) that start with Alias.
vi /etc/httpd/conf.d/phpMyAdmin.conf OR # /etc/phpmyadmin/apache.conf
Next, include a fresh one in the manner described below:
Alias /phpmyadmin /usr/share/phpmyadmin Alias /my /usr/share/phpmyadmin
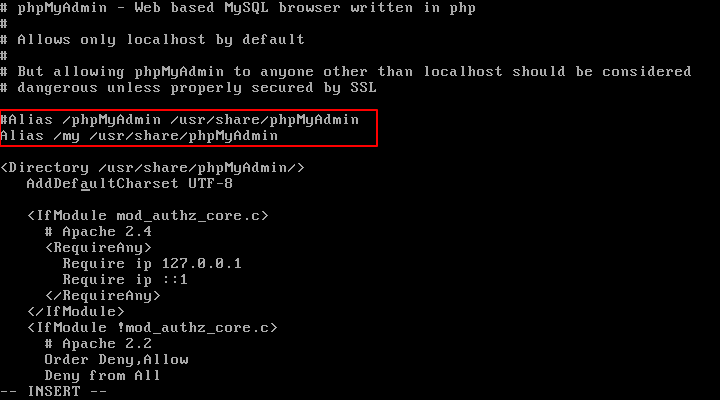
By doing the aforementioned, we can use http://<ip address>/my to access the phpmyadmin interface. If you would prefer to utilize a different URL, feel free to alter the Alias above.
Verify that the Require all granted directive is present in the Directory /usr/share/phpmyadmin block of the same file.
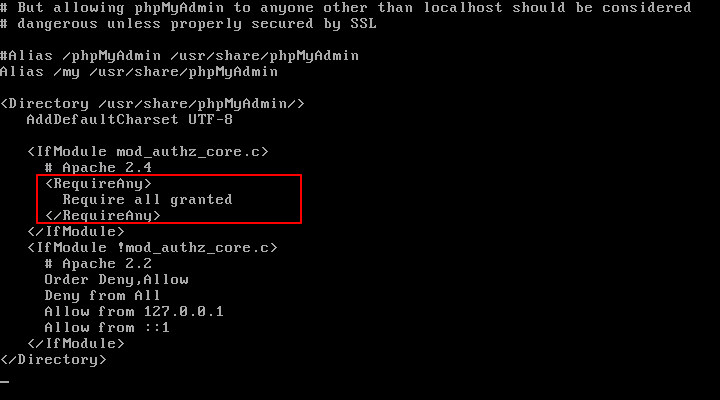
Furthermore, confirm that Apache is able to read the Debian/Ubuntu phpmyadmin configuration:
------------ On Debian and Ubuntu ------------
echo "Include /etc/phpmyadmin/apache.conf" >> /etc/apache2/apache2.conf
In order to implement the modifications, restart Apache and direct your browser to http://<ip address>/my.
------------ On CentOS/RHEL and Fedora ------------
systemctl restart httpd

------------ On Debian and Ubuntu ------------
systemctl restart apache2
Change PhpMyAdmin Login Page in Nginx
To build a symbolic link of the PhpMyAdmin installation files to our Nginx document root directory /usr/share/nginx/html, all we need to do is use the following command on the Nginx web server:
ln -s /usr/share/phpMyAdmin /usr/share/nginx/html
OR
ln -s /usr/share/phpmyadmin /usr/share/nginx/html
We now only need to rename the symbolic link as shown to update the URL of our phpMyAdmin page:
cd /usr/share/nginx/html
mv phpmyadmin my
OR
mv phpMyAdmin my
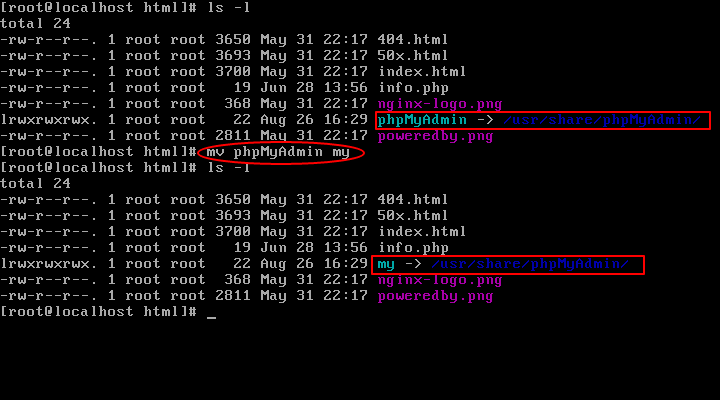
Lastly, to make the modifications and direct your browser to http://<ip address>/my, restart PHP-FPM and Nginx.
------------ On CentOS/RHEL and Fedora ------------
systemctl restart nginx
systemctl restart php-fpm

------------ On Debian and Ubuntu ------------
systemctl restart nginx
systemctl restart php5-fpm
While http://<ip address>/phpmyadmin should lead to a Not Found error page, it should open the phpmyadmin interface (as shown in the image below).
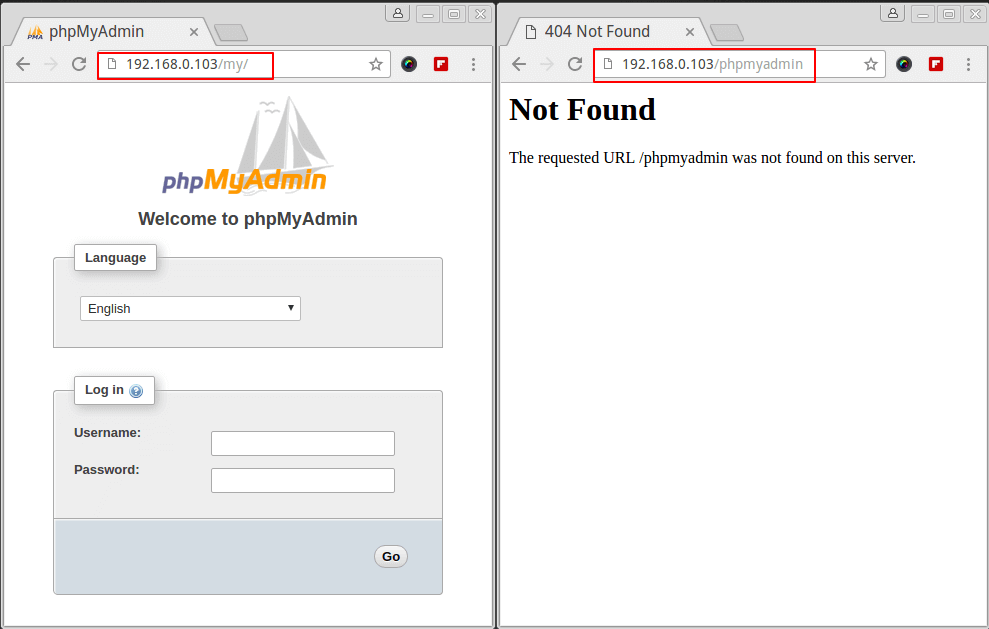
Do not yet log in with the credentials of the database root user. We'll go over how to set up a self-signed certificate for the PhpMyAdmin login page in the next tip because you don't want those credentials traveling over the internet in plain text. We entered and hit Enter on the following command to start sniffing traffic:
tcpdump port http -l -A | egrep -i 'pass=|pwd=|log=|login=|user=|username
As seen in the abbreviated output of tcpdump in the image below, it won't take us long to discover that the login and password have been transferred over the wire in plain text format.
Please take note that the following portion of the root password has a blue mark over it, hiding it:

Let's use a certificate to secure the login page in order to prevent this. Installing the mod_ssl package on CentOS-based distributions will accomplish this.
yum install mod_ssl
The same process works for CentOS and RHEL as well; just substitute the CentOS equivalents for the commands and directories below. We'll use the Debian/Ubuntu path and names, but the steps are the same.
Make a directory where the key and certificate will be kept:
mkdir /etc/apache2/ssl    [On Debian/Ubuntu based systems]
mkdir /etc/httpd/ssl      [On CentOS based systems]
Build the key and certificate:
----------- On Debian/Ubuntu based systems -----------
openssl req -x509 -nodes -days 365 -newkey rsa:2048 -keyout  /etc/apache2/ssl/apache.key -out /etc/apache2/ssl/apache.crt

----------- On CentOS based systems -----------
openssl req -x509 -nodes -days 365 -newkey rsa:2048 -keyout /etc/httpd/ssl/apache.key -out /etc/httpd/ssl/apache.crt
Sample Output:
........................+++
.....................................................+++
writing new private key to '/etc/httpd/ssl/apache.key'
-----
You are about to be asked to enter information that will be incorporated
into your certificate request.
What you are about to enter is what is called a Distinguished Name or a DN.
There are quite a few fields but you can leave some blank
For some fields there will be a default value,
If you enter '.', the field will be left blank.
-----
Country Name (2 letter code) [XX]:IN
State or Province Name (full name) []:Karnataka
Locality Name (eg, city) [Default City]:Bengaluru
Organization Name (eg, company) [Default Company Ltd]:VegaStack
Organizational Unit Name (eg, section) []:VegaStack
Common Name (eg, your name or your server's hostname) []:VegaStack
Email Address []:[email protected]
Now, verify key and certificate.
cd /etc/apache2/ssl/   [On Debian/Ubuntu based systems]
cd /etc/httpd/ssl/     [On CentOS based systems]
ls -l total 8 -rw-r--r--. 1 root root 1424 Sep  7 15:19 apache.crt -rw-r--r--. 1 root root 1704 Sep  7 15:19 apache.key
Verify that Apache is listening on port 443 for the default site in Debian/Ubuntu (/etc/apache2/sites-available/000-default.conf)and include the following 3 lines in the VirtualHost declaration about SSL:
SSLEngine on
SSLCertificateFile /etc/apache2/ssl/apache.crt
SSLCertificateKeyFile /etc/apache2/ssl/apache.key
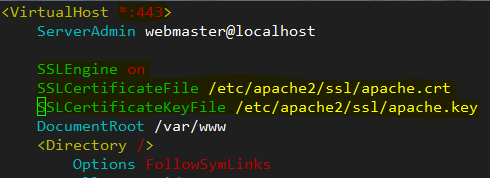
Upon configuring Apache on port 443, locate the Listen directive in /etc/httpd/conf/httpd.conf and add the aforementioned lines beneath it in CentOS-based installations.
SSLEngine on
SSLCertificateFile /etc/httpd/ssl/apache.crt
SSLCertificateKeyFile /etc/httpd/ssl/apache.key
Save the modifications, then load the SSL Apache module on Debian/Ubuntu (on CentOS, this is loaded automatically after installing mod_ssl previously):
a2enmod ssl
Make sure the following line appears in the /etc/phpmyadmin/config.inc.php or /etc/phpMyAdmin/config.inc.php file to force phpmyadmin to utilize SSL:
$cfg['ForceSSL'] = true;
and restart the web server:
systemctl restart apache2   [On Debian/Ubuntu based systems]
systemctl restart httpd     [On Debian/Ubuntu based systems]
Then, open your browser and enter https://<ip address>/my, as indicated below.
Important: Please be aware that this only indicates that the usage of a self-signed certificate makes the connection insecure. After selecting Advanced, verify the security exception:
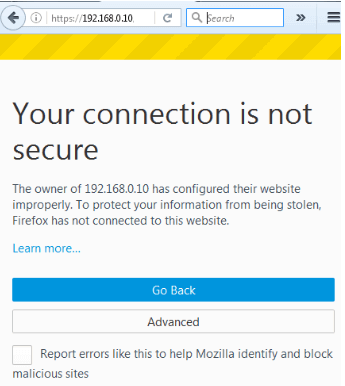
Now that the security exception has been verified, let's begin sniffing HTTP and HTTPS traffic before logging in:
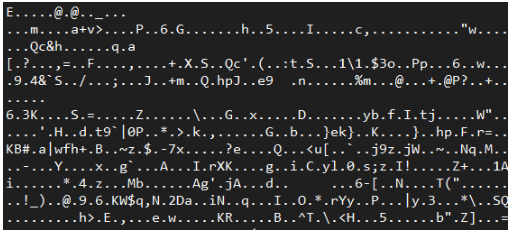
tcpdump port http or port https -l -A | egrep -i 'pass=|pwd=|log=|login=|user=|username=|pw=|passw=|passwd=|password=|pass:|user:|username:|password:|login:|pass |user ' --line-buffered -B20
Next, log in using your previous login information. The traffic sniffer will record gibberish:
FAQs to Change and Secure Default phpMyAdmin Login URL
Why should I change the default phpMyAdmin login URL?
Changing the default phpMyAdmin login URL adds an extra layer of security to your database. Hackers often target default login URLs, and by changing it, you minimize the risk of unauthorized access.
How can I change the phpMyAdmin login URL?
To change the phpMyAdmin login URL, you can rename the directory or use an alias in your web server configuration. This will make it harder for attackers to locate the login page.
Is changing the phpMyAdmin login URL a complex process?
No, it is a simple process. You can change the login URL by following a few easy steps, like renaming the directory or using an alias in the web server configuration file.
Will changing the phpMyAdmin login URL affect my existing databases?
No, changing the login URL will not affect your existing databases. It only modifies the way you access phpMyAdmin, and the databases and their contents remain intact.
Can changing the login URL prevent all security threats?
While changing the login URL improves security, it does not guarantee complete protection. It is important to implement other security measures and follow best practices to ensure the overall security of your phpMyAdmin installation.
What are some additional security measures I can take to secure phpMyAdmin?
You can enhance phpMyAdmin security by setting up strong passwords, enabling two-factor authentication, limiting access via IP whitelisting, keeping the software updated, and regularly monitoring log files for suspicious activities.
What are the benefits of securing the phpMyAdmin login URL?
Securing the login URL protects your database from brute-force attacks, unauthorized access, and potential exploitation by malicious individuals or bots. It is an essential step towards maintaining the security and integrity of your data.
Conclusion
We hope this tutorial helped you understand how to change and secure default phpMyAdmin login URL.
If you have any queries, please leave a comment below, and we’ll be happy to respond to them for sure.

