Introduction
Before we begin talking about how to configure Nginx with SSL as a reverse proxy for Jenkins, let's briefly understand - What are Nginx and Jenkins ?
Nginx is a web server that can alternatively be used as a reverse proxy, load balancer, mail proxy, and HTTP cache. It is also known for its high performance, stability, rich feature set, simple configuration, and low resource consumption.
Now, Jenkins is a free and open-source automation server. It helps in automating the parts of software development related to building, testing, and deploying, facilitating continuous integration and continuous delivery.
In this tutorial, you will configure Nginx with SSL as a reverse proxy for your Jenkins instance. We will also address a few FAQs on how to configure Nginx with SSL as a Reverse Proxy for Jenkins.
Advantages of Nginx and Jenkins
- High performance: Nginx handles concurrent connections efficiently, making it suitable for high traffic websites.
- Load balancing: Nginx distributes incoming traffic to multiple servers, ensuring optimal resource utilization and scalability.
- Reverse proxy: Nginx acts as an intermediary between clients and servers, enhancing security and performance.
- Easy installation & configuration: Jenkins can be set up quickly, and its user-friendly interface simplifies job configuration.
- Extensibility: Jenkins vast plugin ecosystem allows customization and integration with various tools and technologies.
Prerequisites
- Familiarity with Linux commands
- A working Jenkins installation
- Ubuntu 14.04 Operating System
- A user account with sudo privileges
Step 1 - Configuring Nginx
We will be using the Nginx web server for its speed and flexibility.
Installing Nginx:
Update your package lists and install Nginx using the following command:
sudo apt-get update
sudo apt-get install nginx
It’s not important, but you might want to check Nginx’s version in case you need to do any troubleshooting in the future. Newer versions of Nginx provide a few more features as well.
nginx -v
Step 2 - Getting a Certificate
After that, you will need to purchase or create an SSL certificate. The commands we are showing are for self-signed certificates, to avoid any browser warnings you should get a signed certificate.
Next, move into the proper directory and generate a certificate.
cd /etc/nginx
sudo openssl req -x509 -nodes -days 365 -newkey rsa:2048 -keyout /etc/nginx/cert.key -out /etc/nginx/cert.crt
You will now be asked to enter some information about the certificate. You can fill this out however you wish, just keep in mind that the information will be visible in the certificate properties. Furthermore, you will be setting the number of bits to 2048 since that is the minimum needed to get it signed by a CA. If you wish to get the certificate signed, you will need to create a CSR.
Step 3 - Editing the Configuration
After that, you will need to edit the default Nginx configuration file.
sudo nano /etc/nginx/sites-enabled/default
You will get a final configuration as follows. You can also update or replace the existing config file, although you may want to first make a quick copy.
server {
    listen 80;
    return 301 https://$host$request_uri;
}

server {

    listen 443;
    server_name jenkins.domain.com;

    ssl_certificate           /etc/nginx/cert.crt;
    ssl_certificate_key       /etc/nginx/cert.key;

    ssl on;
    ssl_session_cache  builtin:1000  shared:SSL:10m;
    ssl_protocols  TLSv1 TLSv1.1 TLSv1.2;
    ssl_ciphers HIGH:!aNULL:!eNULL:!EXPORT:!CAMELLIA:!DES:!MD5:!PSK:!RC4;
    ssl_prefer_server_ciphers on;

    access_log            /var/log/nginx/jenkins.access.log;

    location / {

      proxy_set_header        Host $host;
      proxy_set_header        X-Real-IP $remote_addr;
      proxy_set_header        X-Forwarded-For $proxy_add_x_forwarded_for;
      proxy_set_header        X-Forwarded-Proto $scheme;

      # Fix the “It appears that your reverse proxy set up is broken" error.
      proxy_pass          http://localhost:8080;
      proxy_read_timeout  90;

      proxy_redirect      http://localhost:8080 https://jenkins.domain.com;
    }
  }
In your configuration, the cert.crtand cert.key settings reflect the location where you have created your SSL certificate. You will need to update the servername and proxyredirect lines with your own domain name.
The first section tells the Nginx server to pay heed to any requests that come in on port 80 (default HTTP) and redirect them to HTTPS.
...
server {
   listen 80;
   return 301 https://$host$request_uri;
}
...
After that, you have the SSL settings. Below is a good set of defaults, but can definitely be expanded on.
...
  listen 443;
  server_name jenkins.domain.com;

  ssl_certificate           /etc/nginx/cert.crt;
  ssl_certificate_key       /etc/nginx/cert.key;

  ssl on;
  ssl_session_cache  builtin:1000  shared:SSL:10m;
  ssl_protocols  TLSv1 TLSv1.1 TLSv1.2;
  ssl_ciphers HIGH:!aNULL:!eNULL:!EXPORT:!CAMELLIA:!DES:!MD5:!PSK:!RC4;
  ssl_prefer_server_ciphers on;
  ...
The final section is where the proxying happens. It accepts any incoming requests and proxies them to the Jenkins instance that is listening to port 8080 on the local network interface.
...
location / {

    proxy_set_header        Host $host;
    proxy_set_header        X-Real-IP $remote_addr;
    proxy_set_header        X-Forwarded-For $proxy_add_x_forwarded_for;
    proxy_set_header        X-Forwarded-Proto $scheme;

    # Fix the “It appears that your reverse proxy set up is broken" error.
    proxy_pass          http://localhost:8080;
    proxy_read_timeout  90;

    proxy_redirect      http://localhost:8080 https://jenkins.domain.com;
}
...
A few things to point out here are that if you don’t have a domain name that resolves to your Jenkins server, then the proxy_redirect statement above won’t function accurately without editing. Also, if you add a trailing slash, for example, it will lead to a misconfiguration of proxy_pass you will get something similar to the following in your Jenkins Configuration page.

If you get this error, double-check your proxy_pass and proxy_redirect settings in the Nginx configuration!
Step 4 - Configuring Jenkins
For Jenkins to work with Nginx, you need to update the Jenkins config to listen only on the localhost interface instead of all (0.0.0.0), to ensure traffic gets handled properly. This is a crucial step because if Jenkins is still listening on all interfaces, then it will still potentially be accessible via its original port (8080). We will edit the /etc/default/jenkins configuration file to make these adjustments.
sudo nano /etc/default/jenkins
After that, locate the JENKINS\_ARGS line and update it to look something like this:
JENKINS_ARGS="--webroot=/var/cache/jenkins/war --httpListenAddress=127.0.0.1 --httpPort=$HTTP_PORT -ajp13Port=$AJP_PORT"
Make note that the –httpListenAddress=127.0.0.1 setting needs to be either added or edited.
After that, go ahead and restart Jenkins and Nginx.
sudo service jenkins restart
sudo service nginx restart
Now you should be able to visit your domain using either HTTP or HTTPS, and the Jenkins site will be served securely.
Step 5 - (Optional) Updating OAuth URLs
In case you are using GitHub or another OAuth plugin for authentication, it will probably break at this point. For instance, when attempting to visit the URL, you will get a “Failed to open page” with a URL similar to the following:
http://jenkins.domain.com:8080/securityRealm/finishLogin?code=random-string
To fix this issue you will need to update a few settings, including your OAuth plugin settings. Firstly, you need to update the Jenkins URL (in the Jenkins GUI), you can find it by navigating in the following way:
Jenkins -> Manage Jenkins -> Configure System -> Jenkins Location
After that, update the Jenkins URL to use HTTPS - https://jenkins.domain.com/
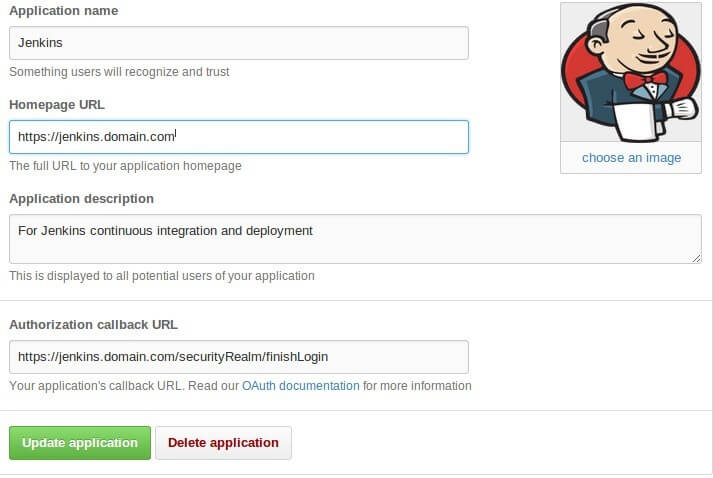
As a next step, update your OAuth settings with the external provider. This example is for GitHub. On GitHub, you can find it under Settings -> Applications -> Developer applications, on the GitHub site.
There should be an entry for Jenkins. Update the Homepage URL and Authorization callback URL to reflect the HTTPS settings. You will see something like this.
FAQs to Configure Nginx with SSL as a Reverse Proxy for Jenkins
Why should I configure Nginx as a reverse proxy for Jenkins?
Nginx improves security, performance, and flexibility by acting as an intermediary between clients and Jenkins, handling SSL encryption, load balancing, and caching.
Can I use a different port for Jenkins when using Nginx as a reverse proxy?
Yes, you can configure Jenkins to run on a different port. Update the reverse proxy configuration in Nginx to match the new port and ensure proper communication between Nginx and Jenkins.
Do I need to make any changes to Jenkins configuration when using Nginx as a reverse proxy?
Jenkins configuration changes are not typically required. Ensure Jenkins is configured to run on the expected host and port, and Nginx is correctly proxying requests to Jenkins.
How can I enable SSL termination on Nginx for Jenkins?
Configure SSL termination by defining SSL certificates in the Nginx configuration and directing the traffic to Jenkins using HTTP (non-SSL) internally.
Can Nginx handle multiple Jenkins instances behind the reverse proxy?
Yes, Nginx can handle multiple Jenkins instances by configuring separate server blocks in the Nginx configuration, directing each to the corresponding Jenkins instance using reverse proxy directives.
How can I improve Jenkins performance when using Nginx as a reverse proxy?
Enable Nginx caching to serve static files directly from Nginx, reducing the load on Jenkins. Additionally, you can configure Jenkins and Nginx to use Gzip compression for faster data transmission.
Is it possible to add authentication to the Jenkins-Nginx setup?
Yes, you can enable authentication by configuring Nginx to require user authentication before proxying requests to Jenkins. This adds an extra layer of security to your setup.
Conclusion
We hope that this tutorial has helped you to configure Nginx with SSL as a reverse proxy for Jenkins.
If you have any further queries or concerns, do leave us a comment below and we'll be sure to respond.

