

Introduction
Before we begin talking about how to configure PHP-FPM on Ubuntu 22.04, let's briefly understand – What is PHP-FPM?
PHP-FPM stands for PHP FastCGI Process Manager. It is a high-performance alternative to the traditional PHP CGI handler. PHP-FPM manages and processes PHP requests more efficiently, improving website performance and reducing resource usage.
It helps handle multiple PHP requests concurrently, making it ideal for high-traffic sites. PHP-FPM is an essential component for running PHP applications and is commonly used with web servers like Nginx to deliver optimized websites with faster response times and better scalability.
In this tutorial, you will configure PHP-FPM on Ubuntu 22.04. We will also address a few FAQs on how to configure PHP-FPM on Ubuntu 22.04.
Prerequisites
- Ubuntu 22.04 freshly installed
- User privileges: sudo access for root or non-root users
Step 1. Update the System
We must run the following commands in order to perform a system update for a fresh Ubuntu 22.04 installation.
sudo apt update -y && sudo apt upgrade -y
Step 2. Install Nginx webserver
The following command can be used to install the Nginx web server:
sudo apt install nginx -y
Start the Nginx service and enable it after the installation is finished.
sudo systemctl start nginx && sudo systemctl enable nginx
Step 3. Install PHP-FPM
Installing the php-fpm extension and other php extensions comes next.
sudo apt install software-properties-common ca-certificates lsb-release apt-transport-https -y
sudo add-apt-repository ppa:ondrej/php -y
sudo apt update
It is now possible to install PHP-FPM after the dependencies have been installed.
sudo apt install php8.1 php8.1-fpm php8.1-mysql php8.1-mbstring php8.1-xml php8.1-curl
After installation, start and enable the php8.1-fpm.service.
sudo systemctl start php8.1-fpm.service && sudo systemctl enable php8.1-fpm.service
Run the following command to see if everything is in order:
sudo systemctl status php8.1-fpm.service
The following output is what you need to get:
Output

root@host:/var/www/html# systemctl status php8.1-fpm
● php8.1-fpm.service - The PHP 8.1 FastCGI Process Manager
     Loaded: loaded (/lib/systemd/system/php8.1-fpm.service; enabled; vendor preset: enabled)
     Active: active (running) since Sat 2022-09-10 15:31:29 CEST; 1min 52s ago
       Docs: man:php-fpm8.1(8)
   Main PID: 16869 (php-fpm8.1)
     Status: "Processes active: 0, idle: 2, Requests: 0, slow: 0, Traffic: 0req/sec"
      Tasks: 3 (limit: 4575)
     Memory: 8.9M
        CPU: 482ms
     CGroup: /system.slice/php8.1-fpm.service
Step 4. Configure PHP-FPM with Nginx
This is the final and most crucial step, since we will be explaining in this paragraph how to configure php-fpm with Nginx that has already been installed.
It is necessary to generate a virtual host file with our domain name in it. Create the file by going into the Nginx configuration directory.
cd /etc/nginx/conf.d/ && sudo nano yourdomain.com.conf
The code that follows should be pasted.
server {
         listen       80;
         server_name  yourdomain.com;
         root         /var/www/html/;

         access_log /var/log/nginx/yourdomain.com-access.log;
         error_log  /var/log/nginx/yourdomain.com-error.log error;
         index index.html index.htm index.php;

         location / {
                      try_files $uri $uri/ /index.php$is_args$args;
         }

         location ~ \.php$ {
            fastcgi_split_path_info ^(.+\.php)(/.+)$;
            fastcgi_pass unix:/var/run/php/php8.1-fpm.sock;
            fastcgi_index index.php;
            include fastcgi.conf;
        }

}
Verify that the Nginx configuration syntax is correct.
nginx -t
Output

root@vps:/etc/nginx/conf.d# nginx -t
nginx: the configuration file /etc/nginx/nginx.conf syntax is ok
nginx: configuration file /etc/nginx/nginx.conf test is successful
Turn the Nginx server back on.
sudo systemctl restart nginx
The next step in the PHP8.1-FPM configuration is to create a custom pool. The pool configuration can be found at /etc/php/8.1/fpm/pool.d. Since it is advised to use separate files for each new configuration and website, we will not be making changes to the default pool configuration, www.conf.
Prior to adding the user to the group, we must first create the group and the user.
groupadd php_fpm_group

useradd -g php_fpm_group php_fpm_user
The pool configuration for the website must then be made.
cd /etc/php/8.1/fpm/pool.d && touch yourdomain.conf
Using your preferred editor, open the file yourdomain.conf and insert the following lines of code:
[pool_name]
user = php_fpm_user
group = php_fpm_group
listen = /var/run/php/php8.1-fpm.sock
listen.owner = www-data
listen.group = www-data
pm = dynamic
pm.max_children = 30
pm.start_servers = 5
pm.process_idle_timeout = 20s
Let's go over the settings in the file that was generated above:
Every new pool configuration requires a unique pool name. The listen.owner and listen.group are the user and group that Nginx is running on, whereas the user and group for our website must be the created user and group. The path of the PHP8.1 sock is listen.
The maximum number of children that can be alive at once is set using the pm.max_children variable. The number of children created at startup is indicated by pm.start_servers. The maximum number of desired idle server processes is determined by the pm.process_idle_timeout, which is only used if the pm is set to dynamic. The number of child processes is set dynamically based on the following directives when the pm=dynamic argument is used.
Keep in mind that this setup may vary depending on the requirements of your website and server resources.
Making the phpinfo.php file and placing it in the website's document root is the final step.
cd /var/www/html/ && sudo nano phpinfo.php
After the file has opened, paste the following code:
<? php
phpinfo();
?>
After saving the file, shut it down, and go to the following URL: http://yourdomain.com/phpinfo.php
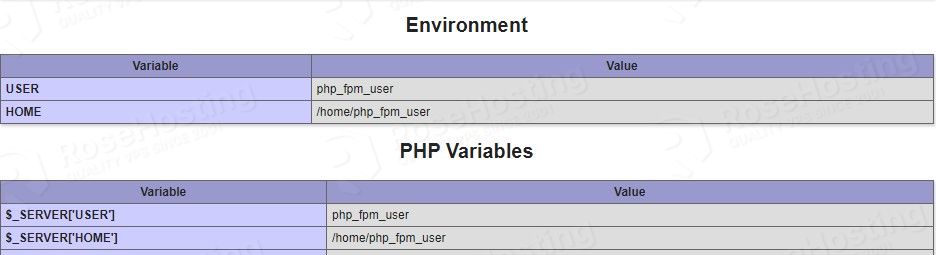
You'll see that the USER and HOME variables in the Environment and PHP Variables are set to php_fpm_user and /home/php_fpm_user, respectively. This demonstrates that Nginx and PHP-FPM have been configured successfully.
FAQs to Configure PHP-FPM on Ubuntu 22.04
How can I configure php-fpm to use a different port?
You can modify the port by editing the listen directive in the php-fpm configuration file.
How do I adjust the number of php-fpm worker processes?
The number of worker processes can be adjusted within the php-fpm configuration file using the pm.max_children directive.
How can I enable or disable PHP extensions in php-fpm?
By editing the php.ini file, you can enable or disable PHP extensions as needed.
How do I restart php-fpm service on Ubuntu 22.04?
To restart the php-fpm service, you can use the appropriate command provided by the system.
What is the default pool configuration file for php-fpm?
The default pool configuration file for php-fpm on Ubuntu 22.04 is /etc/php/7.x/fpm/pool.d/www.conf.
What is the error log file for php-fpm on Ubuntu 22.04?
The error log file for php-fpm on Ubuntu 22.04 is located at /var/log/php7.x-fpm.log.
Conclusion
We hope this tutorial helped you understand how to install PHP-FPM on Ubuntu 22.04.
If you have any queries, please leave a comment below, and we’ll be happy to respond to them for sure.