
Introduction
Before we begin talking about how to create a static ip on alpine linux, let's briefly understand-What is Alpine Linux ?
Alpine Linux is a lightweight and security-focused Linux distribution known for its small size, simplicity, and use in containerized environments. It is widely used in Docker deployments.
Setting up a static IP on Alpine Linux allows you to assign a fixed IP address to your network interface, ensuring consistent connectivity and easier network management.
This tutorial will walk you through the steps to create a static IP on Alpine Linux.
Steps to Create a Static IP on Alpine Linux
There are several reasons to configure Alpine Linux's static IPs, including setting up a KVM server or DHCP server to host multiple virtual machines. You must carry out the following steps in Alpine Linux in order to create a static IP:
Step 1: Check the Current IP Address
Alpine Linux uses DHCP to receive an IP address from the router (DHCP server). Before setting up a static IP address, make sure the present IP configuration is correct.
To start, issue the command below to verify the IP on the active network interface:
ifconfig
The above result indicates that the "eth0" active interface has an allocated IP address of 10.0.2.15. We can build a static IP address after obtaining the current IP address.
Step 2: Configure the Static IP Address
The static network or DHCP setup is specified in the /etc/network/interfaces file. You can use the following command to examine the configuration file:
cat /etc/network/interfaces
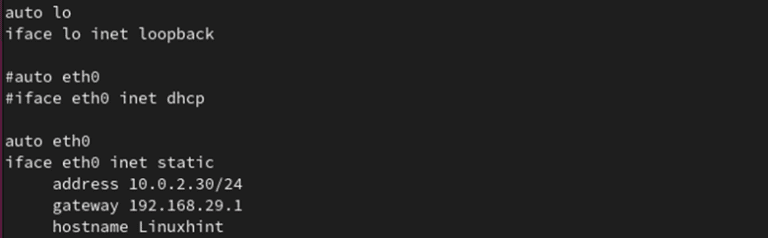
Now we set the router's IP address to "192.168.29.1" and configure the static IP of "10.0.2.30". By adding the hash symbol (#) to the eth0 interface, we may stop the DHCP addressing from the second block.
vi /etc/network/interfaces
The gateway and IPv4 address should be configured to match the environment's IP subnet after pasting the following lines:
To make the changes effective, please use the following commands to restart the networking daemon when you have finished making the changes:
service networking restart
/etc/init.d/networking restart
Run the following command to confirm the new static IP that has been configured on your network interface:
ifconfig
Bonus Tips:
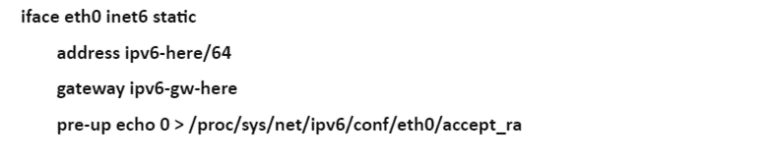
1) Similarly, you can generate a static IP address for IPv6. The lines that you must paste are as follows:
2) Similar to this, you can provide a single network interface several IP addresses. For example, let's provide the eth0 interface a second IP address of 10.0.2.50.
vi /etc/network/interfaces
Restart the networking service as usual to save the modifications.
service networking restart
To verify the IP configuration, use the following command:
ip a
The previous output shows that our interface has been connected with two IP addresses.
Step 3: Set up the DNS or Nameserver IP
The /etc/resolv.conf file contains information about your nameserver/DNS server. In the event that the DHCP configuration is already in use, these items do not need to be modified. Just double-check the entries as indicated below:
vi /etc/resolv.conf
The DNS server's IP address is typically the router's IP address. In our example, the DNS server is the router's IP address. Restart networking after making the necessary modifications to the /etc/resolv.conf file for them to take effect.
If for some reason you decide to return to DHCP, enable the DHCP address by adding a hash (#) to the second block of the /etc/network/interfaces file as seen below.
Finally, use the following command to restart the networking service:
service networking restart
FAQs to Create Static IP on Alpine Linux
Where are the network configuration files located in Alpine Linux?
The network configuration files are located in the /etc/network/interfaces/ directory in Alpine Linux.
Do I need to restart the network service after making changes?
Yes, you can restart the network service or reboot the system for the changes to take effect. Use the command: sudo service networking restart
How can I check if the static IP configuration is successful?
Run the command ip address show eth0 to display the network interface details. Look for the configured IP address in the output.
What happens if there is a conflict with the static IP address?
In case of an IP address conflict, network connectivity issues may occur. Ensure that the assigned static IP is unique within the network to avoid conflicts.
Can I configure multiple network interfaces with static IPs?
Yes, you can create multiple configuration files (e.g., /etc/network/interfaces/eth0, /etc/network/interfaces/eth1, etc.) for each network interface with the desired static IP settings.
Can I configure a static IP address using the netctl command on Alpine Linux?
No, Alpine Linux does not use the netctl command. The network configuration files in /etc/network/interfaces/ must be modified manually.
What should I do if I mistakenly configure the wrong static IP address?
If you configure the wrong static IP address, edit the network configuration file again, specifying the correct IP address, and restart the network service.
Conclusion
IP addresses are assigned dynamically by DHCP servers in the cloud or at home. Through the static IP, working with HTTPS servers, firewalls, and address port forwarding is simple.
In this tutorial, you learned how to create a static IP on Alpine Linux.
If you have any queries or doubts, please leave them in the comment below. We'll be happy to address them.