

Choose a different version or distribution
Introduction
Before we begin talking about how to enable disable Firewall on Ubuntu 24.04, let's briefly understand – What is Firewall?
A firewall acts as a security barrier between a computer network and the internet. It monitors and controls incoming and outgoing network traffic, safeguarding against unauthorized access and potential threats.
This protective measure ensures data integrity and network security by filtering traffic based on predefined security rules. Firewalls are essential components for maintaining a secure and robust network infrastructure in both individual systems and organizations.
In this tutorial, you will enable disable Firewall on Ubuntu 24.04. We will also address a few FAQs on how to enable disable Firewall on Ubuntu 24.04.
Step1: Installing and Enabling UFW
First, verify that ufw is installed on your Ubuntu system. It typically comes pre-installed, but if it's missing, you can easily install it with the following command:
sudo apt install ufw
After installation, activate ufw to begin managing network traffic. Enabling ufw will turn on the firewall and apply any existing rules. To enable ufw, use:
sudo ufw enable
Step2: Configuring Firewall Rules
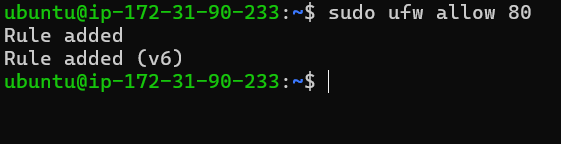
With ufw enabled, the next step is to configure firewall rules. These rules define how incoming and outgoing traffic should be handled. For example, to allow HTTP traffic on port 80, you would use:
sudo ufw allow 80
Likewise, to permit a particular service such as SSH, use the following command:
sudo ufw allow ssh
Remember, you can also specify protocols, block traffic, or create rules for specific IP addresses to gain more precise control.
Step 3: Testing Firewall Settings
Once you've set up the rules, it's crucial to test them to confirm they're functioning correctly. You can check ufw's status and view all active rules with:
sudo ufw status verbose
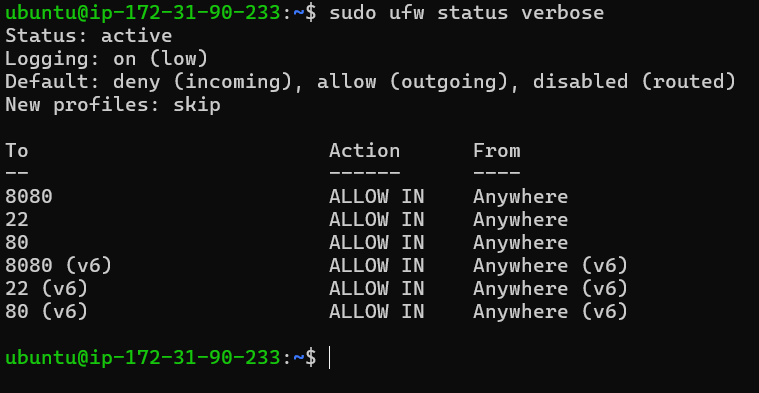
This command offers detailed information about the rules and their statuses, assisting you in verifying your configurations.
Step 4: Resetting Firewall to Default Settings
If you need to restore your firewall settings to their defaults, ufw simplifies this process. Resetting is helpful if you want to start anew or remove all custom configurations. To reset ufw, use:
sudo ufw reset
This command will disable the firewall and remove all active rules, giving you a fresh start.
Step 5: Removing a Specific UFW Rule
To remove a specific rule from UFW, you first need to identify the rule by its number. You can list all current rules with their numbers to find the one you want to remove. Once you have the rule number, deleting it is straightforward. This is especially helpful when updating or tidying up your firewall configuration.
sudo ufw status numbered
sudo ufw delete [NUMBER]
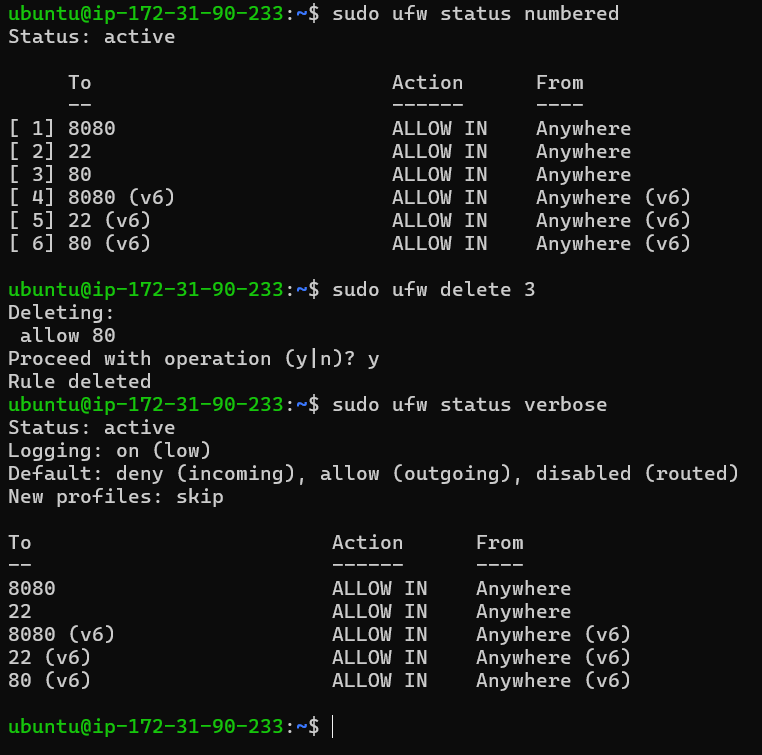
Start by using sudo ufw status numbered to show all rules with their corresponding numbers. Locate the number of the rule you want to delete. Next, execute sudo ufw delete [NUMBER], replacing [NUMBER] with the actual rule number. This command will remove the specified rule from your firewall configuration.
Step 6: Graphical User Interface Alternative
If you prefer a graphical interface for managing the firewall, gufw is a great option. gufw provides a user-friendly GUI for ufw, simplifying the process for those who aren't as comfortable with command-line tools. You can install it with:
sudo apt install gufw
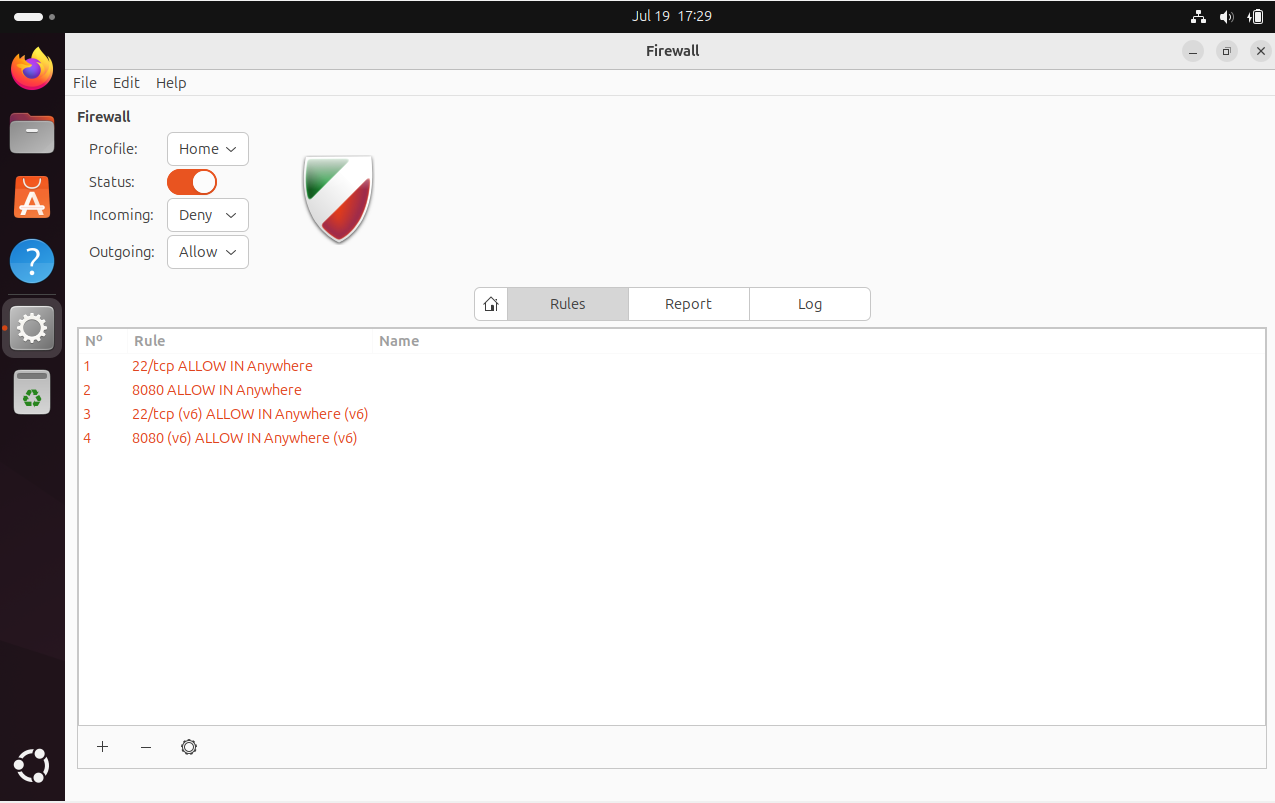
After installation, you can access gufw from your applications menu and manage your firewall settings through its user-friendly interface.
20 UFW Examples: From Basic to Advanced
Mastering UFW (Uncomplicated Firewall) on Ubuntu is crucial for effective security and network management. These 20 top examples span from basic to advanced scenarios, aiding you in understanding and applying various firewall rules and configurations. Whether you're just starting with UFW or aiming to deepen your expertise, these examples will guide you through various aspects of firewall management.
1. Enabling UFW: Begin by enabling the firewall to ensure it is actively overseeing network traffic.
sudo ufw enable
This command turns on UFW and enforces any current rules.
2. Disabling UFW: To deactivate the firewall and halt all its rules, use:
sudo ufw disable
This can be helpful for troubleshooting network problems or setting up new services.
3. Allowing SSH Connections: Permit incoming SSH connections to enable remote management of your server.
sudo ufw allow ssh
This rule allows SSH traffic, usually on port 22.
4. Denying Incoming Traffic by Default: Configure the default policy to deny all incoming connections for enhanced security.
sudo ufw default deny incoming
This command blocks all incoming traffic unless explicitly permitted by a specific rule.
5. Allowing Outgoing Traffic by Default: To enable general internet usage, allow all outgoing connections
sudo ufw default allow outgoing
This ensures that the system can initiate web requests and other outbound communications.
6. Allowing Specific Port (HTTP): Allow traffic on a specific port, such as port 80 for HTTP.
sudo ufw allow 80
This permits web server traffic, which is essential for hosting a website.
7. Denying Specific Port: To block traffic on a specific port, such as port 8080:
sudo ufw deny 8080
This can be used to close ports that are no longer necessary.
8. Allowing a Specific IP Address: Allow access for a specific IP address, such as 192.168.1.100:
sudo ufw allow from 192.168.1.100
This rule permits all traffic from this IP address.
9. Denying a Specific IP Address: To block a specific IP address:
sudo ufw deny from 192.168.1.100
This is useful for preventing suspicious or unwanted traffic from a particular source.
10. Allowing a Range of IP Addresses: Permit traffic from a range of IP addresses using CIDR notation.
sudo ufw allow from 192.168.1.0/24
This allows connections from any IP address within the 192.168.1.x range.
11. Limiting Connections to Prevent Brute-Force Attacks: Restrict connections to a service like SSH to help prevent brute-force attacks.
sudo ufw limit ssh
This rule restricts the rate of incoming connections to the SSH port.
12. Allowing a Specific Port for a Specific IP Address: Limit access to a service port to a single IP address for improved security.
sudo ufw allow from 192.168.1.100 to any port 22
Permits SSH connections only from the specified IP address.
13. Denying Outgoing Traffic to a Specific IP: Prevent all outgoing traffic to a specific IP address.
sudo ufw deny out to 192.168.1.100
Effective for preventing data leaks or interactions with known malicious hosts.
14. Allowing Traffic on a Specific Network Interface: Manage traffic based on the network interface, such as eth0.
sudo ufw allow in on eth0 to any port 80
Permits HTTP traffic exclusively on the eth0 interface.
15. Rejecting Traffic on a Specific Port: Reject traffic on a port instead of silently dropping it, which sends a response back to the sender.
sudo ufw reject 25
Helpful for indicating that a service is unavailable or blocked, such as with SMTP port 25.
16. Allowing Protocols on Specific Ports: Permit specific protocols such as TCP or UDP on designated ports.
sudo ufw allow 53/tcp
This example permits TCP traffic on port 53, which is commonly used for DNS.
17. Logging Firewall Activity: Activate logging to monitor and troubleshoot firewall activity.
sudo ufw logging on
Logs are available in /var/log/ufw.log for reviewing traffic and rule enforcement.
18. Resetting Firewall to Defaults: Reset UFW to its default settings, removing all active rules.
sudo ufw reset
Helpful for starting from scratch or clearing a complex set of rules.
19. Blocking All Traffic Except: Configure a default deny policy and then permit specific services.
sudo ufw default deny
sudo ufw allow http
sudo ufw allow https
This configuration blocks all traffic except HTTP and HTTPS, making it ideal for a web server.
20. Advanced Port Ranges and Protocols: Permit port ranges and specify protocols, which is useful for applications or services that utilize multiple ports.
sudo ufw allow 6000:6007/tcp
Permits TCP traffic on ports 6000 to 6007, which are commonly used for X11 applications.
FAQs to Enable Disable Firewall on Ubuntu 24.04
Can UFW protect against all types of attacks?
UFW provides basic firewall protection but should be part of a broader security strategy.
How do I check if UFW is active?
You can check the status of UFW by running the command sudo ufw status.
Will UFW start automatically on boot?
Yes, once enabled, UFW will start automatically on system reboot.
What is the command to reset UFW to default settings?
Use sudo ufw reset to remove all rules and set UFW back to its default state.
How do I block a specific port using UFW?
Use the command sudo ufw deny <port_number> to block a specific port.
What is the command to check UFW logs?
You can view logs in /var/log/ufw.log using commands like sudo tail -f /var/log/ufw.log.
Can I schedule UFW rules to change automatically?
UFW does not support scheduling natively; consider using cron jobs for automation.
Conclusion
We hope this tutorial helped you understand how to enable disable Firewall on Ubuntu 24.04.
If you have any queries, please leave a comment below, and we’ll be happy to respond to them for sure.