
Choose a different version or distribution
Introduction
Before we begin talking about how to install Laravel on Ubuntu 20.04, let's briefly understand - What is Laravel?
Laravel is an open-source PHP framework. It gives a set of tools and resources to build the latest PHP applications. It has a complete ecosystem leveraging its built-in features. Laravel’s popularity has grown rapidly in the last few years as many developers adopting it as their framework of choice now. It is mainly for a streamlined development process.
In this tutorial, you will install and configure Laravel on Ubuntu 20.04. We will also address a few FAQs related to the Laravel installation.
Advantages of Laravel
- Efficient Development: Laravel offers a clean and expressive syntax, allowing developers to write code quickly and efficiently.
- Scalability: With its modular structure and robust features, Laravel enables the development of scalable and expandable applications.
- Rich Feature Set: Laravel comes with a wide range of features like authentication, caching, and database migration, saving developers time and effort.
- Active Community: Laravel has a large and active community of developers who provide support, tutorials, and packages, making it easier to find solutions and enhance productivity.
- SEO-Friendly: Laravel promotes SEO-friendly practices, enabling developers to optimize their websites for search engines and improve visibility online.
Prerequisites to Install and Configure Laravel on Ubuntu 20.04
- Create a
sudouser and enable theufw - Install a LEMP stack with MySQL 8
- Installed Composer
Step 1 - Installing Required PHP modules
1) Before installing Laravel, you will need to install a few PHP modules required by the framework. You will use apt to install php-mbstring, php-xml and php-bcmath PHP modules. These PHP extensions give extra support. These mainly deal with character encoding, XML, and precision mathematics. If using apt for the first time, you should run update command first to update the package manager cache:
sudo apt update
2) Next, install the necessary packages using the below command:
sudo apt install php-mbstring php-xml php-bcmath php-curl php-mysql php-fpm
Your system is now ready to execute the Laravel installation from Composer. But, before this, you will need a database for your application.
Step 2 - Creating a Database for the Application
1) To demonstrate Laravel’s basic installation as well as usage, create a travel-list application. It will show a list of places a user wants to travel to and a list of places that they have already visited. This can be stored in a places table along with a field for locations. You will call names and another field to mark them as visited or not-visited. Additionally, you will include an id field to identify each entry.
2) Next, to connect to the database from the Laravel application, you will need to create a dedicated MySQL user for this. Even grant this user full privileges over travellist database. Here, the native MySQL PHP library mysqlnd does not support caching_sha2_authentication. It is the default authentication method for MySQL 8. Moreover, you will set up the database user with mysql_native_password authentication method. You should be able to connect to the MySQL database from PHP.
3) To start, log in to the MySQL console as the root database user, by:
sudo mysql
4) Now create a new database and run the below command from your MySQL console:
CREATE DATABASE travellist;
5) Now proceed to create a new user and grant them full privileges on the custom database. Here, you are creating a user travellist_user with a password password. Although, you should change this to a more secure password of your choice:
CREATE USER 'travellist_user'@'%' IDENTIFIED WITH mysql_native_password BY 'password';
6) Now, give this user permission over the travellist database, by:
GRANT ALL ON travellist.* TO 'travellist_user'@'%';
So, it will give the travellist_user user full privileges over travellist database. It is while preventing this user from creating/modifying other databases on your server.
7) Next, exit the MySQL shell:
exit
8) You will now test if a new user has proper permissions. Do it by logging-in to the MySQL console again. This time use the custom user credentials:
mysql -u travellist_user -p
9) Note, that the -p flag in this command, will prompt you for the password. It is the password used when creating travellist_user user. After logging in to the MySQL console. You will confirm your access to the travellist database:
SHOW DATABASES;
You will see the below output:
+--------------------+
| Database           |
+--------------------+
| information_schema |
| travellist        |
+--------------------+
2 rows in set (0.01 sec)
10) Proceed to create a table named, places Do it in the travellist database. From MySQL console, run the below statement:
CREATE TABLE travellist.places (
    id INT AUTO_INCREMENT,
    name VARCHAR(255),
    visited BOOLEAN,
    PRIMARY KEY(id)
);
11) Next, populate the places table with sample data:
INSERT INTO travellist.places (name, visited)
VALUES ("Tokyo", false),
("Budapest", true),
("Nairobi", false),
("Berlin", true),
("Lisbon", true),
("Denver", false),
("Moscow", false),
("Olso", false),
("Rio", true),
("Cincinnati", false),
("Helsinki", false);
12) Also, to confirm the data is successfully saved to your table, run:
SELECT * FROM travellist.places;
You will have the below output:
+----+-----------+---------+
| id | name      | visited |
+----+-----------+---------+
|  1 | Tokyo     |       0 |
|  2 | Budapest  |       1 |
|  3 | Nairobi   |       0 |
|  4 | Berlin    |       1 |
|  5 | Lisbon    |       1 |
|  6 | Denver    |       0 |
|  7 | Moscow    |       0 |
|  8 | Oslo      |       0 |
|  9 | Rio       |       1 |
| 10 | Cincinnati|       0 |
| 11 | Helsinki  |       0 |
+----+-----------+---------+
11 rows in set (0.00 sec)
13) After confirming the valid data in your test table, exit the MySQL console, by:
exit
You are now ready to create the application as well as configure it, which helps in connecting to the new database.
Step 3 - Creating a New Laravel Application
1) Now, proceed to create a new Laravel application. Do it using the composer create-project command. The Composer command is useful to bootstrap new applications. It is based on existing frameworks and content management systems too. Here, you will use travellist as an example application. But, you are free to change it to something else. The travellist application will display a list of locations taken from a local MySQL server. It is intended to demonstrate Laravel’s basic configuration. Also, to confirm that you are able to connect to the database, go to your user’s home directory, by:
cd ~
2) The below command will create a new travellist directory. It contains a barebones Laravel application based on default settings:
composer create-project --prefer-dist laravel/laravel travellist
You will see the below output:
Installing laravel/laravel (v5.8.17)
  - Installing laravel/laravel (v5.8.17): Downloading (100%)
Created project in travellist
> @php -r "file_exists('.env') || copy('.env.example', '.env');"
Loading composer repositories with package information
Updating dependencies (including require-dev)
Package operations: 80 installs, 0 updates, 0 removals
  - Installing symfony/polyfill-ctype (v1.11.0): Downloading (100%)
  - Installing phpoption/phpoption (1.5.0): Downloading (100%)
  - Installing vlucas/phpdotenv (v3.4.0): Downloading (100%)
  - Installing symfony/css-selector (v4.3.2): Downloading (100%)
...
3) After, the installation is complete, you will access the application’s directory. Then, run Laravel’s artisan command. It will verify the successful installation of all components:
cd travellist
php artisan
You will see the below output:
Laravel Framework 7.11.0

Usage:
  command [options] [arguments]

Options:
  -h, --help            Display this help message
  -q, --quiet           Do not output any message
  -V, --version         Display this application version
      --ansi            Force ANSI output
      --no-ansi         Disable ANSI output
  -n, --no-interaction  Do not ask any interactive question
      --env[=ENV]       The environment the command should run under
  -v|vv|vvv, --verbose  Increase the verbosity of messages: 1 for normal output, 2 for more verbose output and 3 for debug
...
This output will confirm that the application files are in place. Even the Laravel command-line tools are working as per expectation. Although, you still need to configure the application to set up the database.
Step 4 - Configuring the Laravel
1) The Laravel configuration files are in a directory known as config which is inside the application’s root directory. Also, when installing Laravel with Composer, it will create an environment file. This file has settings specific to the current environment where the application is running.
It will take precedence over the values set in regular configuration files. It is located in the config directory. Each installation on a new environment needs a tailored environment file to define things like database connection settings and debug options. Further, defines application URLs, among other items that may vary. It will be depending on which environment the application is running.
2) Now edit the .env file. It will customize the configuration options for the current application environment.
3) Now, open the .env file. Do it using your command line editor of choice. Here you will use nano:
nano .env
Even though there are many configuration variables in the file, you do not need to set up all of them now. The below list contains an overview of all variables that require immediate attention:
APP_NAME: Application name useful for notifications as well as messages.APP_ENV: The current application environment.APP_KEY: Useful for generating salts and hashes. So, this unique key is automatically generated. It is at the time of installing Laravel via Composer there is no need to change it.APP_DEBUG: It is whether or not to show debug data on the client side.APP_URL: It is the base URL for the application. It is used for generating application links.DB_DATABASE: It means the database name.DB_USERNAME: The username enabling to connect to the database.DB_PASSWORD: Password necessary to connect to the database.
By default, the configuration of these values is for a local development environment. It uses Homestead, a prepackaged Vagrant box given by Laravel. You will need to change these values. It will reflect the current environment settings of your example application. Now, in case you are installing Laravel in a development or testing environment, leave the APP_DEBUG option enabled. This option will give you important debug information. It is while testing the application from a browser. The APP_ENV variable should be set to development or testing here.
2) If you are installing Laravel in a production environment, you should disable the APP_DEBUG option as it shows to final user sensitive information about your application. The APP_ENV here should be set to the production.
The below .env file sets up your example application for development:
APP_NAME=TravelList
APP_ENV=development
APP_KEY=APPLICATION_UNIQUE_KEY_DONT_COPY
APP_DEBUG=true
APP_URL=http://domain_or_IP

LOG_CHANNEL=stack

DB_CONNECTION=mysql
DB_HOST=127.0.0.1
DB_PORT=3306
DB_DATABASE=travellist
DB_USERNAME=travellist_user
DB_PASSWORD=password

...
3) Now, adjust the variables accordingly. After completing editing, save and close the file. It will keep your changes. If you are using nano, do it with CTRL+X. Then, press Y and Enter to confirm. Your Laravel application is now set up. Still, you need to configure the webserver. It is in order to be able to access it from a browser.
Step 5 - Setting Up the Nginx
1) Move the application folder to /var/www. It is the usual location for web applications running on Nginx. First, you will use the mv command. It will enable you to move the application folder. It has all its contents to the /var/www/travellist:
sudo mkdir /var/www/travellist
sudo mv ~/travellist /var/www/travellist
2) Now, you need to give the web server user write access, both to the storage as well as cache folders. It is where Laravel stores application-generated files:
sudo chown -R www-data.www-data /var/www/travellist/storage
sudo chown -R www-data.www-data /var/www/travellist/bootstrap/cache
3) The application files are now in order. But, still, you need to configure Nginx to serve the content. For this, create a new virtual host configuration file at /etc/nginx/sites-available:
sudo nano /etc/nginx/sites-available/travellist
4) The below configuration file has recommended settings for Laravel applications on Nginx:
server {
    listen 80;
    server_name server_domain_or_IP;
    root /var/www/travellist/public;

    add_header X-Frame-Options "SAMEORIGIN";
    add_header X-XSS-Protection "1; mode=block";
    add_header X-Content-Type-Options "nosniff";

    index index.html index.htm index.php;

    charset utf-8;

    location / {
        try_files $uri $uri/ /index.php?$query_string;
    }

    location = /favicon.ico { access_log off; log_not_found off; }
    location = /robots.txt  { access_log off; log_not_found off; }

    error_page 404 /index.php;

    location ~ \.php$ {
        fastcgi_pass unix:/var/run/php/php7.4-fpm.sock;
        fastcgi_index index.php;
        fastcgi_param SCRIPT_FILENAME $realpath_root$fastcgi_script_name;
        include fastcgi_params;
    }

    location ~ /\.(?!well-known).* {
        deny all;
    }
}
Remember to change the php7.4-fpm.sock with your version of PHP.
5) Copy the content to your /etc/nginx/sites-available/travellist file. Also, if necessary, adjust the values to align with your own configuration. Then, save and close the file, when you complete editing.
6) Next, activate the new virtual host configuration file. You will create a symbolic link to travellist in sites-enabled and unlink default:
sudo ln -s /etc/nginx/sites-available/travellist /etc/nginx/sites-enabled/
sudo unlink /etc/nginx/sites-enabled/default
7) You need to have the assurance that the configuration does not contain any syntax errors. Do it by using:
sudo nginx -t
You will see the below output:
nginx: the configuration file /etc/nginx/nginx.conf syntax is ok
nginx: configuration file /etc/nginx/nginx.conf test is successful
8) To apply the changes, reload Nginx using the below command:
sudo systemctl reload nginx
9) Now, go to your browser. Then, access the application using the server’s domain name or IP address. Do it as defined by server_name directive in your configuration file:
http://server_domain_or_IP
You will see the page like this:
It will confirm your configuration of Nginx server to serve Laravel. From here, you can start building up your application on top of the skeleton. That is provided by the default installation. The next step is to modify the application’s main route. It will be to query for data in database using the Laravel’s DB facade.
Step 6 - Customizing the Main Page
1) You should now have a working Laravel application and a database table named, places having few sample data. Now edit the main application route. It is to query for the database and return contents to the application’s view. So, open the main route file, routes/web.php:
nano routes/web.php
This file comes by default with the below content:
routes/web.php
<?php

/*
|--------------------------------------------------------------------------
| Web Routes
|--------------------------------------------------------------------------
|
| Here is where you can register web routes for your application. These
| routes are loaded by the RouteServiceProvider within a group which
| contains the "web" middleware group. Now create something great!
|
*/

Route::get('/', function () {
    return view('welcome');
});
The routes are defined within this file. It is using the static method Route::get. It receives a path and even a callback function as arguments.
2) The next code replaces the main route callback function. It makes 2 queries to the database using visited flag to filter the results. Further, it returns the results to a view named, travellist. Copy this content to your routes/web.php file. Next, replace the code that is already there:
routes/web.php
<?php

use Illuminate\Support\Facades\DB;

Route::get('/', function () {
  $visited = DB::select('select * from places where visited = ?', [1]);
  $togo = DB::select('select * from places where visited = ?', [0]);

  return view('travellist', ['visited' => $visited, 'togo' => $togo ] );
});
3) Proceed to save and close the file after editing and create the view. It will render the database results to the user. So, create a new view file inside resources/views:
nano resources/views/travellist.blade.php
4) The below template creates two lists of places based on the variables visited and togo. Copy this content to your new view file:
resources/views/travellist/blade.php
<html>
<head>
    <title>Travel List</title>
</head>

<body>
    <h1>My Travel Bucket List</h1>
    <h2>Places I'd Like to Visit</h2>
    <ul>
      @foreach ($togo as $newplace)
        <li>{{ $newplace->name }}</li>
      @endforeach
    </ul>

    <h2>Places I've Already Been To</h2>
    <ul>
          @foreach ($visited as $place)
                <li>{{ $place->name }}</li>
          @endforeach
    </ul>
</body>
</html>
5) Then, save and close the file when you complete it. Next, go to your browser and reload the application, you will get a similar output:
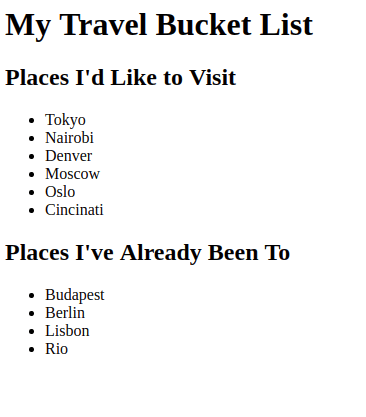
You now have a functional Laravel application, pulling the contents from a MySQL database.
FAQs to Install and Configure Laravel on Ubuntu 20.04
Which version of PHP is compatible with Laravel?
Laravel requires PHP 7.4 or higher. It is recommended to use the latest stable version of PHP for better performance and security.
How do I create a new Laravel project?
After installing Laravel, you can create a new project using the laravel new command followed by the project name. For example, laravel new myproject.
What are the minimum system requirements for Laravel?
The minimum system requirements for Laravel include PHP 7.4 or higher, various PHP extensions, and a database server such as MySQL or PostgreSQL.
How do I start the Laravel development server?
Use the php artisan serve command in your Laravel project directory to start the development server. By default, it runs on http://localhost:8000.
Can I use a different web server instead of the built-in Laravel server?
Yes, you can configure Laravel to run on a different web server like Apache or Nginx by setting up a virtual host or server block and pointing it to the public directory of your Laravel project.
How can I enable debugging and view error messages in Laravel?
In the .env file, set the APP_DEBUG variable to true to enable debugging. Error messages will be displayed on the screen, and detailed logs will be stored in the storage/logs directory.
Conclusion
We hope this detailed tutorial helped you to install and configure Laravel on Ubuntu 20.04.
If you have any queries, please leave a comment below and we’ll be happy to respond to them for sure.