
Introduction
Before we begin talking about how to install and configure SMTP Server on Windows, let's briefly understand – What is an SMTP ?
SMTP (Simple Mail Transfer Protocol) is a protocol that allows email to be sent and received over the Internet and within a local network. SMTP works with the Mail Transfer Agent (MTA) to do that and makes sure the messages get to their intended recipients.
In order to transmit and receive email messages, mail servers and other message transfer agents typically use SMTP.
In this tutorial, you will install and configure SMTP Server on Windows. We will also address a few FAQs on how to install and configure SMTP Server on Windows.
Advantages of SMTP
- Reliable Delivery: SMTP ensures reliable delivery of email messages by following a set of rules and protocols.
- Compatibility: It is compatible with various email clients and servers, allowing seamless communication across different platforms.
- Efficient Communication: SMTP facilitates fast and efficient transfer of emails between servers, reducing delivery delays.
- Error Reporting: It provides detailed error reporting, allowing senders to identify and rectify issues with email delivery.
- Scalability: SMTP is highly scalable, making it suitable for both individual users and organizations with large email volumes.
Prerequisites
- A Windows Server OS.
- A user account with administrator privileges.
Install SMTP on Windows
The installation of SMTP on Windows Server operating systems is simple. Install SMTP by using the Server Manager management console and the instructions listed below.
Step 1: Add Roles and Features in Server Manager Dashboard
Choose Dashboard in the left pane of the Server Manager management console after it is open.
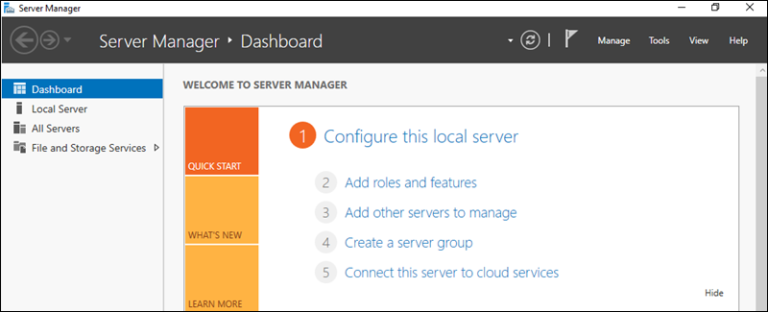
To launch the wizard and install the SMTP server, select the Add roles and features option from the Dashboard.
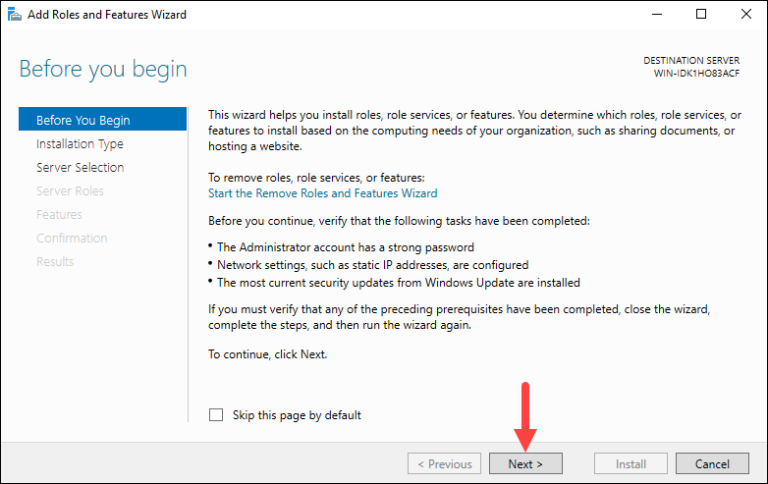
The Before You Begin page shows up and lists the requirements for adding a position as follows:
- Using a secure password for the Administrator account.
- The server's network settings have been configured.
- You have the most recent security updates installed.
Click Next to continue the installation if every requirement has been met.
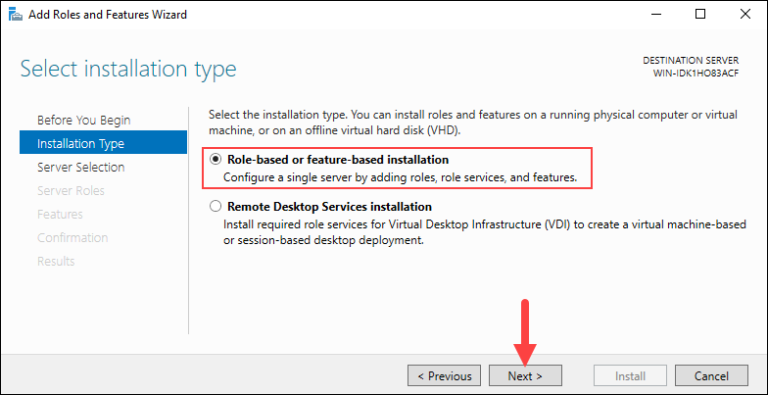
Step 2: Select Installation Type
Choose Role-based or feature-based installation from the Installation type window. To proceed, click Next.
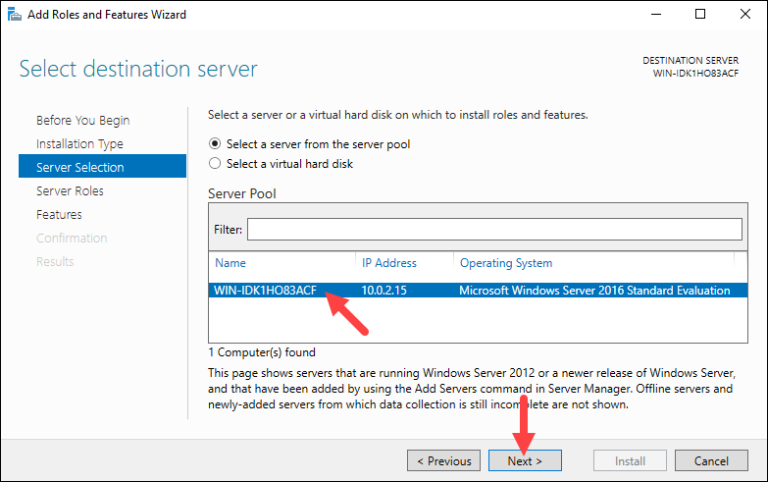
Step 3: Select Destination Server
To set the destination server, choose the Select a server from the server pool option and select the appropriate server from the Server Pool. The servers that you have added using Server Manager's Add Server option are listed in the Server Pool. The local server is selected by default.
To proceed to the following step, click Next.
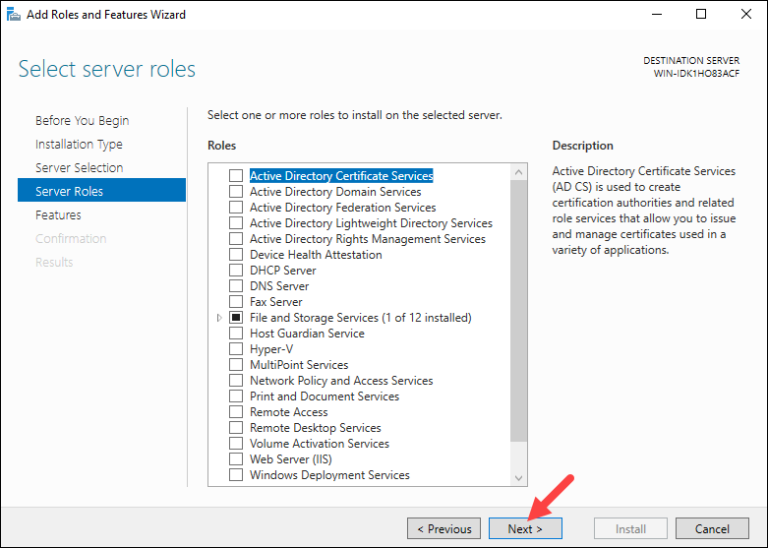
Step 4: Select Server Role
Choose which features and roles to install using the Select server roles screen. Click Next and leave the default option selected.
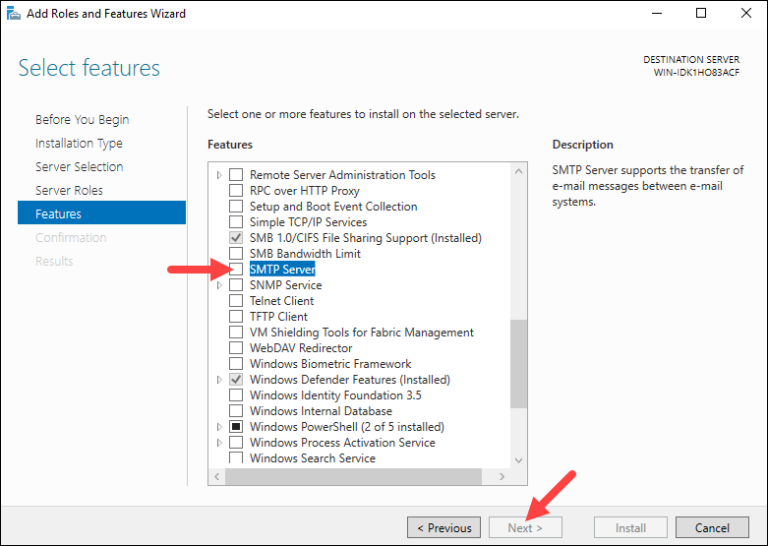
Step 5: Select Features
Selecting which features to install is the next step. To discover and choose SMTP Server, scroll through the list. To continue, click Next.
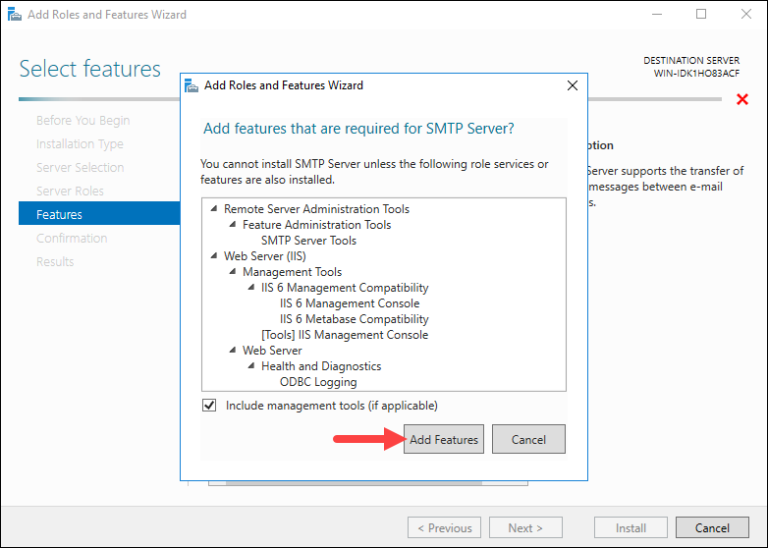
Step 6: Install Missing Features
The procedure prompts you to install the Web Server role and Remote Server Administration Tools if you haven't already. To install them, select Include management tools and then click Add Features:
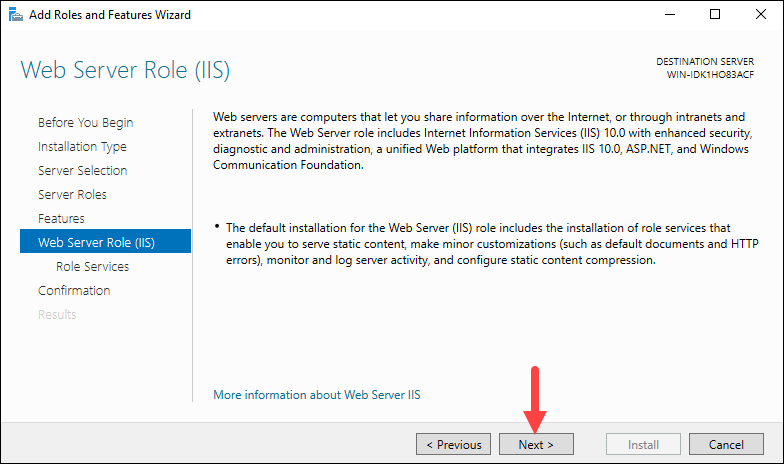
Install Web Server Role
The wizard shows a screen with information on the Web Server Role (IIS). To install the role, click Next.
Install Role Services
For the Web Server role, make sure to check every service you want to install. The default choices have already been made.
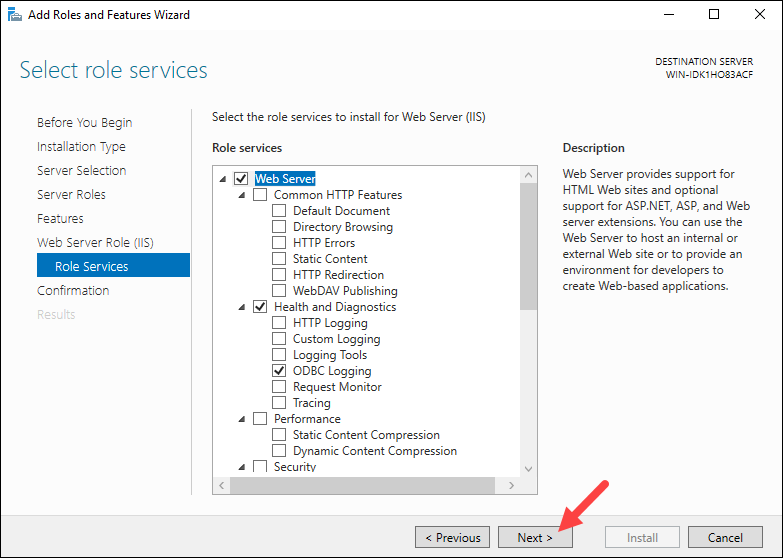
As soon as you have chosen all the services, click Next to move on to the next step.
Step 7: Confirm Installation
A confirmation window from the wizard shows a list of all the roles, services, and features that are about to be installed. To complete the installation, check the box next to Restart the destination server automatically if necessary, then click Install.
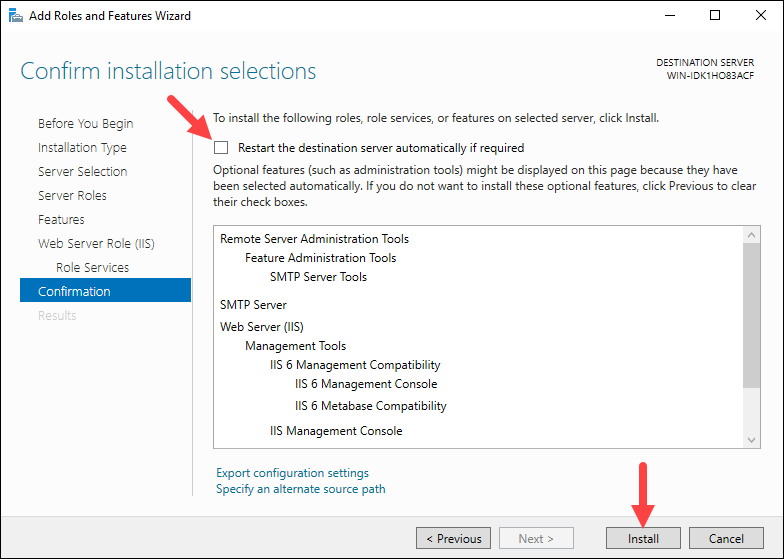
Click Close to close the installation wizard after the installation is finished.
Configure SMTP on Windows
Use the Internet Information Services (IIS) Manager 6.0 to configure the SMTP server. Follow the directions in the following chapters.
Step 1: Open IIS 6.0
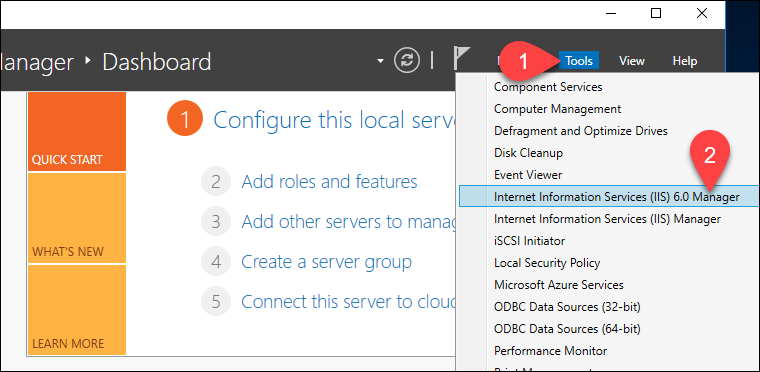
From the Server Manager dashboard, launch the IIS Manager 6.0.
Choose Tools from the drop-down box, then select Internet Information Services (IIS) 6.0 Manager:
Step 2: Configure SMTP Virtual Server
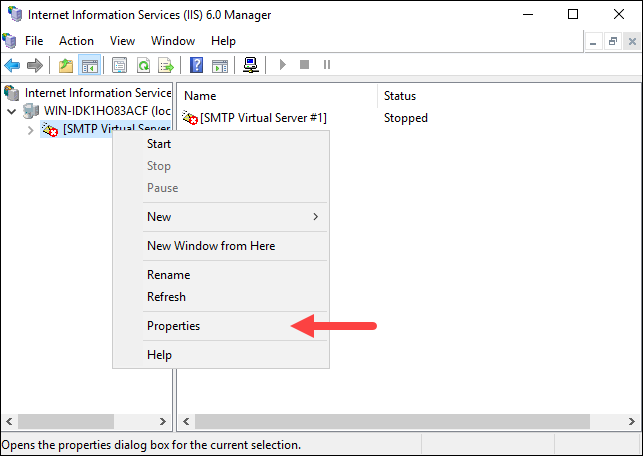
Expand the computer name in IIS Manager 6.0, then right-click [SMTP Virtual Server #1].
From the drop-down option, choose Properties.
Step 3: Configure Relay
Via the SMTP virtual server, you can relay emails using the relay options.
Configure Server Access
1) Choose the Relay button under the Access tab in [SMTP Virtual Server #1] properties:
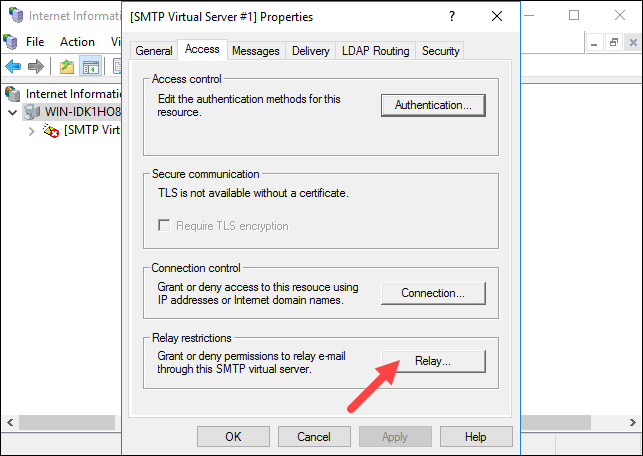
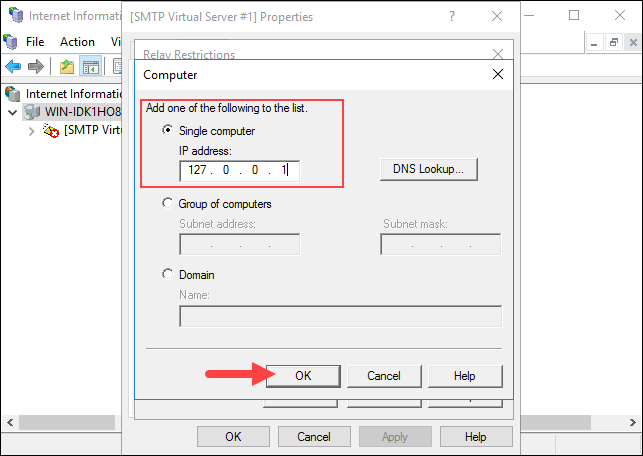
2) To specify which machine is permitted to relay emails over the SMTP server, choose the Add… option.

To enable the localhost to relay emails over the SMTP server, choose the Single Computer option and input 127.0.0.1. With the Group of computers option, you can also define a set of computers.
To accept the modifications, click OK.
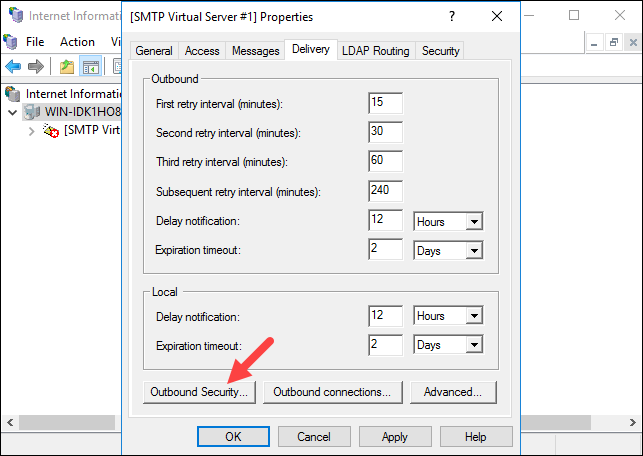
Step 4: Configure Security Options
The [SMTP Virtual Server #1] properties' Delivery tab contains various parameters for the intervals of retrying to send outbound emails following a failure in delivery, as well as various security features.
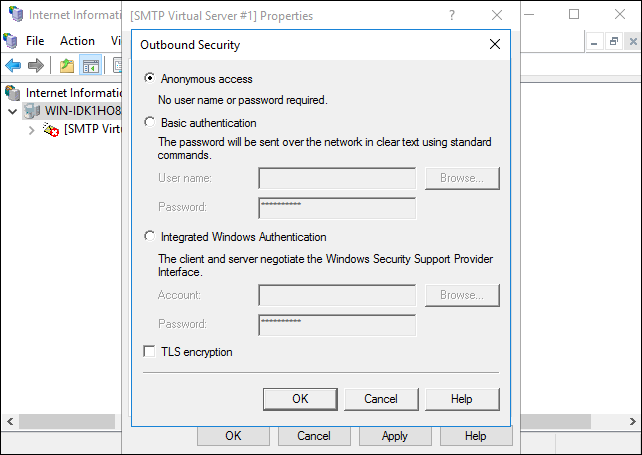
Click Outbound Security to set the security options.
You can select one of four solutions for protecting your SMTP server from the pop-up window:
- Anonymous access. SMTP server authentication is disabled because it doesn't require a username or password.
- Simple authentication. Used when emailing a personal or exchange account. If you choose this option, employ TLS encryption because it sends the account name and password in clear text.
- Integrated Windows Authentication. Authentication is performed using the Windows domain account name and password.
- TLS encryption. To protect the connection, use TLS. Installing an authentic SSL certificate on the server is a must for this option.
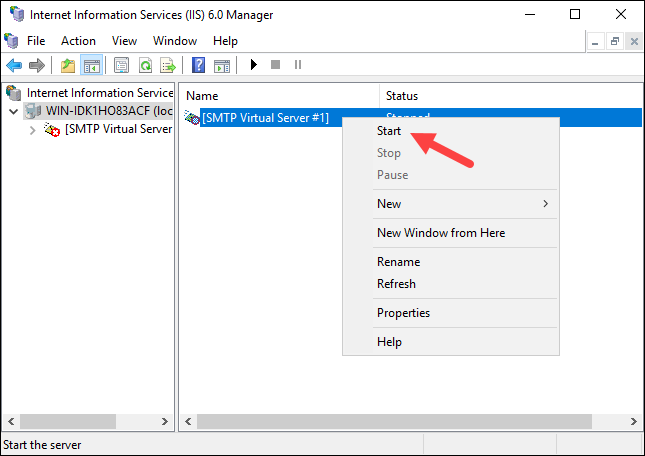
Step 5: Restart SMTP Server
To make the modifications effective, restart the SMTP Server. Select Stop from the context menu of [SMTP Virtual Server #1] before selecting Start.
Test SMTP Server
By using the SMTP server to send an email message, you may check the SMTP server setup. Using telnet is one method of doing that. The steps are as follows:
1) To find PowerShell, press the Windows key.
2) Open the PowerShell application in Administrator mode.
3) Execute the next command:
telnet localhost 25
4) Run the below command to begin communicating with the server:
EHLO server
5) Type the email address you'll be sending the message from. As for the syntax:
MAIL FROM: [[email protected]]
6) Type the email address of the receiver. As for the syntax:
RCPT TO: [[email protected]]
7) Enter the following to let the SMTP Server know you're prepared to transmit the message:
DATA
8) Type this as the email subject:
Subject: Test Message
9) To enter the email content, press Enter again. To complete, enter the message body and press Enter.
10) Type a period (.) and hit Enter to send the email.
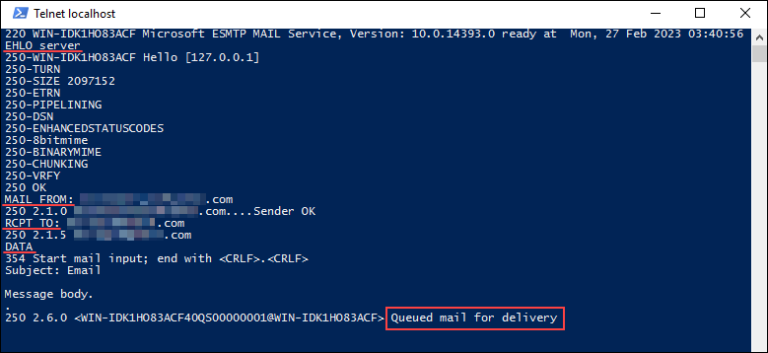
Verify whether the email came by looking in the recipient's inbox. In that case, the message could still be stored in the SMTP Queue directory (C:\inetpub\mailroot\Queue).
FAQs to Install and Configure SMTP Server on Windows
Why do I need an SMTP Server on Windows?
An SMTP Server is essential for sending and receiving emails from applications, websites, or email clients. It ensures proper delivery and enables seamless communication.
How can I install the SMTP Server on Windows?
You can install the SMTP Server on Windows by following a step-by-step guide. It typically involves enabling the SMTP feature using the Windows Server Manager or PowerShell.
How do I configure the SMTP Server on Windows?
Configuration involves specifying the server settings, such as domain name, port number, authentication, and security options. These settings ensure proper functioning of the SMTP Server.
Can I use the built-in SMTP Server on Windows?
Yes, Windows Server provides a built-in SMTP Server feature that can be enabled and used for basic email transfer. However, for advanced features, third-party SMTP servers are recommended.
What are the default SMTP Server settings on Windows?
By default, the Windows SMTP Server listens on port 25 and doesn't require authentication. However, it is important to configure the server based on your specific requirements for security and authentication.
What security measures should I take when configuring an SMTP Server on Windows?
It is recommended to enable encryption (TLS/SSL), configure proper authentication mechanisms, and set up security filters to prevent unauthorized access and protect against spam or abuse.
Are there any limitations or specific requirements for SMTP Server installation on Windows?
Yes, there may be certain limitations, such as firewall configuration or ISP restrictions. It is advisable to consult the documentation and ensure compliance with any specific hosting or network requirements.
Conclusion
The installation and configuration of the SMTP server on Windows Server operating systems were demonstrated in this tutorial. When you want to set up your own mail server, an SMTP server is an excellent option because it enables email communication using the MTA.
If you have any suggestions or queries, kindly leave them in the comments section.
