
Choose a different version or distribution
Introduction
Before we begin talking about how to install and configure Squid Proxy on CentOS 7, let's briefly understand – What is Squid Proxy?
Squid is a full-featured caching proxy that supports an extensive set of network protocols such as HTTP, HTTPS, FTP, and others. Placing Squid in front of a web server can significantly increase server speed by caching repeated requests, filtering web traffic, and accessing geo-restricted data.
Squid proxy is a robust caching server that acts as an intermediary between users and web servers. It accelerates website access by caching frequently visited content, reducing bandwidth usage and improving performance.
In this tutorial, you will install and configure Squid Proxy on CentOS 7. We will also address a few FAQs on how to install and configure Squid Proxy on CentOS 7.
Advantages of Squid Proxy
- Caching: Squid Proxy caches frequently accessed web content, providing faster response times and reducing bandwidth usage.
- Performance: It improves website access speed by serving cached content, especially useful for repetitive page requests.
- Security: Squid offers control over web access, allowing you to block malicious websites and protect against online threats.
- Bandwidth savings: By caching content, Squid reduces the need for repeated data transfers, saving precious bandwidth.
- Flexibility: Supporting various network protocols like HTTP, HTTPS, FTP, Squid is a versatile caching proxy suitable for different applications.
Installing Squid on CentOS
The Squid package is available in the CentOS 7 default repositories. Run the following command as a sudo user to install it:
sudo yum install squid
Start the Squid service once the installation is finished, and then enable it:
sudo systemctl start squid
sudo systemctl enable squid
Type the command that prints the service status to see if the installation was successful:
sudo systemctl status squid
Output

● squid.service - Squid caching proxy
   Loaded: loaded (/usr/lib/systemd/system/squid.service; enabled; vendor preset: disabled)
   Active: active (running) since Sat 2019-07-13 16:47:56 UTC; 12s ago
...
Configuring Squid
Squid may be configured by modifying the /etc/squid/squid.conf file. The “include” directive can be used to include additional files with configuration options.
Use the cp command to make a backup of the original configuration file before making any changes:
sudo cp /etc/squid/squid.conf{,.orginal}
To make modifications, open the file in your text editor.
sudo nano /etc/squid/squid.conf
Squid is set up by default on the server's network interfaces to listen on the port 3128.
If you wish to modify the port and create a listening interface, look for the line that begins with http_port and enter the IP address of the interface as well as the new port. Squid will listen on all interfaces if no specific interface is given.
# Squid normally listens to port 3128
http_port IP_ADDR:PORT
Most users should be able to run Squid on all interfaces and on the default port.
Using access control lists, you can regulate who has access to the Squid server (ACLs).
Squid restricts access to only localhost and localnet by default.
You can create an ACL that includes the authorized IPs if every client using the proxy has a static IP address.
We will make a new, separate file specifically for holding the IP addresses rather than adding them to the main configuration file:
sudo nano /etc/squid/allowed_ips.txt
192.168.33.1
# All other allowed IPs
After that, visit the main configuration file, add a new ACL called allowed_ips (first highlighted line), and then use the http_access directive (second highlighted line) to grant access to that ACL:
# ...
acl allowed_ips  src "/etc/squid/allowed_ips.txt"
# ...
http_access allow localhost
http_access allow allowed_ips
# And finally deny all other access to this proxy
http_access deny all
It matters in what sequence the http_access rules are applied. Ensure that the line is added before http_access deny all.
The http_access directive functions similarly to the firewall rules. Squid reads the rules from top to bottom, and when one rule corresponds to the rules below is not processed.
You must restart the Squid service after making any changes to the configuration file in order for the changes to take effect:
sudo systemctl restart squid
Squid Authentication
To authenticate users, Squid can use a variety of back ends, including Samba, LDAP, and HTTP basic auth.
Squid will be set up to use basic auth in this example. It is a straightforward authentication technique included in the HTTP protocol.
We will create the passwords with openssl and use the tee command to append the username:password pair to the /etc/squid/htpasswd file as seen below:
printf "USERNAME:$(openssl passwd -crypt PASSWORD)\n" | sudo tee -a /etc/squid/htpasswd
You would execute the following command to create a user named “mike” with the password “Pz$lPk76”:
printf "mike:$(openssl passwd -crypt 'Pz$lPk76')\n" | sudo tee -a /etc/squid/htpasswd
Output

mike:2nkgQsTSPCsIo
Setting up Squid to use the file and enable HTTP basic authentication is the next step.
Open the main configuration and insert the following:
# ...
auth_param basic program /usr/lib64/squid/basic_ncsa_auth /etc/squid/htpasswd
auth_param basic realm proxy
acl authenticated proxy_auth REQUIRED
# ...
http_access allow localhost
http_access allow authenticated
# And finally deny all other access to this proxy
http_access deny all
We are establishing a new ACL called authenticated using the first three highlighted lines. Access is permitted to authenticated users as of the last highlighted line.
Launch the Squid service again:
sudo systemctl restart squid
Configuring firewall
You must open the port 3128 if you are using a firewall. Run the following commands to accomplish this:
sudo firewall-cmd --permanent --add-port=3128/tcp
firewall-cmd --reload
Configuring Your Browser to Use Proxy
The final step is to configure your desired browser to use Squid once it has been set up.
Firefox
The steps below apply to Windows, macOS, and Linux.
1) To access Firefox's menu, click the hamburger icon ☰in the top right corner:
2) Select the ⚙ Preferences link.
3) Click on the Settings... button after scrolling down to the Network Settings section.
4) A new window will appear.
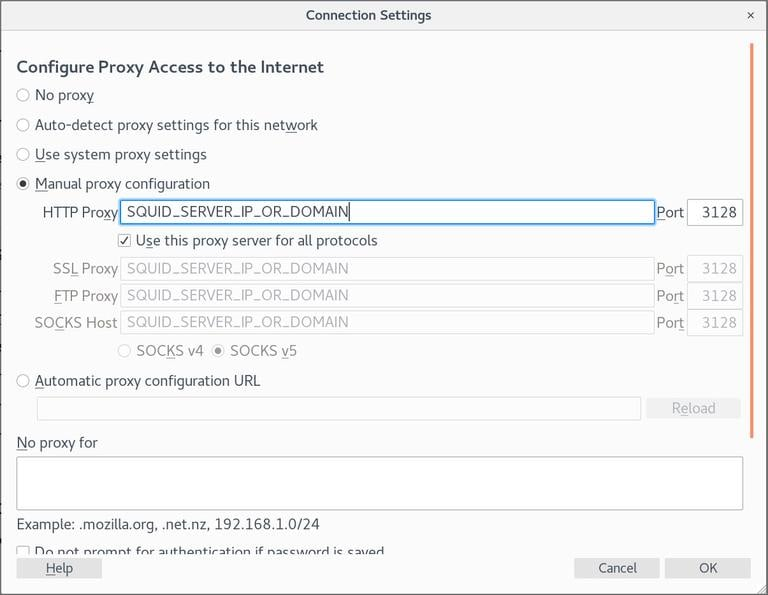
- Choose the radio button for
Manual proxy configuration. - In the
HTTP Hostfield, type in your Squid server's IP address, and in thePortfield, type in3128. - Check the option that says
Use this proxy server for all protocols. - To save the settings, click the
OKbutton.
Now that Firefox is set up, you may use the Squid proxy to browse the Internet. You may check it by going to google.com and typing “what is my ip,” and the IP address of your Squid server should appear.
Go to Network Settings, choose the radio button for Use system proxy settings, and save the settings to return to the original configuration.
FoxyProxy is one of many plugins that can assist you in configuring Firefox's proxy settings.
Google Chrome
The default system proxy settings are used by Google Chrome. You can either start Chrome from the command line, or use a plugin like SwitchyOmega to change the proxy settings in your operating system instead.
Use the following command to start Chrome with a fresh profile and connect to the Squid server:
Linux :
/usr/bin/google-chrome \
    --user-data-dir="$HOME/proxy-profile" \
    --proxy-server="http://SQUID_IP:3128"
macOS :
"/Applications/Google Chrome.app/Contents/MacOS/Google Chrome" \
    --user-data-dir="$HOME/proxy-profile" \
    --proxy-server="http://SQUID_IP:3128"
Windows :
"C:\Program Files (x86)\Google\Chrome\Application\chrome.exe" ^
    --user-data-dir="%USERPROFILE%\proxy-profile" ^
    --proxy-server="http://SQUID_IP:3128"
If the profile does not already exist, one will be generated automatically. You can use this method to run several instances of Chrome concurrently.
Open google.com and type “what is my IP” to verify the proxy server is operating as intended. Your server's IP address should be the one displayed in your browser.
FAQs to Install and Configure Squid Proxy on CentOS 7
How do I start/stop/restart Squid service?
To start: "systemctl start squid", to stop: "systemctl stop squid", and to restart: "systemctl restart squid".
How can I configure Squid Proxy to listen on a specific port?
Modify the "http_port" directive in the Squid configuration file to specify the desired port number.
What is the default port for Squid Proxy?
The default port for Squid Proxy is 3128.
How can I configure Squid to allow specific IP addresses or networks?
Use the "acl" and "http_access" directives in the Squid configuration file to define and grant access to specific IPs or networks.
How can I enable logging in Squid Proxy?
Uncomment the appropriate "access_log" directive in the Squid configuration file to enable logging.
Can Squid Proxy handle SSL/TLS traffic?
Yes, Squid can handle SSL/TLS traffic by configuring SSL-Bump or using the "http_port" directive with the "ssl-bump" option.
How do I troubleshoot Squid Proxy issues?
Check Squid's logs located at "/var/log/squid/access.log" and "/var/log/squid/cache.log" for errors, and refer to Squid's official documentation for further troubleshooting steps.
Conclusion
In this tutorial, you have learned how to install squid on CentOS 7 and configure your browser to use it.
Squid is a well-known proxy caching server. It increases the speed of the web server and allows you to restrict user access to the Internet.
If you have any queries, feel free to comment down below, and we'll be glad to help you.