
Choose a different version or distribution
Introduction
Before we begin talking about how to install and configure Squid Proxy on Debian 10 Linux, let's briefly understand – What is Squid Proxy?
Squid is a full-featured caching proxy that supports well-known network protocols like HTTP, HTTPS, FTP, and others. It can be used to improve the performance of a web server by caching repeated requests, filtering online traffic, and accessing geo-restricted content. It acts as an intermediary between a user's device and the internet, handling requests for resources like web pages, images, and videos.
Squid Proxy helps enhance website performance by caching frequently accessed content, reducing the load on web servers. It also allows users to restrict access to specific websites, improving security and control. Squid Proxy is widely used by organizations and individuals to manage network traffic efficiently, save bandwidth, and improve browsing experience.
In this tutorial, you will install and configure Squid Proxy on Debian 10 Linux. We will also address a few FAQs on how to install and configure Squid Proxy on Debian 10 Linux.
Advantages of Squid Proxy
- Improved Website Performance: Squid Proxy accelerates web browsing by caching frequently accessed content, reducing server load and providing faster response times.
- Bandwidth Optimization: By caching and compressing data, Squid Proxy saves bandwidth and optimizes network traffic, resulting in cost savings for organizations.
- Enhanced Security: Squid Proxy allows users to block access to malicious or inappropriate websites, protecting against malware and improving network security.
- Content Filtering: With Squid Proxy, administrators can implement content filtering policies, restricting access to specific websites or categories, promoting a safer browsing environment.
- User Authentication: Squid Proxy supports user authentication, enabling organizations to control and monitor access to the internet, ensuring only authorized users can access online resources.
Installing Squid on Debian
The Squid package is available in the standard Debian 10 repository. To install Squid, issue the following commands as a sudo user:
sudo apt update
sudo apt install squid
The Squid service will launch automatically after the installation has been completed.
By checking the Squid service's status, you can confirm that the installation was successful, and Squid service is running:
sudo systemctl status squid
Output

● squid.service - LSB: Squid HTTP Proxy version 3.x
   Loaded: loaded (/etc/init.d/squid; generated)
   Active: active (running) since Sat 2019-08-03 08:52:47 PDT; 3s ago
...
Configuring Squid
By changing the /etc/squid/squid.conf configuration file, Squid can be set up. The “include” directive can be used to include separate configuration files.
Each configuration option's function is explained in the comments included in the squid.conf configuration file.
It is always a good idea to create a backup of the original file before making any changes:
sudo cp /etc/squid/squid.conf{,.orginal}
Open the file in your text editor to make changes to the configuration:
sudo nano /etc/squid/squid.conf
Squid listens on port 3128 on all network interfaces by default.
Locate the line beginning with http_port, and then specify the interface IP address and the new port if you want to modify the port and set a listening interface. Squid will listen on all interfaces if no specific interface is given.
# Squid normally listens to port 3128
http_port IP_ADDR:PORT
Most users should be able to run Squid on all interfaces and on the default port.
You can manage how clients access web resources with the help of Access Control Lists (ACLs). Squid only permits access from the localhost by default.
If all the clients who will use the proxy have a static IP address, the simplest solution is to create an ACL that includes the allowed IPs.
We will make a new include file to store the IP addresses rather than adding them to the main configuration file:
sudo nano /etc/squid/allowed_ips.txt
Add the IP address:
192.168.33.1
# All other allowed IPs
After that, open the main configuration file /etc/squid/squid.conf, add a new ACL called allowed_ips (first highlighted line), and then use the http_access directive (second highlighted line) to grant access to that ACL:
# ...
acl allowed_ips  src "/etc/squid/allowed_ips.txt"
http_access allow localhost
http_access allow allowed_ips

# And finally deny all other access to this proxy
http_access deny all
The order of the http_accessrules is critical. Ensure that the line is added before http_access deny all.
The http_access directive functions similarly to firewall rules. Squid scans the rules from top to bottom, and when a rule matches, the rules below are not processed.
You must restart the Squid service after making any changes to the configuration file in order for the changes to take effect:
sudo systemctl restart squid
Squid Authentication
To authenticate users, Squid can use a variety of back ends, including Samba, LDAP, and HTTP basic auth.
We will configure Squid to use basic auth in this example. It is a simple authentication technique built into the HTTP protocol.
To create the passwords and append the username, we will use the openssl utility:
Using the tee command as demonstrated below, add a password pair to the /etc/squid/htpasswd file:
printf "USERNAME:$(openssl passwd -crypt PASSWORD)\n" | sudo tee -a /etc/squid/htpasswd
Create a user with the name “buster” and the password “Sz$Zdg69”:
printf "buster:$(openssl passwd -crypt 'Sz$Zdg69')\n" | sudo tee -a /etc/squid/htpasswd
Output

buster:RrvgO7NxY86VM
The following step is to activate HTTP basic authentication. Open the main configuration and include the following:
# ...
auth_param basic program /usr/lib/squid3/basic_ncsa_auth /etc/squid/htpasswd
auth_param basic realm proxy
acl authenticated proxy_auth REQUIRED
# ...
#http_access allow localnet
http_access allow localhost
http_access allow authenticated
# And finally deny all other access to this proxy
http_access deny all
The first three highlighted lines are creating a new ACL called authenticated, while the final highlighted line is granting access to authenticated users.
Start the Squid service again:
sudo systemctl restart squid
Configuring firewall
By enabling the ‘Squid’ profile, UFW users can open port 3128:
sudo ufw allow 'Squid'
If your system uses nftables to filter connections, run the command below to open the required ports:
sudo nft add rule inet filter input tcp dport 3128 ct state new,established counter accept
Configuring Your Browser to Use Proxy
We will demonstrate how to configure your browser to use Squid proxy in this section.
Firefox
The instructions below are the same for Windows, macOS, and Linux.
- To access Firefox's menu, click the hamburger icon in the top right corner.
- Select the
⚙ Preferenceslink. - Scroll down to the
Network Settingssection and click theSettings...button. - It will launch a new window.
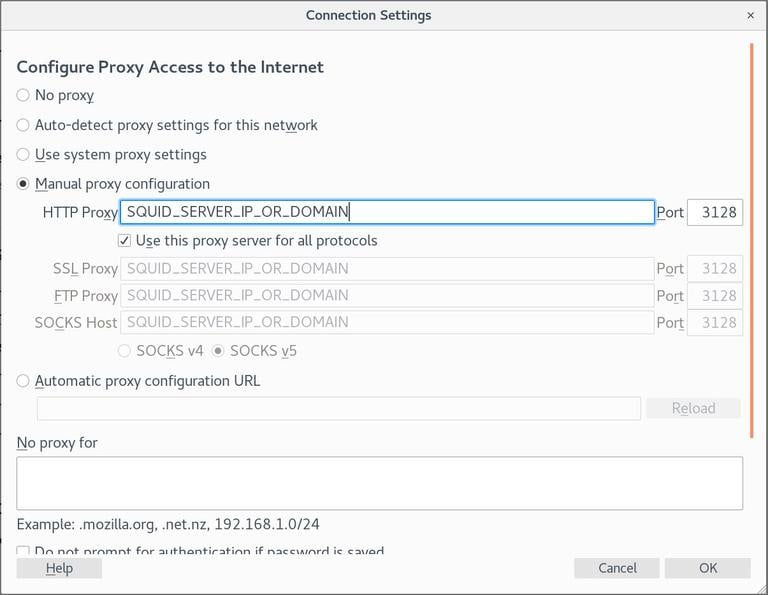
- Click on the
Manual proxy configurationradio option. - In the
HTTP Hostarea, type in your Squid server's IP address, and in thePort field, enter3128. - Choose the
Use this proxy server for all protocolschecked. - To save the settings, click the
OKbutton.
Now that Firefox is set up, you may use the Squid proxy to browse the Internet. You may check it by going to google.com and typing “what is my ip,” and the IP address of your Squid server should appear.
Go to Network Settings, choose the Use system proxy settings radio button, and save the settings to return to the default configuration.
There are a number of plugins that can assist you in setting up Firefox's proxy settings, including FoxyProxy.
Google Chrome
Google Chrome makes use of the default system proxy settings. You can either start Chrome from the command line, or use a plugin like SwitchyOmega to change the proxy settings in your operating system instead.
Use the following command to start Chrome with a new profile and connect to the Squid server:
Linux :
/usr/bin/google-chrome \
    --user-data-dir="$HOME/proxy-profile" \
    --proxy-server="http://SQUID_IP:3128"
macOS :
"/Applications/Google Chrome.app/Contents/MacOS/Google Chrome" \
    --user-data-dir="$HOME/proxy-profile" \
    --proxy-server="http://SQUID_IP:3128"
Windows :
"C:\Program Files (x86)\Google\Chrome\Application\chrome.exe" ^
    --user-data-dir="%USERPROFILE%\proxy-profile" ^
    --proxy-server="http://SQUID_IP:3128"
If the profile does not already exist, one will be created automatically. You can use this method to run several instances of Chrome concurrently.
Open google.com and type “what is my ip” to verify the proxy server is operating as intended. Your server's IP address should be the one displayed in your browser.
FAQs to Install and Configure Squid Proxy on Debian 10 Linux
How do I configure access control in Squid Proxy on Debian 10?
Access control rules can be defined in the squid.conf file using ACLs (Access Control Lists) and then granting or denying access based on those ACLs.
How can I enable authentication in Squid Proxy on Debian 10?
Authentication can be enabled by configuring the "auth_param" and "acl" directives in the squid.conf file and then enabling an appropriate authentication method, such as Basic or Digest.
How do I specify which ports Squid Proxy should listen on in Debian 10?
The ports Squid Proxy listens on can be defined in the squid.conf file using the "http_port" directive.
What is the default Squid Proxy port on Debian 10?
The default HTTP port for Squid Proxy is 3128, which can be changed in the configuration file if needed.
How do I view Squid Proxy logs on Debian 10?
Squid Proxy logs can be found in the /var/log/squid/ directory. Use the "tail" or "cat" command to view the logs.
How can I check if Squid Proxy is running on Debian 10?
Execute the command "sudo systemctl status squid" in the terminal, and it will display the current status of Squid Proxy.
How do I restart Squid Proxy on Debian 10 after making configuration changes?
Restart Squid Proxy by executing the command "sudo systemctl restart squid" in the terminal to apply the configuration changes.
Conclusion
We have gone over the fundamentals of installing Squid on Debian 10 and configuring your browser to use it.
Squid is among the most widely used proxy caching servers. It enhances the web server's speed and enables you to limit user access to the Internet.
If you have any queries, feel free to post a comment below, and we'll be happy to answer them.