
Choose a different version or distribution
Introduction
Before we begin talking about how to install and configure Zabbix on Ubuntu 20.04, let’s briefly understand – What is Zabbix?
Zabbix is a powerful open-source monitoring software designed to track and analyze the performance of various IT components in real-time. It helps businesses ensure their systems are running smoothly by monitoring servers, networks, applications, and other devices. With its user-friendly interface and extensive features, Zabbix enables efficient management and proactive troubleshooting.
This comprehensive monitoring solution provides alerts, customizable dashboards, and data visualization, enabling organizations to optimize performance and minimize downtime. Zabbix supports multiple platforms, making it a flexible and scalable choice for businesses of all sizes.
In this tutorial, you will install and configure Zabbix on Ubuntu 20.04. We will also answer a few FAQs related to Zabbix Installation.
Advantages of Zabbix
- Comprehensive Monitoring: Zabbix offers extensive monitoring capabilities for servers, networks, applications, and more, providing real-time insights into system performance.
- Proactive Issue Detection: With its powerful alerting system, Zabbix identifies and notifies about potential issues before they impact business operations.
- Customizable Dashboards: Zabbix allows users to create personalized dashboards, providing a clear overview of key metrics and facilitating data analysis.
- Scalability: Zabbix is highly scalable, accommodating the monitoring needs of small businesses to large enterprises with thousands of devices.
- Open-Source and Cost-Effective: Being open-source, Zabbix eliminates licensing costs, making it a cost-effective solution without compromising on functionality and performance.
Prerequisites to Install and Configure Zabbix on Ubuntu 20.04
- Set up two Ubuntu 20.04 servers - A Zabbix server and an Ubuntu server.
- Install Apache, MySQL, and PHP to run the Zabbix server.
Step 1 - Installing the Zabbix Server
1) Install Zabbix on the server where you have installed MySQL, Apache, and PHP. 2) You need to log into this machine as a non-root user.
ssh pwsuser@zabbix_server_ip_address
3) It is recommended to use the official Zabbix repository to install the latest and stable version. You can also get it in Ubuntu's package manager but that is outdated and hence not recommended. Download it by using the following command:
wget https://repo.zabbix.com/zabbix/6.4/ubuntu/pool/main/z/zabbix-release/zabbix-release_6.4-1+ubuntu20.04_all.deb
sudo dpkg -i zabbix-release_6.4-1+ubuntu20.04_all.deb
After downloading, you will see the following output:
Output

Selecting previously unselected package zabbix-release.
(Reading database ... 61483 files and directories currently installed.)
Preparing to unpack zabbix-release_4.2-1+bionic_all.deb ...
Unpacking zabbix-release (4.2-1+bionicc) ...
Setting up zabbix-release (4.2-1+bionicc) ...
4) Update the package index to include the new repository.
sudo apt update
5) After that, install the Zabbix server with MySQL database support.
sudo apt install zabbix-server-mysql zabbix-frontend-php
6) Install the Zabbix agent to collect your data itself.
sudo apt install zabbix-agent
After that, you need to set up your database to hold the data, before using Zabbix.
Step 2 - Configuring MySQL Database
1) Now, create a new MySQL database and populate it with some basic information to make it suitable for Zabbix. You need to create a different user for this database to ensure that Zabbix is not logging into MySQL with the root account.
2) Log into your MySQL as the root user using the root password.
mysql -u root -p
3) Create the Zabbix database with UTF-8 character support.
create database zabbix character set utf8 collate utf8_bin;
4) Create a user for the Zabbix server and give it access to the new database by setting up the password.
grant all privileges on zabbix.* to zabbix@localhost identified by 'your_zabbix_mysql_password';
5) After that, enable the log_bin_trust_function_creators option and apply these changes, and exit from the database console by typing quit.
set global log_bin_trust_function_creators = 1;
flush privileges;
quit;
6) Now, you need to import the initial schema and data and run the following command:
sudo zcat /usr/share/doc/zabbix-server-mysql/create.sql.gz | mysql -uzabbix -p zabbix
7) Enter the password for the zabbix MySQL user to configure.
Now disable the log_bin_trust_function_creators from MySQL:
set global log_bin_trust_function_creators = 0;
exit;
8) To allow the Zabbix server to use this database, you have to set the database password in its configuration file. We will use nano in this tutorial to open files. You can use your preferred text editor. Use the following command to open the required file:
sudo nano /etc/zabbix/zabbix_server.conf
9) Find the following section in the file:
### Option: DBPassword
#       Database password. Ignored for SQLite.
#       Comment this line if no password is used.
#
# Mandatory: no
# Default:
# DBPassword=
10) After that, you need to set the DBPassword value in the file to the password for your database user. Add the following line below those comments for database configuration:
DBPassword=your_zabbix_mysql_password
11) Now, save and close the file zabbix_server.conf by pressing CTRL+X, followed by Y and then ENTER if you’re using nano.
This takes care of the Zabbix server configuration.
Step 3 - Configuring PHP
Next, you need to make some modifications to your PHP setup to allow the Zabbix interface to run properly.
1) The process you followed for the Zabbix installation has created an Apache configuration file. It is located in the directory /etc/zabbix and is loaded automatically by Apache. To make the required changes in the file, you need to open it using the following command:
sudo nano /etc/zabbix/apache.conf
This file contains all the PHP settings you need to meet the requirements of the Zabbix web interface.
2) Make appropriate changes in the timezone setting.
<IfModule mod_php7.c>
    php_value max_execution_time 300
    php_value memory_limit 128M
    php_value post_max_size 16M
    php_value upload_max_filesize 2M
    php_value max_input_time 300
    php_value always_populate_raw_post_data -1
    # php_value date.timezone Europe/Riga
</IfModule>
3) Uncomment the time zone line and change it according to your requirement and save and close the file.
4) Restart Apache to apply the changes you have made just now.
sudo systemctl restart apache2
5) Start the Zabbix server using the following command and check the status.
sudo systemctl status zabbix-server
Output

●
zabbix-server.service - Zabbix Server
   Loaded: loaded (/lib/systemd/system/zabbix-server.service; disabled; vendor preset: enabled)
   Active: active (running) since Fri 2019-04-05 08:50:54 UTC; 3s ago
  Process: 16497 ExecStart=/usr/sbin/zabbix_server -c $CONFFILE (code=exited, status=0/SUCCESS)
  ...
6) After that, enable the server to start at boot time:
sudo systemctl enable zabbix-server
It is highly important to enable SSL/TLS on your server.
Step 4 - Configuring Settings for the Zabbix
The web interface lets you see reports and add hosts that you want to monitor but needs some initial setup before you can use it.
1) Open your browser and go to the following address http://zabbix_server_name/zabbix/.
2) Click the Next step to continue.
On the next screen, you will see the table that lists down all of the prerequisites to run Zabbix.
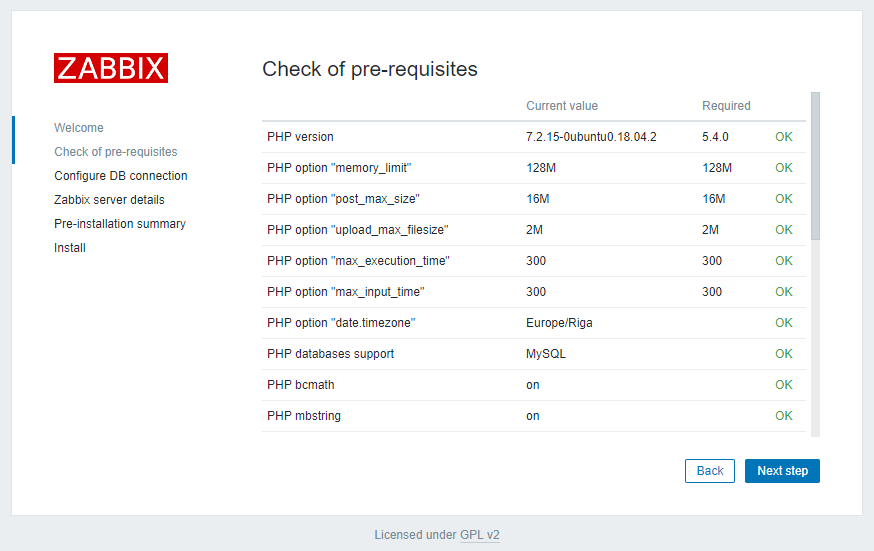
3) All of the values in this table must be OK and once you verify that, click Next step to proceed.
4) After that, the next screen will ask you for database-connection information.
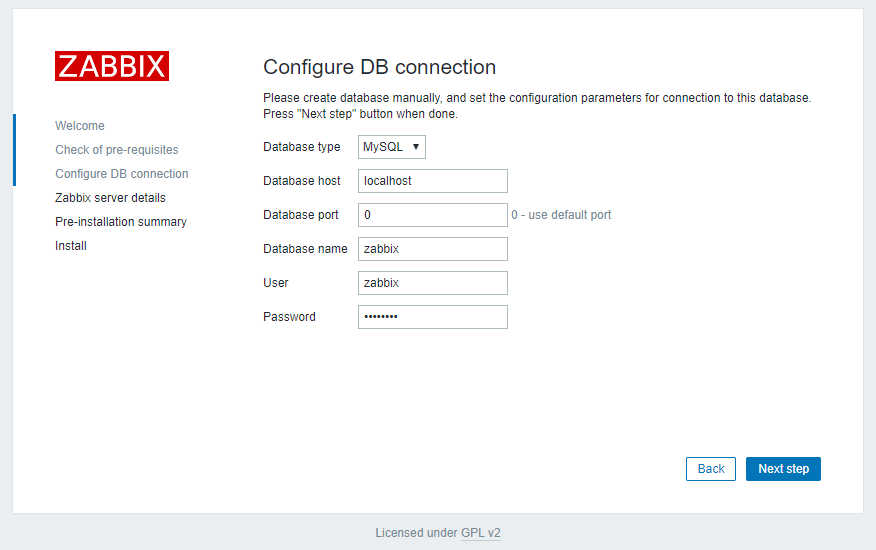
Now Zabbix knows about your database, but you need to make the database information accessible for the web interface as well. Therefore enter the MySQL credentials and click Next Step to move forward.
5) Leave the options at their default values on the next screen.
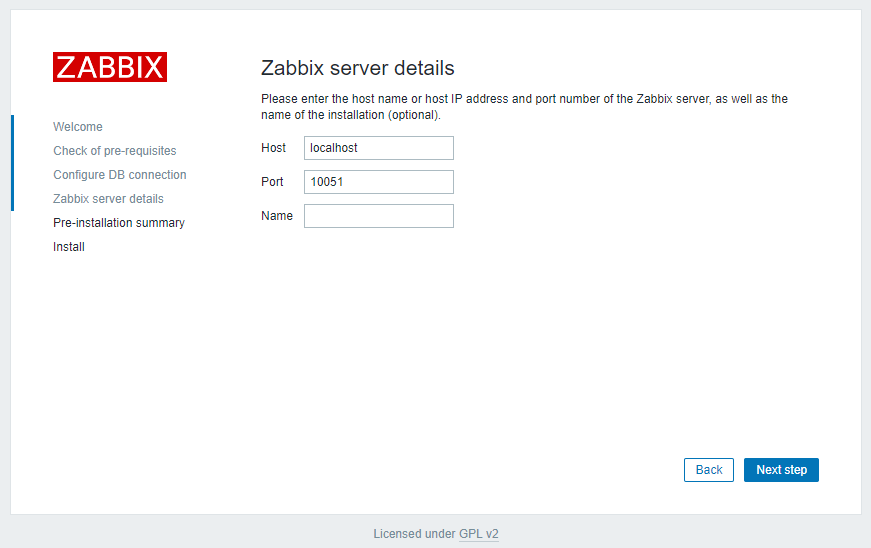
The Name is not mandatory here, it is used to distinguish one server from another in case you need many servers for monitoring. Click Next step to proceed.
6) The next screen will show the pre-installation summary so you can confirm everything is correct.
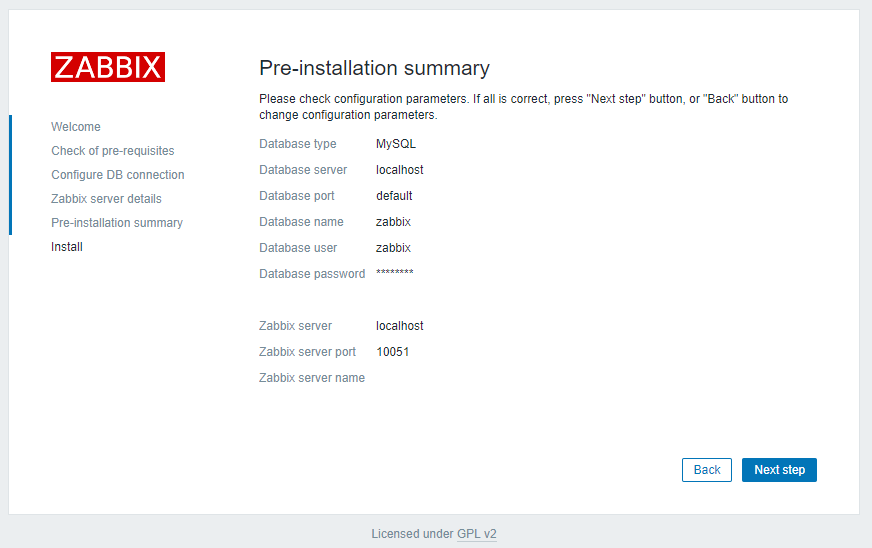
7) Click the Next step to proceed to the final screen. The web interface setup is complete now!
The configuration file /usr/share/zabbix/conf/zabbix.conf.php is ready for future use.
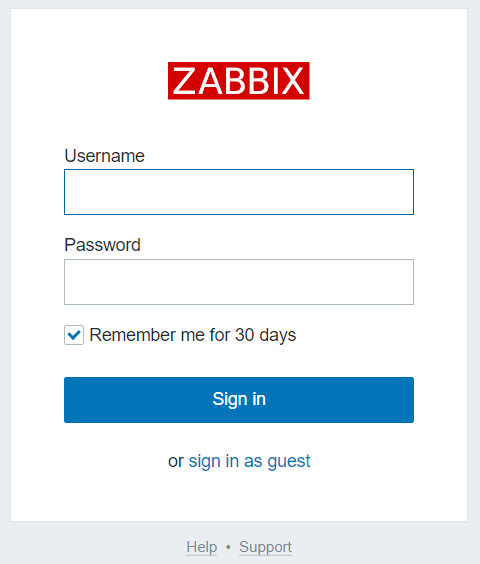
7) Click Finish to proceed to the login screen, by default user is Admin and the password is Zabbix.
Set up the Zabbix agent before you log into your second Ubuntu server.
Step 5 - Install and Configure the Zabbix Agent
Now, you are going to start the process of configuring agent software that will send monitoring data to the server.
1) Log in to the second Ubuntu server:
ssh pwsuser@second_ubuntu_server_ip_address
2) Run the following commands to install the repository configuration package:
wget https://repo.zabbix.com/zabbix/6.4/ubuntu/pool/main/z/zabbix-release/zabbix-release_6.4-1+ubuntu20.04_all.deb
sudo dpkg -i zabbix-release_6.4-1+ubuntu20.04_all.deb
3) Update the package index and install the Zabbix agent.
sudo apt update
sudo apt install zabbix-agent
5) We are not discussing the certificate authority in this tutorial. The connection between the server and the agent can be secured by using pre-shared (PSK) keys.
First, you need to generate a PSK using the following command:
sudo sh -c "openssl rand -hex 32 > /etc/zabbix/zabbix_agentd.psk"
6) You need to copy the key and then configure the host.
cat /etc/zabbix/zabbix_agentd.psk
You will get the following output as the key:
Output

12eb854dea38ac9ee7d1ded2d74cee6262b0a56710f6946f7913d674ab82cdd4
7) Edit the Zabbix agent settings to set up its secure connection and open the agent configuration file in your text editor.
sudo nano /etc/zabbix/zabbix_agentd.conf
8) Edit the IP address of the Zabbix server and change the default value. Therefore find the following section:
...
### Option: Server
#       List of comma delimited IP addresses (or hostnames) of Zabbix servers.
#       Incoming connections will be accepted only from the hosts listed here.
#       If IPv6 support is enabled then '127.0.0.1', '::127.0.0.1', '::ffff:127.0.0.1' are treated equally.
#
# Mandatory: no
# Default:
# Server=

Server=127.0.0.1
...
9) Now, you need to change the default value to the IP of your Zabbix server:
...
Server=zabbix_server_ip_address
...
10) After that, search for the section that configures the secure connection to the Zabbix server, and also you need to enable the pre-shared key support. Find the following section:
...
### Option: TLSConnect
#       How the agent should connect to server or proxy. Used for active checks.
#       Only one value can be specified:
#               unencrypted - connect without encryption
#               psk         - connect using TLS and a pre-shared key
#               cert        - connect using TLS and a certificate
#
# Mandatory: yes, if TLS certificate or PSK parameters are defined (even for 'unencrypted' connection)
# Default:
# TLSConnect=unencrypted
...
11) Configure incoming connections to support pre-shared keys.
...
TLSConnect=psk
...
12) After that, locate the TLSAccept section, which looks like this:
...
### Option: TLSAccept
#       What incoming connections to accept.
#       Multiple values can be specified, separated by comma:
#               unencrypted - accept connections without encryption
#               psk         - accept connections secured with TLS and a pre-shared key
#               cert        - accept connections secured with TLS and a certificate
#
# Mandatory: yes, if TLS certificate or PSK parameters are defined (even for 'unencrypted' connection)
# Default:
# TLSAccept=unencrypted
...
Now, you need to configure incoming connections to support pre-shared keys by adding this line:
...
TLSAccept=psk
...
13) After that, find the TLSPSKIdentity section, which looks like this:
...
### Option: TLSPSKIdentity
#       Unique, case sensitive string used to identify the pre-shared key.
#
# Mandatory: no
# Default:
# TLSPSKIdentity=
...
14) Choose a unique name for identifying your pre-shared key.
...
TLSPSKIdentity=PSK 001
...
It will be used as a PSK ID when you add your host through the Zabbix web interface.
15) After that, set the option that will point to the pre-shared key which you created earlier. Search for the TLSPSKFile option:
...
### Option: TLSPSKFile
#       Full pathname of a file containing the pre-shared key.
#
# Mandatory: no
# Default:
# TLSPSKFile=
...
16) Add the following line to point the Zabbix agent to your PSK file:
...
TLSPSKFile=/etc/zabbix/zabbix_agentd.psk
...
17) After that, you need to save and close the file. You can now restart the Zabbix agent and set it to start at boot time:
sudo systemctl restart zabbix-agent
sudo systemctl enable zabbix-agent
18) Check and confirm that the Zabbix agent is running properly using the following command:
sudo systemctl status zabbix-agent
If you will get to see the following status, it means that the agent is running:
Output

● zabbix-agent.service - Zabbix Agent
   Loaded: loaded (/lib/systemd/system/zabbix-agent.service; enabled; vendor preset: enabled)
   Active: active (running) since Fri 2019-04-05 09:03:04 UTC; 1s ago
  ...
The agent listens on a port 10050 for connections from the server. Now, you need to configure UFW to allow connections to this port:
sudo ufw allow 10050/tcp
Your Zabbix server is now ready to send data. Now, you have to link it from the server's web console to use it successfully. You will now complete the configurations.
Step 6 - Add the New Host to Zabbix
If you want to monitor every host then it has to be registered on Zabbix Server first. You can do it using the web interface.
1) Log in to the Zabbix Server web interface by navigating to the address http://zabbix_server_name/zabbix/.
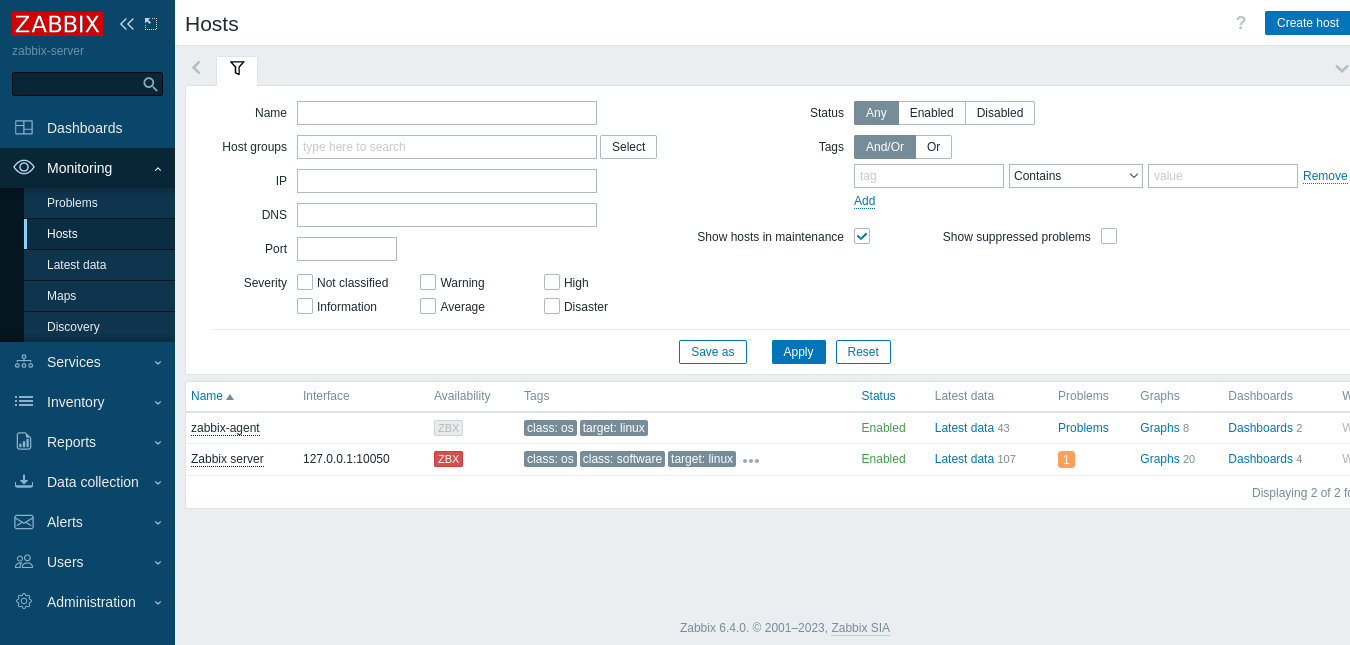
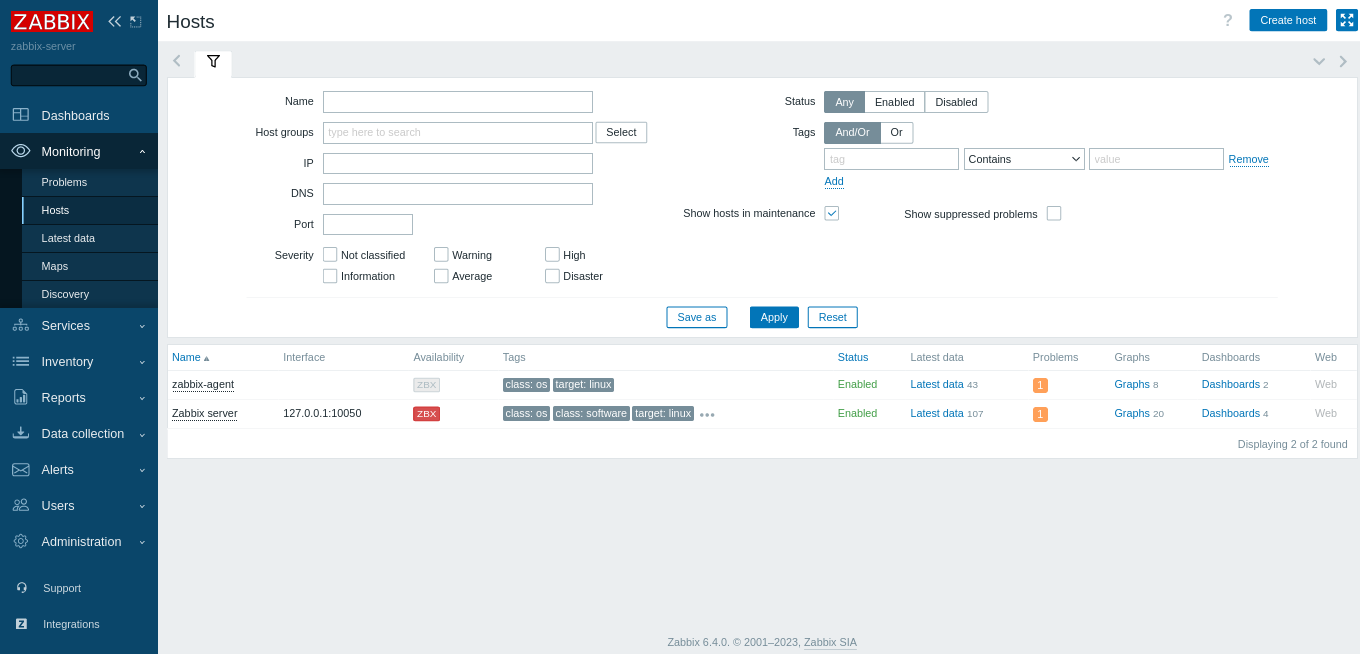
2) Click on Monitoring > Hosts > Create host, this will open the host configuration page.
3) Adjust the Hostname and IP address and add the host to a group. You can use an already existing group or create your own group. The host can be available in multiple groups.
4) Then click Select in the template field.
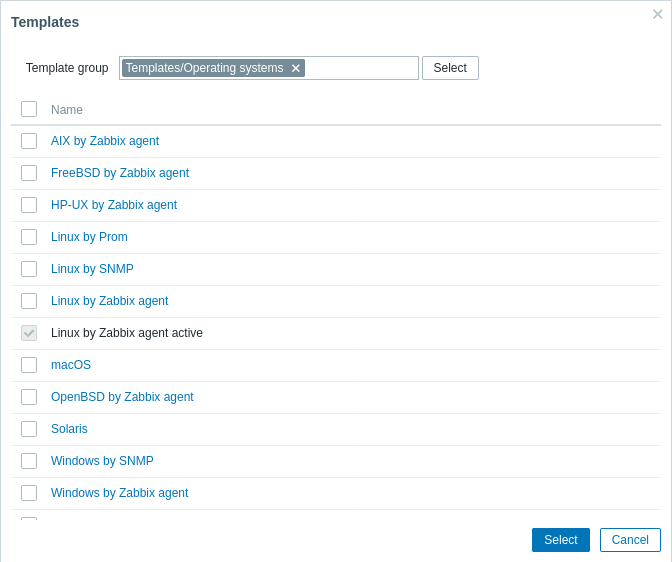
5) After that click on select and click on Templates/Operating system then Click on Linux by zabbix agent active and then click Select.
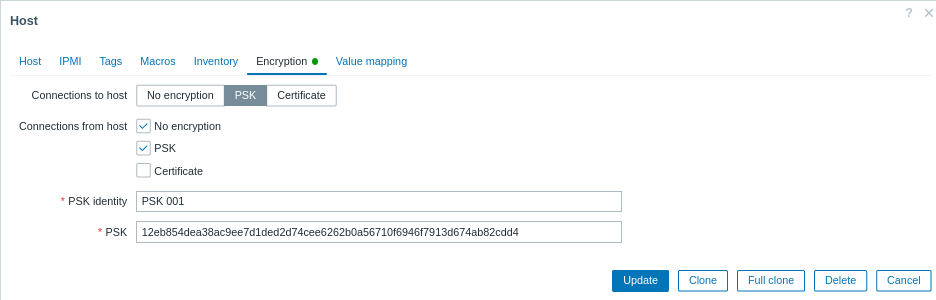
5) Navigate to the Encryption field. PSK needs to be selected for both the Connections to host and Connections from the host, set PSK identity to PSK 001. Then you need to set the PSK value to the key you generated for the Zabbix agent. It is present on the agent machine in the file /etc/zabbix/zabbix_agentd.psk.
6) Click the Update button at the bottom of the form to create the host.
You will see your new host in the list and green labels indicating that everything is working fine and the connection is encrypted.
If you need to monitor more servers, at first you need to log in to every host, then install the Zabbix agent, generate a PSK, configure the agent, and then finally add the host to the web interface.
Finally, the Zabbix server is monitoring your second Ubuntu server. Additionally, you can set up email notifications to be notified about problems.
Step 7 - Configuring Email Notifications
Zabbix supports many types of notifications: email, Jabber, SMS, etc. You can also use Telegram or Slack. A full list of integrations can be seen here.
The simplest communication method is email, and in this step, we will help you configure notifications for this media type.
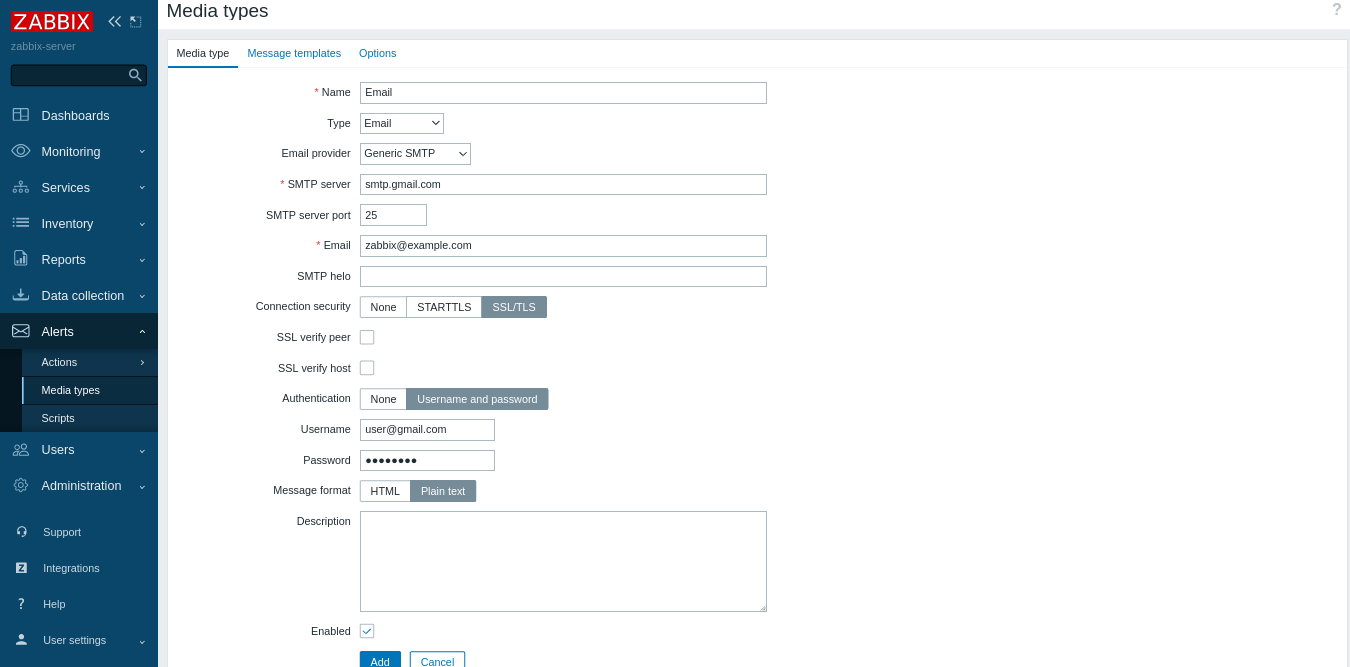
1) Click on Alerts > Media types > Create.
Adjust your Email’s SMTP options according to the settings provided by your email service. We will use Gmail in this tutorial.
Generate an App Password for Zabbix, if you use 2-Step Verification with Gmail. You will find instructions on how to generate this password in the Google Help Center.
2) Choose the message format HTML or plain text and click on the Update button to update the email parameters.
3) Create a new user, click on Users > users > Create user. This will open the user configuration page.
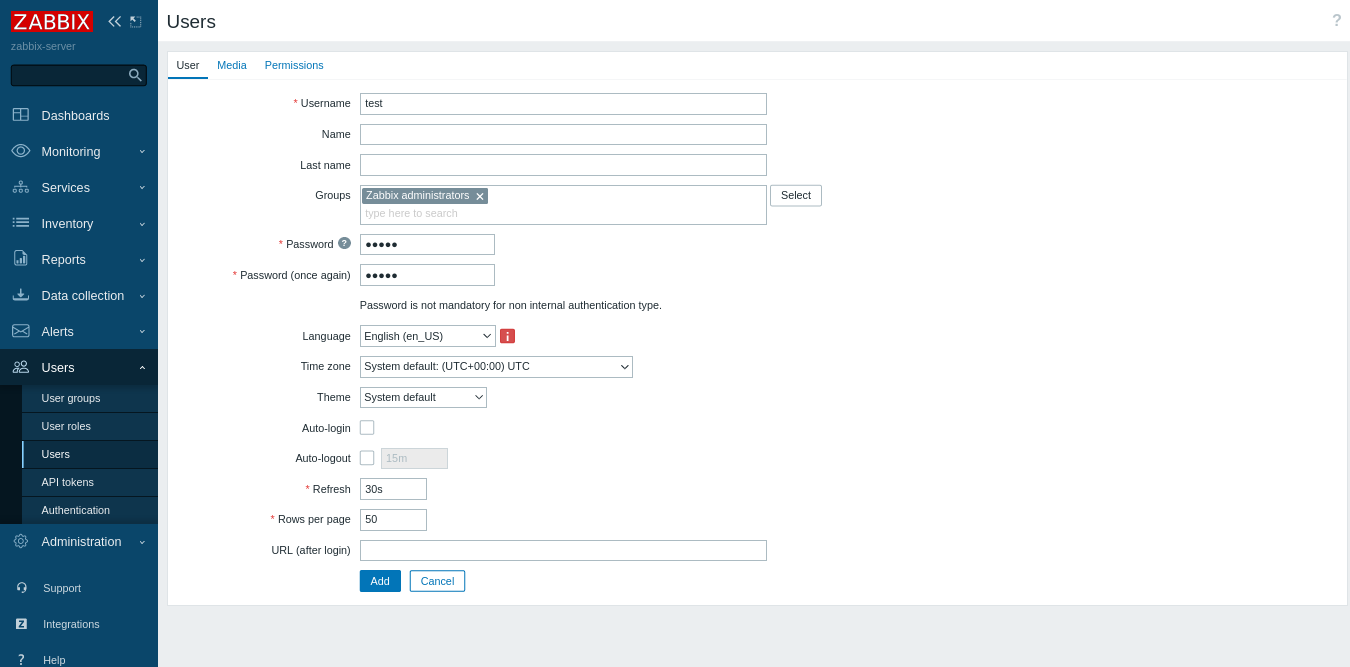
4) Enter the new username in the Alias field and set up a new password.
5) Add the user to the administrator’s group and type Zabbix administrators in the Groups field and select it from the proposed list.
6) Click on Media > Add, and you will see a pop-up window.
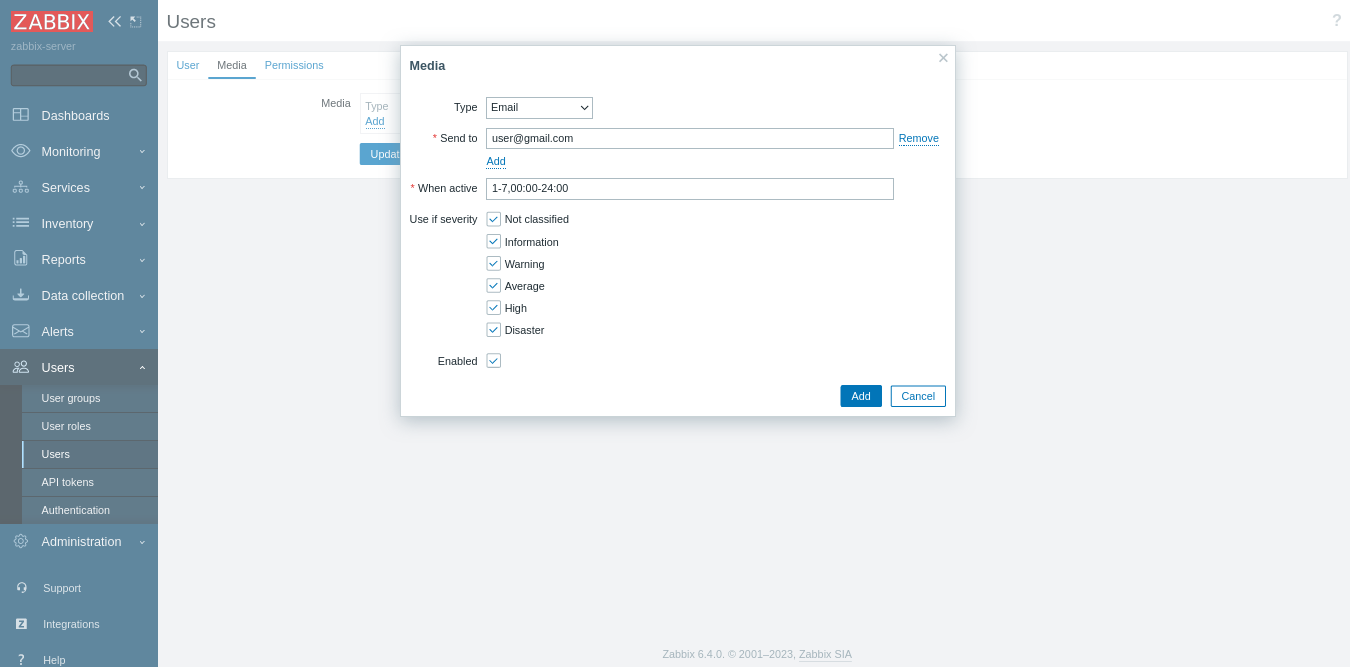
7) Enter your email address in the Send to the field and click on the Add button.
8) After that, navigate to the Permissions tab and select Zabbix Super Admin from the User type drop-down menu.
9) Click on the Add button to create the user and enable notifications.
10) Now you should enable the notifications. Click on Configuration tab > Actions in the top navigation bar. You will get a pre-configured action, which will handle the notifications to all Zabbix administrators. You can change the settings based on your needs. Use the default parameters as of now. Click on the red Disabled link in the Status column, to enable the action.
Now you are all set to receive the alerts.
Step 8 - Generating a Test Alert
Now, you need to generate a test alert to ensure that everything is connected. Zabbix keeps track of the amount of free disk space on the server. It detects all disk mounts and then adds the corresponding checks. It is executed every hour so you need to wait a bit for the notification to be triggered.
1) Create a temporary file that’s large enough to trigger Zabbix’s file system usage alert by logging in to your second Ubuntu server.
ssh pwsuser@second_ubuntu_server_ip_address
2) You can use the df command to find out the amount of free space you have on your server.
df -h
The command df will report the disk space usage of your file system, and -h will make the output human-readable. You’ll see the output in the following format:
OutputFilesystem      Size  Used Avail Use% Mounted on
/dev/vda1        25G  1.2G   23G   5% /
In this case, the free space is 23 GB but your free space may differ.
3) Use the fallocate command to pre-allocate or de-allocate space to a file and create a file that takes up more than 80% of the available disk space.
fallocate -l 20G /tmp/temp.img
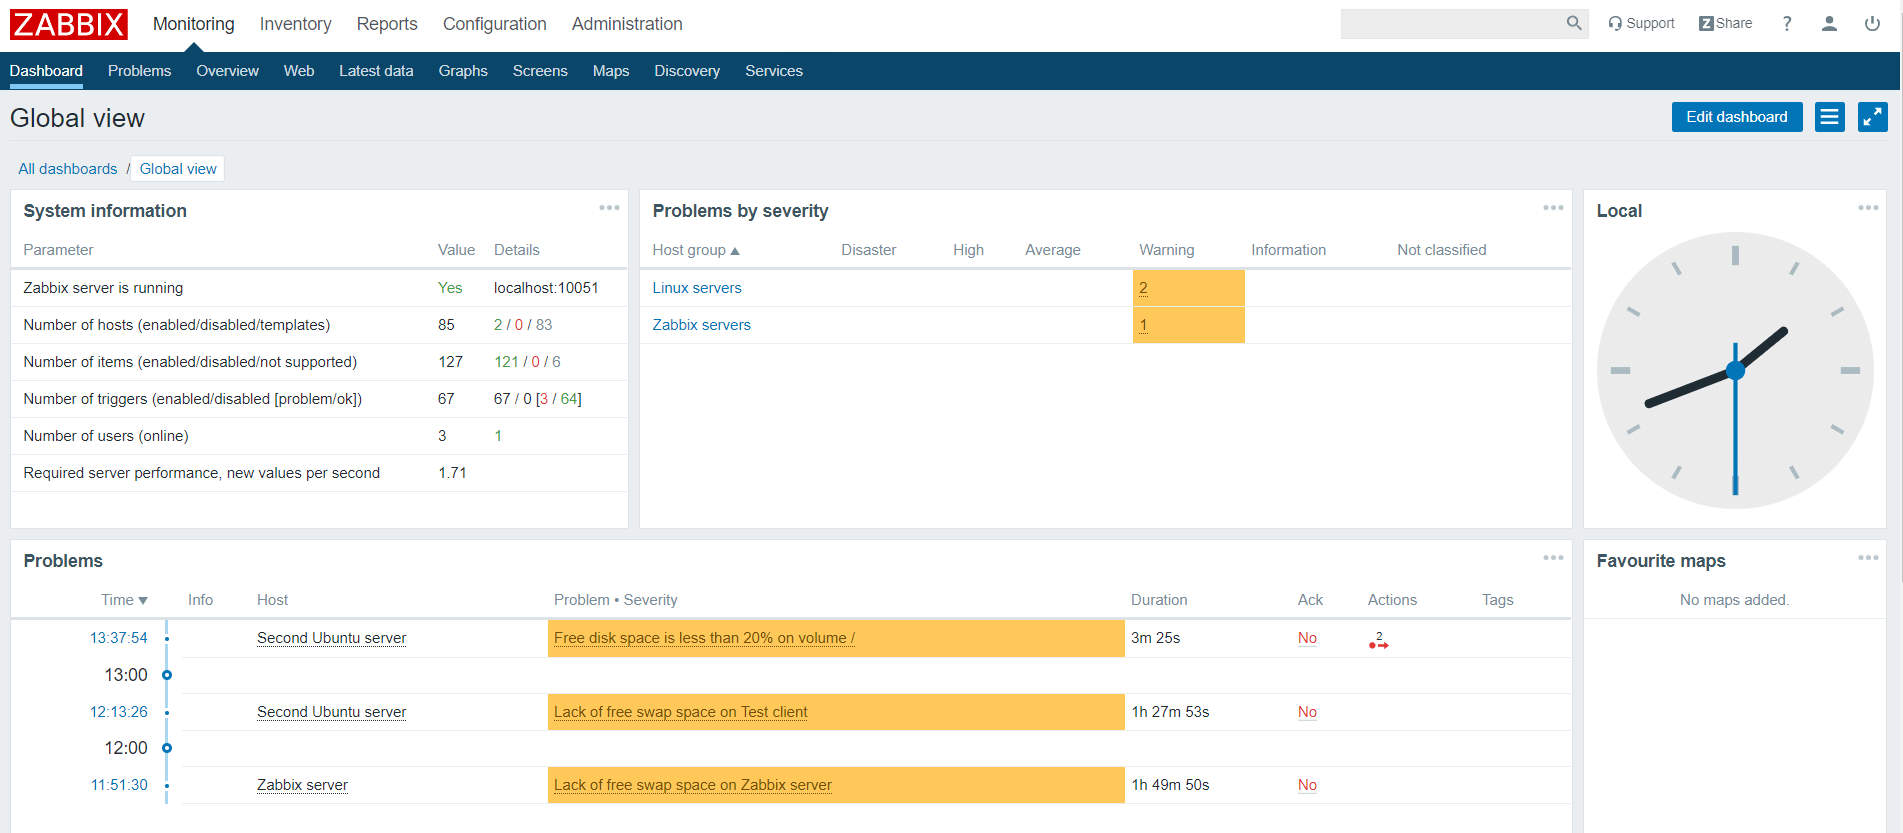
4) Zabbix triggers an alert about the amount of free disk space and also it will run the action which you configured by sending the notification message.
Output

Problem started at 10:37:54 on 2019.04.05
Problem name: Free disk space is less than 20% on volume /
Host: Second Ubuntu server
Severity: Warning

Original problem ID: 34
5) Navigate to the Monitoring tab and Dashboard to see the notification and its details.
6) Once the alerts start working, delete the temporary file to reclaim your disk space.
rm -f /tmp/temp.img
After some time Zabbix will send the recovery message and the alert will disappear from the main dashboard.
FAQs to Install and Configure Zabbix on Ubuntu 20.04
Which database does Zabbix support on Ubuntu 20.04?
Zabbix supports multiple databases, including MySQL, MariaDB, and PostgreSQL. On Ubuntu 20.04, you can use either MySQL or MariaDB.
How do I access the Zabbix web interface after installation?
You can access the Zabbix web interface by entering the server's IP address or domain name in a web browser, followed by /zabbix (e.g., http://your-server-ip/zabbix). Log in with the default credentials (Admin:zabbix) and change the password afterward.
How can I monitor remote hosts with Zabbix on Ubuntu 20.04?
To monitor remote hosts, you need to install the Zabbix agent on each target machine. Configure the agent to communicate with your Zabbix server, and then add the remote hosts to the Zabbix server for monitoring.
Can I configure email notifications in Zabbix?
Yes, you can configure email notifications in Zabbix. Configure the SMTP server settings in the Zabbix web interface, and then set up email notifications for specific triggers or events.
Is it possible to customize Zabbix dashboards and views?
Yes, Zabbix provides a flexible interface for customizing dashboards and views. You can create personalized dashboards, add various widgets, and arrange them according to your monitoring needs.
How can I upgrade Zabbix to a newer version on Ubuntu 20.04?
To upgrade Zabbix on Ubuntu 20.04, you need to follow the official Zabbix upgrade documentation specific to your current version. It usually involves backing up the database, installing the new version, and migrating the configuration.
Can I integrate Zabbix with other tools or applications?
Yes, Zabbix offers numerous integrations with third-party tools and applications. You can integrate Zabbix with popular services like Slack, Grafana, and Jira to enhance your monitoring and alerting capabilities.
Conclusion
We hope this tutorial helped you understand how to install Zabbix on Ubuntu 20.04. To learn more about it, check out the official documentation of Zabbix.
If you have any queries, please leave a comment below and we’ll be happy to respond to them for sure.