
Choose a different version or distribution
Introduction
Before we begin talking about how to install Docker on Ubuntu 22.04, let's briefly understand – What is Docker?
Docker is a popular open-source platform that simplifies the process of building, deploying, and running applications using containerization. It allows developers to package their software and its dependencies into portable containers, which can run on any system with Docker installed.
With Docker, applications are isolated from the underlying infrastructure, making them highly scalable, lightweight, and consistent across different environments. Whether you're a developer, system administrator, or IT professional, Docker enables you to streamline the deployment process and improve collaboration, ultimately boosting productivity and efficiency.
In this tutorial, you will learn how to install and use Docker Community Edition (CE) on Ubuntu 22.04. We will also address a few FAQs on how to install and use Docker on Ubuntu 22.04.
Advantages of Docker
- Portability: Docker containers can run on any system, making applications highly portable and eliminating compatibility issues.
- Scalability: Docker's lightweight nature allows easy scaling of applications, adapting to fluctuating demands efficiently.
- Efficiency: Docker's containerization reduces resource consumption, maximizes hardware utilization, and speeds up deployment.
- Isolation: Containers provide strong isolation between applications, enhancing security and preventing conflicts between different software components.
- Collaboration: Docker simplifies collaboration by providing a standardized environment, ensuring consistent development and deployment across teams.
Prerequisites to Install and Use Docker on Ubuntu 22.04
You will require the following in order to continue this tutorial:
- One Ubuntu 22.04 server configured with a firewall and a
sudonon-root user by following the instructions in the Ubuntu 22.04 initial server setup guide. - If you want to create your own images and push them to Docker Hub, as explained in Steps 7 and 8, you will need a Docker Hub account.
Step 1 - Install Docker
The Docker installation package offered in the official Ubuntu repository may not be the most recent version. We will install Docker from the official Docker repository to make sure we have the most up-to-date version. To accomplish that, we will first create a new package source, then install the package after adding the GPG key from Docker to confirm the downloads are legitimate.
Update your existing list of packages first:
sudo apt update
Install the following prerequisites to enable apt to use packages through HTTPS:
sudo apt install apt-transport-https ca-certificates curl software-properties-common
Next, add the official Docker repository's GPG key to your system:
curl -fsSL https://download.docker.com/linux/ubuntu/gpg | sudo gpg --dearmor -o /usr/share/keyrings/docker-archive-keyring.gpg
Add the Docker repository to the APT sources:
echo "deb [arch=$(dpkg --print-architecture) signed-by=/usr/share/keyrings/docker-archive-keyring.gpg] https://download.docker.com/linux/ubuntu $(lsb_release -cs) stable" | sudo tee /etc/apt/sources.list.d/docker.list > /dev/null
Edit your existing list of packages again to reflect the addition:
sudo apt update
Ensure that you are about to install from the Docker repo rather than the default Ubuntu repo:
apt-cache policy docker-ce
Even though Docker's version number can be different, the output will look something like this:
Output
docker-ce:
  Installed: (none)
  Candidate: 5:20.10.14~3-0~ubuntu-jammy
  Version table:
     5:20.10.14~3-0~ubuntu-jammy 500
        500 https://download.docker.com/linux/ubuntu jammy/stable amd64 Packages
     5:20.10.13~3-0~ubuntu-jammy 500
        500 https://download.docker.com/linux/ubuntu jammy/stable amd64 Packages
docker-ce is not installed, although the Ubuntu 22.04 Docker repository is the candidate for installation (jammy).
Lastly, install Docker:
sudo apt install docker-ce
Docker should now be installed, the daemon running, and the process set to start automatically on startup. Verify that it is operating:
sudo systemctl status docker
The output should resemble the following, demonstrating that the service is operational and active:
● docker.service - Docker Application Container Engine
     Loaded: loaded (/lib/systemd/system/docker.service; enabled; vendor preset: enabled)
     Active: active (running) since Fri 2022-04-01 21:30:25 UTC; 22s ago
TriggeredBy: ● docker.socket
       Docs: https://docs.docker.com
   Main PID: 7854 (dockerd)
      Tasks: 7
     Memory: 38.3M
        CPU: 340ms
     CGroup: /system.slice/docker.service
             └─7854 /usr/bin/dockerd -H fd:// --containerd=/run/containerd/containerd.sock
Now that Docker is installed, you also get access to not only the Docker service (daemon) but also the docker command line utility, or the Docker client. Later in this tutorial, we will go through how to use the docker command.
Step 2 - Executing the Docker Command Without Sudo (Optional)
By default, the docker command can only be executed by the root user or a user in the docker group, which is created automatically during the Docker installation process. If you try to run the docker command without adding the sudo prefix or without being in the docker group, you will see output similar to this:
Output
docker: Cannot connect to the Docker daemon. Is the docker daemon running on this host?.
See 'docker run --help'.
Add your account to the docker group to avoid typing sudo each time you run the docker command:
sudo usermod -aG docker ${USER}
Log out of the server and back in again to apply the new group membership, or type the following:
su - ${USER}
To proceed, you must enter your user's password.
Check to see if your user has been added to the docker group by typing:
groups
Output
sammy sudo docker
If you need to add a user to the docker group who is not currently logged in, use the following syntax to declare that username explicitly:
sudo usermod -aG docker username
The rest of this tutorial assumes you are running the docker command as a user of the docker group. If you do not want to, please prefix the commands with sudo.
Next, let us examine the docker command.
Step 3 - Using the Docker Command
In order to use docker, you must pass it a series of arguments after commands and options. The syntax looks like this:
docker [option] [command] [arguments]
To see all available subcommands, enter:
docker
The following subcommands are available as of Docker version 20.10.14:
Output
 attach      Attach local standard input, output, and error streams to a running container
  build       Build an image from a Dockerfile
  commit      Create a new image from a container's changes
  cp          Copy files/folders between a container and the local filesystem
  create      Create a new container
  diff        Inspect changes to files or directories on a container's filesystem
  events      Get real time events from the server
  exec        Run a command in a running container
  export      Export a container's filesystem as a tar archive
  history     Show the history of an image
  images      List images
  import      Import the contents from a tarball to create a filesystem image
  info        Display system-wide information
  inspect     Return low-level information on Docker objects
  kill        Kill one or more running containers
  load        Load an image from a tar archive or STDIN
  login       Log in to a Docker registry
  logout      Log out from a Docker registry
  logs        Fetch the logs of a container
  pause       Pause all processes within one or more containers
  port        List port mappings or a specific mapping for the container
  ps          List containers
  pull        Pull an image or a repository from a registry
  push        Push an image or a repository to a registry
  rename      Rename a container
  restart     Restart one or more containers
  rm          Remove one or more containers
  rmi         Remove one or more images
  run         Run a command in a new container
  save        Save one or more images to a tar archive (streamed to STDOUT by default)
  search      Search the Docker Hub for images
  start       Start one or more stopped containers
  stats       Display a live stream of container(s) resource usage statistics
  stop        Stop one or more running containers
  tag         Create a tag TARGET_IMAGE that refers to SOURCE_IMAGE
  top         Display the running processes of a container
  unpause     Unpause all processes within one or more containers
  update      Update configuration of one or more containers
  version     Show the Docker version information
  wait        Block until one or more containers stop, then print their exit codes
To see the options available for a specific command, type:
docker docker-subcommand --help
Use the following to view Docker system-wide information:
docker info
Let us look into a few of these commands. We will begin with images.
Step 4 - Working with Docker Images
Docker images are used to create Docker containers. Docker, by default, takes these images from Docker Hub, a Docker registry managed by Docker, the company behind the Docker project. The majority of the software and Linux distributions you will require have images hosted on Docker Hub because anyone can host their Docker images there.
Type the following to see if you can access and download images from Docker Hub:
docker run hello-world
The output will show that Docker is working properly:
Output
Unable to find image 'hello-world:latest' locally
latest: Pulling from library/hello-world
2db29710123e: Pull complete
Digest: sha256:bfea6278a0a267fad2634554f4f0c6f31981eea41c553fdf5a83e95a41d40c38
Status: Downloaded newer image for hello-world:latest

Hello from Docker!
This message shows that your installation appears to be working correctly.

...
The default repository, Docker Hub, was used to download the hello-world image after Docker was initially unable to locate it locally. After the image was downloaded, Docker used the image to create a container, and the container's running application then displayed the message.
The docker command with the search subcommand can be used to look for images on Docker Hub. For instance, enter the following to find the Ubuntu image:
docker search ubuntu
A list of all images whose names match the search string will be returned when the script has crawled Docker Hub. In this instance, the output will resemble this:
Output
NAME                             DESCRIPTION                                     STARS     OFFICIAL   AUTOMATED
ubuntu                           Ubuntu is a Debian-based Linux operating sys…   14048     [OK]
websphere-liberty                WebSphere Liberty multi-architecture images …   283       [OK]
ubuntu-upstart                   DEPRECATED, as is Upstart (find other proces…   112       [OK]
neurodebian                      NeuroDebian provides neuroscience research s…   88        [OK]
open-liberty                     Open Liberty multi-architecture images based…   51        [OK]
...
OK in the OFFICIAL column denotes an image created and supported by the company behind the project. With the pull subcommand, you can download the image to your computer once you have found it and decided to use it.
The official ubuntu image can be downloaded to your computer by running the following command:
docker pull ubuntu
The following output will appear:
Using default tag: latest
latest: Pulling from library/ubuntu
e0b25ef51634: Pull complete
Digest: sha256:9101220a875cee98b016668342c489ff0674f247f6ca20dfc91b91c0f28581ae
Status: Downloaded newer image for ubuntu:latest
docker.io/library/ubuntu:latest
You can use the run subcommand to run a container using a downloaded image after the image has been downloaded. As you saw with the hello-world example, the Docker client will first download the image before running a container using it, if an image has not already been downloaded when docker is called using the run subcommand.
Type the following to view the images that have been downloaded to your computer:
docker images
The output will look something like this:
REPOSITORY          TAG                 IMAGE ID            CREATED             SIZE
ubuntu              latest              1d622ef86b13        3 weeks ago         73.9MB
hello-world         latest              bf756fb1ae65        4 months ago        13.3kB
As you will see later in this guide, you can alter the images you use to run containers and use them to create new images. These new images can then be uploaded (technically referred to as "pushed") to Docker Hub or other Docker registries.
Let us examine running containers in greater detail.
Step 5 - Running a Docker Container
A container that runs and exits after emitting a test message is the hello-world container you executed in the previous step. Containers can be far more useful and interactive than that. After all, they are identical to virtual machines but use fewer resources.
Let us run a container using the most recent image of Ubuntu as an example. You get interactive shell access to the container when you combine the -i and -t switches:
docker run -it ubuntu
As soon as you start working inside the container, your command prompt should be updated to reflect this and take the following form:
Output
root@d9b100f2f636:/#
Take note of the container id in the command prompt. In this instance, it is d9b100f2f636. When you want to remove a container, you will need that container ID later on to identify the container.
You are now able to execute any command inside the container. Let us update the package database within the container as an example. Since you are running commands within the container as the root user, you do not need to prefix them with sudo:
apt update
Install any application in it after that. Here we will install Node.js:
apt install nodejs
Using this, Node.js is installed in the container from the official Ubuntu repository. Ensure that Node.js is installed when the installation is complete:
node -v
The version number will be shown in your terminal:
Output
v12.22.9
The container is the only thing that changes when you make modifications inside of it.
To quit the container, type exit at the prompt.
Next, let us examine how to manage the containers on our system.
Step 6 - Managing Docker Containers
You will have a lot of active (running) and dormant containers on your PC after using Docker for a while. Use the following command to view the active ones:
docker ps
The output will resemble the following:
CONTAINER ID IMAGE COMMAND CREATED
With the help of the hello-world image and the ubuntu image, you launched two containers in this lesson. Despite not being active any more, both containers are still there on your machine.
To see all active and inactive containers, use docker ps with the -a switch:
docker ps -a
The output will resemble the following:
Output
CONTAINER ID   IMAGE         COMMAND   CREATED         STATUS                     PORTS     NAMES
1c08a7a0d0e4   ubuntu        "bash"     About a minute ago   Exited (0) 7 seconds ago             dazzling_taussig
587000e49d53   hello-world   "/hello"   5 minutes ago        Exited (0) 5 minutes ago             adoring_kowalevski
The -l switch should be used to view the most recent container you created:
docker ps -l
CONTAINER ID   IMAGE     COMMAND   CREATED         STATUS                     PORTS     NAMES
1c08a7a0d0e4   ubuntu    "bash"    3 minutes ago   Exited (0) 2 minutes ago             dazzling_taussig
Use docker start, followed by the container ID or the container name, to restart a stopped container. Let us launch the container running Ubuntu with the ID 1c08a7a0d0e4:
docker start 1c08a7a0d0e4
The container will start, and you can check its status with docker ps:
CONTAINER ID   IMAGE     COMMAND   CREATED         STATUS         PORTS     NAMES
1c08a7a0d0e4   ubuntu    "bash"    6 minutes ago   Up 8 seconds             dazzling_taussig
Use docker stop, followed by the container ID or name, to stop a running container. We will use the name that Docker gave the container this time, which is dazzling_taussig:
docker stop dazzling_taussig
Once you have made the decision that you no longer require a container, delete it using the docker rm command, once more specifying the container ID or name. To delete the container connected to the hello-world image, use the docker ps -a command to locate its container ID or name.
docker rm adoring_kowalevski
With the --name switch, you can launch a new container and give it a name. Moreover, you can make a container that detaches itself when terminated by using the --rm switch. For further details on these and other options, see the docker run help command.
Images of containers can be created, and these images can then be used to create new containers. Let us see how that functions.
Step 7 - Committing Changes in a Container to a Docker Image
You can create, change, and delete files when a Docker image is running, just like you do with a virtual machine. Only that container will be affected by the modifications you make. You can start and stop it, but if you use the docker rm command to remove it, the changes will be permanently lost.
This section demonstrates how to create a new Docker image from the state of a container.
You now have a container running off an image after installing Node.js inside the Ubuntu container, but the container is not the same as the image you used to create it. But, later on, you could want to use this Node.js container as the basis for new images.
Use the command below to commit the modifications to a new Docker image instance.
docker commit -m "What you did to the image" -a "Author Name" container_id repository/new_image_name
The -m switch lets you and other users understand what changes you made, and the -a switch specifies the author. The container_id is the one you took note of when you started the interactive Docker session earlier in the lesson. The repository is typically your Docker Hub username unless you set up multiple repositories.
For instance, the command would be as follows for the user sammy and the container ID of d9b100f2f636:
docker commit -m "added Node.js" -a "sammy" d9b100f2f636 sammy/ubuntu-nodejs
When you commit an image, a new image is created and saved locally on your computer. You will now learn how to upload an image to a Docker registry like Docker Hub so others can access it later on in this guide.
The new image and the previous one from which it was created will both be displayed when listing the Docker images once more:
docker images
The output will be similar to the one shown below:
Output
REPOSITORY               TAG                 IMAGE ID            CREATED             SIZE
sammy/ubuntu-nodejs   latest              7c1f35226ca6        7 seconds ago       179MB
...
In this case, the new image, ubuntu-nodejs, was created by deriving it from the ubuntu image that was previously available on Docker Hub. The size discrepancy reflects the modifications. And in this case, the change was the installation of NodeJS. So, you can just use the new image the next time you need to run a container on Ubuntu with NodeJS already installed.
In order to automate the software installation process in a new image, you may also build images from a Dockerfile. It, however, is not covered in this tutorial.
Let us now share the new image with others so they can make containers out of it.
Step 8 - Pushing Docker Images to a Docker Repository
After creating a new image from an existing image, the next obvious step is to share it with a few of your friends, the entire world on Docker Hub, or any other Docker registry that you have access to. You need to sign in to Docker Hub or another Docker registry in order to push an image there.
Log into Docker Hub first before pushing your image.
docker login -u docker-registry-username
When prompted, enter your Docker Hub password to log in. If you entered the correct password, authentication should be successful.
Note: You must tag your image with your registry username if your Docker registry username differs from the local username you used to create the image. You would type the following for the last step's example:
docker tag sammy/ubuntu-nodejs docker-registry-username/ubuntu-nodejs
You can then push your own image by using:
docker push docker-registry-username/docker-image-name
The following command would be used to push the ubuntu-nodejs image to the sammy repository:
docker push sammy/ubuntu-nodejs
The uploading of the images may take some time, but when finished, the output will look like this:
Output
The push refers to a repository [docker.io/sammy/ubuntu-nodejs]
e3fbbfb44187: Pushed
5f70bf18a086: Pushed
a3b5c80a4eba: Pushed
7f18b442972b: Pushed
3ce512daaf78: Pushed
7aae4540b42d: Pushed
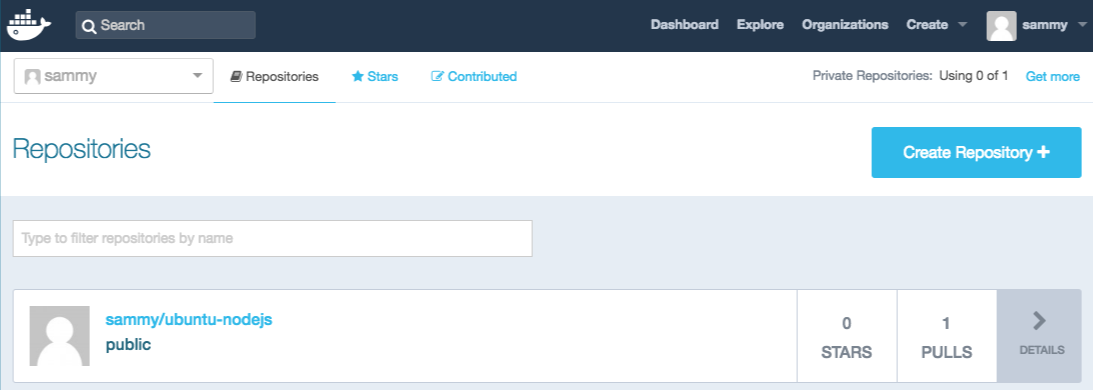
After you push an image to a registry, it should appear on your account's dashboard, as shown in the image below.
If a push attempt results in this error, you most likely did not log in:
Output
The push refers to a repository [docker.io/sammy/ubuntu-nodejs]
e3fbbfb44187: Preparing
5f70bf18a086: Preparing
a3b5c80a4eba: Preparing
7f18b442972b: Preparing
3ce512daaf78: Preparing
7aae4540b42d: Waiting
unauthorized: authentication required
Log in with docker login and try to push again. Following that, make sure it is listed on your Docker Hub repository page.
You can now pull the image to a new machine and use it to run a new container by using the command docker pull sammy/ubuntu-nodejs.
FAQs to Install and Use Docker on Ubuntu 22.04
What are the system requirements for Docker on Ubuntu 22.04?
Docker has relatively low system requirements. However, Ubuntu 22.04 should have a 64-bit processor, at least 2 GB of RAM, and sufficient disk space to accommodate Docker images and containers.
Can Docker coexist with other software on Ubuntu 22.04?
Yes, Docker can coexist with other software on Ubuntu 22.04. It runs as a separate process and does not interfere with existing applications.
How can I verify if Docker is successfully installed on Ubuntu 22.04?
After installation, you can run the command docker --version in the terminal. If Docker is properly installed, it will display the version number.
Can I use Docker without administrative privileges on Ubuntu 22.04?
By default, Docker commands require administrative privileges. However, you can configure Docker to run commands without sudo by adding your user to the docker group.
How can I start and stop Docker services on Ubuntu 22.04?
Docker services can be started and stopped using the following commands: sudo systemctl start docker and sudo systemctl stop docker.
How do I pull Docker images from the Docker Hub on Ubuntu 22.04?
You can pull Docker images from the Docker Hub using the command docker pull <image-name>. Replace <image-name> with the desired image name or repository.
Can I run multiple Docker containers simultaneously on Ubuntu 22.04?
Yes, Docker allows running multiple containers simultaneously on Ubuntu 22.04. Each container operates in isolation, enabling efficient utilization of system resources.
How can I remove Docker from Ubuntu 22.04?
To remove Docker from Ubuntu 22.04, you can execute the command sudo apt-get purge docker-ce followed by sudo rm -rf /var/lib/docker. This will uninstall Docker and delete associated files.
Conclusion
In this tutorial, you have learned how to install Docker, work with images and containers, and push a modified image to Docker Hub.
If you have any suggestions or queries, kindly leave them in the comments section.