

Choose a different version or distribution
Introduction
Before we begin talking about how to install Webmin on CentOS 8, let’s briefly understand – What is Webmin?
Webmin is an interface that is web-based and is used for system administration of machines operating on Linux. Webmin eliminates the requirement of manual editing of Linux Configuration files. It also lets you manage a system remotely or through a console.
In this tutorial, you will install Webmin in an independent environment on CentOS 8.
Advantages of Installing and Using Webmin on CentOS 8
- Web-Based Interface: Webmin provides a web-based interface for system administration, allowing you to manage your CentOS 8 server from any device with a web browser.
- User-Friendly Interface: The Webmin interface is user-friendly and intuitive, making it easy for both experienced and novice administrators to manage and configure various aspects of the server.
- Improved Collaboration: Docker Compose facilitates collaboration among team members. By sharing the Docker Compose YAML file, everyone can work on the same application setup, ensuring consistent deployments across development, testing, and production environments.
- Easy Scaling: Docker Compose makes scaling your application a breeze. By specifying the number of instances for each service in the YAML file, you can easily scale up or down to meet demand without manual intervention or disruption.
- Portability and Consistency: Docker Compose ensures portability and consistency across different environments. By encapsulating all dependencies and configurations within the YAML file, you can deploy your application on any Docker-enabled system, ensuring consistent behavior.
Prerequisites
Make sure you have the following dependencies installed before proceeding further with Webmin installation:
- A CentOS 8 server with a sudo non-root user.
- Apache, which will be used to perform Let’s Encrypt domain verification.
- A Fully-Qualified Domain Name (FQDN), with a DNS A record pointing to the IP address of your server.
Step 1 - Install Webmin
1) The first thing to be done is to add a Webmin repository to make the package manager easier. This is done by adding a new file /etc/yum.repos.d/webmin.repo containing information about the new repository.
Create and open the file with your text editor using the following command:
sudo vi /etc/yum.repos.d/webmin.repo
2) Add the following lines to the file in order to define the new repository:
[Webmin]
name=Webmin Distribution Neutral
#baseurl=http://download.webmin.com/download/yum
mirrorlist=http://download.webmin.com/download/yum/mirrorlist
enabled=1
3) Save it and exit the editor.
4) Now, add the Webmin file's PGP key in order to make the system trust the new repository
wget http://www.webmin.com/jcameron-key.asc
sudo rpm --import jcameron-key.asc
5) Webmin can now be installed.
sudo yum install perl -y
sudo yum install webmin
6) The webmin service will be started once the installation is complete.
Now, we move on to securing access to Webmin. This is done by adding a valid certificate.
Step 2 - Adding a Certificate with the help of Let's Encrypt
Although Webmin is configured to use HTTPS, it makes use of a self-signed, untrusted certificate.
1) Navigate to https://your_domain:10000 in your desired browser and replace your_domain with your domain name or you can use the IP address.
2) You will then be presented with a login screen. You need to sign in with the username root and your current password for the same.
3) This reveals the Webmin Dashboard. Before applying any certificates, you'll have to set the server's hostname. Find the Server hostname and click on the link to the right as shown below:
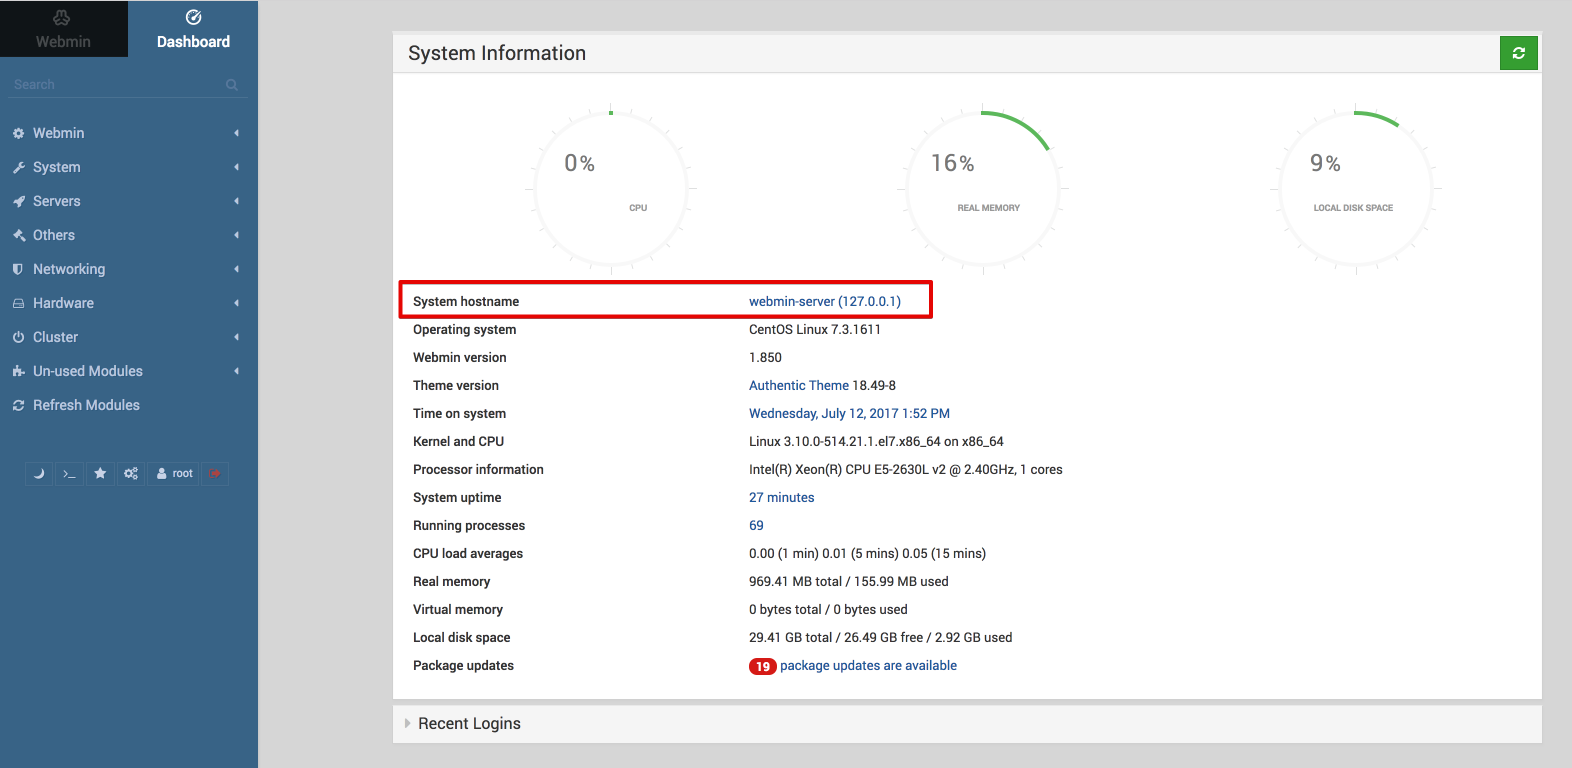
4) This navigates us to the Hostname and DNS Client page. In the hostname field, enter your Fully-Qualified Domain Name and press Save so that the settings are applied.
5) Now, click on Webmin on the left navigation bar and select Webmin Configuration.
6) After that, select SSL Encryption, followed by the Let's Encrypt tab. You'll see the following screen.
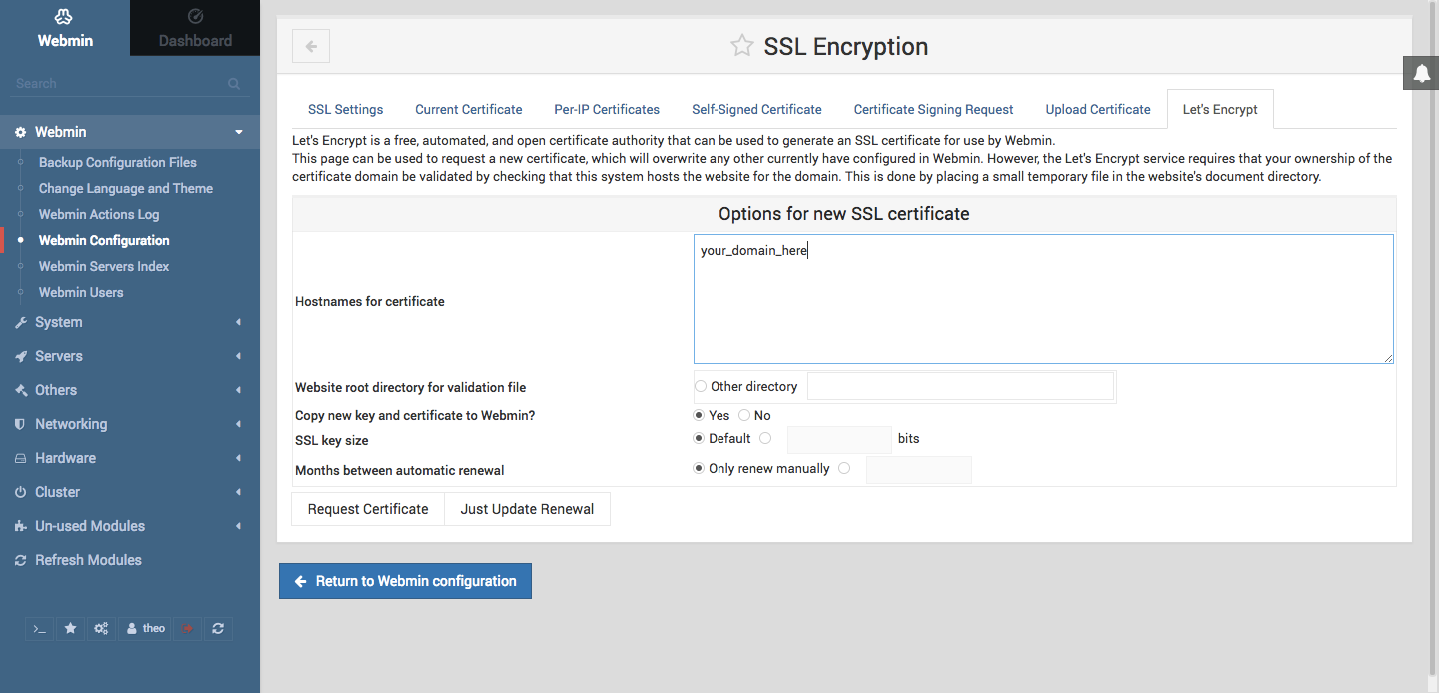
With the help of this window, you can instruct Webmin to obtain and renew your certificate. Let's Encrypt certificate expires after a duration of 3 months. We can instruct Webmin to attempt and renew Let's Encrypt certificates every month. Let's Encrypt searches for a verification file on our system, therefore we can configure Webmin to place the verification file in the /var/www/html folder, which is used by the Apache web server. The below steps can be followed to set up your certificate:
- Fill in Hostnames for a certificate with FQDN.
- Select Other Directory and enter
/var/www/htmlfor Website root directory for the validation file. - For the Months between automatic renewal sections, you should deselect the Only renew manually option by typing
1into the input box and selecting the radio button to the left of the input box. - After that, click the Request Certificate button. You will see a confirmation screen after a few seconds.
You just need to simply reload the page in order to use the new certificate. The browser would indicate that the certificate is now valid.
Step 3 - Using Webmin
The wide range of applications of Webmin modules has the power to control BIND DNS Server to something as simple as adding a new user to the system. Let's see how you can add a new user and update the operating system using Webmin.
Managing Users and Groups
We'll begin with managing the users who are allowed to access Webmin. This way, we don't have to login with the help of the root user.
From the Webmin tab, select the Webmin Users button. This allows you to manage users that can log in to Webmin.
Select the Create a new Webmin user button at the top of the users table. This reveals the Create Webmin user screen where you can update the username, password, modules which can be accessed by the user, etc. By following the steps given below, you'll be able to create an alternate user:
Fill Username with john.
- Fill Password with the password that you would like to use.
- Fill Real Name with
John Patrick. - Select Create.
While creating a user, you can also define the modules which the user can access and the language for Webmin's interface.
Now, you have John as a user for Webmin. This means, that there is no need for the root user now.
Now, we'll explore how you can add new users to the system. The new user will be named deploy and would be used for hosting web applications.
From the System tab, select the Users and Groups button, which enables you to add and manage new users or groups.
Select the Create a new user button at the top of the users table. This reveals the Create user screen where you can update the username and password along with other options. By following the steps given below, you'll be able to create a new user:
- Add Username with
deploy. - Choose Automatic for the User ID.
- Fill Real Name with a descriptive name for instance
Deployment user. - For Home Directory, choose Automatic.
- For Shell, choose
/bin/bashfrom the drop-down list. - For Password, opt for Normal Password and type a password of your choice.
- For Primary Group, hit New group with the same name as the user.
- For Secondary Group, select the wheel from the All groups list, and press the -> button in order to add the group to the in groups list. This will give the new user access to use
sudo. - Press Create in order to create this new user.
You can also customize the user's password expiry, the user's shell, or whether they are allowed a home directory.
Updating Packages
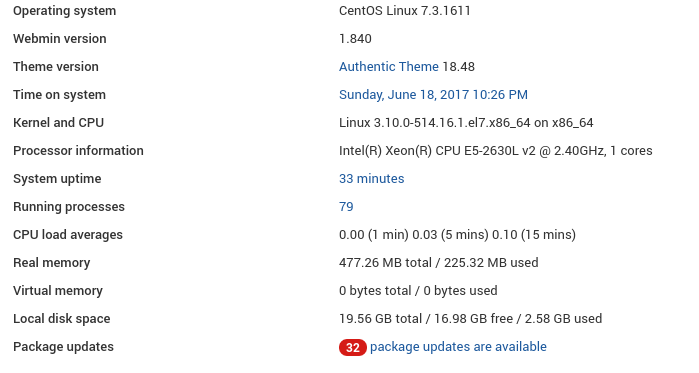
Webmin allows its users to update all its packages through its user interface. For doing this, visit the Webmin Dashboard link and find the Package Updates field. A link stating the number of available updates will be visible as shown below:
Select this link and choose Update selected packages to initiate installation. You may be asked to reboot the system which can be done with the help of Webmin as well.
FAQs on Installing and Using Webmin on CentOS 8
Is Webmin compatible with CentOS 8?
Yes, Webmin is fully compatible with CentOS 8.
What are the system requirements for installing Webmin on CentOS 8?
To install Webmin on CentOS 8, you need a CentOS 8 server with a stable internet connection and sufficient resources (CPU, memory, and disk space).
What is the default port for accessing Webmin?
The default port for accessing Webmin is 10000. You can access the Webmin interface by navigating to https://<your-server-ip>:10000 in a web browser.
Can I limit access to Webmin based on IP address?
Yes, you can limit access to Webmin by configuring the "Allow" and "Deny" directives in the Webmin configuration file. You can specify IP addresses or ranges to restrict access.
Is it possible to create custom modules or plugins in Webmin?
Yes, Webmin allows you to create custom modules or plugins to extend its functionality. You can refer to the Webmin documentation for detailed instructions on developing custom modules.
Can I manage multiple servers from a single Webmin instance?
Yes, Webmin allows you to manage multiple servers from a single Webmin instance. You can add remote systems in the Webmin interface and configure authentication details to manage them.
Can I manage user accounts and permissions with Webmin on CentOS 8?
Yes, Webmin provides a User and Groups module that allows you to manage user accounts, groups, and their permissions.
Conclusion
We hope this detailed tutorial helped you understand how to install, configure and modify Webmin on CentOS 8 server. To learn more about Webmin installation on CentOS 8, check out the official Webmin Installation Documentation.
If you have any queries, please leave a comment below and we’ll be happy to respond to them for sure.