
Choose a different version or distribution
Introduction
Before, we begin with how to install Asterisk on Ubuntu 20.04. Let's first understand – What is Asterisk?
Asterisk is a very famous and open-source PBX platform that powers IP PBX systems, conference servers, and VoIP gateways. It is being used worldwide by small businesses to huge enterprises.
It has many useful features like music on hold, call queuing, interactive voice response, conference calling, and voicemail.
In this tutorial, you will install Asterisk on Ubuntu 20.04. We will also address a few FAQs related to Asterisk installation.
Here are some benefits of using Asterisk:
Cost-effective: Asterisk is open-source, which means it’s free to use and can be modified to fit specific needs. This can make it an affordable alternative to commercial communication solutions.
Flexibility: Asterisk can be integrated with a variety of technologies and programming languages, including PHP, Python, and Perl. This means developers can build a wide range of communication applications tailored to their specific needs.
Customizability: Asterisk is highly customizable and can be configured to work with almost any type of telephony hardware or software. This makes it easy to integrate existing systems with new applications.
Prerequisites
- Make sure to log in as a user with sudo privileges.
- 1 GB RAM
- Ubuntu 20.04 installed on your system
Step 1 – Install dependencies.
1) It is recommended to update your system packages before installing Asterisk.
sudo apt-get update
sudo apt-get upgrade
2) Now, install the build essentials and dependencies using the following command:
sudo apt-get install build-essential

sudo apt-get install git-core subversion wget libjansson-dev sqlite autoconf automake libxml2-dev libncurses5-dev libtool
Step 2 - Install DAHDI and LibPRI (Optional)
DAHDI is a set of drivers and utilities. Using it Asterisk communicates with Analog and Digital telephones. LibPRI allows Asterisk to communicate with ISDN connections. You can skip this step if you don't want these libraries.
1) Switch to the usr/src directory and then download and install DAHDI:
cd /usr/src/
sudo git clone -b next git://git.asterisk.org/dahdi/linux dahdi-linux
cd dahdi-linux
sudo make
sudo make install
cd /usr/src/
sudo git clone -b next git://git.asterisk.org/dahdi/tools dahdi-tools
cd dahdi-tools
sudo autoreconf -i
sudo ./configure
sudo make install
sudo make install-config
sudo dahdi_genconf modules
Execute the following command to build LibPRI:
cd /usr/src/
sudo git clone https://gerrit.asterisk.org/libpri libpri
cd libpri
sudo make
sudo make install
Step 3 - Download Asterisk
1) Download the Asterisk source in the /usr/src directory. It is the common location to place source files. Now, change to the directory using the following command:
cd /usr/src/
2) Download the latest version of Asterisk using the below wget command:
sudo wget http://downloads.asterisk.org/pub/telephony/asterisk/asterisk-20-current.tar.gz
sudo tar zxf asterisk-20-current.tar.gz
Or clone it using the git using the below command:
cd /usr/src/
sudo git clone -b 18 https://gerrit.asterisk.org/asterisk asterisk-18
3) Before continuing with further steps. Make sure to change to the Asterisk source directory by:
cd asterisk-*/
Keep the branch number based on the Asterisk version. Here, at the time of writing this tutorial, Asterisk's version is 18.x.
4) Now, download the MP3 sources, they are necessary to build the MP3 module and useful for MP3 files on Asterisk:
sudo contrib/scripts/get_mp3_source.sh
5) You will then use install_prereq script to resolve all the dependencies on your Ubuntu system:
sudo contrib/scripts/install_prereq install
The above script will install all necessary packages on successful completion. Next, it will print the below message:
Ouput

#############################################
## install completed successfully
#############################################
6) The configure script will perform various checks to make sure that all the dependencies on your system are present. You can start the script by typing:
sudo ./configure
7) Then select the modules you want to compile and install. Next, access the Menu-select system by typing the following command:
sudo make menuselect
8) After, downloading MP3 source files. You will need to tell Asterisk to build the MP3 module. Do it by selecting format_mp3:
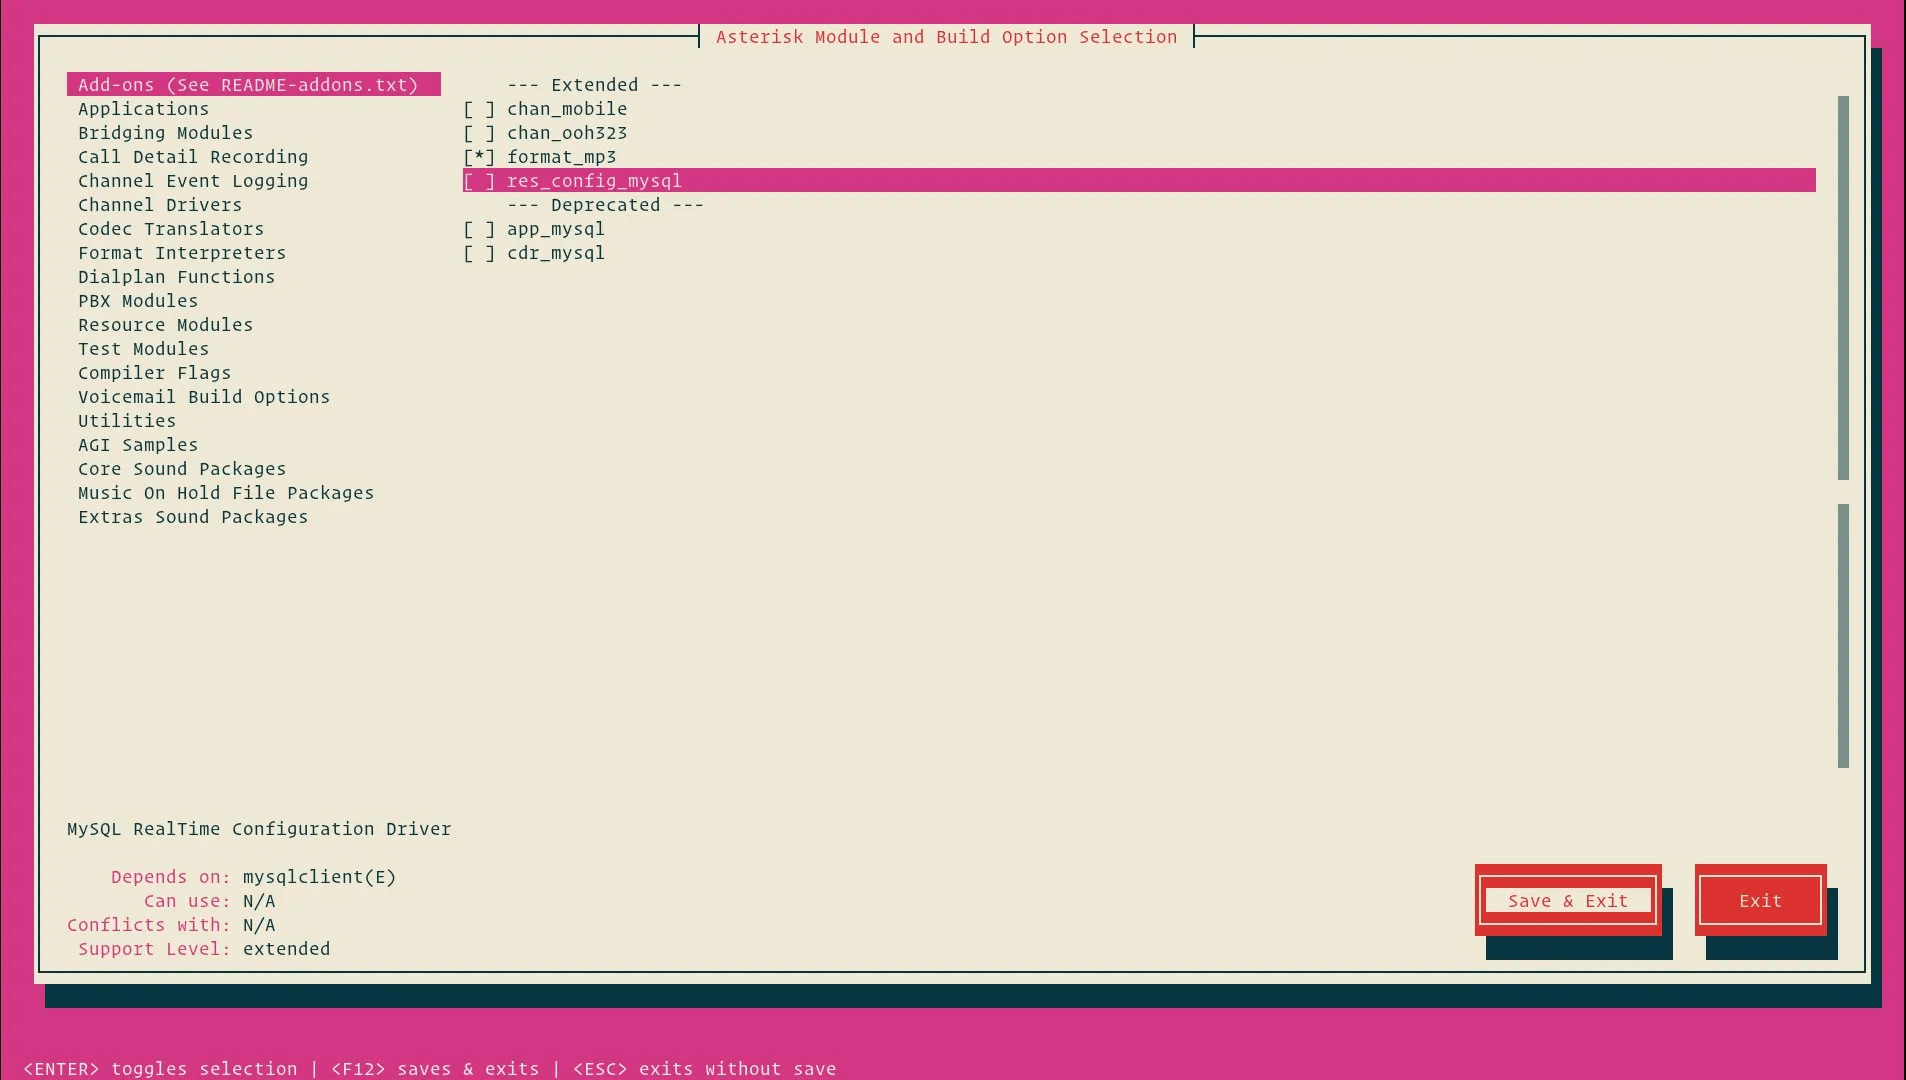
9) When you are done with this then press F12 to save and exit or switch to the Save and Exit button. Next, press Enter. You will be able to start the compilation process. Do it using the make command, by:
sudo make -j2
10) The next step is to install Asterisk and its modules by running:
sudo make install
11) Now, after Asterisk installation, you will install sample configuration files.
Install either generic configuration files, with reference documentation by:
sudo make samples
Or install the basic PBX configuration files, by:
sudo make basic-pbx
12) Install the Asterisk init script using the following command:
sudo make config
13) It's good to run ldconfig to update the shared libraries cache:
sudo ldconfig
Step 3 – Creating Asterisk User
1) By default, Asterisk runs as a root user. For security purposes, you will have to create a new system user as well as configure Asterisk to run as a new user. To create a new system user, run the below command:
sudo adduser --system --group --home /var/lib/asterisk --no-create-home --gecos "Asterisk PBX" asterisk
2) To configure Asterisk to run as asterisk user, open /etc/default/asterisk file. Further, uncomment the below 2 lines:
AST_USER="asterisk"
AST_GROUP="asterisk"
3) Next, add asterisk user to the dialout as well as to audio groups, by:
sudo usermod -a -G dialout,audio asterisk
4) You will also need to change the ownership and permissions of all asterisk files and directories, after which asterisk can access those files:
sudo chown -R asterisk: /var/{lib,log,run,spool}/asterisk /usr/lib/asterisk /etc/asterisk
sudo chmod -R 750 /var/{lib,log,run,spool}/asterisk /usr/lib/asterisk /etc/asterisk
Step 4 – Start Asterisk
1) Now, you can start the Asterisk service. Do it with the following command:
sudo systemctl start asterisk
2) You will need to verify that Asterisk is running. So, connect to the Asterisk command-line interface (CLI) by:
sudo asterisk -vvvr
You will see the below default Asterisk CLI prompt:
Output

Connected to Asterisk GIT-18-263f906af4 currently running on ubuntu2004 (pid = 91303)
ubuntu2004*CLI>
3) The next is to enable the Asterisk service to start on boot using the following command:
sudo systemctl enable asterisk
Step 5 – Configure the Firewall
1) The firewall will secure your server from unwanted traffic. By default, SIP uses the UDP port 5060, to open the port run:
sudo ufw allow 5060/udp
2) If you will enable the real-time Protocol, then you also need to open the port range, by:
sudo ufw allow 10000:20000/udp
Now, you can easily adjust the firewall as per your need.
FAQs to Install Asterisk on Ubuntu 22.04
Is it possible to run Asterisk without special hardware?
Yes, PSTN hardware like Digium cards or ISDN adapters is not a requirement. For some applications, like the conferencing application, you need hardware to get timer support, but that’s possible in many ways. Asterisk works well as a VOIP and voicemail server with SIP, MGCP, IAX, and H.323 support both with and without PSTN connectivity.
How do I dial from the CLI?
You’ll need chan_oss for that. chan_oss provides a “dial” command from the CLI that connects the soundcard (via chan_oss) to the outgoing line. By including the module chan_oss, you’ll find a new “dial” command on the CLI.
What packages are required to install Asterisk on Ubuntu 22.04?
The only package required to install Asterisk on Ubuntu 22.04 is asterisk, which can be installed using the apt package manager.
Is there a graphical user interface (GUI) for Asterisk?
Yes, Ubuntu 22.04 comes with a built-in GUI for managing Asterisk called FreePBX.
What programming languages can I use with Asterisk on Ubuntu 22.04?
Asterisk can integrate with many programming languages, including PHP, Python, and JavaScript.
Conclusion
We hope this detailed tutorial helped you to install Asterisk on Ubuntu 18.04.
If you have any queries, please leave a comment below, and we’ll be happy to respond to them for sure.