
Introduction
Before we begin talking about how to install Darkstat on Ubuntu 22.04, let's briefly understand – What is Darkstat?
Darkstat is a powerful network monitoring tool designed to analyze network traffic and assist in network administration. It provides detailed information about data usage, top talkers, and network connections, allowing users to identify and troubleshoot performance issues. Darkstat is an open-source solution that offers real-time monitoring, web-based interface, and easy installation.
By monitoring network activity, Darkstat helps optimize network efficiency and security. Whether you are a system administrator or a network enthusiast, Darkstat provides valuable insights to enhance your network management capabilities.
In this tutorial, you will install Darkstat on Ubuntu 22.04. We will also address a few FAQs on how to install Darkstat on Ubuntu 22.04.
Advantages of Darkstat
- Real-time Monitoring: Darkstat provides real-time network monitoring, allowing users to track network activity and identify potential bottlenecks or security threats instantly.
- Detailed Traffic Analysis: With Darkstat, users can gain insights into data usage, top talkers, and network connections, enabling efficient troubleshooting and optimization of network performance.
- User-Friendly Interface: Darkstat features a web-based interface that is easy to navigate, making it accessible to both network administrators and enthusiasts.
- Open-Source Solution: Being an open-source tool, Darkstat is freely available and can be customized to meet specific network monitoring requirements.
- Easy Installation: Darkstat is easy to install and configure, saving time and effort for network administrators who need a quick and efficient solution for monitoring network traffic.
Step 1: Install Darkstat
A network traffic analyzer called Darkstat can be found in the official Ubuntu repositories. This indicates that the apt package manager can be used to install it.
sudo apt update && sudo apt install darkstat
While the apt install command installs the Darkstat package and its dependencies, the apt update command updates the package list on your system.
Once the installation is finished, you can use the following command to see if Darkstat is up and running:
systemctl status darkstat
This command will reveal whether the Darkstat service is up and running as well as its current status. You ought to see a notice stating that Darkstat is operational and active if it is.
Step 2: Configure Darkstat
Darkstat needs to have its network interface configured before it can be used. The device that physically or virtually links your system to the network is called the network interface. This could be a virtual interface produced by a VPN, a wireless interface, or a wired Ethernet interface.
Open a terminal and type the following command to get the name of the network interface you wish to keep an eye on:
ip link
Your system's network interfaces will be listed as a result. Locate the interface you wish to watch over and write down its name. The guide will assume that the interface is called eth0 in the subsequent steps.
Use the following command to open the Darkstat configuration file:
sudo nano /etc/darkstat/init.cfg
To allow Darkstat to launch automatically when the computer boots up, uncomment the following line:
#RUN_DARKSTAT=no
Change it to:
RUN_DARKSTAT=yes
To configure Darkstat to monitor a specific network interface, make the following edit:
#INTERFACE=""
Enter the name of the network interface you wish to monitor in place of INTERFACE="". The guide will use the generic name "eth0," as previously mentioned.
INTERFACE="eth0"
You can change the port number that the Darkstat web interface uses by modifying the PORT variable. Darkstat uses port 667 by default, but you can modify this at any time. Press Y after you've saved your edits and used CTRL+X to close the editor.
To reset Darkstat, execute the subsequent command:
sudo systemctl restart darkstat
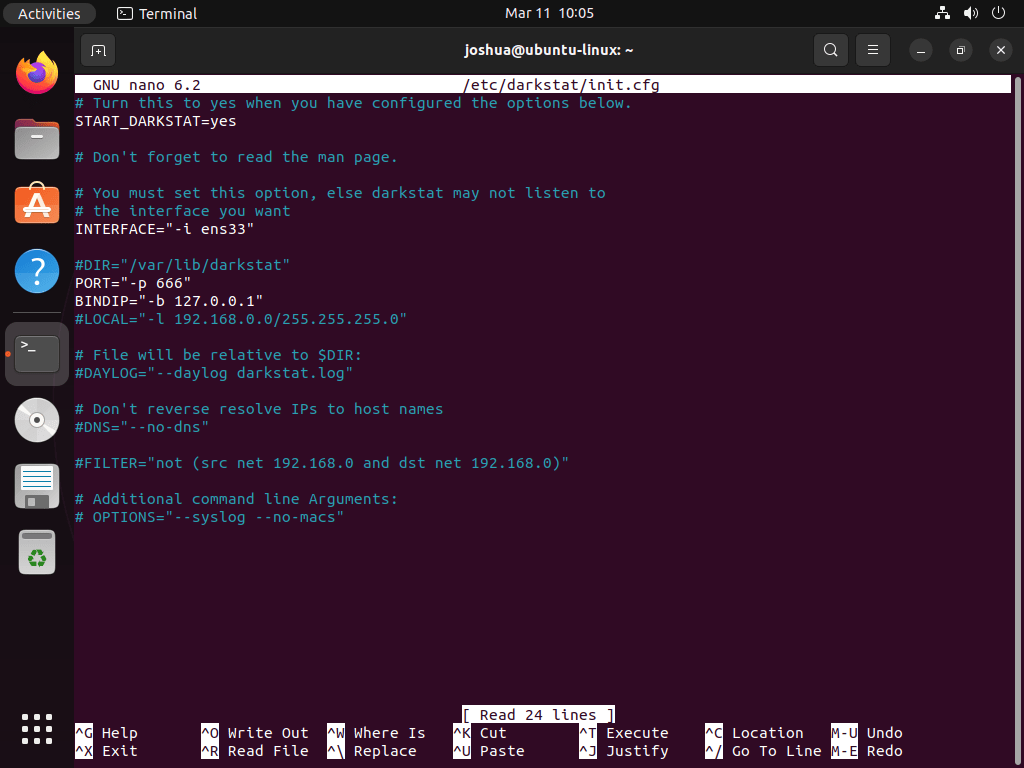
Using the guide's computer, here is an example of a Darkstat configuration file on Ubuntu:
Step 3: Launch Darkstat
You can monitor network traffic using the web interface once Darkstat has been configured. On your Ubuntu system, open a web browser and type the IP address of your system into the address bar. Then, type port 667. For instance, if your Ubuntu system's IP address is 192.168.1.100, type the following into the address bar:
http://192.168.1.100:667
The Darkstat web interface should be visible to you, providing details about your system's network traffic. View and examine the network traffic using the interface's numerous tabs and settings.
FAQs to Install Darkstat on Ubuntu 22.04
Are there any prerequisites for Darkstat installation on Ubuntu 22.04?
No, Darkstat doesn't have any specific prerequisites. It can be installed directly on Ubuntu 22.04 without additional dependencies.
How do I start Darkstat after installation?
After installation, Darkstat can be started by running the command sudo darkstat in the terminal. It will start monitoring network traffic on the default port 666.
Can I configure Darkstat's monitoring settings?
Yes, Darkstat provides a configuration file (typically located at /etc/darkstat/init.cfg) where you can modify various settings such as network interface, port number, and data retention period.
How can I access Darkstat's web interface?
Darkstat's web interface can be accessed by opening a web browser and navigating to http://localhost:666 or http://<your-server-ip>:666. Replace <your-server-ip> with the IP address of the Ubuntu 22.04 server.
Does Darkstat consume a lot of system resources?
No, Darkstat is designed to be lightweight and consumes minimal system resources, allowing it to run efficiently without impacting overall server performance.
Can I view historical network statistics in Darkstat?
Yes, Darkstat provides historical network statistics that can be accessed within the web interface. It allows you to analyze trends and patterns in the network traffic over time.
Is Darkstat compatible with other Ubuntu versions?
Yes, Darkstat is compatible with various Ubuntu versions, including Ubuntu 22.04. However, it's always recommended to check the official documentation for any version-specific instructions or updates.
Conclusion
We hope this tutorial helped you understand how to install Darkstat on Ubuntu 22.04.
If you have any queries, please leave a comment below, and we’ll be happy to respond to them for sure.