Choose a different version or distribution
Introduction
Before we begin talking about how to install Dokku on Debian 12, let's briefly understand – What is Dokku?
Dokku is an open-source Platform as a Service (PaaS) that simplifies the deployment and management of applications. It allows developers to quickly and easily deploy their applications on a server using a simple git push command. With Dokku, you can deploy your applications in minutes, without the need for complex configuration or infrastructure setup.
It supports a wide range of programming languages and frameworks, making it a flexible solution for developers. Dokku also offers features like automatic SSL certificate generation and easy scaling of applications. With its simplicity and versatility, Dokku is an excellent choice for developers looking for a hassle-free way to deploy and manage their applications efficiently and effectively.
In this tutorial, you will install Dokku on Debian 12. We will also address a few FAQs on how to install Dokku on Debian 12.
Advantages of Dokku
- Simple deployment: Easily deploy applications with a single git push, minimizing the setup and configuration hassle.
- Flexibility: Supports multiple programming languages and frameworks, making it suitable for various projects.
- Lightweight: Dokku's lightweight nature reduces resource consumption and improves performance.
- Integration: Seamless integration with Docker and Heroku, enabling easy management of containers and addons.
- Streamlined workflow: Focus on coding while Dokku handles the deployment process, ensuring a smooth and efficient development.
Install Dokku on Debian 12
Step 1: System Update for Debian Before Dokku Installation
Maintaining an updated Debian system is crucial to a successful installation. By doing this, security is strengthened and possible conflicts with installing updated software are avoided. Run the subsequent commands to update your system packages:
sudo apt update
sudo apt upgrade
These commands refresh the list of available packages (apt update) and upgrade the current packages to the most recent versions (apt upgrade).
Step 2: Preparing for Dokku Installation on Debian
Docker installation is a prerequisite for using Dokku. The Docker Compose plugin becomes necessary after Docker is installed. Use this to install it:
sudo apt install docker-compose-plugin
Furthermore, certain packages are required for the installation of Dokku. These packages include security certificates, software management utilities, and other things. Put them in place using:
sudo apt install ca-certificates curl lsb-release dirmngr software-properties-common apt-transport-https -y
Step 3: Add Dokku APT Repository on Debian
Integrate Dokku's APT repository to ensure the official version installs. Import the GPG key first:
curl -fSsL https://packagecloud.io/dokku/dokku/gpgkey | gpg --dearmor | sudo tee /usr/share/keyrings/dokku.gpg > /dev/null
This command obtains the GPG key, transforms it into a binary file format, and stores it in the keyring directory of the computer.
The repository should then be included:
echo "deb [arch=amd64 signed-by=/usr/share/keyrings/dokku.gpg] https://packagecloud.io/dokku/dokku/debian $(lsb_release -cs) main" | sudo tee /etc/apt/sources.list.d/dokku.list
The architecture and signing key for increased security are specified when you register the Dokku repository with your APT sources using this command.
Step 4: Refreshing the APT Cache After Dokku APT Repo Import
After installing the Dokku repository, clear the APT cache:
sudo apt update
Step 5: Proceed to Install Dokku on Debian 12
Now run the following command to install Dokku:
sudo apt install dokku
The installation process for Dokku is thorough and includes multiple prompts to customize the setup to your own needs.
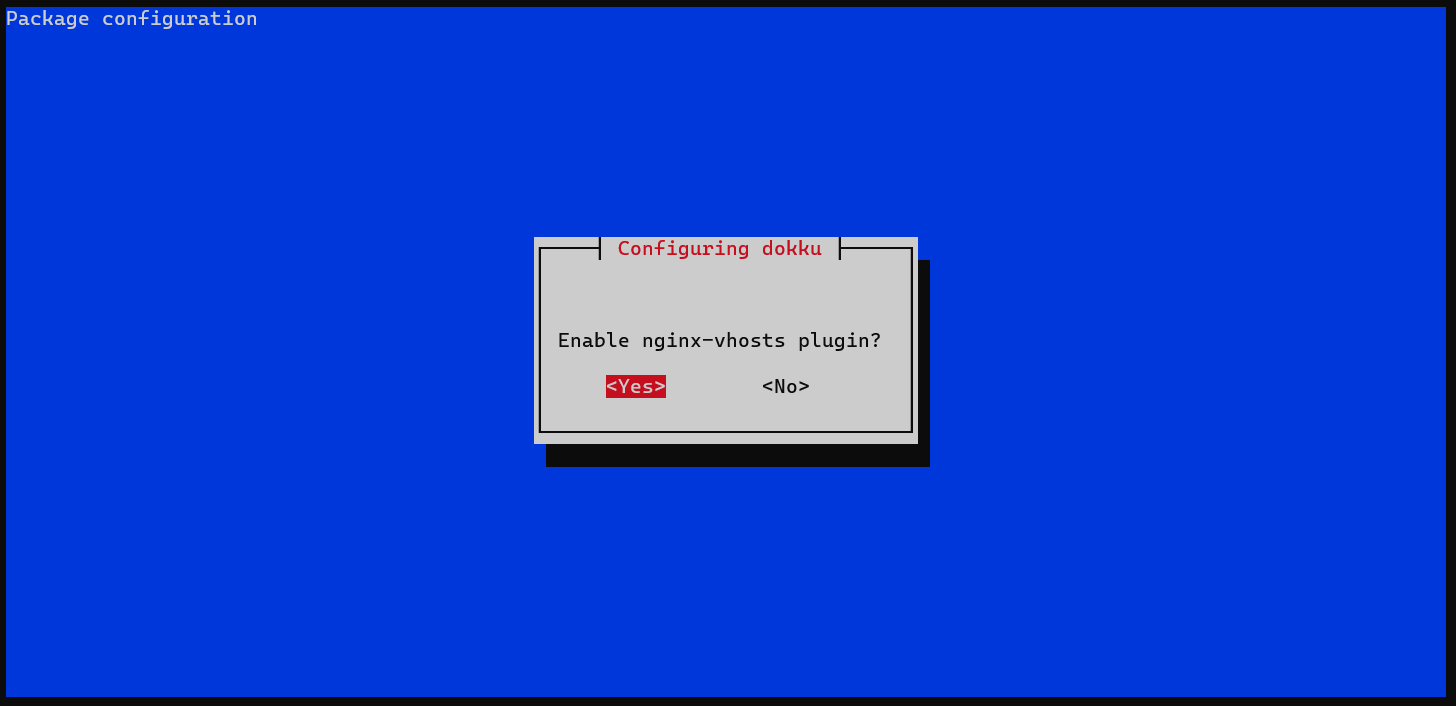
Nginx Vhosts Plugin Activation
The Nginx vhosts plugin will be prompted to you during the installation process. Operating multiple applications on a single server requires the Nginx web server's virtual hosts to be managed by this indispensable plugin. It can be turned on so that every application can continue to have its unique subdomain.

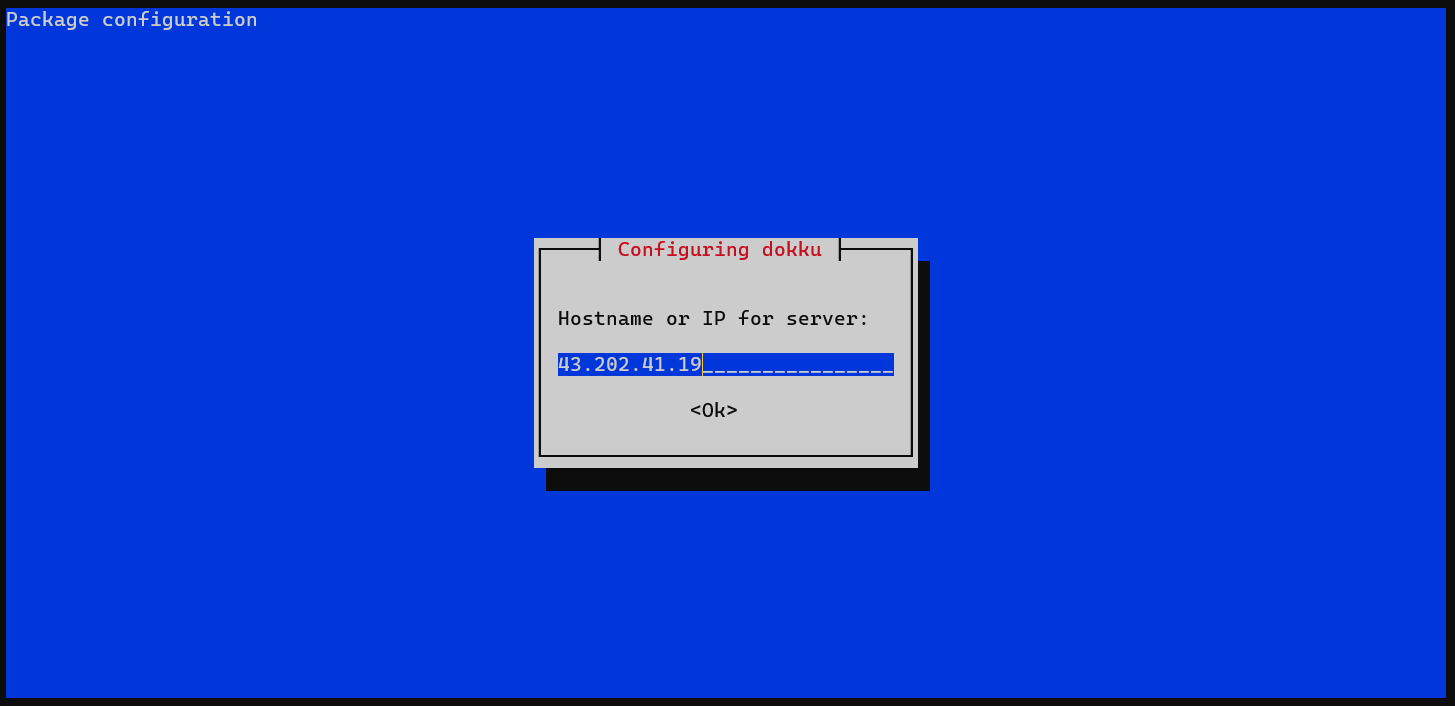
Specifying IP Address or Hostname
You will enter your Dokku instance's hostname or IP address when prompted. This establishes your application access method for deployed apps. Depending on how you have it set up, you may use a public IP address, domain, or subdomain.

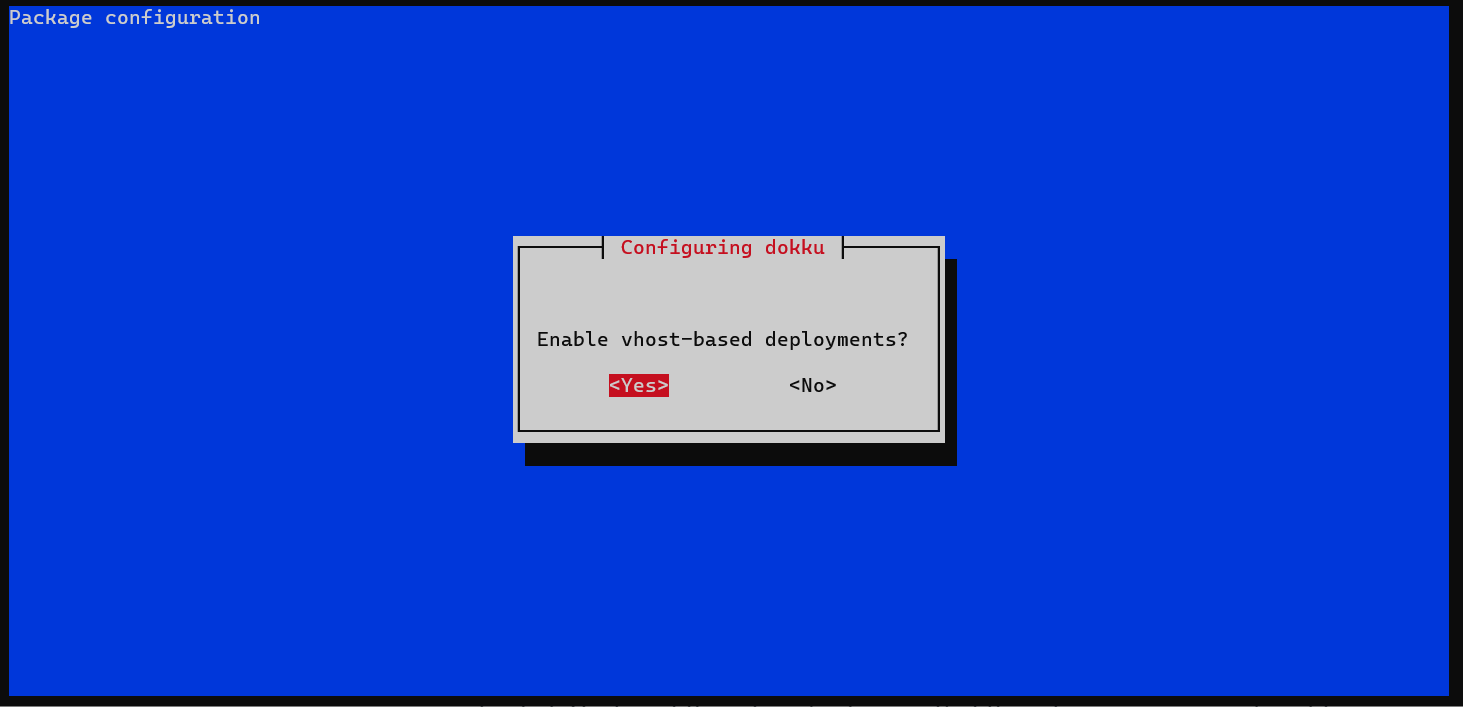
Vhost-Based Deployments Decision
Additionally, you will choose vhost-based deployments. Every application that is deployed using Dokku will have a subdomain under the Dokku domain if it is enabled. When hosting several applications with different namespaces, this is advantageous.

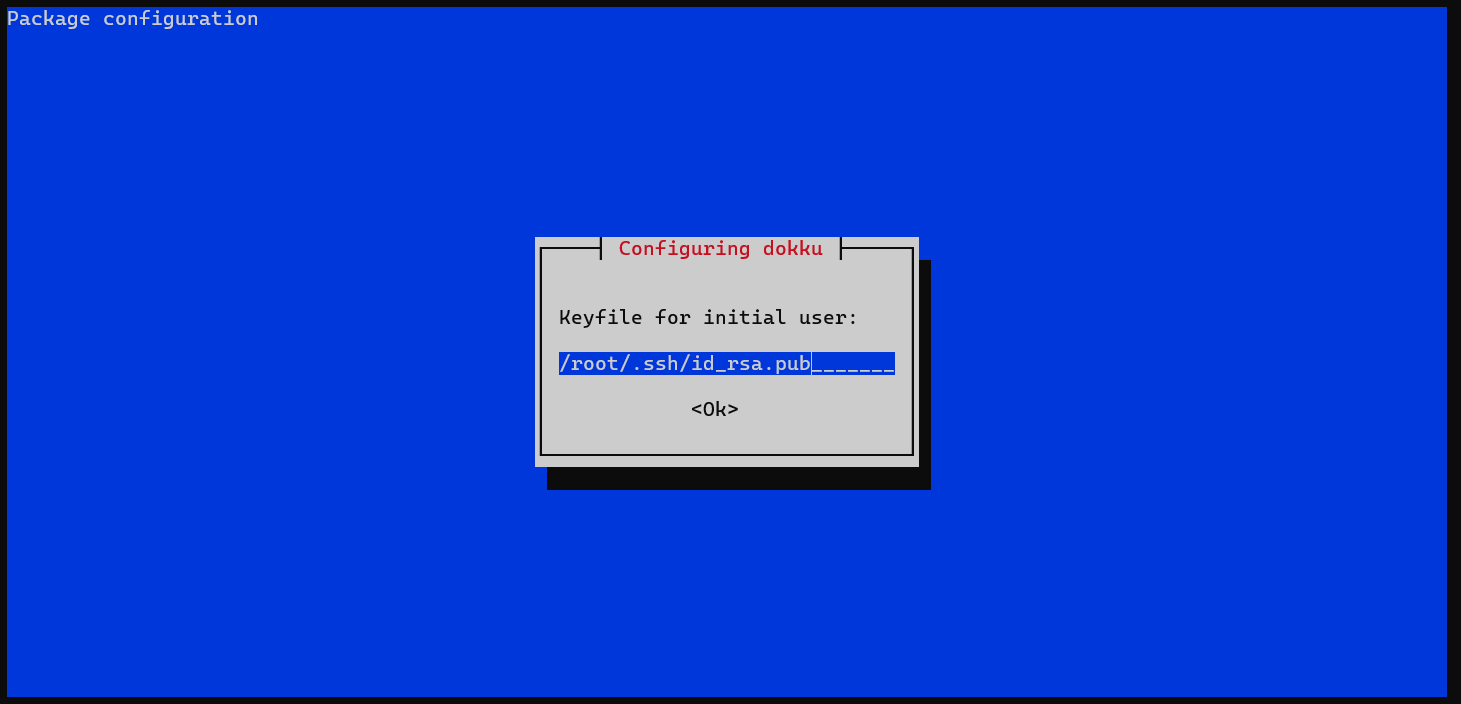
Initial User Keyfile Location
Additionally, vhost-based deployments will be decided. All applications deployed with Dokku will have their own subdomain under the Dokku domain if they are activated. Hosting different applications with different namespaces can benefit from this.

After navigating through these prompts, the installation of Dokku is complete. Now that your server has a powerful PaaS, your application deployment procedures are optimized.
To confirm that Dokku was installed successfully, execute the following commands:
dokku --version
This command indicates the Dokku version that is installed on your server, indicating that it is operational.
Configure Dokku on Debian 12
The next important step after successfully installing Dokku on your Debian Linux system is to configure it. A properly configured Dokku operates at peak efficiency and fulfills your unique needs. This manual will make clear the necessary configuration steps.
Step 1: Initial Dokku Configuration
As soon as Dokku is installed, you need to configure it. For this task, you typically use the web-based setup utility provided by Dokku. To use this utility, though, you must first find out the IP address or domain name of your server.
You can set up Dokku using the following if you are using a public server and know its domain name or public IP address:
sudo dokku domains:set-global your-domain-name.com
Substitute your IP address or real domain name for your-domain-name.com. The domain name for every application deployed using Dokku is globally designated by this command.
Step 2: Accessing the Dokku Web Setup Utility
After the initial setup, you can access the Dokku setup tool at http://your-domain-name.com. Substitute the previously mentioned domain name or IP address for your-domain-name.com.
The addition of a public SSH key will be prompted by this utility. The Dokku daemon runs on this key, which is used by the Dokku user. Using the ssh-keygen command, create a new SSH key pair locally, and then enter the public key into the setup tool.
Step 3: Configuring Environment Variables with Dokku
Dokku configures its applications using environment variables. To deploy a Node.js application, for instance, that needs a particular environment variable, set it like this:
dokku config:set your-app-name NODE_ENV=production
Replace NODE_ENV=production with the appropriate key-value pair and your-app-name with the name of your Dokku application.
Step 4: Dokku Plugin Configuration
Numerous plugins are included with Dokku to expand its functionality. For instance, you have the mysql plugin available if you wish to incorporate a MySQL database into your application.
Install the plugin first:
sudo dokku plugin:install https://github.com/dokku/dokku-mysql.git mysql
Create a new MySQL database and connect it to your application after installing the plugin:
sudo dokku mysql:create your-database-name
sudo dokku mysql:link your-database-name your-app-name
Replace your-app-name with the name of your Dokku application and your-database-name with the name of your newly created MySQL database.
Extending Dokku with Plugins on Debian 12
Dokku's wide selection of plugins greatly increases its adaptability. These plugins cover a wide range of features, including logging, monitoring, and database integration. This tutorial will explain how to easily incorporate these plugins into your Debian Linux Dokku setup.
Step 1: Grasping the Essence of Dokku Plugins
The fundamental component of a Dokku plugin is a repository that follows rules and is intended to enhance or change Dokku's built-in functionality. Though they can create these plugins in any language, most developers use Python or shell due to their ease of use. These plugins act as modular extensions, enabling frequently used tools and services that are essential for skillful application deployment and administration.
Step 2: Installing Dokku Plugins on Debian
The dokku plugin:install command makes installing a Dokku plugin easier. The required parameters for this command are the URL of the desired plugin's Git repository and, optionally, a designated plugin name. The structure of the command is:
sudo dokku plugin:install <url-of-plugin-repository> <plugin-name>
Change <url-of-plugin-repository> to the URL of the plugin's Git repository and <plugin-name> (optional) to the name of the plugin that you prefer.
As an example, to incorporate the MySQL plugin into Dokku, run:
sudo dokku plugin:install https://github.com/dokku/dokku-mysql.git mysql
In this case, the MySQL plugin's Git repository URL is https://github.com/dokku/dokku-mysql.git, and its designated name is mysql.
Step 3: Validating the Plugin Installation
It's a good idea to confirm the plugin's integration after installation. Use the dokku plugin command to list every integrated plugin:
sudo dokku plugin
The installed plugins are all visible with this command. Your recent addition to this list indicates that the installation was successful.
Step 4: Refreshing Dokku Plugins
Maintaining updated Dokku plugins is essential if you want to take advantage of the newest features and security improvements. To update every integrated plugin, use:
sudo dokku plugin:update --all
On the other hand, if updating a particular plugin is the goal, use:
sudo dokku plugin:update <plugin-name>
Substitute the name of the particular plugin you want to update for <plugin-name>.
Dokku Management Commands on Debian 12
Dokku is a powerful Platform as a Service (PaaS) that needs to be managed on a regular basis to guarantee compatibility, security, and peak performance. The steps for updating, confirming, and, if required, uninstalling Dokku from your Debian Linux system are explained in this section.
Upgrade Dokku on Debian
It's critical to keep up with the most recent version of Dokku. Updates on a regular basis strengthen your system with critical security patches and enhancements while introducing new features.
Determining Your Dokku Version
Determine the most recent Dokku version using the following before starting the update:
dokku version
By displaying the installed Dokku version, this command offers a point of reference for post-upgrade verification.
Refresh APT Package Repository
You should update your package repository to make sure your system is running the most recent version of Dokku:
sudo apt update
Executing the Dokku Upgrade
Start the Dokku upgrade after the repository has been updated:
sudo apt upgrade dokku
In case the most recent version of the Dokku package is available, this tells the APT package manager to concentrate on it and fetch and integrate it.
Confirming the Upgrade
Following the upgrade, confirm the Dokku version:
dokku version
An upgrade is successful when there is a version increment.
Post-Upgrade Measures
It's wise to synchronize your plugins after an upgrade:
sudo dokku plugin:update --all
This guarantees that every plugin is compatible with the most recent version of Dokku. Read the release notes or changelog as well for information on new features and possible changes that may affect your applications. Make sure your apps are still functioning after an upgrade.
Dokku Removal from Debian
In certain cases, you may want to consider a full Dokku removal. You are guided through this process by the following steps.
Dokku Uninstallation
Start the removal process by removing Dokku:
sudo apt remove dokku
The Dokku package is subsequently deleted by the APT manager, who first requests confirmation before proceeding.
Purging Dokku Dependencies
It is advised to remove any remaining dependencies from the system after removing Dokku:
sudo apt autoremove
This command removes unnecessary packages that were initially set up in order to satisfy Dokku dependencies.
Remove Dokku Directories From Debian
After uninstalling, residual Dokku data and configurations may continue to exist. Usually, Dokku reserves the directories located at /var/lib/dokku and /home/dokku. To get rid of these:
sudo rm -rf /home/dokku
sudo rm -rf /var/lib/dokku
The rm -rf command deletes specified directories and their contents irrevocably, so use caution when using it. Before running, make sure that these directories contain nothing important.
Finally, the repository information is stored in the APT sources list. Delete the Dokku repository's unique list file in order to remove it:
sudo rm /etc/apt/sources.list.d/dokku.list
FAQs to Install Dokku on Debian 12
What are the system requirements for Dokku on Debian 12?
The minimum requirements are a Debian 12 server with SSH access, at least 1GB of RAM, and a recent 64-bit processor.
Is Dokku compatible with different programming languages or frameworks?
Yes, Dokku supports multiple languages and frameworks, including but not limited to Ruby, Python, Node.js, and Java.
Does Dokku manage databases automatically?
No, Dokku doesn't handle database management by default. However, it seamlessly integrates with popular database addons like PostgreSQL and MySQL.
How can I secure my Dokku instance on Debian 12?
You should follow security best practices, like disabling unnecessary services, setting up a firewall, and keeping Dokku and system packages up to date.
Can I deploy multiple applications on a single Dokku instance?
Yes, Dokku allows you to deploy multiple applications on a single instance, making it convenient for managing multiple projects.
Is it possible to scale applications with Dokku?
Yes, Dokku supports application scaling. You can easily scale your applications horizontally or vertically to handle increased traffic or resource demands.
Is there a web interface to manage Dokku on Debian 12?
Yes, Dokku provides a user-friendly web interface called Dokku Dashboard. It simplifies the management of deployed applications, domains, plugins, and configurations.
Conclusion
We hope this tutorial helped you understand how to install Dokku on Debian 12.
If you have any queries, please leave a comment below, and we’ll be happy to respond to them for sure.

