
Choose a different version or distribution
Introduction
Before we begin talking about how to install Drupal on CentOS 8, let’s briefly understand – What is Drupal?
Drupal is a popular open-source content management system (CMS) used to build dynamic websites and web applications.
As far as Content Management Software is concerned, Drupal has surely carved out a niche for itself. The fact that it is extremely user-friendly and versatile makes it apt for building websites ranging from small blogs to corporate sites.
This tutorial will help you install Drupal on CentOS 8. We will also address a few FAQs on how to install Drupal on CentOS 8.
Advantages of Using Drupal on CentOS 8
- Flexible Content Management: Drupal provides a flexible content management framework that allows you to create and organize content with ease. It offers various content types, taxonomies, and custom fields for efficient content management.
- Large Community and Module Ecosystem: Drupal has an active and supportive community of developers and users who contribute to its continuous improvement.
- Scalability and Customizability: Drupal is highly scalable, supporting small personal websites to large enterprise-level platforms. It can handle high traffic and allows you to customize its behavior and appearance to suit your specific requirements.
- Multilingual Support: Drupal provides built-in features for creating multilingual websites, making it easy to create content in multiple languages and cater to a global audience.
- Security and Reliability: Drupal is known for its robust security features and a dedicated security team that actively monitors and addresses vulnerabilities.
Prerequisites
- You'll be required to have a domain name pointing to your public server IP. We'll be using
example.com. - You'll need to install Nginx.
- An SSL certificate is installed for your domain. You can also install a free Let’s Encrypt SSL certificate.
- Log in as a user with sudo privileges.
Step 1 - Creating a MySQL Database
We have to begin with creating a database and granting permissions to the user.
1) This step can be skipped if MySQL or MariaDB is already installed in your system. In case you don't have it, use the following command to install MariaDB 10.3 server package from the CentOS 8 default repositories and start the service.
sudo yum install mariadb-server -y
sudo systemctl enable --now mariadb
Set up the MySQL root password.
sudo mysql_secure_installation
2) Using the command given below, log in to the MySQL shell and put in the password when prompted.
mysql -u root -p
3) Next, use the following command to create a database drupal, with the username drupaluser and to grant necessary permissions to the user.
CREATE DATABASE drupal CHARACTER SET utf8mb4 COLLATE utf8mb4_general_ci;
GRANT SELECT, INSERT, UPDATE, DELETE, CREATE, DROP, INDEX, ALTER, CREATE TEMPORARY TABLES ON drupal.* TO 'drupaluser'@'localhost' IDENTIFIED BY 'change-with-strong-password';
exit;
Step 2 - Installing PHP
CentOS 8 ships with an old PHP version 7.2 which is outdated for Drupal and needs to be replaced with version 8.2.
1) For installing the latest version, we need to enable EPEL and Remi repositories
sudo yum install epel-release yum-utils
sudo dnf install -y https://rpms.remirepo.net/enterprise/remi-release-8.rpm
sudo dnf module enable php:remi-8.2 -y
2) Next, run the commands given below in order to install PHP 8.2 and all required PHP extensions.
sudo dnf install php php-cli php-common php-fpm php-mysql php-json php-opcache php-mbstring php-xml php-gd php-curl git zip unzip nginx nano -y
Here, we have installed PHP FPM since we're using Nginx as the web server.
3) PHP FPM will run as a user apache on port 9000 by default. You need to change the user to nginx and switch from the TCP socket to Unix socket. Open the /etc/php-fpm.d/www.conf file and edit the content after = sign, and also comment that acl_ line:
...
user = nginx
...
group = nginx
...
listen = /run/php-fpm/www.sock
...
listen.owner = nginx
listen.group = nginx

;listen.acl_users = apache,apache
;listen.acl_groups =
4) Use the command below to make sure the /var/lib/php the directory has the correct ownership.
sudo chown -R root:nginx /var/lib/php
5) Now, enable the PHP FPM service
sudo systemctl enable php-fpm
sudo systemctl start php-fpm
Step 3 - Installing Composer
The composer happens to be a dependency manager for PHP. You need to download the Drupal template and install the necessary Drupal components with the help of Composer.
1) Now, use the command given below to install Composer with the help of the Composer installer along with curl command and moving the file to the /usr/local/bin directory:
curl -sS https://getcomposer.org/installer | sudo php -- --install-dir=/usr/local/bin --filename=composer
2) Next, verify the installation with the help of the following command. This will print the composer version.
composer --version
3) You should receive the following output:
Output

Composer version 2.5.8 2023-06-09 17:13:21
Step 4 - Installing Drupal
1) Once the Composer is installed, create a new Drupal project using the Drupal template in the /var/www/my_drupal directory:
sudo /usr/local/bin/composer create-project drupal-composer/drupal-project:9.x-dev /var/www/my_drupal --stability dev --no-interaction
2. If you got output something like this, then we have to allow one plugin.
Output

In PluginManager.php line 740:

  cweagans/composer-patches contains a Composer plugin which is blocked by your allow-plugins config. You may add it to the list if you consider it safe. You can run "composer config --no-plugins allow plugins.cweagans/composer-patches [true|false]" to enable it (true) or disable it explicitly and suppress this exception (false)
  See https://getcomposer.org/allow-plugins
3. Fix the above problem with these commands:
cd /var/www/my_drupal/
sudo chmod 666 composer.json
composer config --no-plugins allow-plugins.cweagans/composer-patches true
sudo /usr/local/bin/composer install
Press y and Enter for every prompt while in this installation.
This will make the program download the template, fetch the required PHP packages, and run the scripts necessary to prepare the project for installation. The process may take a few minutes. Once done, the output should be similar to the one below.
Output

Create a sites/default/settings.php file with chmod 0666
Create a sites/default/files directory with chmod 0777
2) Now, download Drupal with the help of Drush. You need to pass the MySQL database and user information created initially with the help of the command given below:
cd /var/www/my_drupal
sudo vendor/bin/drush site-install --db-url=mysql://drupaluser:change-with-strong-password@localhost/drupal
3) You will receive the following prompt, press enter, and continue
Output

You are about to DROP all tables in your 'drupal' database. Do you want to continue? (yes/no) [yes]:
4) Once the process is complete, the administrative username and password will be printed by the script. It should look similar to the output below:
Output

[notice] Starting Drupal installation. This takes a while.
[success] Installation complete.  User name: admin  User password: frxka2Db5v
5) Now, set the permissions so that all files and directories can be accessed by the web server.
sudo restorecon -Rv /var/www/my_drupal
sudo chown -R nginx:nginx /var/www/my_drupal
sudo chmod -R g+w /var/www/my_drupal
sudo chmod g+s /var/www/my_drupal
sudo semanage port -a -t mysqld_port_t -p tcp 3306
Step 5 - Configuring Nginx
1) Now, you need to use the Nginx recipe from its official site to create a new server block for the Drupal project.
Open the text editor, then create the following file:
sudo nano /etc/nginx/conf.d/example.conf
If you have generated SSL certificates then paste this configuration:
# Redirect HTTP -> HTTPS
server {
    listen 80;
    server_name www.example.com example.com;

    include snippets/letsencrypt.conf;
    return 301 https://example.com$request_uri;
}

# Redirect WWW -> NON WWW
server {
    listen 443 ssl http2;
    server_name www.example.com;

    ssl_certificate /etc/letsencrypt/live/example.com/fullchain.pem;
    ssl_certificate_key /etc/letsencrypt/live/example.com/privkey.pem;
    ssl_trusted_certificate /etc/letsencrypt/live/example.com/chain.pem;
    include snippets/ssl.conf;

    return 301 https://example.com$request_uri;
}

server {
    listen 443 ssl http2;
    server_name example.com;

    root /var/www/my_drupal/web;

    # SSL parameters
    ssl_certificate /etc/letsencrypt/live/example.com/fullchain.pem;
    ssl_certificate_key /etc/letsencrypt/live/example.com/privkey.pem;
    ssl_trusted_certificate /etc/letsencrypt/live/example.com/chain.pem;
    include snippets/ssl.conf;

    # log files
    access_log /var/log/nginx/example.com.access.log;
    error_log /var/log/nginx/example.com.error.log;

    location = /favicon.ico {
        log_not_found off;
        access_log off;
    }

    location = /robots.txt {
        allow all;
        log_not_found off;
        access_log off;
    }

    location ~ \..*/.*\.php$ {
        return 403;
    }

    location ~ ^/sites/.*/private/ {
        return 403;
    }

    # Block access to scripts in site files directory
    location ~ ^/sites/[^/]+/files/.*\.php$ {
        deny all;
    }

    # Block access to "hidden" files and directories whose names begin with a
    # period. This includes directories used by version control systems such
    # as Subversion or Git to store control files.
    location ~ (^|/)\. {
        return 403;
    }

    location / {
        try_files $uri /index.php?$query_string;
    }

    location @rewrite {
        rewrite ^/(.*)$ /index.php?q=$1;
    }

    # Don't allow direct access to PHP files in the vendor directory.
    location ~ /vendor/.*\.php$ {
        deny all;
        return 404;
    }


    location ~ '\.php$|^/update.php' {
        fastcgi_split_path_info ^(.+?\.php)(|/.*)$;
        include fastcgi_params;
        # Block httpoxy attacks. See https://httpoxy.org/.
        fastcgi_param HTTP_PROXY "";
        fastcgi_param SCRIPT_FILENAME $document_root$fastcgi_script_name;
        fastcgi_param PATH_INFO $fastcgi_path_info;
        fastcgi_param QUERY_STRING $query_string;
        fastcgi_intercept_errors on;
        fastcgi_pass unix:/run/php-fpm/www.sock;
    }

    # Fighting with Styles? This little gem is amazing.
    # location ~ ^/sites/.*/files/imagecache/ { # For Drupal <= 6
    location ~ ^/sites/.*/files/styles/ { # For Drupal >= 7
        try_files $uri @rewrite;
    }

    # Handle private files through Drupal. Private file's path can come
    # with a language prefix.
    location ~ ^(/[a-z\-]+)?/system/files/ { # For Drupal >= 7
        try_files $uri /index.php?$query_string;
    }

    location ~* \.(js|css|png|jpg|jpeg|gif|ico|svg)$ {
        try_files $uri @rewrite;
        expires max;
        log_not_found off;
    }

}
Else use this configuration without SSL, You can enter any port you want we have set to 8080:
server {

    listen 8080;
    server_name _;

    root /var/www/my_drupal/web;
    index index.php index.html index.htm index.nginx-debian.html;


    # log files
    access_log /var/log/nginx/example.com.access.log;
    error_log /var/log/nginx/example.com.error.log;

    location / {
                #try_files $uri $uri/ =404;
          try_files $uri $uri/ /index.php$is_args$args;
     }


    location = /favicon.ico {
        log_not_found off;
        access_log off;
    }

    location = /robots.txt {
        allow all;
        log_not_found off;
        access_log off;
    }

    location ~ \..*/.*\.php$ {
        return 403;
    }

    location ~ ^/sites/.*/private/ {
        return 403;
    }

    # Block access to scripts in site files directory
    #location ~ ^/sites/[^/]+/files/.*\.php$ {
    #    deny all;
    #}

    # Block access to "hidden" files and directories whose names begin with a
    # period. This includes directories used by version control systems such
    # as Subversion or Git to store control files.
    location ~ (^|/)\. {
        return 403;
    }

    location @rewrite {
        rewrite ^/(.*)$ /index.php?q=$1;
    }

    # Don't allow direct access to PHP files in the vendor directory.
    location ~ /vendor/.*\.php$ {
        deny all;
        return 404;
    }


    location ~ '\.php$|^/update.php' {
        fastcgi_split_path_info ^(.+?\.php)(|/.*)$;
        include fastcgi_params;
        # Block httpoxy attacks. See https://httpoxy.org/.
        fastcgi_param HTTP_PROXY "";
        fastcgi_param SCRIPT_FILENAME $document_root$fastcgi_script_name;
        fastcgi_param PATH_INFO $fastcgi_path_info;
        fastcgi_param QUERY_STRING $query_string;
        fastcgi_intercept_errors on;
        fastcgi_pass unix:/run/php-fpm/www.sock;
    }

    # Fighting with Styles? This little gem is amazing.
    # location ~ ^/sites/.*/files/imagecache/ { # For Drupal <= 6
    location ~ ^/sites/.*/files/styles/ { # For Drupal >= 7
        try_files $uri @rewrite;
    }

    # Handle private files through Drupal. Private file's path can come
    # with a language prefix.
    location ~ ^(/[a-z\-]+)?/system/files/ { # For Drupal >= 7
        try_files $uri /index.php?$query_string;
    }

    location ~* \.(js|css|png|jpg|jpeg|gif|ico|svg)$ {
        try_files $uri @rewrite;
        expires max;
        log_not_found off;
    }
}
2) Check for any syntax errors before restarting with the following command:
sudo nginx -t
3) In order to apply the changes, restart the Nginx service using the following command:
sudo systemctl restart nginx
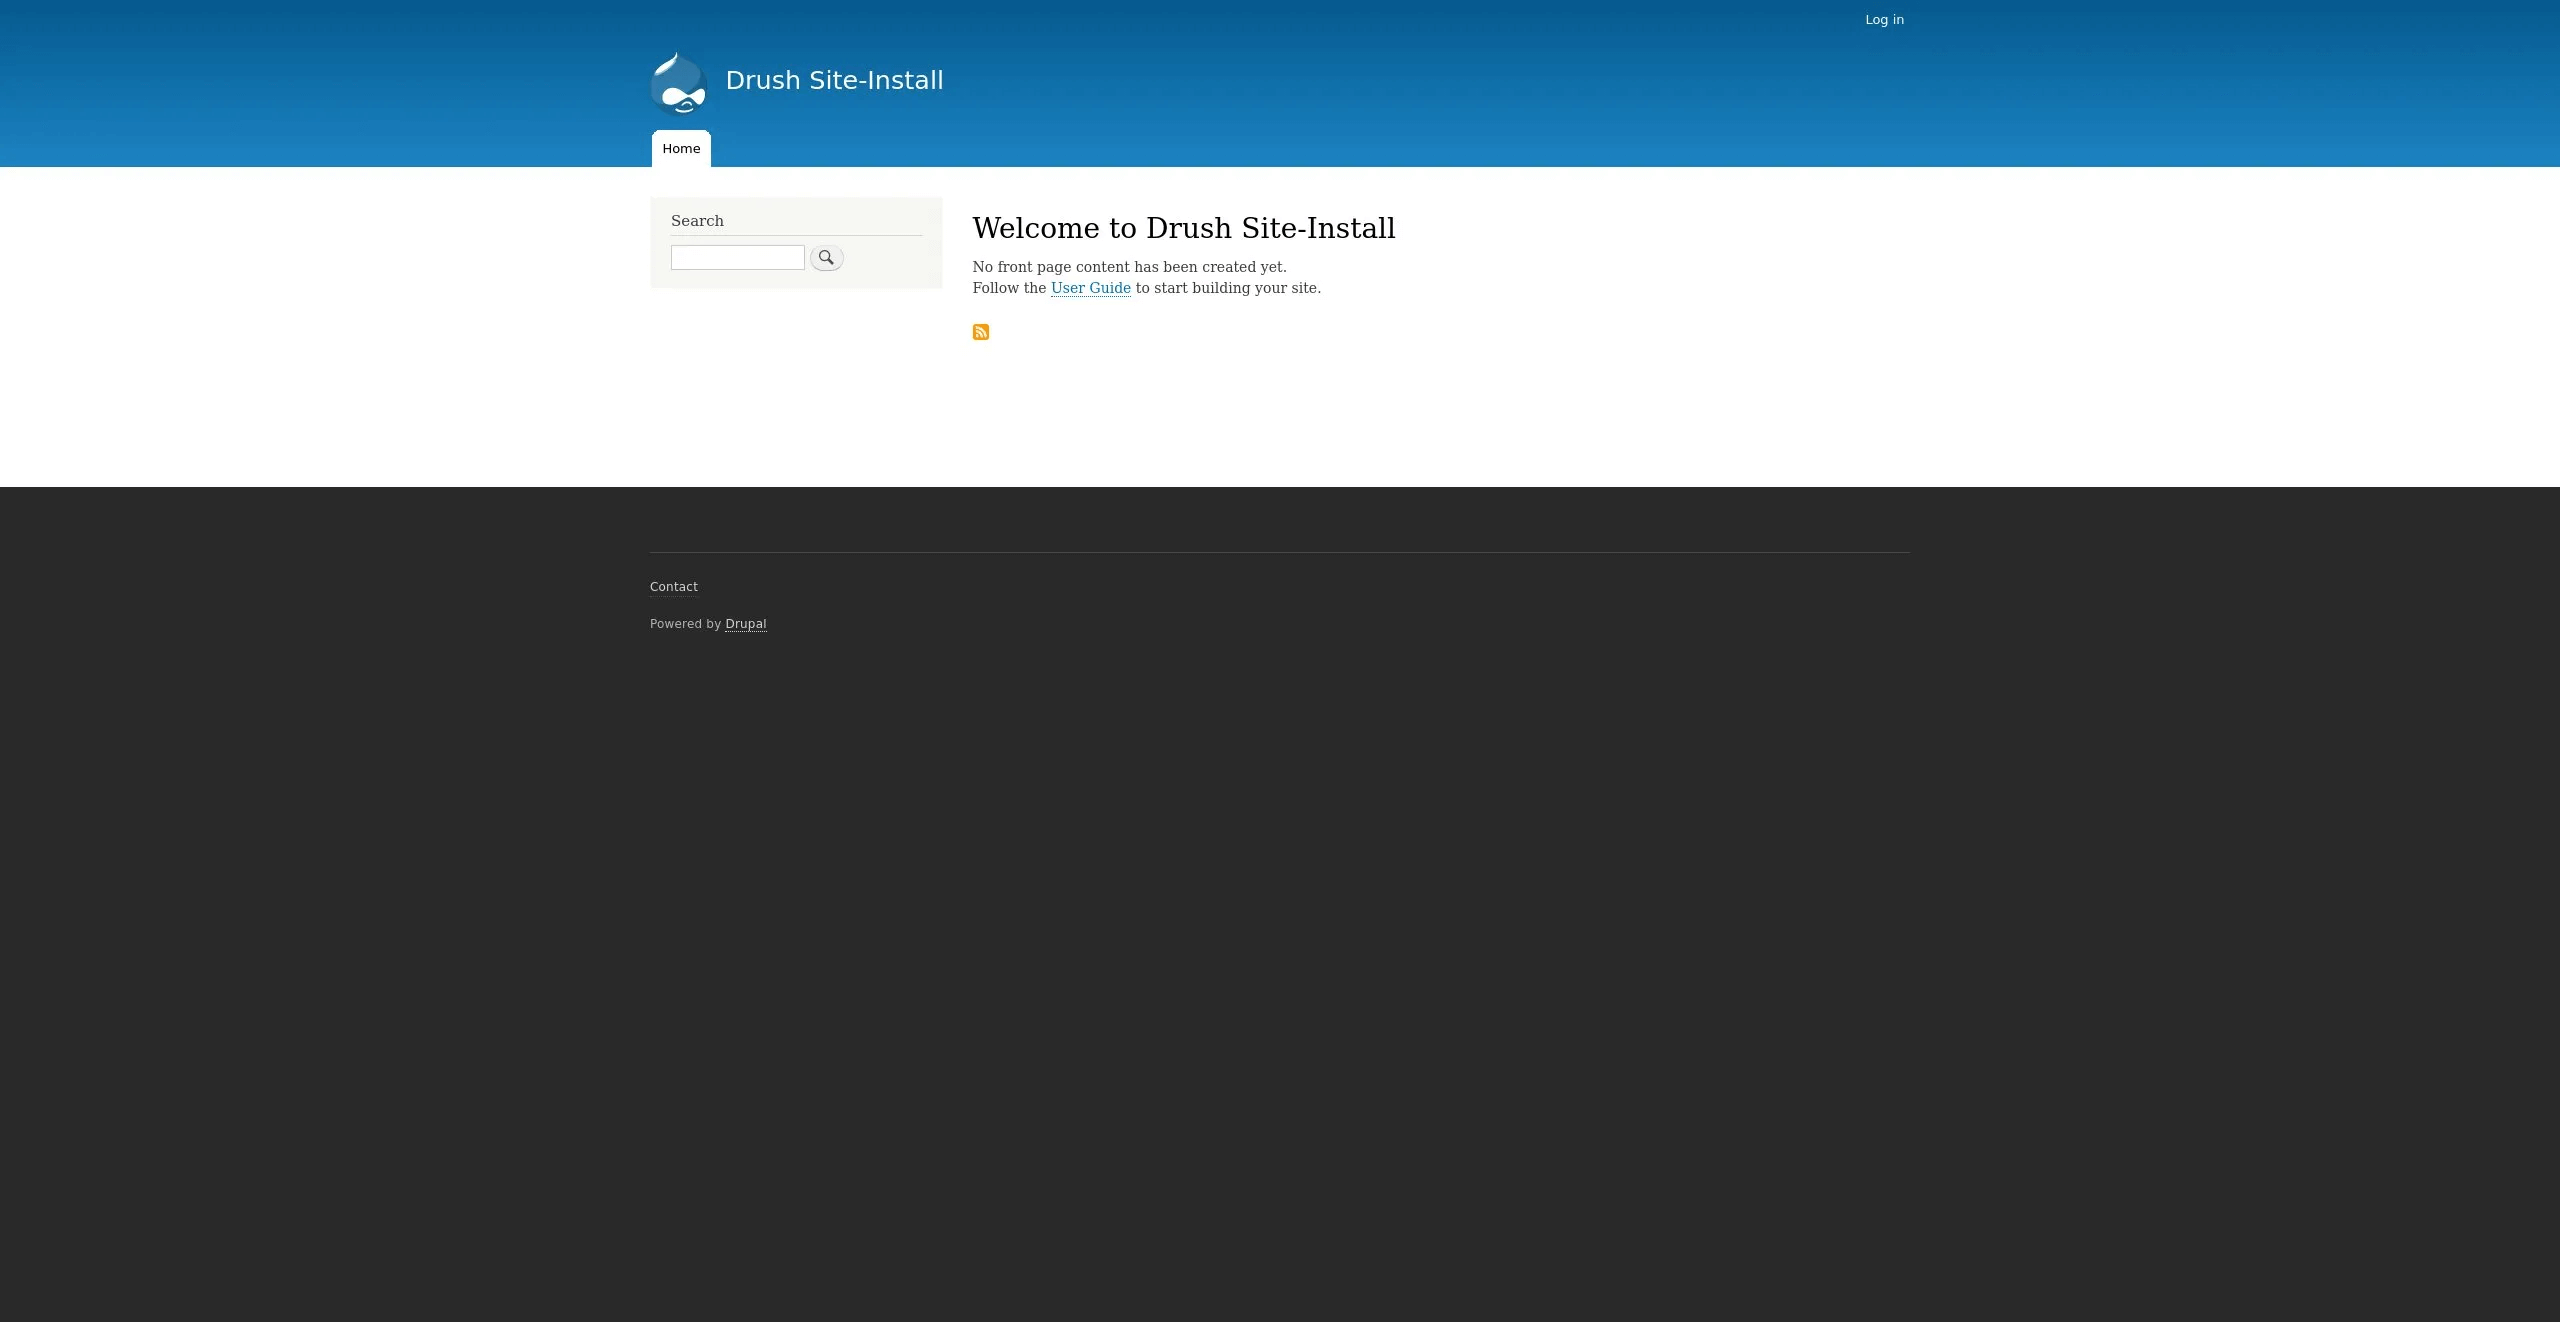
Step 6 - Testing the Installation
1) When the installation is complete, you'll see something like the image below when you type your domain in the browser or visit http://_ip_:8080/user/login if not using domain and SSL.
If you can't see any CSS loaded, then follow the below steps:
- First, get login with admin, then visit this location
http://domain_or_IP:8080/admin/config/development/performancein your browser. - Under
Bandwidth optimizationUncheck both boxesAggregate CSS files&Aggregate JavaScript files. - Click on Save the configuration, and now the default CSS will load.
2) You can now log in as an admin and customize the Drupal installation.
Step 7 - Installing Drupal Modules and Themes
Once Drupal has been installed, you can install additional modules and themes. These are hosted on a custom composer repository, configured by the drupal-project.
For installing a module or a theme, cd to the project directory and type composer require drupal/module_or_theme_name. For instance, if you have to install the Pathauto module, you need to run the following command:
cd /var/www/my_drupal
sudo -u nginx /usr/local/bin/composer require drupal/pathauto
Output

Using version ^1.3 for drupal/pathauto
./composer.json has been updated
> DrupalProject\composer\ScriptHandler::checkComposerVersion
Loading composer repositories with package information
Updating dependencies (including require-dev)
Package operations: 3 installs, 0 updates, 0 removals
  - Installing drupal/token (1.5.0): Downloading (100%)
  - Installing drupal/ctools (3.2.0): Downloading (100%)
  - Installing drupal/pathauto (1.3.0): Downloading (100%)
Package phpunit/phpunit-mock-objects is abandoned, you should avoid using it. No replacement was suggested.
Writing lock file
Generating autoload files
> DrupalProject\composer\ScriptHandler::createRequiredFiles
The output shows that even Composer installs all package dependencies for us.
Step 8 - Back up and Updating Drupal Core
It would be a good idea to back up the files and database. You can do so with the help of the Backup & Migrate module or simply do it manually.
1) Use the following command to back up the installation files. Make sure to use the correct path to the installation directory.
sudo rsync -a /var/www/my_drupal/ /var/www/my_drupal_$(date +%F)
2) We can use the standard mysqldump command to back up:
sudo mysqldump --all-databases -u root -p | sudo tee /var/www/my_drupal_database_$(date +%F).sql >/dev/null
3) Alternatively, we can use the drush sql-dump:
cd /var/www/my_drupal
sudo vendor/bin/drush sql-dump | sudo tee /var/www/my_drupal_database_$(date +%F).sql >/dev/null
4) Next, we can update all the Drupal core files using the following command:
sudo -u nginx /usr/local/bin/composer update drupal/core webflo/drupal-core-require-dev symfony/* --with-dependencies
FAQs to Install Drupal on CentOS 8
What's a Drupal module?
Modules are collections of functions that extend Drupal. They enhance its functionality. For example, you need to integrate with an email management tool that is not one of the Drupal Core Features.
Why choose Drupal for your website?
Drupal offers a powerful set of features, including extensive community support, a large library of modules for added functionality, scalability, flexibility, and excellent security.
What are the prerequisites for installing Drupal on CentOS 8?
Before installing Drupal, ensure that you have a CentOS 8 server set up with Apache or Nginx as your web server, PHP installed, a MySQL or MariaDB database server, and appropriate PHP extensions enabled.
How do I install Drupal on CentOS 8?
The installation process for Drupal on CentOS 8 involves downloading the latest Drupal package, configuring the web server, creating a database, and running the installation script.
Can I use a different database instead of MySQL/MariaDB?
Yes, Drupal supports other databases such as PostgreSQL or SQLite. You can choose a different database during the Drupal installation process or migrate an existing site to a new database.
Is it possible to install Drupal using a graphical user interface (GUI)?
While the Drupal installation itself does not have a GUI installer, you can use a web-based administration interface after the initial installation to manage your Drupal site using its graphical interface.
What are the advantages of using Drupal on CentOS 8?
Drupal offers several advantages, including a user-friendly administration interface, a large community for support and contributions, a wide range of modules to extend functionality, customizable themes, multilingual support, and robust security features.
Conclusion
We hope this detailed tutorial helped you understand how to install, configure and modify Drupal on CentOS 8 server. To learn more about Drupal installation on CentOS 8, check out the official Drupal installation Documentation.
If you have any queries, please leave a comment below, and we’ll be happy to respond to them for sure.