
Choose a different version or distribution
Introduction
Fathom Analytics is a tool that helps website owners keep track of who's visiting their site and what they're doing there. Basically, it gives you a way to see how people are interacting with your website so you can make informed decisions about how to improve it.
Some specific use cases for Fathom Analytics include:
- Monitoring website traffic: Fathom Analytics provides website owners with real-time data on how many visitors are accessing their website, where they are coming from, and what pages they are visiting.
- Understanding user behavior: Fathom Analytics tracks how visitors are interacting with a website, including which pages they are visiting, how long they are staying on each page, and what links they are clicking.
- Improving website performance: By analyzing the data provided by Fathom Analytics, website owners can identify areas of their website that may be causing user frustration or leading to a high bounce rate, and make improvements to improve the user experience.
- Tracking marketing campaigns: Fathom Analytics can help website owners track the effectiveness of their marketing campaigns by providing data on how many visitors are coming to their site from different sources, such as social media or paid advertising.
- Protecting user privacy: Fathom Analytics is a privacy-focused analytics platform that does not collect personal data from visitors to a website, helping website owners comply with data protection regulations like GDPR and CCPA.
In this tutorial, you'll install and set up Fathom Analytics and set up Nginx as a reverse proxy for Fathom Analytics. Finally, you'll use Certbot to get and configure SSL certificates from the Let's Encrypt Certificate Authority, enabling safe HTTPS connections.
Prerequisites
- A running Ubuntu 20.04 server
- An active domain or subdomain that points to your server
- SSH as a regular user with sudo privileges
- Set up the LEMP Stack
Step 1 - Download Fathom Analytics
To install Fathom Analytics, first, download the most recent version and then extract the executable file to the /usr/local/bin directory.
To begin, navigate to a directory where you can write. The /tmp directory is an excellent option:
cd /tmp
Visit the GitHub page for Fathom's most recent software release in your web browser, then look for the file fathom_1.2.1_linux_amd64.tar.gz. It's possible that the version number is different.
Copy the link to the file by right-clicking on it and selecting Copy Link (or similar, depending on your browser).
To download the file from the link you just copied, use the curl command:
curl -L -O https://github.com/usefathom/fathom/releases/download/v1.2.1/fathom_1.2.1_linux_amd64.tar.gz
In your /tmp directory, you should now have a fathom_1.2.1_linux_amd64.tar.gz file. Extract the fathom executable and place it in /usr/local/bin using the tar command:
sudo tar -C /usr/local/bin/ -xzf fathom*.tar.gz fathom
Because /usr/local/bin is a protected directory that requires superuser rights to write to, the sudo command is required.
To adjust the permissions of the fathom binary, use sudo and chmod:
sudo chmod +x /usr/local/bin/fathom
Fathom is now executable. Run fathom --version to see if it works:
fathom --version
Output

Fathom version 1.2.1, commit 8f7c6d2e45ebb28651208e2a7320e29948ecdb2c, built at 2018-11-30T09:21:37Z
The program will print the version number of Fathom as well as some further information. You've completed the download and installation of Fathom binaries. After that, you'll set up Fathom and run it for the first time.
Step 2 - Configure and Run Fathom Analytics
You'll need to create a new Fathom user on your machine before you can configure it. The Fathom server will be administered by this new user account, which will help isolate and safeguard the service.
With the adduser command, create a new user named fathom:
sudo adduser --system --group --home /opt/fathom fathom
This creates a special --system user with no password and no ability to log in like a regular user. We also create a fathom group and a home directory in /opt/fathom using the --group flag.
Now go to the home directory of the fathom user:
cd /opt/fathom
Now we need to run a couple of commands as the fathom user. To do so, use sudo to launch a bash shell as the fathom user:
sudo -u fathom bash
Your prompt will change to fathom@host:$ or something similar. Every command you run will be run as the fathom user until you quit this shell.
You're now ready to create a Fathom configuration file. A random string that Fathom will use for signing and encryption is one item we'll need in this configuration file. To produce a random string, use the openssl command:
openssl rand --base64 32
Output

iKo/rYHFa2hDINjgCcIeeCe9pNglQreQrzrs+qK5tYg=
Copy the string to your clipboard or a temporary scratch page, and then create a new.env file with the configuration:
nano /opt/fathom/.env
In the nano text editor, this will create a new blank file. Instead, feel free to use your preferred editor.
Copy and paste the following into the file, replacing the random string with the one you generated earlier:
FATHOM_SERVER_ADDR="127.0.0.1:8080"
FATHOM_DATABASE_DRIVER="sqlite3"
FATHOM_DATABASE_NAME="fathom.db"
FATHOM_SECRET="your_random_string_here"
The server should only listen on localhost (127.0.0.1) port 8080, and it should use an SQLite database file called fathom.db, according to this setup.
The file should be saved and closed. To save, press CTRL+O, then ENTER, and then CTRL+X to quit nano.
You can now add the first user to our Fathom instance, now that the database has been configured:
fathom user add --email="your_email" --password="your_password"
Because this is the first time you've run fathom with the database configured, you'll notice some preliminary database migrations:
Output

INFO[0000] Fathom version 1.2.1, commit 8f7c6d2e45ebb28651208e2a7320e29948ecdb2c, built at 2018-11-30T09:21:37Z
INFO[0000] Configuration file: /opt/fathom/.env
INFO[0000] Connected to sqlite3 database: /opt/fathom/fathom.db
INFO[0000] Applied 26 database migrations!
INFO[0000] Created user [email protected]
The user has now been added to your fathom.db database file.
To try it out, start the Fathom server now:
fathom server
Output

INFO[0000] Fathom version 1.2.1, commit 8f7c6d2e45ebb28651208e2a7320e29948ecdb2c, built at 2018-11-30T09:21:37Z
INFO[0000] Configuration file: /opt/fathom/.env
INFO[0000] Connected to sqlite3 database: /opt/fathom/fathom.db
Curl the webpage of your Fathom instance in a second terminal linked to your server:
curl localhost:8080
Output

<!DOCTYPE html>
<html class="no-js" lang="en">
<head>
  <title>Fathom - simple website analytics</title>
  <link href="assets/css/styles.css?t=1543569696966" rel="stylesheet">
. . .
A few lines of HTML code should appear on your screen. This indicates that the server is up and running and accepting requests from localhost.
Exit the fathom server process by hitting CTRL+C in the first terminal.
You've finished running commands as the fathom user, so close that window:
exit
The shell prompt should now be back to normal.
Fathom is now fully configured, and you've successfully used the command line to start it. We'll then configure Fathom to run as a Systemd service.
Step 3 - Setting Up Fathom Analytics as a Systemd Service
You'll set up fathom serve as a service with Systemd to run it at all times, even when you're not logged into the server. On Ubuntu and many other Linux distributions, Systemd is a service manager that manages the start, stop, and restart of services.
The fathom.service file you create will have all of the configuration information Systemd requires to execute the server effectively. Now open the new file:
sudo nano /etc/systemd/system/fathom.service
To the file, add the following:
[Unit]
Description=Fathom Analytics server
Requires=network.target
After=network.target

[Service]
Type=simple
User=fathom
Group=fathom
Restart=always
RestartSec=3
WorkingDirectory=/opt/fathom
ExecStart=/usr/local/bin/fathom server

[Install]
WantedBy=multi-user.target
This file specifies when the service should be started (After=network.target, which means after the network is up), that it should be run as the fathom user and group, that Systemd should always try to restart the process if it exits (Restart=always), that it should be run from the /opt/fathom directory, and what command should be used to start the server (ExecStart=/usr/local/bin/fathom server).
The file should be saved and closed. Refresh the Systemd configuration:
sudo systemctl daemon-reload
Now, enable the service:
sudo systemctl enable fathom.service
When you enable a service, Systemd will start it automatically when the system boots up. We'll also need to manually start the service now, just once:
sudo systemctl start fathom
It's worth noting that the .service element of the service name can be omitted in the preceding command. Finally, double-check the service's status to ensure it's up and running:
sudo systemctl status fathom
Output

● fathom.service - Fathom Analytics server
     Loaded: loaded (/etc/systemd/system/fathom.service; enabled; vendor preset: enabled)
     Active: active (running) since Wed 2021-11-03 15:32:45 UTC; 13s ago
   Main PID: 3748 (fathom)
      Tasks: 5 (limit: 1136)
     Memory: 10.3M
     CGroup: /system.slice/fathom.service
             └─3748 /usr/local/bin/fathom server

Nov 03 15:32:45 ubuntu-fathom systemd[1]: Started Fathom Analytics server.
Nov 03 15:32:46 ubuntu-fathom fathom[3748]: time="2021-11-03T15:32:46Z" level=info msg="Fathom version 1.2.1, commit 8f>
Nov 03 15:32:46 ubuntu-fathom fathom[3748]: time="2021-11-03T15:32:46Z" level=info msg="Configuration file: /opt/fathom>
Nov 03 15:32:46 ubuntu-fathom fathom[3748]: time="2021-11-03T15:32:46Z" level=info msg="Connected to sqlite3 database: >
On localhost port 8080, the service is back up and running. The Fathom service will then be exposed to the outside world using Nginx as a reverse proxy.
Step 4 - Install and Configure Nginx
By delegating caching, compression, and static file serving to a more efficient process, putting a web server in front of your application server, such as Nginx, can increase speed. We'll install Nginx and set it up to reverse proxy requests to Fathom, which means it'll handle routing requests from your users to Fathom and back.
First, update your package list, then use apt to install Nginx:
sudo apt update
sudo apt install nginx
Using the "Nginx Full" UFW application profile, allow public traffic to ports 80 and 443 (HTTP and HTTPS):
sudo ufw allow "Nginx Full"
Output

Rule added
Rule added (v6)
Then, under the /etc/nginx/sites-available directory, create a new Nginx configuration file. We'll call ours fathom.conf, but you may call yours something else:
sudo nano /etc/nginx/sites-available/fathom.conf
Replace your_domain_here with the domain, you've configured to point to your Fathom server and paste the following into the new configuration file. This should be something along the lines of fathom.example.com:
server {
    listen       80;
    listen       [::]:80;
    server_name  your_domain_here;

    access_log  /var/log/nginx/fathom.access.log;
    error_log   /var/log/nginx/fathom.error.log;

    location / {
      proxy_pass http://localhost:8080;
      proxy_set_header X-Real-IP $remote_addr;
      proxy_set_header X-Forwarded-For $remote_addr;
      proxy_set_header Host $host;
  }
}
For the time being, this setup is HTTP-only. In the next step, you'll delegate SSL configuration to Certbot. The rest of the configuration sets up logging locations and then forwards all traffic to our Fathom server at http://localhost:8080, including a few important proxy forwarding headers.
Save and close the file, then link it to /etc/nginx/sites-enabled/ to enable the configuration:
sudo ln -s /etc/nginx/sites-available/fathom.conf /etc/nginx/sites-enabled/
Unlink the default conf of nginx:
sudo unlink /etc/nginx/sites-enabled/default
To check that the configuration file syntax is accurate, run nginx -t:
sudo nginx -t
Output

nginx: the configuration file /etc/nginx/nginx.conf syntax is ok
nginx: configuration file /etc/nginx/nginx.conf test is successful
Finally, reload the nginx service to take advantage of the changed settings:
sudo systemctl reload nginx
The basic HTTP version of your Fathom site should now be available. When you go to http://your_domain here, you'll see something like this:

It's time to protect the connection with Certbot and Let's Encrypt certificates now that your site is up and operating via HTTP.
Step 5 - Install Certbot and Set Up SSL Certificates
Adding SSL encryption to our Fathom app will require only two commands thanks to Certbot and the Let's Encrypt free certificate authority.
To begin, download and install Certbot and the Nginx plugin:
sudo apt install certbot python3-certbot-nginx
After that, run certbot in --nginx mode, specifying the same domain as in the Nginx server_name config:
sudo certbot --nginx -d your_domain_here
You'll be asked to accept the Let's Encrypt terms of service and provide your email address.
After that, you'll be asked if you want all HTTP traffic to be redirected to HTTPS. It's entirely up to you, but it's typically advised and safe to do so.
Certbot will then download your certificate after Let's Encrypt confirms your request:
Output

Congratulations! You have successfully enabled https://Fathom.example.com

You should test your configuration at:
https://www.ssllabs.com/ssltest/analyze.html?d=Fathom.example.com
- - - - - - - - - - - - - - - - - - - - - - - - - - - - - - - - - - - - - - - -

IMPORTANT NOTES:
 - Congratulations! Your certificate and chain have been saved at:
   /etc/letsencrypt/live/Fathom.example.com/fullchain.pem
   Your key file has been saved at:
   /etc/letsencrypt/live/Fathom.example.com/privkey.pem
   Your cert will expire on 2021-12-06. To obtain a new or tweaked
   version of this certificate in the future, simply run certbot again
   with the "certonly" option. To non-interactively renew *all* of
   your certificates, run "certbot renew"
 - Your account credentials have been saved in your Certbot
   configuration directory at /etc/letsencrypt. You should make a
   secure backup of this folder now. This configuration directory will
   also contain certificates and private keys obtained by Certbot so
   making regular backups of this folder is ideal.
 - If you like Certbot, please consider supporting our work by:

   Donating to ISRG / Let's Encrypt:   https://letsencrypt.org/donate
   Donating to EFF:                    https://eff.org/donate-le
Certbot will reload Nginx to take advantage of the updated settings and certificates. If you chose the redirect option, reloading your site should automatically move you to HTTPS.
Your site is now secure, and logging in with the user credentials you created in Step 2 is safe.
When you log in successfully, you'll receive a request to create your first Fathom website:
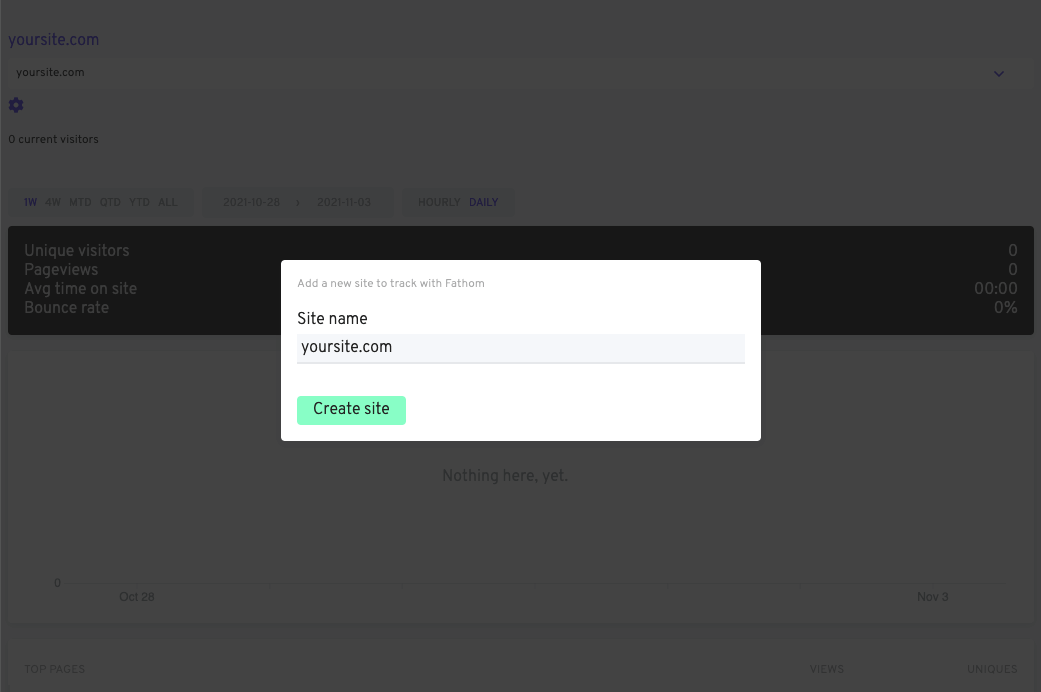
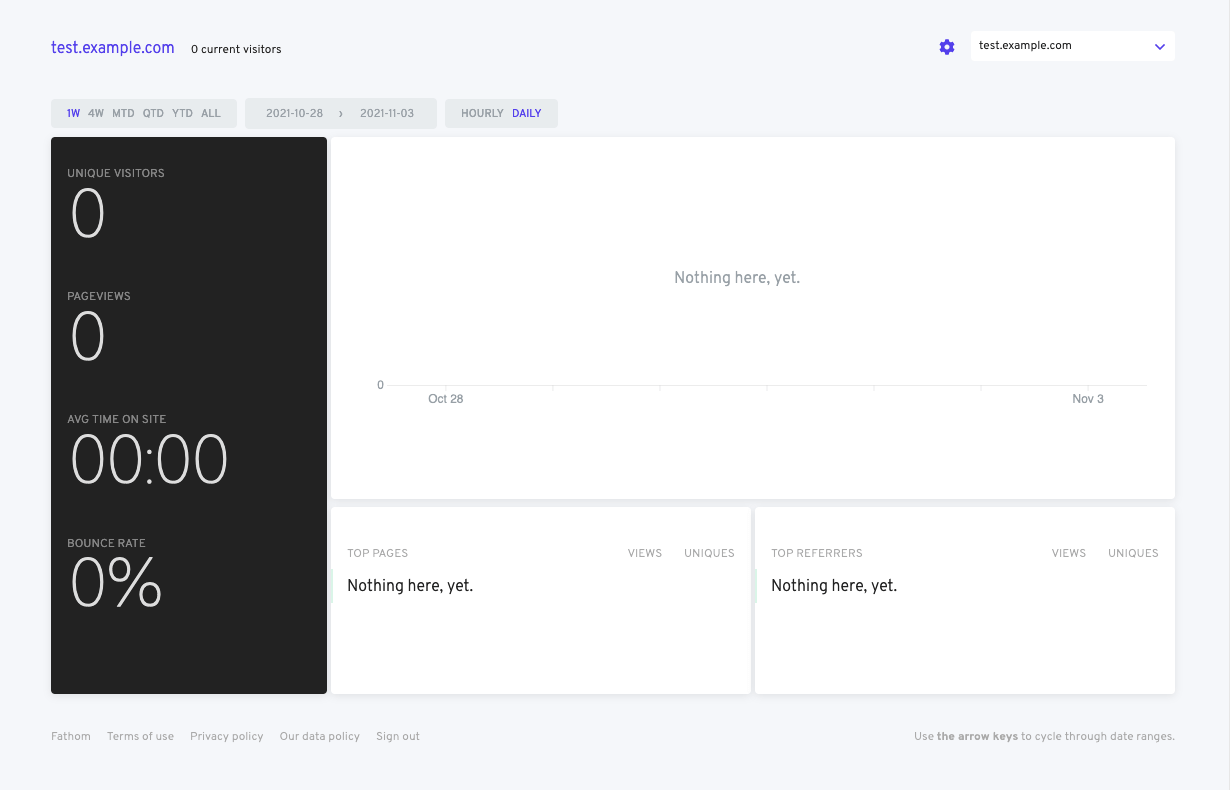
After that, you'll be taken to the (now empty) dashboard for the site you just created:
Fathom analytics software has been successfully deployed and secured.
FAQs to Install Fathom Analytics on Ubuntu 20.04
Can I use the same Fathom plan for multiple sites?
Yes, you can add unlimited sites under a single plan, and they all share your monthly page views. Fathom also has several unlimited features for customers: unlimited email reports and unlimited custom domains.
How do I add the tracking code?
You paste it into the header of any website or content management system. It’s one single line of code and will never slow down your website’s speed. The software easily integrates with all content management and software tools, such as WordPress, Ghost, Squarespace, Next.js, Vue, and more.
What happens if I go over my page view limit?
Fathom never charges for occasional traffic spikes, nor do they ever shut your account off if you reach your plan limit early. There are no surprise fees or extra charges, just fair pricing. Instead, if you go over your plan two months in a row, or within the first month of joining Fathom, Fathom contacts you to upgrade your account. From there you can decide to upgrade or cancel your account (no hard feelings either way). You can even export your data if you leave.
Conclusion
You downloaded, installed, and configured the Fathom Analytics in this tutorial, then set up a Nginx reverse proxy using Let's Encrypt SSL certificates to secure it.
You may now complete the setup of your website by including the Fathom Analytics tracking script. For more information on how to use Fathom Analytics and set up your site, please check the official Fathom Analytics guide.
If you have any queries, please leave a comment below and we’ll be happy to respond to them.
