
Choose a different version or distribution
Introduction
Before we begin talking about how to install Fathom Analytics on Ubuntu 22.04, let’s briefly understand – What is Fathom?
Fathom Analytics is a user-friendly and privacy-focused web analytics tool. It provides essential insights about website visitors without compromising their privacy. With a clean and easy-to-understand interface, Fathom offers real-time data on website traffic, popular pages, and referral sources.
It respects user privacy by avoiding the use of cookies or storing personal information, making it a trustworthy and GDPR-compliant analytics solution. Stay informed about your website's performance while keeping your visitors' privacy intact with Fathom Analytics.
In this tutorial, you will install Fathom Analytics on Ubuntu 22.04. We will also address a few FAQs on how to install Fathom Analytics on Ubuntu 22.04.
Advantages of Fathom Analytics
- Privacy-focused: Fathom Analytics prioritizes user privacy by avoiding cookies and storing personal information.
- Real-time data: Get instant access to accurate and up-to-date website traffic and visitor information.
- Intuitive interface: Enjoy a user-friendly dashboard that presents data in a clear and easy-to-understand manner.
- GDPR-compliant: Fathom ensures compliance with data protection regulations, giving you peace of mind.
- Reliable insights: Gain valuable insights into your website's performance, popular pages, and referral sources for informed decision-making.
Prerequisites to Install Fathom Analytics on Ubuntu 22.04
- A running Ubuntu 22.04 server.
- An active domain or subdomain that points to your server.
- SSH as a regular user with sudo privileges.
You need to update the system with the latest available version. Use the following command to do so:
apt-get update -y
apt-get upgrade -y
Now, restart the system to apply the changes.
Step 1 – Install Nginx and MariaDB
1) First, you have to run the following command in order to install Nginx and MariaDB:
sudo apt-get install nginx mariadb-server -y
2) After that, run both services and enable them to start on startup with the following commands:
sudo systemctl enable --now nginx
sudo systemctl enable --now mariadb
Step 2 – Configure MariaDB
1) Since MariaDB is not secured by default, you need to secure it using the mysql_secure_installation script:
mysql_secure_installation
2) This script will change your root password, remove anonymous users, and restrict remote root login.
 Enter current password for root (enter for none):
    Set root password? [Y/n]: N
    Remove anonymous users? [Y/n]: Y
    Disallow root login remotely? [Y/n]: Y
    Remove test database and access to it? [Y/n]:  Y
    Reload privilege tables now? [Y/n]:  Y
3) After that, log in to MariaDB using the following command:
mysql -u root -p
4) Now, enter the root password and create a user and a database for Fathom with the following command:
MariaDB [(none)]> CREATE DATABASE fathom;
MariaDB [(none)]> CREATE USER 'fathomuser'@'localhost' IDENTIFIED BY 'password';
5) Use the command given below to grant permission to Fathom:
MariaDB [(none)]> GRANT ALL ON fathom.* TO 'fathomuser'@'localhost' IDENTIFIED BY 'password' WITH GRANT OPTION;
6) After that, flush the privileges and exit the MariaDB shell:
MariaDB [(none)]> FLUSH PRIVILEGES;
MariaDB [(none)]>EXIT;
Step 3 – Install and Configure Fathom
1) You need to download the latest version of Fathom binary from the Git repository with the following command:
wget https://github.com/usefathom/fathom/releases/download/latest-development/fathom-linux-amd64
2) After that, move the downloaded binary to the /usr/local/bin/ directory.
sudo mv fathom-linux-amd64 /usr/local/bin/fathom
3) Then, you need to provide Fathom executable permissions.
sudo chmod 755 /usr/local/bin/fathom
4) This will be followed by configuring the Fathom home environment.
nano .env
5) After that, you will have to add the following lines:
FATHOM_SERVER_ADDR=9000
FATHOM_DEBUG=true
FATHOM_DATABASE_DRIVER="mysql"
FATHOM_DATABASE_NAME="fathom"
FATHOM_DATABASE_USER="fathomuser"
FATHOM_DATABASE_PASSWORD="password"
FATHOM_DATABASE_HOST="localhost"
FATHOM_DATABASE_SSLMODE=""
FATHOM_SECRET="random-secret-string"
6) Now, create an administrator account for Fathom using the following command:
fathom --config=.env user add [email protected] --password=admin@123
7) An output similar to the one given below will be revealed.
Output

INFO[0000] Fathom 1.1.0
INFO[0000] Configuration file: /root/.env
INFO[0000] Connected to mysql database: fathomuser:password@tcp(localhost)/fathom?loc=Local&parseTime=true
INFO[0000] Created user [email protected]
8) Next, start the Fathom server with the following command:
fathom server
9) You will get the following output:
Output

INFO[0000] Fathom 1.1.0
INFO[0000] Configuration file: /root/.env
INFO[0000] Connected to mysql database: fathomuser:new_password_here@tcp(localhost)/fathom?loc=Local&parseTime=true
INFO[0002] Applied 11 database migrations!
INFO[0002] Server is now listening on: 9000
Step 4 – Access Fathom Web Interface
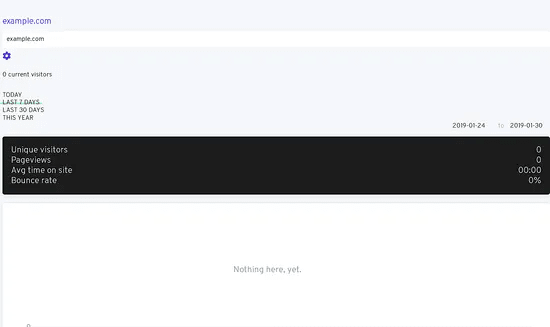
1) Open your web browser, enter https://your_domain as the URL, you will be redirected to the following page:

2) After that, provide the administrator credentials and select Sign in.
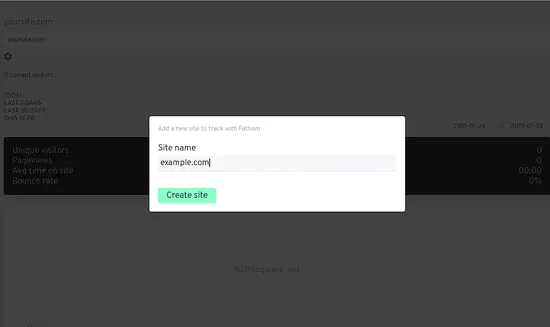
3) Enter the site name, then click the Create Site button.
Step 5 – Create a Fathom Systemd Service File
1) You need to create a Systemd Service file for Fathom in order to manage Fathom services.
nano /etc/systemd/system/fathom.service
2) Now, you need to add the following lines:
[Unit]
Description=Fathom server management service unit
Requires=network.target
After=network.target

[Service]
Type=simple
User=root
Restart=always
RestartSec=3
WorkingDirectory=/root
ExecStart=/usr/local/bin/fathom server

[Install]
WantedBy=multi-user.target
3) Save the file and close it. Now, enable Fathom service.
systemctl daemon-reload
systemctl enable fathom
4) Then, start the Fathom service using the following command:
systemctl start fathom
5) Now, check the status of the Fathom service using the following command:
systemctl status fathom
6) The following output should be visible now:
Output

? fathom.service - Fathom server management service unit
   Loaded: loaded (/etc/systemd/system/fathom.service; disabled; vendor preset: enabled)
   Active: active (running) since Wed 2019-01-30 11:44:46 UTC; 4s ago
 Main PID: 19671 (fathom)
    Tasks: 5 (limit: 1114)
   CGroup: /system.slice/fathom.service
           ??19671 /usr/local/bin/fathom server

September 30 11:44:46 ubuntu1804 systemd[1]: Started Fathom server management service unit.
September 30 11:44:46 ubuntu1804 fathom[19671]: time="2020-09-30T11:44:46Z" level=info msg="Fathom 1.1.0"
September 30 11:44:46 ubuntu1804 fathom[19671]: time="2020-09-30T11:44:46Z" level=info msg="Configuration file: /root/.env"
September 30 11:44:46 ubuntu1804 fathom[19671]: time="2020-09-30T11:44:46Z" level=info msg="Connected to mysql database: fathomuser:new_password_here@tcp(loc
September 30 11:44:46 ubuntu1804 fathom[19671]: time="2020-09-30T11:44:46Z" level=info msg="Server is now listening on :9000"
Step 6 – Configure Nginx as a Reverse Proxy
1) Since Fathom is listening on port 9000, you need to configure Nginx as a reverse proxy. This allows you to access Fathom without specifying the port number.
For this, you need to create a Fathom virtual host:
nano /etc/nginx/sites-available/fathom
2) After that, add the following lines:
server {
  listen 80;
  listen [::]:80;

  server_name 192.168.0.103;

  location / {
      proxy_pass http://localhost:9000/;
  }
}
3) Save the file and close it. Next, check for any syntax errors using:
nginx -t
4) Now, disable Nginx default virtual host file and enable the Fathom virtual host file with the help of:
rm -rf /etc/nginx/sites-enabled/default
ln -s /etc/nginx/sites-available/fathom /etc/nginx/sites-enabled/
5) After that, restart Nginx:
systemctl restart nginx
Now, the Fathom web interface can be accessed using the URL http://your_domain.
FAQs to Install Fathom Analytics on Ubuntu 22.04
What are the system requirements for installing Fathom Analytics on Ubuntu 22.04?
Fathom Analytics requires a server running Ubuntu 22.04 with Nginx or Apache, PHP 7.4 or higher, and MySQL 5.7 or MariaDB 10.2.
Can I install Fathom Analytics on a shared hosting server?
Yes, you can install Fathom Analytics on a shared hosting server as long as it meets the required system specifications. However, ensure that you have the necessary permissions to install the software.
Is it necessary to have a domain name for installing Fathom Analytics on Ubuntu 22.04?
Yes, a domain name is required to access and use Fathom Analytics. You need to set up a domain or subdomain and point it to your server's IP address.
Can I install Fathom Analytics on multiple websites hosted on the same server?
Yes, you can install and use Fathom Analytics on multiple websites hosted on the same Ubuntu 22.04 server. Each website will have its own tracking code and separate analytics.
Does Fathom Analytics provide HTTPS support?
Yes, Fathom Analytics fully supports HTTPS. It is recommended to use an SSL certificate for secure communication between the server and website visitors.
Can I integrate Fathom Analytics with content management systems like WordPress?
Yes, Fathom Analytics provides plugins for popular content management systems like WordPress, making integration quick and easy.
How often does Fathom Analytics update its tracking data?
Fathom Analytics provides real-time tracking, ensuring that you have access to the most up-to-date website analytics and visitor information.
Does Fathom Analytics collect personally identifiable information (PII)?
No, Fathom Analytics is privacy-focused and does not collect personally identifiable information. It respects user privacy and follows GDPR guidelines.
Can I export data from Fathom Analytics for further analysis?
Yes, Fathom Analytics allows you to export data in various formats like CSV, JSON, or Excel, enabling you to perform further analysis or share reports with stakeholders.
Conclusion
You downloaded, installed, and configured the Fathom Analytics on Ubuntu 22.04 in this tutorial, then set up a Nginx reverse proxy using Let's Encrypt SSL certificates to secure it.
You may now complete the setup of your website by including the Fathom Analytics tracking script. For more information on how to use Fathom Analytics and set up your site, please check the official Fathom Analytics guide.
If you have any queries, please leave a comment below and we’ll be happy to respond to them.