Introduction
Before we discuss how to install Grub Customizer on Ubuntu 22.04, let's briefly understand-What is Grub Customizer?
Grub Customizer is a graphical tool that allows you to customize the GRUB bootloader settings on Ubuntu and other Linux distributions. It provides an easy-to-use interface for modifying the appearance, boot order, default entry, and other options of the GRUB menu.
This tutorial will walk you through the installation process of Grub Customizer on Ubuntu 22.04.
Advantages
- User-Friendly Interface: Grub Customizer offers a simple and intuitive interface, making it easy for users to customize their GRUB bootloader settings without manually editing configuration files.
- Customization Options: With Grub Customizer, you can modify various aspects of the GRUB menu, including background image, theme, font, boot order, timeout period, and default entry, giving you full control over your booting process.
- Manage Multiple Operating Systems: If you have multiple operating systems installed on your system, Grub Customizer allows you to set the default boot entry for easy selection during startup.
- Backup and Restore: Grub Customizer provides options for backing up and restoring the GRUB configuration, ensuring you can revert any changes if needed.
- Compatibility: Grub Customizer supports various Linux distributions, including Ubuntu and its derivatives, allowing users to customize their GRUB menu regardless of the Linux flavor they are using.
Section 1: Install Grub Customizer on Ubuntu 22.04
Step 1: Refreshing the Ubuntu System Before Grub Customizer Installation
To initiate the installation process, ensuring your Ubuntu system is up-to-date is crucial. Updating the system brings the advantage of having the latest patches, enhanced security, and possibly, better software compatibility. Use the following command to refresh your system:
sudo apt update
sudo apt upgrade
Step 2: Integrating the Grub Customizer PPA on Ubuntu 22.04
The next course of action involves incorporating the Personal Package Archive (PPA) for Grub Customizer into your Ubuntu system. The PPA, managed by Daniel Richter, is a repository that contains the Grub Customizer package. This repository enables Ubuntu to know where to fetch Grub Customizer during the installation process.
The -y flag automatically confirms that you want to add the repository, without prompting you to manually accept:
sudo add-apt-repository ppa:danielrichter2007/grub-customizer -y
Step 3: Updating the APT Package Cache after Grub Customizer PPA Import
Now that we’ve added the Grub Customizer PPA, it’s vital to update the APT package cache. The APT package cache is a database that holds references to installable software on the system. An update to the cache ensures that APT is aware of the new packages that have been added, along with their repositories. It allows the system to fetch the latest version of Grub Customizer during installation:
sudo apt update
Step 4: Install Grub Customizer on Ubuntu 22.04
We are now poised to install Grub Customizer on our Ubuntu system. This is executed by calling upon APT (Advanced Package Tool), the package manager used by Ubuntu, to fetch the software from the PPA we added earlier. By using the install command, we instruct APT to download and set up Grub Customizer on our system:
sudo apt install grub-customizer
Confirm the installation and version of Grub Customizer using the following command:
grub-customizer -v
Example output:
Output

Grub Customizer, version x.x.x
Section 2: Launching Grub Customizer on Ubuntu 22.04
After successfully installing Grub Customizer, the next logical step is to launch the application. You can utilize either of two methods to accomplish this, one through the Command Line Interface (CLI) and the other via the Graphical User Interface (GUI).
CLI Method of Launching Grub Customizer on Ubuntu
If you’re comfortable working with the command line, this method will suit your needs perfectly. The CLI can be quicker and more direct, providing instant access to Grub Customizer. Simply open your terminal and input the following command:
grub-customizer
Executing the above command will prompt Grub Customizer to initiate, presenting you with its main interface where you can begin managing your GRUB bootloader.
GUI Method of Launching Grub Customizer on Ubuntu
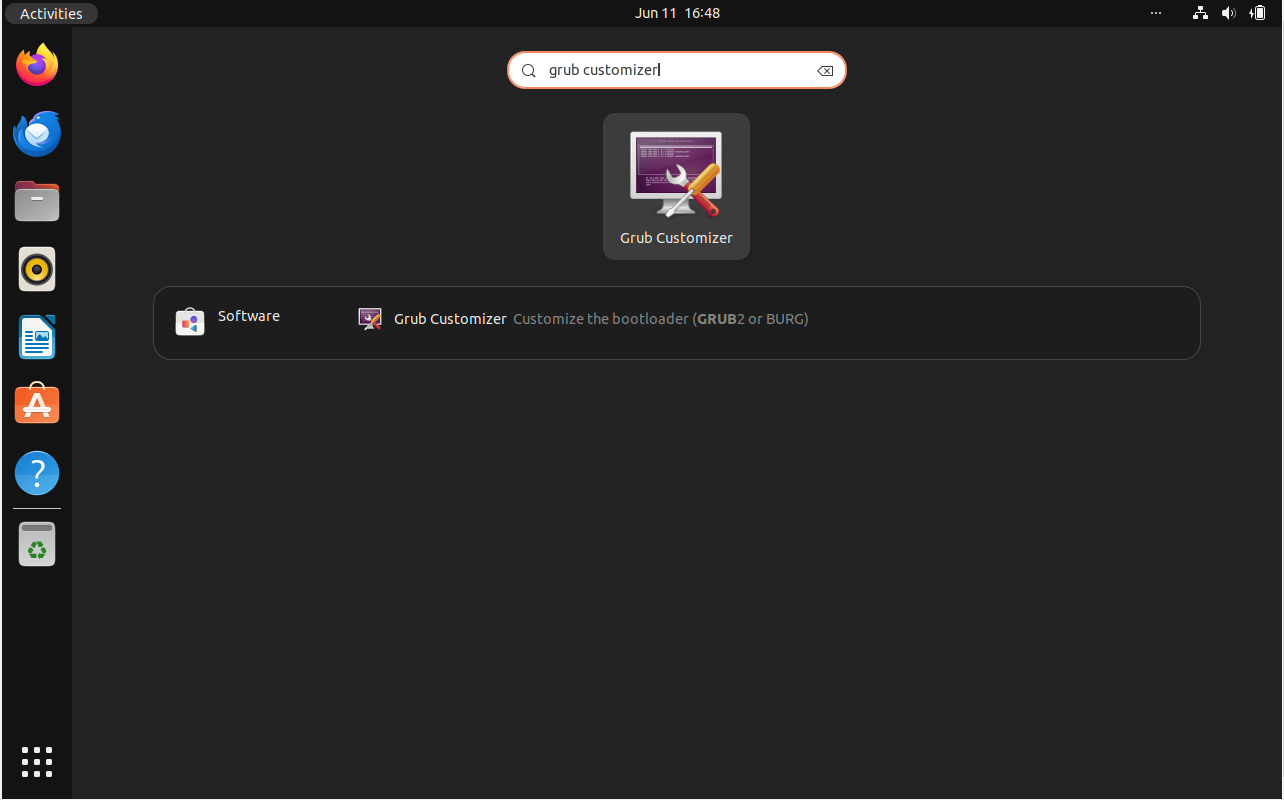
For those who prefer navigating through the graphical interface, this method provides a visual path to launch Grub Customizer. Follow these steps:
- Click on the Activities option situated in the top left corner of your Ubuntu desktop.
- Navigate towards the Show Applications button, often represented by a grid of dots located at the bottom of the screen.
- In the applications list, search for Grub Customizer.
Upon locating and clicking the Grub Customizer icon, the application will start, enabling you to modify your boot environment with ease.

Section 3: Getting Started with Grub Customizer on Ubuntu 22.04
Understanding the Interface with Grub Customizer on Ubuntu
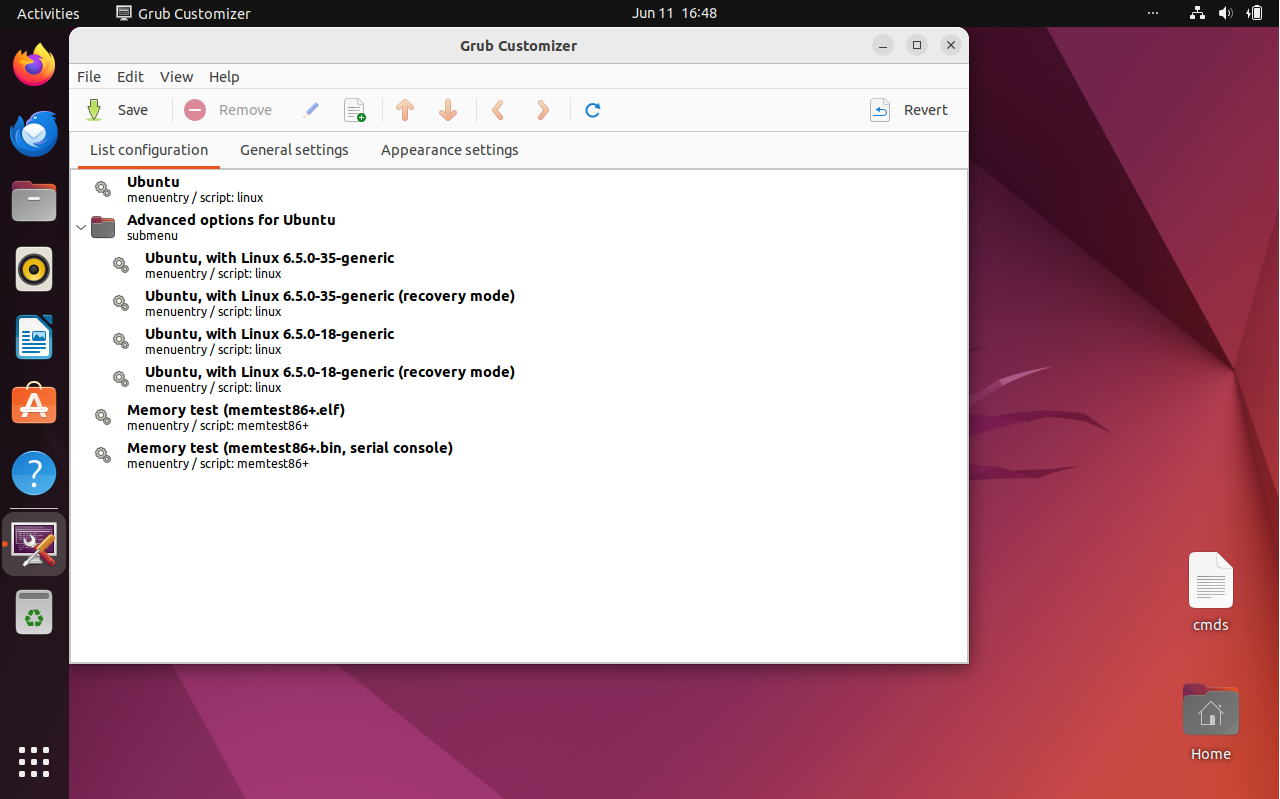
Upon launching Grub Customizer, you’ll be presented with a robust interface divided into several sections. Familiarize yourself with this layout:
- List configuration: This is the main area of Grub Customizer, where you’ll find the menu entries presented during boot.
- General settings: Located in the toolbar, this area lets you modify the overall bootloader settings such as the default entry, visibility of the menu, and menu timeout.
- Appearance settings: Also located in the toolbar, this section provides tools for customizing the bootloader’s visual presentation.
Manipulating Bootloader Entries with Grub Customizer on Ubuntu
One of Grub Customizer’s key features is the ability to manipulate bootloader entries. This ranges from simple tasks like reordering entries to advanced functions like adding custom boot parameters:
- Reordering Entries: You can change the order of your bootloader entries simply by selecting an entry and using the up and down arrow icons in the toolbar. The order in Grub Customizer will reflect the order during boot.
- Adding and Removing Entries: Grub Customizer allows you to add custom entries or remove unnecessary ones. This can be done through the plus and minus icons in the toolbar. Note that removed entries aren’t permanently deleted, but are merely hidden from the boot menu.
- Editing Entries: You can modify existing entries by double-clicking on them. This allows you to change the entry’s name, associated boot parameters, or the kernel/initrd images to use.
Customizing Appearance with Grub Customizer on Ubuntu
If you wish to change the visual presentation of your boot menu, Grub Customizer offers a variety of customization options under “Appearance settings”. This includes:
- Setting a custom background: Grub Customizer supports image files for use as custom backgrounds. Make sure to use an image format compatible with GRUB.
- Changing text color and font: You can adjust the colors and font used for menu entries for better readability or aesthetics.
Safeguarding Your Configuration with Grub Customizer on Ubuntu
When dealing with bootloader settings, it’s essential to maintain a backup of your configuration:
sudo cp /etc/default/grub /etc/default/grub.bak
The above command creates a backup of your current GRUB configuration. Should any issues arise after modifications, you can restore your backup with the following command:
sudo cp /etc/default/grub.bak /etc/default/grub
With these insights, you’re well-prepared to dive into Grub Customizer. This tool brings you closer to a personalized, efficient boot environment on your Ubuntu Linux system.

Section 4: Managing Grub Customizer on Ubuntu 22.04
The practicality of Grub Customizer doesn’t end after installation. Knowing how to effectively manage the application is a critical aspect of software stewardship. This includes tasks such as updating the application, removing it, or even eliminating the supporting PPA.
Update Grub Customizer on Ubuntu 22.04
In a dynamic and ever-evolving software landscape, staying updated with the latest versions of your installed applications is important. This ensures that you have the latest features and critical security updates. To update Grub Customizer, use the following commands:
sudo apt update
sudo apt upgrade
The first command fetches the latest package lists from the repositories, while the second command will upgrade all upgradable packages in your system, including Grub Customizer.
Remove Grub Customizer on Ubuntu 22.04
There might come a time when you no longer need Grub Customizer, or perhaps you want to troubleshoot issues by reinstalling the application. To remove Grub Customizer, you can utilize the following command:
sudo apt remove grub-customizer
The above command will uninstall Grub Customizer from your system, but will leave behind the configuration files. This allows you to reinstall the application in the future without losing any previous settings.
Remove the Grub Customizer PPA on Ubuntu 22.04
If you’ve decided not to use Grub Customizer in the long run, it’s a good practice to also remove its associated PPA. This action ensures that your system will not keep checking for updates from this specific PPA. To remove the Grub Customizer PPA, run the following command:
sudo add-apt-repository --remove ppa:danielrichter2007/grub-customizer -y
By running the above command, you successfully prevent your system from contacting the Grub Customizer PPA during updates.
FAQs to Install Grub Customizer on Ubuntu 22.04
Is Grub Customizer available in the Ubuntu Software Center?
No, Grub Customizer is not available directly in the Ubuntu Software Center. You need to install it from external repositories or manually download the package.
Can Grub Customizer modify the boot order and timeout period?
Yes, Grub Customizer allows you to modify the boot order of operating systems listed in the GRUB menu, as well as the timeout period for automatic booting.
Can I customize the appearance of the GRUB menu using Grub Customizer?
Yes, Grub Customizer provides options to customize the GRUB menu's appearance, including background image, theme, font, and other visual elements.
Can Grub Customizer create new boot entries for different Linux kernels?
Yes, Grub Customizer can detect and add new boot entries automatically when new Linux kernels are installed, allowing you to choose between different kernel versions during startup.
Can Grub Customizer handle dual-boot setups with Windows?
Yes, Grub Customizer can manage dual-boot setups, including systems with Windows. It can set the default boot entry for easy selection between Linux and Windows during startup.
Does Grub Customizer provide a backup option for the GRUB configuration?
Yes, Grub Customizer allows you to backup and restore the GRUB configuration, ensuring you can revert any changes or restore the default settings if necessary.
Is Grub Customizer compatible with EFI systems?
Yes, Grub Customizer supports EFI (Extensible Firmware Interface) systems, providing customization options for the GRUB EFI bootloader.
Conclusion
Throughout this tutorial, you’ve been introduced to Grub Customizer and its significant role in managing the GRUB bootloader on your Ubuntu system.
If you have any queries, feel free to ask them in the comments section, and we would be happy to respond to them.

