
Choose a different version or distribution
Introduction
Before we begin talking about how to install Jenkins on Ubuntu 22.04, let's briefly understand – What is Jenkins?
Jenkins is a popular open-source automation server used for continuous integration and delivery (CI/CD). It enables developers to automate various stages of software development, including building, testing, and deploying applications. With Jenkins, teams can efficiently collaborate, integrate code changes, and quickly identify and fix issues.
It offers a wide range of plugins, making it highly customizable and adaptable to different project requirements. By automating repetitive tasks, Jenkins boosts productivity, accelerates software delivery, and enhances overall software quality.
In this tutorial, you will install Jenkins on an Ubuntu 22.04 system. We will also address a few FAQs on how to install Jenkins on Ubuntu 22.04.
Advantages of Jenkins
- Automation: Jenkins automates the entire software development lifecycle, from building to deployment, saving time and reducing errors.
- Continuous Integration: Jenkins enables seamless integration of code changes, ensuring early detection of conflicts and promoting collaboration among team members.
- Extensibility: With a vast array of plugins, Jenkins can be customized to meet specific project needs, expanding its functionality and versatility.
- Scalability: Jenkins supports distributed computing, allowing it to handle large-scale projects and accommodate growing development teams.
- Community Support: Jenkins has a thriving open-source community, providing regular updates, bug fixes, and extensive documentation, ensuring reliable support and continuous improvement.
Prerequisites to Install Jenkins on Ubuntu 22.04
- A machine running Ubuntu 22.04 Jammy Jellyfish.
- A user account with administrator privileges.
- You need a connection to a terminal window or command line
CTRL+ALT+T.
Step 1: Install Java
Java Runtime Environment is necessary for Jenkins (JRE). For the Java environment, OpenJDK is used in this guide. The Java Runtime Environment is part of the development kit known as OpenJDK.
Jenkins only supports Java 11 or 17 on Ubuntu at the time of writing. On Ubuntu, you can install multiple versions of Java. If you do, ensure that Java 11 or Java 17 is set as the default version.
For instructions on how to install Java on Ubuntu, see below:
- Verify that Java is already installed on your Ubuntu system.
java -version
We will use OpenJDK to install Java as it is not already installed on our system.
2. First, open a terminal window and execute the following command to update the system package repository:
sudo apt update
Once you have entered your administrator password, wait for the update to complete.
3. Execute one of the following commands depending on the Java version, Java 11:
- Execute the following command to install OpenJDK 11:
sudo apt install openjdk-11-jdk -y
On our machine, we install OpenJDK version 11.
Step 2: Add Jenkins Repository
Jenkins should be installed from the project-managed repository rather than the default Ubuntu repository. The Jenkins version in the default Ubuntu repository might not be the most recent version, in which case it might not have the newest features and bug fixes.
To add the Jenkins repository to your Ubuntu system, follow the procedures listed below.
1) Firstly, import the GPG key. The package integrity is verified by the GPG key, Run:
curl -fsSL https://pkg.jenkins.io/debian-stable/jenkins.io.key | sudo tee /usr/share/keyrings/jenkins-keyring.asc
2) Add the Jenkins software repository to the source list and supply the authentication key:
echo deb [signed-by=/usr/share/keyrings/jenkins-keyring.asc] https://pkg.jenkins.io/debian-stable binary/ | sudo tee /etc/apt/sources.list.d/jenkins.list
The Long Term Support (LTS) stable release is added to the sources list by the command, but no output is produced.
Step 3: Install Jenkins
After installing the prerequisites, adhere to the steps below to install Jenkins on Ubuntu:
01. The system repository should be updated once more. The system is updated with the new Jenkins repository and the cache is refreshed.
sudo apt update
02. Run the following command to install Jenkins:
sudo apt install jenkins -y
Wait for the download and installation to finish.
03. Execute the upcoming command to see if Jenkins is set up and running:
sudo systemctl status jenkins
The service should be functioning when a bright green entry with the label active (running) appears in the output.
By using Ctrl+Z, you can exit the status screen.
Note: Use the following command to start the Jenkins service if it is not already active or running:
sudo systemctl enable --now jenkins
Step 4: Modify the Firewall to Allow Jenkins
Configure the UFW firewall to its default settings and enable Jenkins to communicate.
- Run the commands below to open port 8080:
sudo ufw allow 8080
sudo ufw status
To enable traffic on a different firewall application, follow its specific instructions to allow traffic on port 8080.
2. If the UFW firewall has not been configured yet, it shows as inactive. Activate UFW by executing:
sudo ufw enable
Step 5: Set up Jenkins
To set up Jenkins and use it, follow these steps:
- Open a web browser and navigate to your server's IP address. Use the syntax shown below:
http://ip_address_or_domain:8080
Use the server's actual IP address or domain name for the server you're using Jenkins on. Use localhost (127.0.0.1) if you are running Jenkins locally, for instance:
http://localhost:8080

You are asked to Unlock Jenkins on a page that opens. The following step is to obtain the necessary administrator password.
2. Open the terminal and enter the following command to find the default Jenkins unlock password:
sudo cat /var/lib/jenkins/secrets/initialAdminPassword
3. An alphanumeric code is returned by the system. Click Continue after entering that code in the Administrator password field.
4. The setup asks you to either Install suggested plugins or Select plugins to install. Just installing the recommended plugins is acceptable.
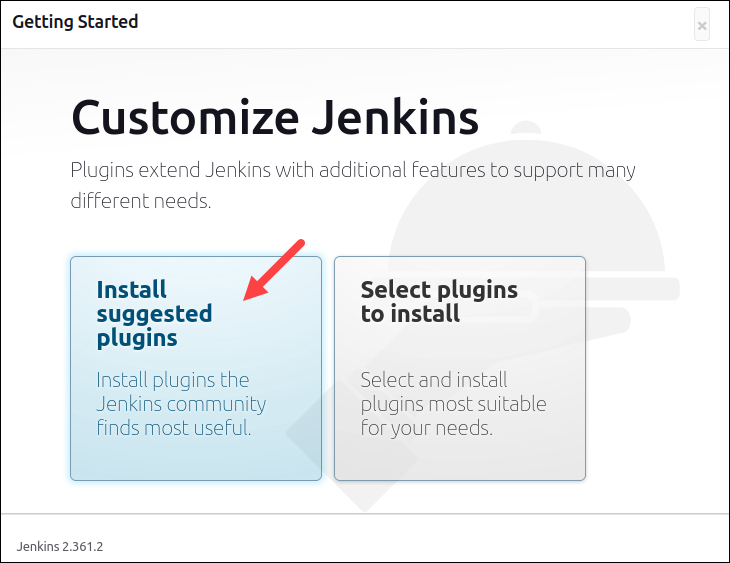
More plugins can always be added later. The system continues the initial Jenkins configuration.
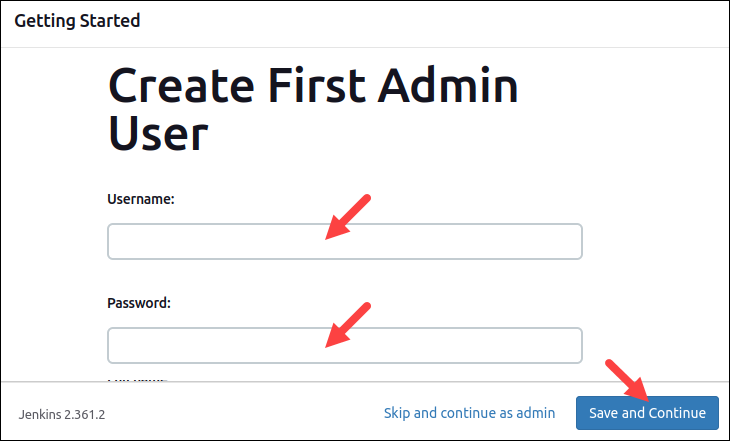
5. The next step is to Create First Admin User. Click Save and Continue after entering the credentials you want to use for your Jenkins administrator.
6. After that, you should configure the Instance Configuration. This is the recommended network address for this Jenkins installation. Verify the address you want to use for your server. The address you used to access this configuration page is probably the same as this one.
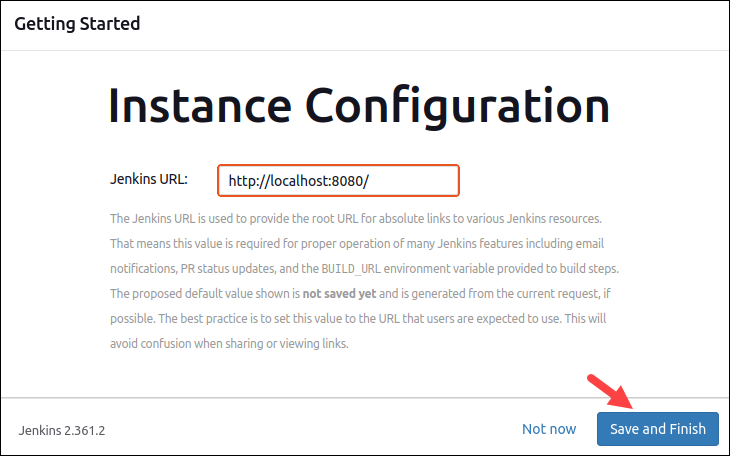
Once the Jenkins URL has been entered, click Save and Finish.
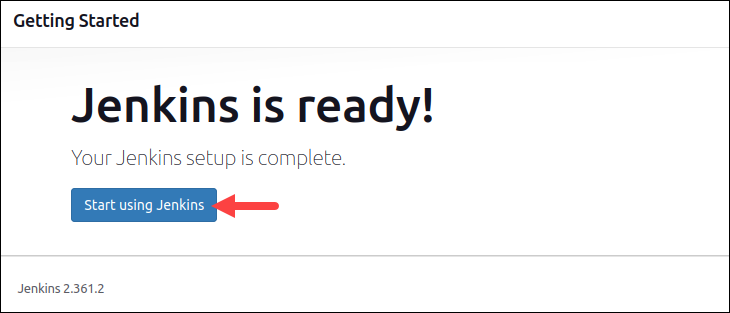
7. You should see a screen that reads Jenkins is ready! You may access the Jenkins dashboard by clicking Start using Jenkins.
FAQs to Install Jenkins on Ubuntu 22.04
What are the system requirements for installing Jenkins on Ubuntu 22.04?
Jenkins requires Java Development Kit (JDK) 11 or later and a minimum of 2GB RAM to run on Ubuntu 22.04.
What is the recommended method to install Jenkins on Ubuntu 22.04?
The recommended method is to install Jenkins using the official Debian package repository. Detailed instructions can be found on the Jenkins website.
Can I install Jenkins using the Ubuntu package manager (apt)?
Yes, Jenkins can be installed using apt on Ubuntu 22.04. However, it is recommended to use the official Debian package repository for the latest stable version.
How can I start, stop, or restart the Jenkins service on Ubuntu 22.04?
You can manage the Jenkins service using the following commands:
sudo systemctl start jenkins
sudo systemctl stop jenkins
sudo systemctl restart jenkins
Where can I find the Jenkins initial admin password after installation?
The Jenkins initial admin password is stored in the file located at: /var/lib/jenkins/secrets/initialAdminPassword.
How can I access the Jenkins web interface after installation?
Jenkins runs on port 8080 by default. You can access the Jenkins web interface by opening your browser and navigating to: http://your_server_ip_or_domain:8080.
Conclusion
We hope this detailed tutorial helped you understand how to install Jenkins on Ubuntu 22.04
If you have any suggestions or queries, kindly leave them in the comments section.