
Choose a different version or distribution
Introduction
Before we begin talking about how to install LAMP on Ubuntu 20.04, let’s briefly understand – What is LAMP?
The LAMP stack is a popular and powerful combination of software used to build and run websites and web applications. LAMP stands for Linux, Apache, MySQL, and PHP/Python/Perl, representing the key components of the stack. Linux is the operating system, Apache is the web server, MySQL is the database management system, and PHP/Python/Perl are the programming languages.
This open-source stack provides a robust and scalable solution for developing dynamic websites. With Linux as the foundation, Apache as the web server, MySQL for managing data, and PHP/Python/Perl for programming, developers can create and deploy websites efficiently. The LAMP stack is highly customizable, flexible, and widely supported by the developer community, making it a popular choice for web development projects.
In this tutorial, you will install LAMP on Ubuntu 20.04. Also, we will answer some FAQs related to LAMP installation.
Advantages of LAMP Stack (Linux, Apache, MySQL, PHP)
- Open-source: LAMP stack components are free, fostering cost-effective development.
- Flexibility: Customizable components allow developers to tailor the stack to specific project requirements.
- Wide Support: LAMP has a vast developer community, providing extensive resources and troubleshooting assistance.
- Scalability: LAMP is highly scalable, accommodating growth and handling increased website traffic.
- Rapid Development: LAMP's integrated components enable fast development and deployment of dynamic websites and applications.
Prerequisites to Install LAMP Stack (Linux, Apache, MySQL, PHP) on Ubuntu 20.04
- Ubuntu 20.04 64-bit operating system
- A user account with sudo privileges
- Command-line/terminal
Step 1 - Install Apache and Update the Firewall
1) Firstly, using Ubuntu's package manager install Apache.
sudo apt update
sudo apt install apache2
2) For first-time sudo users in this session, you must provide your user's password to confirm your privileges to manage system packages with apt. Meanwhile, you must also confirm Apache’s installation by pressing Y and then ENTER.
3) After that, to allow HTTP traffic you must adjust your firewall settings. You can accomplish that with different applications available in UFW. Run the below command to list all available UFW application profiles:
sudo ufw app list
As a result, you will see an output like this:
Output

Available applications:
  Apache
  Apache Full
  Apache Secure
  OpenSSH
Meaning of the profiles you got above:
- Apache: This profile can only open port
80(normal, unencrypted web traffic). - Apache Full: This profile opens both port 80 (normal, unencrypted web traffic) and port 443 (TLS/SSL encrypted traffic).
- Apache Secure: This profile only opens port
443(TLS/SSL encrypted traffic).
4) For now, allow only port 80 connections, since you don't have a TLS/SSL certificate configured to allow for HTTPS traffic on your server.
sudo ufw allow in "Apache"
5) After that, verify the change with the following command:
sudo ufw status
So consequently, your output will be something like this:
Output

Status: active

To                         Action      From
--                         ------      ----
OpenSSH                    ALLOW       Anywhere
Apache                     ALLOW       Anywhere
OpenSSH (v6)               ALLOW       Anywhere (v6)
Apache (v6)                ALLOW       Anywhere (v6)
- Through the firewall, traffic is now allowed on the port
80. - Do a spot check right away to verify if everything went well by visiting your server's public IP address in your web browser ( If you do not have this information, see the note under FAQ's section of this article to find out your public IP address).
http://your_server_ip
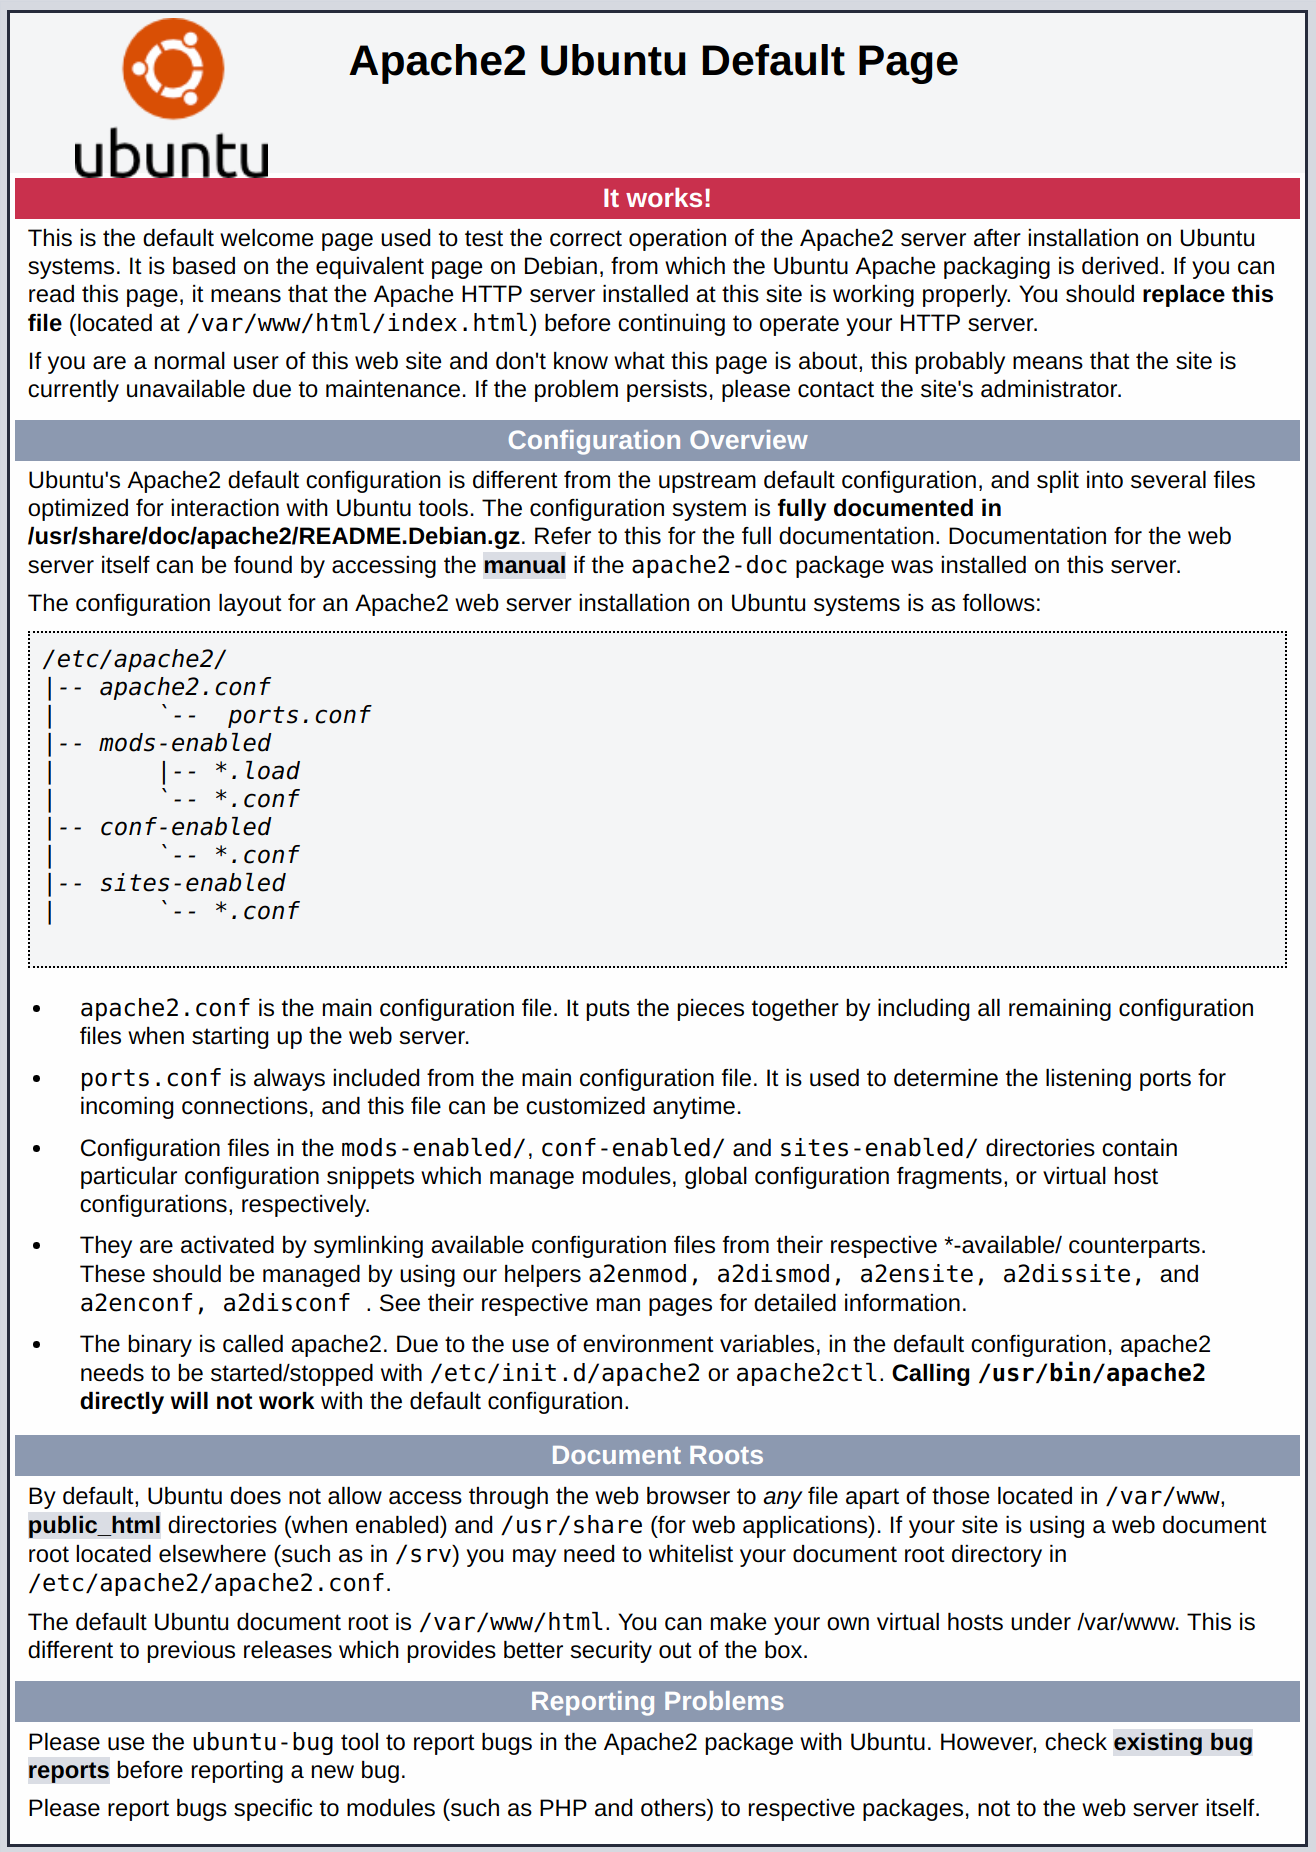
- Meanwhile, you will see Ubuntu 20.04 Apache web page. It is an informational and testing purposes page. It should look something like this:
Step 2 - Install MySQL
1) Firstly, install the database management system MySQL to store and manage data of your site.
Again, acquire and install this software by using apt:
sudo apt install mysql-server
2) Now you need to confirm the installation by typing Y and then press ENTER.
3) After that, run a security script that comes pre-installed with MySQL. As a result, insecure default settings and lockdown to access your database will be removed. Run the below command to start the interactive script:
sudo mysql_secure_installation
3) After that, configure VALIDATE PASSWORD PLUGIN.
4) Now, press Y for yes, or anything else to continue without enabling.
VALIDATE PASSWORD PLUGIN can be used to test passwords
and improve security. It checks the strength of password
and allows the users to set only those passwords which are
secure enough. Would you like to setup VALIDATE PASSWORD plugin?

Press y|Y for Yes, any other key for No:
5) If your answer is "yes", select a level of password validation. If you select 2 then you will have to make sure that you are using upper and lower case letters, numbers as well as special characters.
There are three levels of password validation policy:

LOW    Length >= 8
MEDIUM Length >= 8, numeric, mixed case, and special characters
STRONG Length >= 8, numeric, mixed case, special characters and dictionary              file

Please enter 0 = LOW, 1 = MEDIUM and 2 = STRONG: 1
6) Now you will be asked to select and confirm a password for the MySQL root user. Don't confuse it with the system root. The database root will give you full access to the database system.
If the password validation is enabled then you will be able to see the password strength of the password you set. If you are convinced with your current password then enter Y when given the following prompt:
Estimated strength of the password: 100
Do you wish to continue with the password provided?(Press y|Y for Yes, any other key for No) : y
Similarly, press Y and hit the ENTER key at each prompt for the rest of the questions.
7) Now, test if you are able to login into the MySQL by typing:
sudo mysql
You must see an output like this:
Output

Welcome to the MySQL monitor.  Commands end with ; or \g.
Your MySQL connection id is 22
Server version: 8.0.19-0ubuntu5 (Ubuntu)

Copyright (c) 2000, 2020, Oracle and/or its affiliates. All rights reserved.

Oracle is a registered trademark of Oracle Corporation and/or its
affiliates. Other names may be trademarks of their respective
owners.

Type 'help;' or '\h' for help. Type '\c' to clear the current input statement.

mysql>
8) To exit MySQL type:
exit
Make sure you have dedicated user accounts with less expansive privileges set up for every database, especially if you plan on having multiple databases hosted on your server for increased security.
Step 3 - Install PHP
1) Firstly, install packages by running:
sudo apt install php libapache2-mod-php php-mysql
2) Now, run the command below to confirm your PHP version:
php -v
The output will look something like this:
Output

PHP 7.4.3 (cli) (built: Mar 26 2020 20:24:23) ( NTS )
Copyright (c) The PHP Group
Zend Engine v3.4.0, Copyright (c) Zend Technologies
    with Zend OPcache v7.4.3, Copyright (c), by Zend Technologies
Congratulations, your LAMP stack is completely operational. But, before testing it let's set up a proper Apache Virtual Host to hold your website’s files and folders.
Step 4 - Virtual Host for your Website
You can create virtual hosts (similar to server blocks in Nginx) to enclose configuration details and host more than one domain from a single server. We will set up a domain called your_domain, you should replace this with your desired domain name.
1) Create a directory for your_domain by following further steps:
sudo mkdir /var/www/your_domain
2) After that, refer your current system user by assigning ownership of the directory with the $USER environment variable
sudo chown -R $USER:$USER /var/www/your_domain
3) Now, using your preferred command-line editor open a new configuration file in Apache’s sites-available directory. we’ll use nano here:
sudo nano /etc/apache2/sites-available/your_domain.conf
4) Paste the following bare-bones configuration in the new blank file created:
<VirtualHost *:80>
    ServerName your_domain
    ServerAlias www.your_domain
    ServerAdmin webmaster@localhost
    DocumentRoot /var/www/your_domain
    ErrorLog ${APACHE_LOG_DIR}/error.log
    CustomLog ${APACHE_LOG_DIR}/access.log combined
</VirtualHost>
5) After that, Save and close the file when you are done.
We’re telling Apache to serve your_domain using /var/www/your_domain as the web root directory. If you’d like to test Apache without a domain name, you can remove or comment out the options ServerName and ServerAlias by adding a # character at the beginning of each option’s lines.
6) Enable the new virtual host by using a2ensite
sudo a2ensite your_domain
7) Disable Apache's default website.
sudo a2dissite 000-default
8) Run the below command to make sure that the configuration file does not have any syntax errors.
sudo apache2ctl configtest
9) Finally, you must reload Apache to ensure these changes take effect.
sudo systemctl reload apache2
10) After that, test your new active website by creating an index.html file in the web root /var/www/your_domain so that we can test that the virtual host works as expected.
nano /var/www/your_domain/index.html
11) Add the below content in that file:
<html>
  <head>
    <title>your_domain website</title>
  </head>
  <body>
    <h1>Hello World!</h1>

    <p>This is the landing page of <strong>your_domain</strong>.</p>
  </body>
</html>
12) Now, access your server’s domain name or IP address once again:
http://server_domain_or_IP
You will see a similar page:
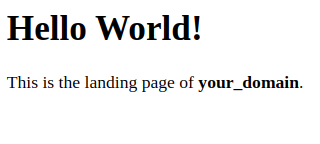
If you can see this page, it means your Apache virtual host is working as expected.
Step 5 - Test PHP Processing on your Web Server
1) Firstly, create a new info.php in your custom web root folder.
nano /var/www/your_domain/info.php
2) After that, add the following text (which is valid PHP code) in the blank file:
<?php
phpinfo();
3) Save and close the file after you complete this process.
4) Test this script by accessing your server’s domain name or IP address, followed by the script name, which in this case is info.php in the web browser:
http://server_domain_or_IP/info.php
You must see a page similar to this:
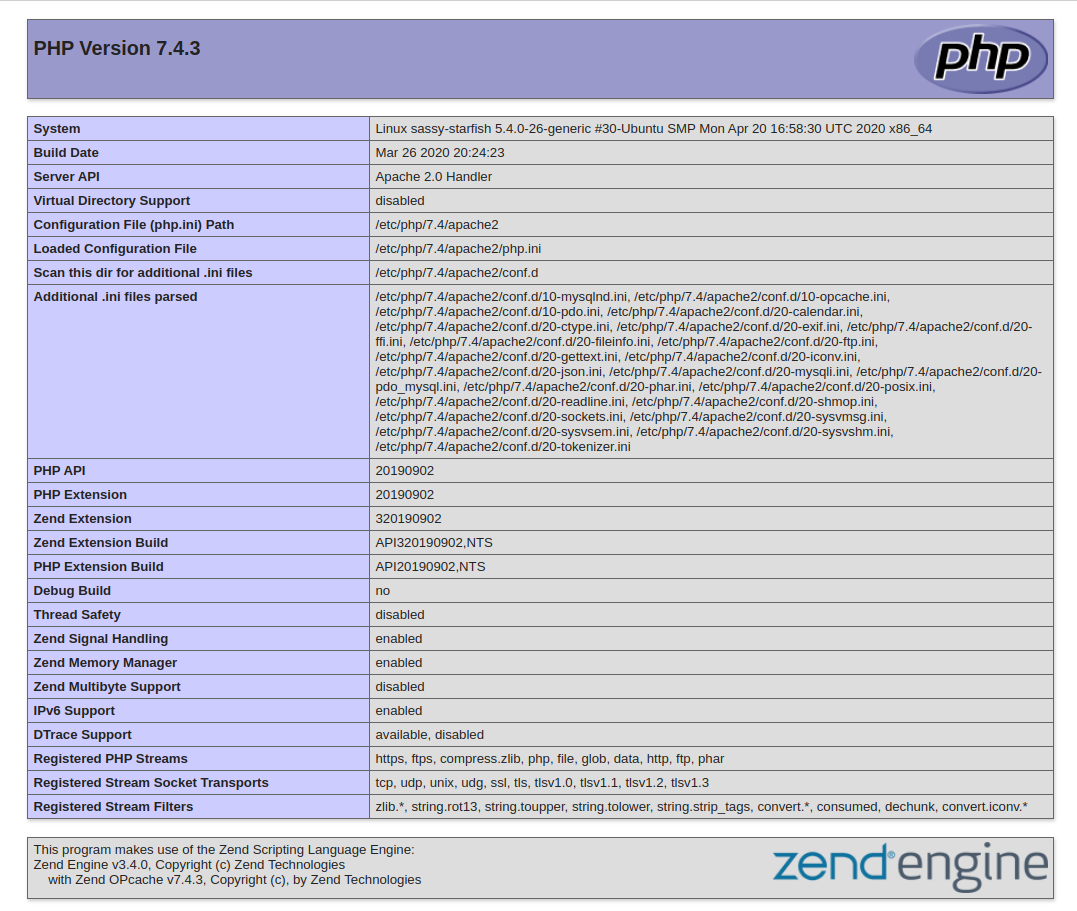
Use the information displayed on this page for debugging and to ensure that your settings are being applied correctly.
5) Finally, remove the file you created as it contains sensitive information about your PHP environment and your Ubuntu server.
sudo rm /var/www/your_domain/info.php
You can recreate this page anytime again.
Step 6 - Test Database Connection from PHP (Optional)
To check and confirm if PHP is able to connect with MySQL and execute database queries you need to create a test table with the dummy data and query for its contents from a PHP script. Before that, you have to create a test database and a MySQL user configured properly to access it.
1) Firstly, using the root account connect to the MySQL console.
sudo mysql
2) After that, run the following command from your MySQL console to create a new database:
CREATE DATABASE example_database;
3) Now, create a new user and grant them full privileges on the custom database you’ve just created.
CREATE USER 'example_user'@'%' IDENTIFIED WITH mysql_native_password BY 'password';
4) After that, give this user permission over the example_database database.
GRANT ALL ON example_database.* TO 'example_user'@'%';
5) Now, exit the MySQL Shell.
exit
6) After that, login to the MySQL console again, this time using the custom user credentials to test if the new user has the proper permissions.
mysql -u example_user -p
7) Now, confirm that you have access to the example_database database:
SHOW DATABASES;
You must get the following output:
Output

+--------------------+
| Database           |
+--------------------+
| example_database   |
| information_schema |
+--------------------+
2 rows in set (0.000 sec)
8) Now, create a test table named todo_list and run the following statement:
CREATE TABLE example_database.todo_list (item_id INT AUTO_INCREMENT, content VARCHAR(255), PRIMARY KEY(item_id));
9) After that, insert a few rows of content into the test table.
INSERT INTO example_database.todo_list (content) VALUES ("My first important item");
10) Now confirm the successful entry of the data into your table by running:
SELECT * FROM example_database.todo_list;
You must see the following output:
Output

+---------+--------------------------+
| item_id | content                  |
+---------+--------------------------+
|       1 | My first important item  |
|       2 | My second important item |
|       3 | My third important item  |
|       4 | and this one more thing  |
+---------+--------------------------+
4 rows in set (0.000 sec)
11) After that, exit the MySQL console after confirming that you have valid data in your test table.
exit
12) Now, create a new PHP file using nano (you can use any preferred editor) in your custom web root directory.
nano /var/www/your_domain/todo_list.php
13) Connect the MySQL database and queries for the content of todo_list table by using the following PHP script. If there’s a problem with the database connection, you will get an exception.
14) Finally, copy the following content into your todo_list.php script:
<?php
$user = "example_user";
$password = "password";
$database = "example_database";
$table = "todo_list";

try {
  $db = new PDO("mysql:host=localhost;dbname=$database", $user, $password);
  echo "<h2>TODO</h2><ol>";
  foreach($db->query("SELECT content FROM $table") as $row) {
    echo "<li>" . $row['content'] . "</li>";
  }
  echo "</ol>";
} catch (PDOException $e) {
    print "Error!: " . $e->getMessage() . "<br/>";
    die();
}
After completing save and close the file.
15) Now, access this page in your web browser by visiting the domain name or public IP address configured for your website, followed by /todo_list.php:
http://your_domain_or_IP/todo_list.php
You must see a page like this with the content you have inserted:

Congratulations, your PHP environment is ready to connect and interact with your MySQL server.
FAQs to Install LAMP on Ubuntu 20.04
How can I test if Apache is running after installation?
You can test if Apache is running by opening a web browser and entering your server's IP address or domain name. If Apache is running, you should see the default Apache2 Ubuntu Default Page.
What is the default web root directory in Ubuntu 20.04?
The default web root directory in Ubuntu 20.04 is /var/www/html. You can place your website files in this directory.
How do I secure my MySQL installation after installation?
To secure your MySQL installation, you can run the following command: sudo mysql_secure_installation.
How do I configure Apache to use a custom domain name?
To configure Apache to use a custom domain name, you need to create a virtual host configuration file. Place your configuration file in the /etc/apache2/sites-available/ directory and enable it using a2ensite. Don't forget to update DNS records to point to your server's IP address.
How do I start, stop, or restart Apache?
You can start, stop, or restart Apache using the following commands:
sudo systemctl start apache2
sudo systemctl stop apache2
sudo systemctl restart apache2
How do I access MySQL from the command line?
To access MySQL from the command line, you can use the following command: mysql -u username -p
Replace username with your MySQL username. You will be prompted to enter your password before accessing the MySQL command-line interface.
Conclusion
We hope this tutorial helped you understand how to install LAMP on your Ubuntu 20.04 machine.
If you have any queries, please leave a comment below and we’ll be happy to respond to them for sure.