
Choose a different version or distribution
Introduction
Before we begin talking about how to install Magento 2 on Ubuntu 20.04, let’s briefly understand – What is Magento?
Magento 2 is a popular and powerful e-commerce platform, known for its versatility and user-friendliness. Released as an upgrade to the original Magento, it offers enhanced performance, flexibility, and a seamless shopping experience. With a wide range of customizable themes and extensions, Magento 2 empowers businesses of all sizes to create and manage online stores efficiently.
Its user-friendly interface, robust features, and SEO capabilities make it an ideal choice for businesses seeking to establish a strong online presence and boost sales.
This tutorial will guide you through the steps involved in installing Magento 2 on Ubuntu 20.04. We will also address a few FAQs on how to install Magento 2 on Ubuntu 20.04.
Advantages of Magento 2
- Enhanced Performance: Magento 2 offers faster page loading times, reducing bounce rates and improving user experience.
- User-Friendly Interface: Its intuitive admin panel simplifies store management for non-technical users.
- Extensive Customization: A wide range of themes and extensions allow personalized online stores.
- Mobile-Optimized: Responsive design ensures seamless shopping across various devices.
- SEO Capabilities: Built-in SEO features boost search engine rankings, increasing online visibility and traffic.
Prerequisites to Install Magento 2 on Ubuntu 20.04
In order to make the installation a success, you're going to require the following:
- A domain name pointing to your public server IP.
- Apache is installed on your Ubuntu machine.
- An SSL Certificate for your domain to encrypt user information.
Step 1 - Install Apache 2.2, along with the required PHP Extensions
Apache server is the most common cross-platform HTTP server which is supported by Linux, Windows, and other operating systems.
1) In order to install Apache, you need to update the packages and then install Apache with the following command:
sudo apt update
sudo apt install apache2
2) Use the following command if you want Apache to run automatically during startup:
sudo systemctl enable apache2.service
Configure Apache Virtual Host
1) To declare Apache site configuration for the Magento store, you need to create a new configuration file magento2.conf:
sudo nano /etc/apache2/sites-available/magento2.conf
2) Paste the following data on the above file, make sure to change domain.com to your own domain name:
<VirtualHost *:80>
     ServerAdmin [email protected]
     DocumentRoot /var/www/html/magento2/
     ServerName domain.com
     ServerAlias www.domain.com

     <Directory /var/www/html/magento2/>
        Options Indexes FollowSymLinks MultiViews
        AllowOverride All
        Order allow,deny
        allow from all
     </Directory>

     ErrorLog ${APACHE_LOG_DIR}/error.log
     CustomLog ${APACHE_LOG_DIR}/access.log combined
</VirtualHost>
3) In case you are installing Magento locally, make sure you change domain.com to localhost.com, dev.com or m2.com. After that, you have to update hosts file at /etc/hosts with the help of the following command:
127.0.0.1 localhost.com
127.0.0.1 dev.com
127.0.0.1 m2.com
Enable Rewrite mode
Now, enable the rewrite mode with the help of the following command:
sudo a2ensite magento2.conf
sudo a2enmod rewrite
sudo a2dissite 000-default
Install PHP 8.1 along with its extensions
You can install PHP and its extensions with the following command:
sudo add-apt-repository ppa:ondrej/php
sudo apt install php8.1 libapache2-mod-php8.1 php8.1-common php8.1-gmp php8.1-curl php8.1-soap php8.1-bcmath php8.1-intl php8.1-mbstring php8.1-xmlrpc php8.1-mcrypt php8.1-mysql php8.1-gd php8.1-xml php8.1-cli php8.1-zip php8.1-fpm unzip -y
Update php.ini file:
1) Now, open the php.ini file:
sudo nano /etc/php/8.1/apache2/php.ini
2) After that, change the data given below:
file_uploads = On
allow_url_fopen = On
short_open_tag = On
memory_limit = 512M
upload_max_filesize = 128M
max_execution_time = 3600
3) Save the php.ini file, then restart Apache with the following command:
sudo a2enconf php8.1-fpm
sudo a2enmod proxy_fcgi setenvif
sudo systemctl restart apache2.service
Step 2 - Install Database Server
1) It has been observed that Magento prefers the MariaDB server over the default MySQL server. Run the following command to install MariaDB Server and Client:
sudo apt-get install mariadb-server mariadb-client
2) Make sure it starts on startup and then reboot the system:
sudo systemctl restart mariadb.service
sudo systemctl enable mariadb.service
3) Next, set up the MariaDB server:
sudo mysql_secure_installation
4) When prompted, choose the following options:
Enter current password for root (enter for none): Enter
Set root password? [Y/n]: Y
New password: Type your password
Re-enter new password: Type your password
Remove anonymous users? [Y/n]: Y
Disallow root login remotely? [Y/n]: Y
Remove test database and access to it? [Y/n]:  Y
Reload privilege tables now? [Y/n]:  Y
Step 3 - Create a MySQL User
Magento requires a unique user and cannot be accessed by the default root user.
1) Hence, you'll have to start by logging into MariaDB
sudo mysql -u root -p
2) Next, create a new database for Magento:
CREATE DATABASE magento2;
3) Now, create a new username: mageplaza
CREATE USER 'mageplaza'@'localhost' IDENTIFIED BY 'YOUR_PASSWORD';
4) Next, grant mageplaza user to magento2 database:
GRANT ALL ON magento2.* TO 'mageplaza'@'localhost' IDENTIFIED BY 'YOUR_PASSWORD' WITH GRANT OPTION;
5) Now flush privileges and exit
FLUSH PRIVILEGES;
EXIT;
Step 4 - Install Composer
1) Use the command given below to install Composer
curl -sS https://getcomposer.org/installer | sudo php -- --install-dir=/usr/local/bin --filename=composer
2) Check the installation with the help of the following command:
composer -v
3) You shall see the following output:
Output

   ______
  / ____/___  ____ ___  ____  ____  ________  _____
 / /   / __ \/ __ `__ \/ __ \/ __ \/ ___/ _ \/ ___/
/ /___/ /_/ / / / / / / /_/ / /_/ (__  )  __/ /
\____/\____/_/ /_/ /_/ .___/\____/____/\___/_/
                    /_/
Composer version 2.1.6 2021-08-28
Step 5 - Download and Install Elasticsearch
The Magento 2.4.x installations must be configured to use Elasticsearch as the catalog search solution.
Elasticsearch is not available in the Ubuntu 20.04 repository. We have to add the Elasticsearch repository to the system.
Install dependencies:
sudo apt install apt-transport-https ca-certificates gnupg2 -y
Import the GPG key using the following command:
sudo wget -qO - https://artifacts.elastic.co/GPG-KEY-elasticsearch | sudo apt-key add -
Run the command below to add the Elasticsearch repository:
sudo sh -c 'echo "deb https://artifacts.elastic.co/packages/7.x/apt stable main" > /etc/apt/sources.list.d/elastic-7.x.list'
Install the Elasticsearch:
sudo apt update
sudo apt install elasticsearch -y
Start and enable the Elasticsearch:
sudo systemctl --now enable elasticsearch
Verify the installation using the following command:
curl -X GET "localhost:9200"
Step 5 - Download and Install Magento
1) Choose one of the following links to download Magento:
wget https://github.com/magento/magento2/archive/refs/tags/2.4.4-p2.tar.gz
2) Now, extract the package to /var/www/html/. For instance, a folder named: magento2 in /var/www/html/
sudo tar xzvf 2.4.4-p2.tar.gz -C /var/www/html/
sudo mv /var/www/html/magento2-2.4.4-p2 /var/www/html/magento2
3) Then set permissions with the help of the following command:
sudo chown -R www-data:www-data /var/www/html/magento2/
sudo chmod -R 755 /var/www/html/magento2/
cd /var/www/html/magento2/ && sudo chmod -R 777 pub/* var/*
sudo chown -R www-data:www-data .
Install Magento
1) Install dependencies, compile, and install the Magento:
cd /var/www/html/magento2
sudo composer install
sudo php bin/magento module:enable --all;

sudo php bin/magento setup:di:compile

sudo systemctl start elasticsearch

sudo bin/magento setup:install --base-url=http://your_domain_or_ip --db-host=localhost --db-name=magento2 --db-user=mageplaza --db-password=pass --admin-firstname=admin --admin-lastname=admin [email protected] --admin-user=admin --admin-password=admin123 --language=en_US --currency=USD --timezone=America/Chicago --use-rewrites=1
Change your --admin-user, --admin-email, --admin-password and also the db credentials. And replace your_domain_or_ip with your FQDN or IP.
Output

[SUCCESS]: Magento installation complete.
[SUCCESS]: Magento Admin URI: /admin_od95ba
Nothing to import.
Setup cron job for Magento:
sudo -u www-data bin/magento cron:install
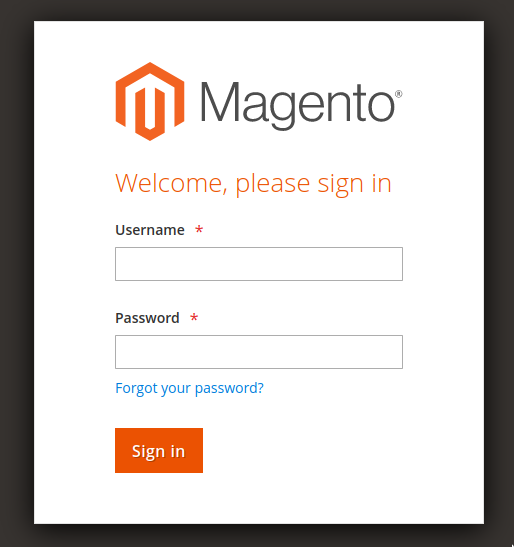
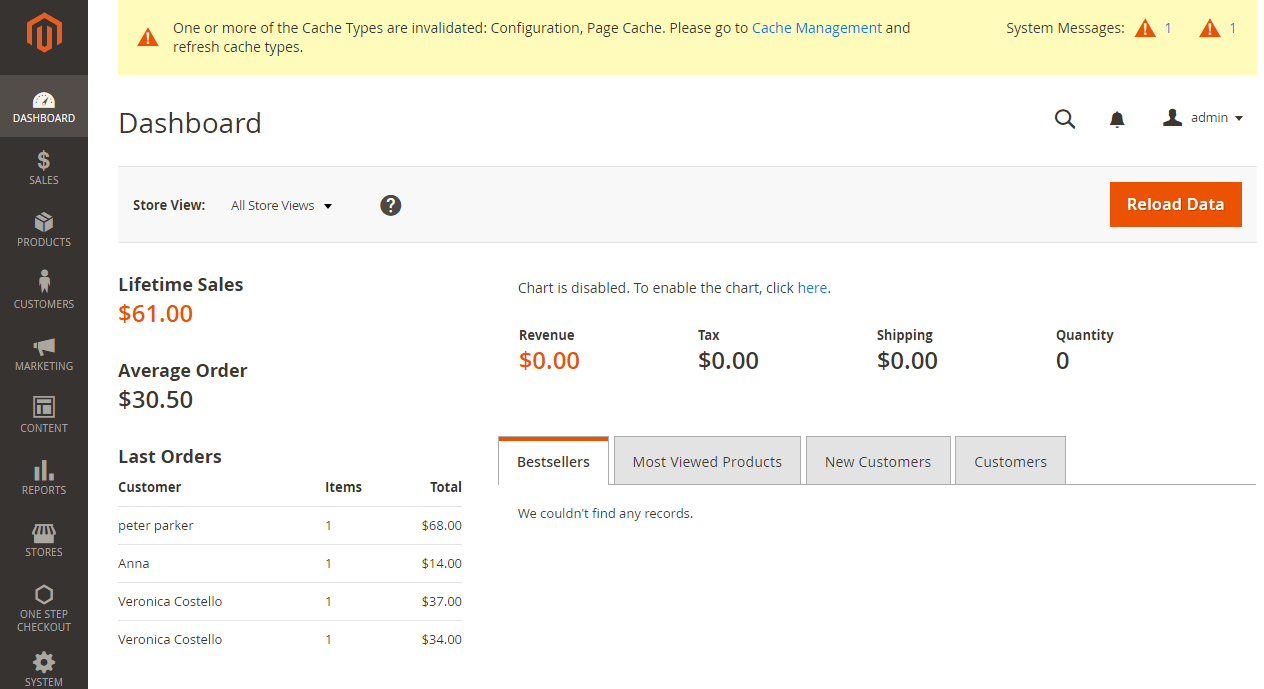
/var/www/html/magento2/var/log/system.log and /var/log/apache2/error.log.2) Use the Admin URI and Access the following path http://localhost.com/admin_od95ba or http://your_ip/admin_od95ba, and the Magento login screen will be revealed:
If you have not installed the setup using the above commands then you will see the below pages, else you will see the dashboard:

3) Now, select Start Readiness Check in order to check for any errors. If there are any, resolve them before proceeding.
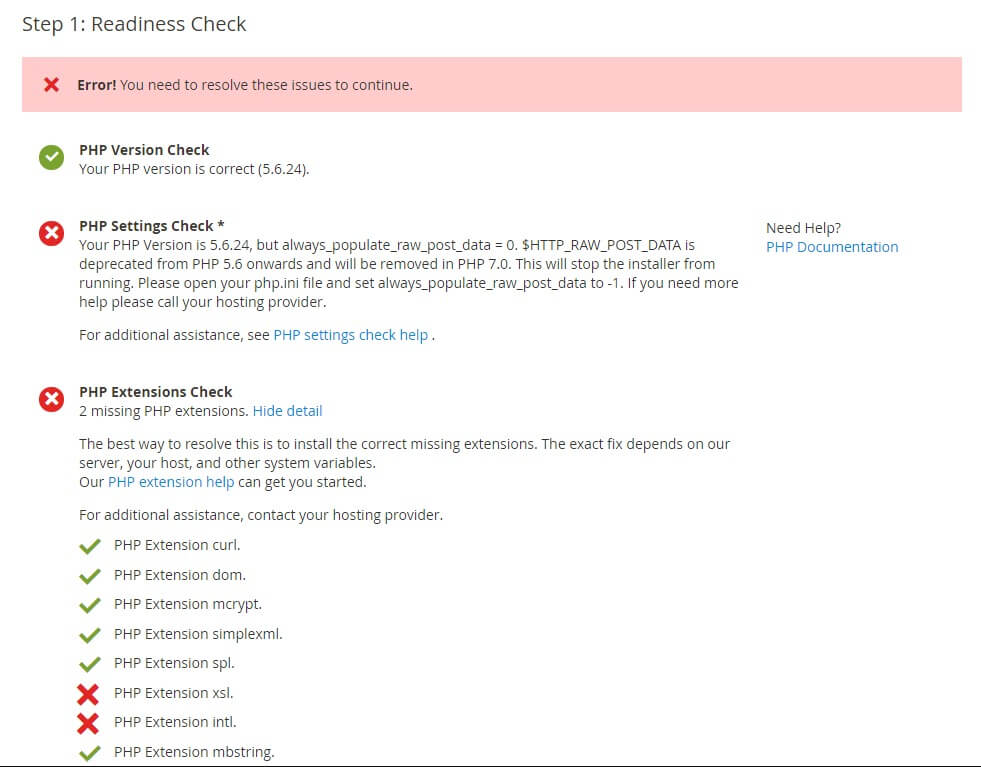
4) Click Next
Add a Database
- Fill in database information then select
Next
Web Configuration
Next, fill in the following information:
- Store Address:
http://localhost.com - Magento Admin Address: Corresponding URL
- Magento Admin, For instance: backend
- Now click
Next
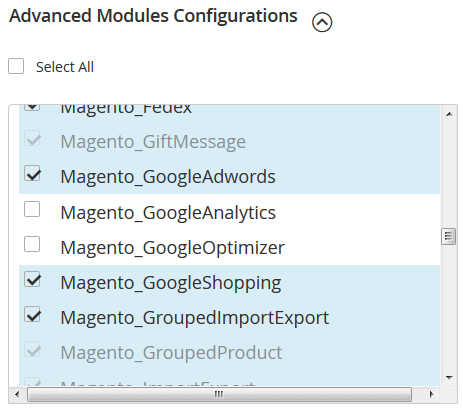
Customise your Store
- Choose the name of your store’s time zone from the Store Default Time Zone list.
- Choose the default currency to use in your store.
- Then choose the default language to use in your store.
- Expand Advanced Modules Configuration to enable or disable modules before you install the Magento software.
Create an Admin Account
1) Enter the following data
- New Username
- New E-Mail
- New Password
- Confirm Password
- Then click Next
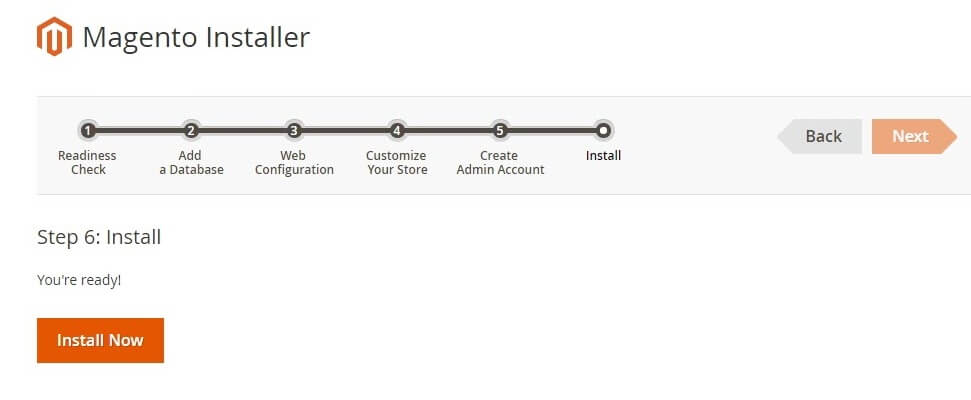
2) Now, click Install Now
3) On completion, you'll receive a message which reads "Success".
4) Now, visit the frontend and the backend to see the result.
FAQ's to Install Magento 2 on Ubuntu 20.04
What are the system requirements for installing Magento 2 on Ubuntu 20.04?
The minimum system requirements include a web server, PHP, a database, and other dependencies. Detailed requirements can be found in the official Magento 2 documentation.
How do I install a web server on Ubuntu 20.04 for Magento 2?
Apache or Nginx can be used as a web server. You can install and configure them by following the instructions provided in the official Ubuntu documentation.
Which version of PHP is required for Magento 2 on Ubuntu 20.04?
Magento 2 requires PHP 7.4 or higher. You can install the required PHP version along with necessary extensions using the package manager or by compiling from source.
What database options are available for Magento 2 on Ubuntu 20.04?
Magento 2 supports MySQL and MariaDB as database options. You can install and configure either of them to work with Magento 2.
Can I use a different database engine instead of MySQL for Magento 2 on Ubuntu 20.04?
Yes, Magento 2 also supports MariaDB as an alternative to MySQL. You can choose the database engine that suits your requirements.
Are there any additional configurations or settings required after installing Magento 2 on Ubuntu 20.04?
Yes, after the installation, you need to configure Magento 2 by setting up the store, configuring payment methods, and customizing the theme. Detailed instructions can be found in the official Magento 2 documentation.
Conclusion
We hope this detailed tutorial helped you understand how to install, configure and modify Magento on Ubuntu 20.04. To learn more about Magento installation, check out the official Magento installation Documentation.
If you have any queries, please leave a comment below, and we’ll be happy to respond to them for sure.