

Choose a different version or distribution
Introduction
Before we begin talking about how to install Memcached on AlmaLinux 9, let's briefly understand – What is Memcached?
Memcached is a widely used open-source caching system that helps speed up websites and applications by storing data in memory. It acts as a high-performance key-value store, allowing quick retrieval of data, which is crucial for boosting website loading speeds and reducing server load.
Memcached is effective for dynamic Web applications and databases by reducing the need for repeated time-consuming database requests. By caching frequently accessed data in memory, Memcached enhances webpage load times, providing a smoother user experience.
In this tutorial, you will install Memcached on AlmaLinux 9. We will also address a few FAQs on how to install Memcached on AlmaLinux 9.
Advantages of Memcached
- Improved Website Performance: Memcached enhances website speed by storing frequently accessed data in memory, reducing the need to fetch it from databases repeatedly.
- Scalability: It can easily scale to accommodate increased workload because of its distributed nature, making it ideal for growing websites and applications.
- Reduced Database Load: By caching data in memory, Memcached decreases the load on databases, preventing bottlenecks and improving overall system performance.
- Enhanced User Experience: Faster response times and reduced latency lead to a better user experience, with web pages loading quickly and efficiently.
- Cost-Efficiency: Memcached's ability to optimize performance and reduce server load can result in cost savings by requiring fewer resources, making it a cost-effective solution for improving website speed and performance.
Install Memcached on AlmaLinux via Appstream
Refresh AlmaLinux Before Memcached Installation
Update every system package on AlmaLinux first. Before installing Memcached, make sure you have the most recent updates and security patches.
Use this command to update and refresh your system:
sudo dnf upgrade --refresh
Install Memcached via DNF Command with AlmaLinux Appstream
To install Memcached, run the following command. This command installs the default Memcached package using the AlmaLinux Appstream repository. Note that although the version available in Appstream is stable, it might not always be the most recent.
You may require a more recent version of Memcached depending on your particular needs, which may include compatibility with newer technologies or performance optimization.
sudo dnf install memcached libmemcached -y
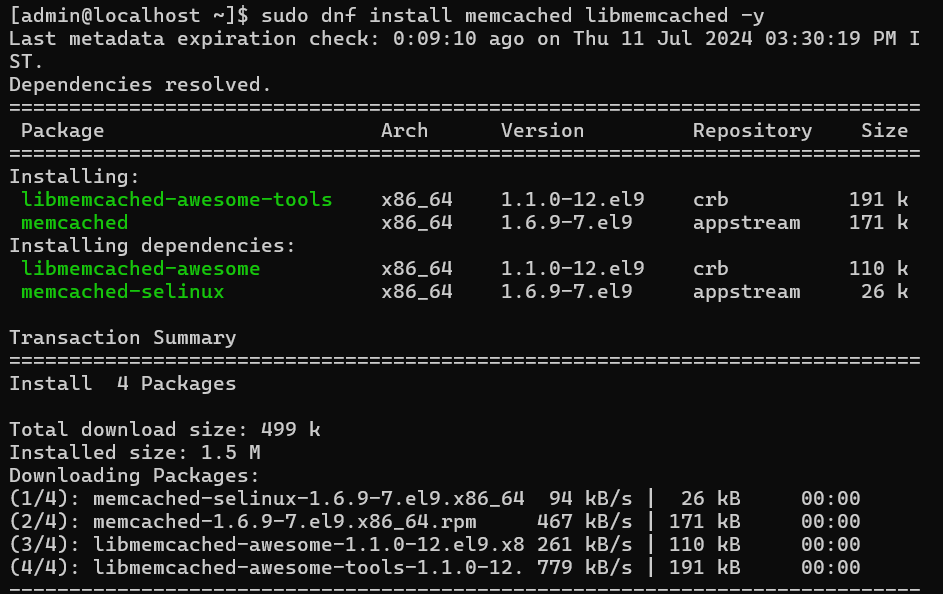
Verify Memcached Installation via AlmaLinux Appstream
It's crucial to confirm Memcached installation after installation. This step shows the version number and verifies that Memcached is installed. Understanding the version of Memcached you've installed will help you better grasp its features and constraints.
To find out which version of Memcached is installed, run the following command:
memcached --version
This concludes the installation and validation of Memcached with the AlmaLinux Appstream by default.
Install Memcached on AlmaLinux via Remi RPM
Import Remi RPM on AlmaLinux
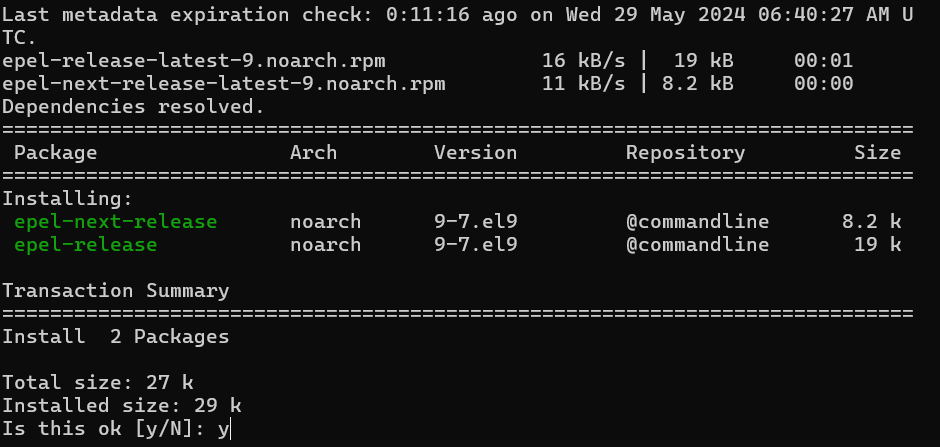
Setting up EPEL Repository
The EPEL (Extra Packages for Enterprise Linux) repository must be installed before importing the Remi repository into AlmaLinux. Because of its RHEL heritage, EPEL is a useful source for extra software packages in AlmaLinux.
In order to make AlmaLinux 9 compatible, install EPEL and launch the Code Ready Builder (CRB):
sudo dnf config-manager --set-enabled crb
sudo dnf install \
    https://dl.fedoraproject.org/pub/epel/epel-release-latest-9.noarch.rpm \
    https://dl.fedoraproject.org/pub/epel/epel-next-release-latest-9.noarch.rpm
Adding Remi Repository
The Remi repository needs to be added after EPEL has been set up. Regarding the most recent Memcached versions, Remi is a reliable source.
Install AlmaLinux 9's Remi repository:
sudo dnf install dnf-utils http://rpms.remirepo.net/enterprise/remi-release-9.rpm -y

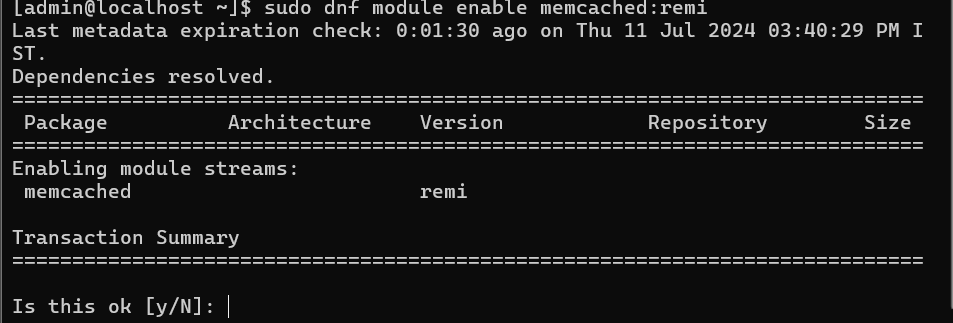
Enable Memcached with Remi RPM
Open the Remi repository and enable the Memcached module:
sudo dnf module enable memcached:remi
Your system will be ready to use Remi's Memcached version after completing this step.
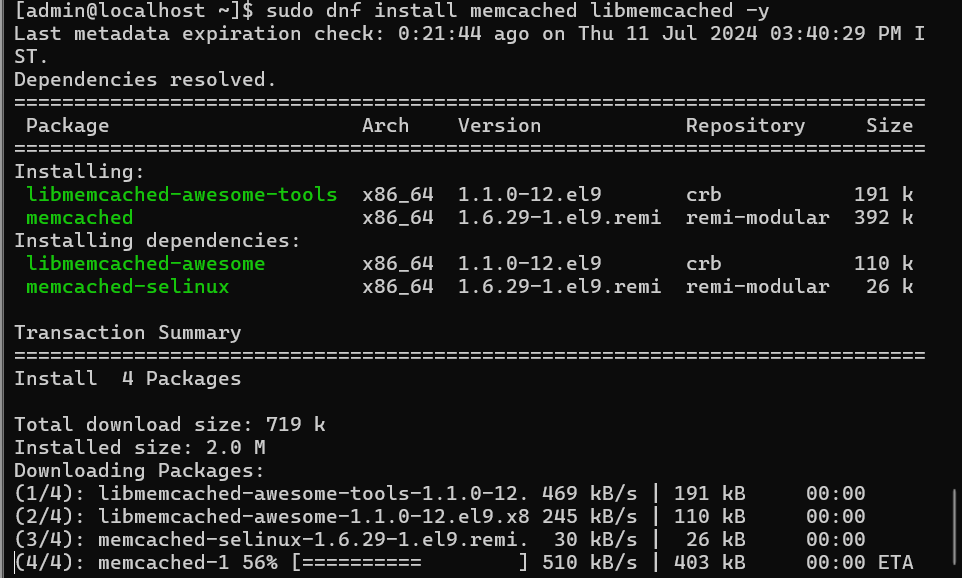
Install Memcached via DNF Command with Remi RPM
You can now install Memcached after turning on the Memcached module:
sudo dnf install memcached libmemcached -y
The most recent Memcached version that is available in the Remi repository is installed using this command.
Confirm Memcached Installation
Verify the installed Memcached version to make sure the installation went smoothly:
memcached -v
This step of verification verifies that Memcached was installed correctly on AlmaLinux by using the Remi repository.
Secure Memcached with Firewalld on AlmaLinux
One of the most important steps in preserving system security and data integrity is to secure your AlmaLinux Memcached server. This tutorial focuses on setting up a secure environment for your Memcached instance using Firewalld, a dynamic firewall manager.
Verify Firewalld Installation on AlmaLinux
First, make sure your AlmaLinux system has Firewalld installed. To see if it exists and what version it is, use this command:
sudo firewall-cmd --version
The version number will be returned by the command if Firewalld is installed. You will have to install it if it isn't already installed.
Install Firewalld on AlmaLinux for Memcached
If Firewalld is not installed, run the following command to install it:
sudo dnf install firewalld
Once installed, turn on Firewalld.
sudo systemctl enable --now firewalld
Create a Dedicated Memcached Zone in Firewalld
Memcached traffic can be isolated in a separate zone for increased security.
Create Memcached Firewalld Zone
sudo firewall-cmd --permanent --new-zone=memcached
With this command, a new Firewalld zone called "memcached" is created. This change is ensured to last through reboots with the --permanent flag enabled.
Set Default Policies for Memcached Firewalld Zone
Establish a default policy to reject all unsolicited traffic in order to boost security:
sudo firewall-cmd --permanent --zone=memcached --set-target=DROP
This command guarantees that any traffic in the "memcached" zone that is not specifically permitted will be automatically dropped.
Add Memcached Service to Firewalld Zone
To your recently established zone, add the Memcached service:
sudo firewall-cmd --permanent --zone=memcached --add-source=<ip_address>
The real IP address that requires access to Memcached should be substituted for <ip_address>.
Cluster Network with Multiple Instances
Regarding a network that has multiple instances:
sudo firewall-cmd --permanent --zone=memcached --add-source=<ip_address>/24
Access from a subnet's range of IP addresses is permitted with this command. Subnet address should be used in place of <ip_address>.
Finalizing and Applying Changes
To apply and validate your firewall configurations:
Reload Firewalld
Apply all the changes with:
sudo firewall-cmd --reload
To make sure all of your new configurations are in effect, reload Firewalld.
Confirm Zone Settings
Verify the configuration in your Memcached zone:
sudo firewall-cmd --zone=memcached --list-all
By displaying all of the settings and rules in the "memcached" zone, this command enables you to confirm that the configuration complies with your security specifications.
Configure Memcached on AlmaLinux
The basic steps for configuring Memcached settings in AlmaLinux are covered in this section. Specifically, we adjust the listening IP address, disable UDP, and change the default memory allocation in the memcached.conf file.
Access the Memcached Configuration File
Open the memcached.conf file by first going to /etc/sysconfig/memcached. Employ a text editor such as Nano:
sudo nano /etc/sysconfig/memcached
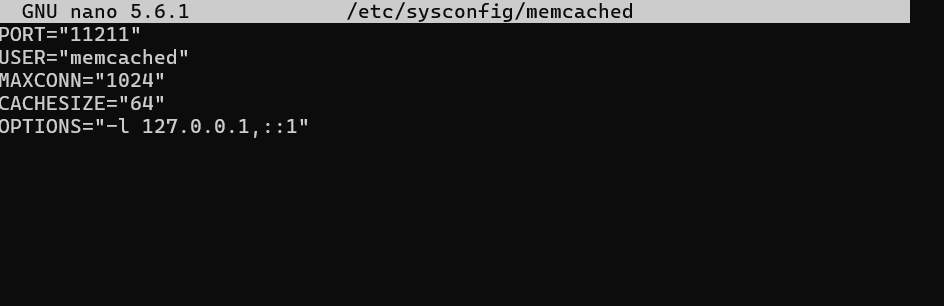
Depending on the approach taken, you'll have to manually create the configuration.
Here's an example:
# Example memcached.conf file

# Start with 64MB of memory as a reasonable default
-m 64

# Default listening port 11211
-p 11211

# Run as a background process
-d

# Log to syslog
-s

# Enable verbose logging
-vv

# Set max simultaneous connections to 1024
-c 1024
Configure the Listening IP Address
By default, Memcached is set up to listen on IP address 127.0.0.1. Make sure the IP address for your setup is reflected in the -l parameter in your configuration file. Adjust it as necessary:
-l <your_preferred_ip_address>
Enter the desired IP address in place of <your_preferred_ip_address>.
Disable UDP (Optional)
For increased security, it is best to disable UDP support if it is not needed. To stop UDP, add the following line:
-U 0
Adjust Memory Allocation
64MB of memory is the default allocation for Memcached. This value should be increased for larger apps. To specify the desired memory allocation in megabytes, edit the -m parameter. For example, with 2GB:
-m 2048
Make sure the memory allotment fits the needs and available resources on your server.
Save Changes and Restart Memcached
Save the file once the required changes have been made. Press CTRL+O to open Nano, Y to confirm, and CTRL+X to close it. Restarting the Memcached service will enable the changes:
sudo systemctl restart memcached
Additional Configuration Tips for Memcached on AlmaLinux
Memcached on AlmaLinux requires fine-tuning a number of parameters in addition to the initial configuration. These improvements address particular security and performance requirements.
Specify User and Group
You can use the -u parameter to set specific user and group settings under which Memcached can operate. To use Memcached as the memcache user, for instance:
-u memcache
For security and permissions to remain appropriate, this setting is essential.
Enable Large Memory Pages
Turning on this feature can improve performance on systems that support large memory pages. Remove the parenthesis from the -L argument to enable large memory pages:
-L
This can optimize memory usage, which can result in performance gains.
Configure Maximum Item Size
The default maximum item size in Memcached is 1MB. Use the -I parameter and the desired size to raise this limit. For example, with an item size of 5MB:
-I 5m
For applications that need to store larger objects in the cache, this modification is helpful.
Set the Maximum Number of Threads
By default, Memcached runs on four threads. You may want to adjust this based on the workload and capacity of your server. In order to have eight threads:
-t 8
Memcached performs best when threads are adjusted on multicore systems.
Adjust Idle Timeout
With the -o option, Memcached's inactivity time can be changed. Otherwise, connections are closed. For a timeout of 600 seconds:
-o idle_timeout=600
This configuration ends unused connections to aid in more effective resource management.
Enable SASL Authentication
Turn on SASL (Simple Authentication and Security Layer) for improved security, particularly in settings where access to the Memcached server requires authentication.
Remove or add the -S parameter:
-S
Your Memcached server gains an extra security layer thanks to SASL.
Restart Memcached Service
To apply any configuration changes you've made, restart the Memcached service:
sudo systemctl restart memcached
Install Memcached Libraries on AlmaLinux
Memcached is well known for its effectiveness in RAM object and data caching, which dramatically lowers database load. This tutorial will cover how to integrate Memcached libraries into the Apache and Nginx web servers on AlmaLinux, as well as how to install and configure them for PHP, Python, and Perl.
Setting up PHP Libraries for Memcached
Installing PHP Libraries for Memcached
Installing the required libraries is the first step in integrating Memcached with PHP:
sudo dnf install php-memcached
PHP programs can now interact with the Memcached server thanks to the installation of the PHP library for Memcached by this command.
Installing Python Library for Memcached
Install the pymemcache library in order to enable Memcached in Python applications:
sudo dnf install python3-pymemcache
Installing the Python library for connecting to Memcached is done with this command.
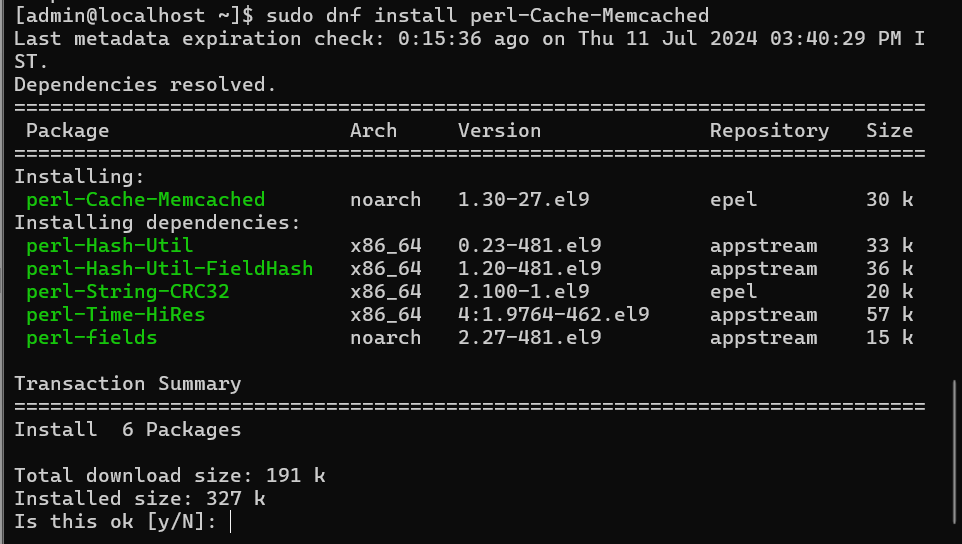
Installing Perl Library for Memcached
Use this command to allow Memcached support for Perl:
sudo dnf install perl-Cache-Memcached
This installation completes the multi-language support setup for Memcached on AlmaLinux by enabling Perl applications to communicate with the Memcached server.
Troubleshooting Memcached and SELinux Interactions on AlmaLinux
Understanding SELinux’s Impact on Memcached
In Linux systems such as AlmaLinux, SELinux is an essential security module that can affect Memcached's performance. Memcached may not start or may not be able to access necessary files if SELinux settings are incorrect.
Identifying SELinux Issues Affecting Memcached
Checking SELinux Status
Start by confirming that SELinux is currently operational:
sestatus
Inspecting SELinux Logs for Memcached
Check the SELinux logs for any denials connected to Memcached, which are normally located in /var/log/audit/audit.log:
grep memcached /var/log/audit/audit.log
Resolving SELinux Policy Conflicts with Memcached
Enabling Memcached Network Access
Modify SELinux policies to permit network activities using Memcached:
setsebool -P memcached_can_network 1
Configuring SELinux for Memcached on Custom Ports
Create a SELinux policy for the particular port, such as 11211, if Memcached is operating on a port that is not the default:
semanage port -a -t memcached_port_t -p tcp 11211
Addressing SELinux File Context Restrictions for Memcached
Modifying File Contexts for Memcached
Modify the SELinux contexts for any directories or files used for Memcached configurations:
semanage fcontext -a -t memcached_etc_t "/path/to/memcached/config(/.*)?"
restorecon -Rv /path/to/memcached/config
Generating Custom SELinux Policy Modules
Make a SELinux policy module customized for Memcached using audit2allow:
grep memcached /var/log/audit/audit.log | audit2allow -M mymemcached
semodule -i mymemcached.pp
Confirming SELinux Configurations for Memcached
Check that the SELinux settings are appropriately in line with Memcached's requirements after applying the changes:
getsebool -a | grep memcached
FAQs to Install Memcached on AlmaLinux 9
Can Memcached be used with other databases on AlmaLinux 9?
Yes, Memcached can be integrated with various databases like MySQL, PostgreSQL, and others on AlmaLinux 9.
Is Memcached secure on AlmaLinux 9?
Memcached can be secured by configuring firewall rules and access controls to ensure data safety on AlmaLinux 9.
How does Memcached improve website performance on AlmaLinux 9?
Memcached speeds up websites on AlmaLinux 9 by caching data in memory, reducing the need for frequent database queries.
Does installing Memcached require advanced technical knowledge on AlmaLinux 9?
Installing Memcached on AlmaLinux 9 is straightforward and does not necessarily require advanced technical expertise.
Can Memcached handle high traffic websites on AlmaLinux 9?
Memcached is designed to handle high traffic websites efficiently on AlmaLinux 9 by caching data in memory to reduce server load.
Does Memcached support data encryption on AlmaLinux 9?
Memcached itself does not provide data encryption features, but data encryption can be implemented at the application level before storing data in Memcached on AlmaLinux 9.
How does Memcached handle cache expiration on AlmaLinux 9?
Memcached allows setting expiration times for cached data, ensuring it stays up-to-date by expiring and refreshing data automatically on AlmaLinux 9.
Conclusion
We hope this tutorial helped you understand how to install Memcached on AlmaLinux 9.
If you have any queries, please leave a comment below, and we’ll be happy to respond to them for sure.