

Introduction
Before we begin talking about how to install MySQL 8.0 on AlmaLinux 9, let's briefly understand – What is MySQL?
MySQL is an open-source relational database management system used to store and manage data effectively. It is widely used by websites and applications to handle data storage and retrieval. MySQL is known for its speed, reliability, and ease of use.
With support for various programming languages, it allows for seamless integration into different platforms. Whether you are a beginner or an advanced user, MySQL provides a robust solution for your data management needs.
In this tutorial, you will install MySQL 8.0 on AlmaLinux 9. We will also address a few FAQs on how to install MySQL 8.0 on AlmaLinux 9.
Advantages of MySQL 8.0
- Performance: MySQL 8.0 offers improved performance with enhanced speed and efficiency, making data retrieval and processing faster than before.
- Enhanced Security: With advanced security features, MySQL 8.0 ensures better protection for sensitive data to mitigate cybersecurity risks.
- Scalability: MySQL 8.0 provides increased scalability options, enabling seamless handling of growing datasets without compromising performance.
- JSON Support: Native JSON data type support in MySQL 8.0 simplifies storing and querying JSON objects efficiently.
- Optimized InnoDB: MySQL 8.0 optimizes the InnoDB storage engine, improving reliability, crash recovery, and row-level locking for enhanced database management.
Update AlmaLinux Before MySQL 8.0 Installation
Ensure System Packages are Up-to-Date
Prior to starting the MySQL 8.0 installation on AlmaLinux, it is necessary to update all installation packages. This step is essential to maintaining the stability and optimal performance of your system and preventing any conflicts that may occur during the MySQL installation.
Run the following command to make updates to the packages:
sudo dnf upgrade --refresh
This command updates all installed packages to the most recent versions and refreshes the repository metadata.
Install MySQL 8.0 on AlmaLinux via Appstream or MySQL RPM
Option 1: Install MySQL 8.0 on AlmaLinux via Appstream
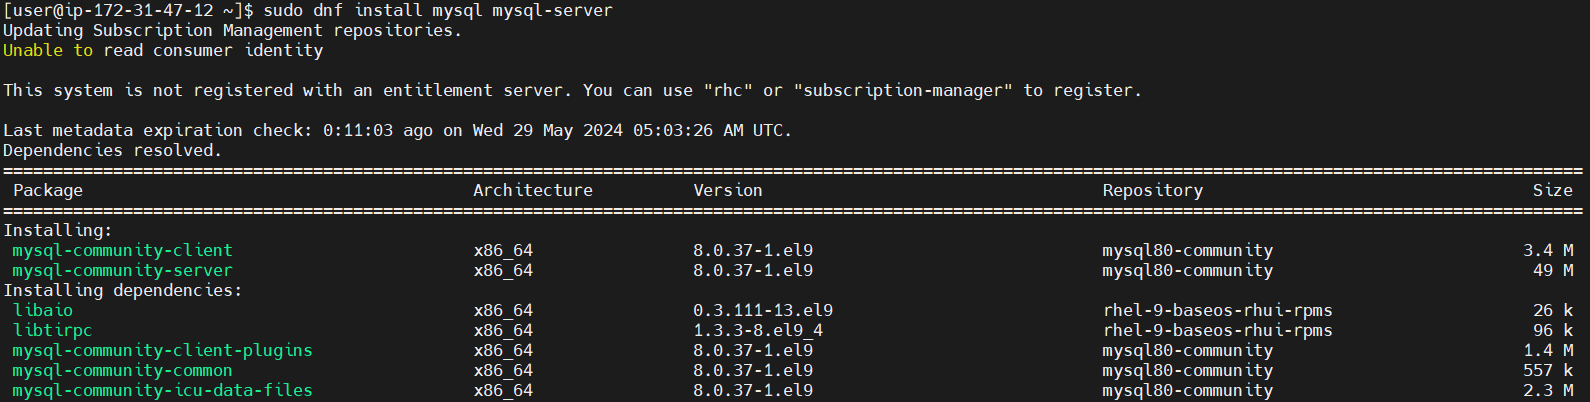
MySQL 8.0 is included in the default package of AlmaLinux. Use this command in your terminal to install it:
sudo dnf install mysql mysql-server
For developers who need more extensive MySQL functionality—including the development tools—an expanded installation is offered. This entails installing the server and the MySQL development package simultaneously. To install the development kit and the MySQL server, run the following command:
sudo dnf install mysql mysql-server mysql-devel
For developers creating applications that need for extensive MySQL interaction, this expanded installation is especially helpful. Since it includes extra components that might not be required in content management or web server applications, it is usually not required.
Once MySQL has been installed, use: to confirm the installation.
mysql --version
Making sure MySQL launches automatically when the system boots up improves data accessibility and management effectiveness. Use to make this possible:
sudo systemctl enable mysqld --now
Option 2: Install MySQL 8.0 Community Edition on AlmaLinux
Import MySQL 8.0 Community Edition RPM
Import the official MySQL RPM package first in order to install the most recent version of MySQL, 8.0 Community Edition. Run the following command:
sudo rpm -ivh https://dev.mysql.com/get/mysql80-community-release-el9-1.noarch.rpm
Install MySQL 8.0 Community Server via DNF Command
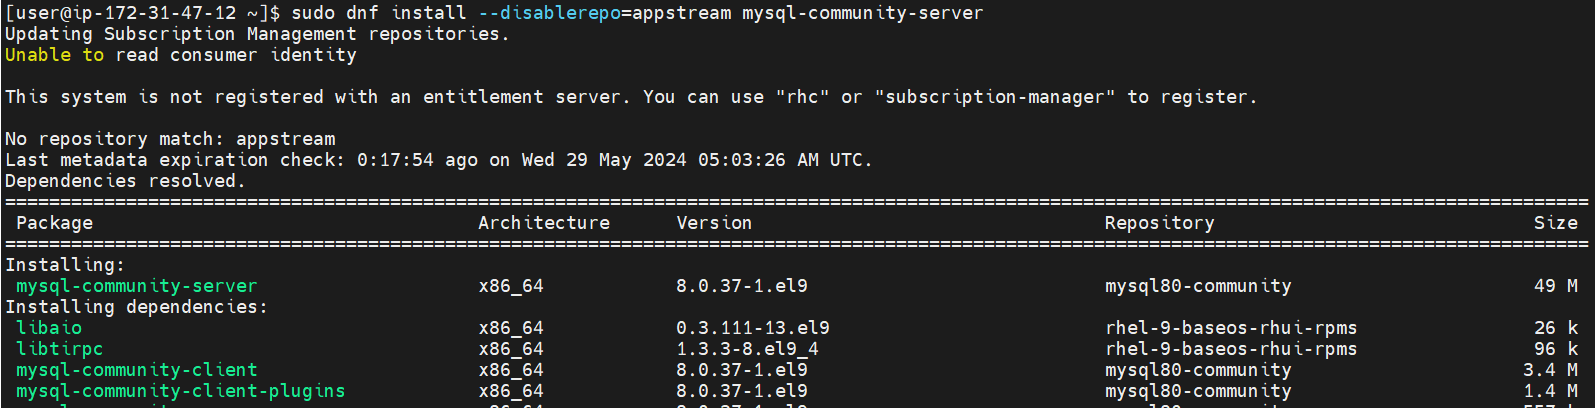
Install MySQL 8.0 Community Server after importing the correct repository. Use the following command to turn off the App Stream version and turn on the community edition:
sudo dnf install --disablerepo=appstream mysql-community-server
Verifying MySQL 8.0 Community Server Installation
To guarantee a successful installation, verify the build version of MySQL after installation:
mysql --version
The expected output could look something like this:
Output

mysql  Ver 8.0.xx for Linux on x86_64 (MySQL Community Server - GPL)
Lastly, turn on the MySQL service and configure it to launch automatically:
sudo systemctl enable mysqld --now
This command automates the startup procedure of your MySQL server, ensuring its readiness and dependability.
Check the Status of MySQL 8.0 on AlmaLinux
Verifying MySQL 8.0 Service Status
Try running the following command in the terminal to see if your MySQL service is running:
systemctl status mysqld
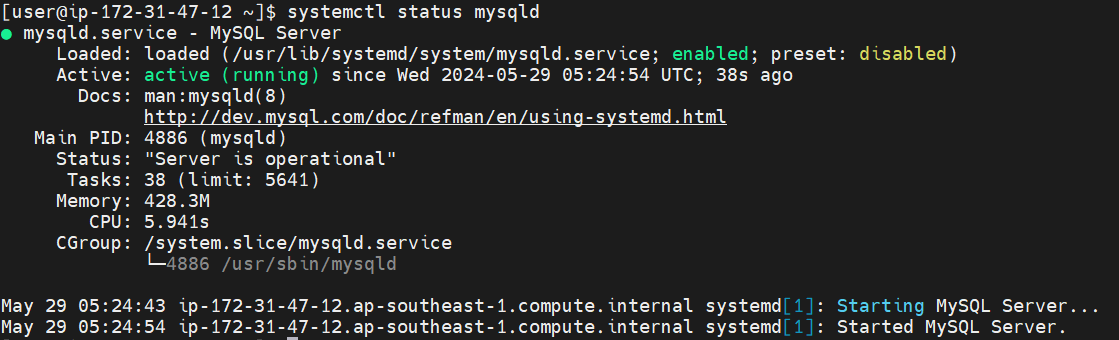
You can use this command to see if the MySQL service is running and operating as intended. You ought to observe a status on newly installed MySQL 8.0 instances on AlmaLinux that shows the service is operating correctly.
Managing MySQL 8.0 Service with Systemd Commands
It takes familiarity with systemd commands to manage MySQL effectively. The following are essential commands to manage the MySQL service:
Stop the MySQL Service
For the MySQL service to stop:
sudo systemctl stop mysqld
Start the MySQL Service
In order to start the MySQL service:
sudo systemctl start mysqld
Disable MySQL Service at System Startup
In order to stop MySQL from booting up automatically:
sudo systemctl disable mysqld
Enable MySQL Service at System Startup
Setting up MySQL to launch automatically upon system boot:
sudo systemctl enable mysqld
Restart the MySQL Service
Restarting the MySQL service is especially helpful in the event that configuration changes are made:
sudo systemctl restart mysqld
Secure MySQL 8.0 on AlmaLinux with Security Script
Initiating MySQL 8.0 Security Enhancement
It's possible that MySQL 8.0's default security settings don't adhere to industry standards, making your AlmaLinux system susceptible to attacks. It is recommended to run the MySQL Installation Security script in order to reduce these risks.
Use these instructions to start the script:
mysql_secure_installation
Handling Temporary Password Issues
If you're running MySQL 8.0 Community and get a message stating that your temporary password is missing, like this:
Output

Error: Access denied for user 'root'@'localhost' (using password: NO)
To obtain the temporary password from the MySQL logs, run the following command:
sudo grep 'temporary password' /var/log/mysqld.log
The following is an example of the expected output with the temporary password generated:

Password Validation and Configuration
After logging in, you'll be asked to modify the temporary password. For initial access, this temporary password is essential, and it should be changed right away to a more secure one.
The VALIDATE PASSWORD COMPONENT, which configures password complexity checks, will appear during this process. To make your MySQL installation more secure, these checks are essential. You have the option to change the default settings or stick with them if you need more security.
Key Security Settings to Configure:
- Make sure your root account password is strong.
- Make sure each account has a strong password.
- Take out any root accounts that are reachable from outside of localhost.
- Delete user accounts that are anonymous.
- The default test database, which is usually available to anonymous users, should be deleted.
Securing the MySQL server deployment.

Enter password for user root:

The existing password for the user account root has expired. Please set a new password.

New password: <---- SET NEW PASSWORD

Re-enter new password: <---- RE-ENTER NEW PASSWORD

Re-enter new password:
The 'validate_password' component is installed on the server.
The subsequent steps will run with the existing configuration
of the component.
Using existing password for root.

Estimated strength of the password: 100
Change the password for root ? ((Press y|Y for Yes, any other key for No) : Y <---- Type Y then press the ENTER KEY (SKIP IF YOU ALREADY JUST SET)

New password:

Re-enter new password:

Estimated strength of the password: 100
Do you wish to continue with the password provided?(Press y|Y for Yes, any other key for No) : Y <---- Type Y then press the ENTER KEY.
By default, a MySQL installation has an anonymous user,
allowing anyone to log into MySQL without having to have
a user account created for them. This is intended only for
testing, and to make the installation go a bit smoother.
You should remove them before moving into a production
environment.

Remove anonymous users? (Press y|Y for Yes, any other key for No) : Y <---- Type Y then press the ENTER KEY.
Success.


Normally, root should only be allowed to connect from
'localhost'. This ensures that someone cannot guess at
the root password from the network.

Disallow root login remotely? (Press y|Y for Yes, any other key for No) : Y <---- Type Y then press the ENTER KEY.
Success.

By default, MySQL comes with a database named 'test' that
anyone can access. This is also intended only for testing,
and should be removed before moving into a production
environment.


Remove test database and access to it? (Press y|Y for Yes, any other key for No) : Y <---- Type Y then press the ENTER KEY.
 - Dropping test database...
Success.

 - Removing privileges on test database...
Success.

Reloading the privilege tables will ensure that all changes
made so far will take effect immediately.

Reload privilege tables now? (Press y|Y for Yes, any other key for No) : Y <---- Type Y then press the ENTER KEY.
Success.

All done!
Manage MySQL 8.0 on AlmaLinux
Update MySQL 8.0
You can be sure you have the most recent security patches and features by routinely updating MySQL. Use this command to update MySQL that is installed using DNF repositories:
sudo dnf update --refresh
This command keeps MySQL efficient and secure by applying any available updates to MySQL and refreshing the data in your repository.
Remove MySQL 8.0
Use the following command to remove MySQL from AlmaLinux if necessary. By doing this, the MySQL database software and all related files will be deleted:
sudo dnf remove mysql mysql-server
It's crucial to erase the RPM repositories for users who installed the MySQL Community Edition and want to go back to the AppStream version or uninstall MySQL entirely. To delete every MySQL community repository, run the following command:
sudo rm /etc/yum.repos.d/mysql-community*
In order to ensure that there are no traces of the MySQL Community Edition left on your system, completing this step is essential.
FAQs to Install MySQL 8.0 on AlmaLinux 9
Do I need any prerequisites before installing MySQL 8.0 on AlmaLinux 9?
Before installing MySQL 8.0 on AlmaLinux 9, ensure that you have administrative privileges and any necessary dependencies are met.
What are the benefits of installing MySQL 8.0 on AlmaLinux 9 over other database management systems?
Installing MySQL 8.0 on AlmaLinux 9 offers stability, performance improvements, advanced security features, compatibility, and reliable support, making it a popular choice for many users.
Can I run MySQL 8.0 alongside other database systems on AlmaLinux 9?
Yes, you can run MySQL 8.0 alongside other database systems on AlmaLinux 9 by managing resources and configurations properly to prevent conflicts.
Will installing MySQL 8.0 on AlmaLinux 9 impact existing data or configurations?
Installing MySQL 8.0 on AlmaLinux 9 should not impact existing data or configurations, but it's recommended to back up critical data before major updates.
Are there specific post-installation steps required after installing MySQL 8.0 on AlmaLinux 9?
Post-installation steps may include initializing the database, setting up user accounts, securing the instance, and configuring performance settings for MySQL 8.0 on AlmaLinux 9.
Is it possible to automate backups in MySQL 8.0 on AlmaLinux 9?
Yes, you can automate backups in MySQL 8.0 on AlmaLinux 9 using tools such as mysqldump or by setting up scheduled backup scripts. Automating backups ensures regular data backups, enhancing data security and recoverability in case of unexpected data loss or system failures.
Is it necessary to create a MySQL 8.0 user account after installation on AlmaLinux 9?
Creating a separate user account for interacting with MySQL 8.0 databases is a good practice for security and permission management, although it is not mandatory.
Conclusion
We hope this tutorial helped you understand how to install MySQL 8.0 on AlmaLinux 9.
If you have any queries, please leave a comment below, and we’ll be happy to respond to them for sure.