
Choose a different version or distribution
Introduction
Before we begin talking about how to install MySQL on Debian 10 Linux, let's briefly understand – What is MySQL?
MySQL is an open-source relational database management system (RDBMS) widely used to store and manage data. With its user-friendly interface, MySQL enables businesses to efficiently organize, retrieve, and manipulate structured information.
MySQL, the world's most popular open-source relational database management system, is not included in Debian's default repositories. In Debian 10, MariaDB is the default database system.
In this tutorial, you will install MySQL on Debian 10 Linux. We will also address a few FAQs on how to install MySQL on Debian 10 Linux.
Advantages of MySQL
- Simplicity: MySQL's user-friendly interface and easy installation make it simple to use for beginners.
- Performance: With its optimized design, MySQL delivers fast query execution and efficient data management.
- Scalability: MySQL effortlessly scales to handle growing data demands without compromising performance.
- Reliability: Known for its fault-tolerant nature, MySQL ensures data integrity and offers robust backup and recovery mechanisms.
- Versatility: MySQL supports multiple programming languages, making it compatible with various platforms and applications.
Configuring MySQL Repository
Go to the repository download page and use the wget command to download the most recent release package in order to add the MySQL APT repository to your system:
wget http://repo.mysql.com/mysql-apt-config_0.8.13-1_all.deb
After the download is finished, install the release package as a user with sudo privileges :
sudo apt install ./mysql-apt-config_0.8.13-1_all.deb
You can choose the MySQL version you want to install from the configuration menu that will be displayed to you.
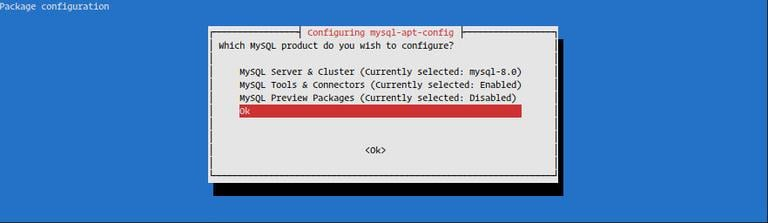
The default selection for MySQL is MySQL 8.0; to install MySQL 5.7, select MySQL Server & Cluster (currently selected: mysql-8.0) and choose your preferred MySQL version.
We will be installing MySQL version 8.0. Press Tab to choose OK, then Enter (as shown in the image above).
Installing MySQL
Run the following commands to update the package list and install the MySQL server package:
sudo apt update
sudo apt install mysql-server
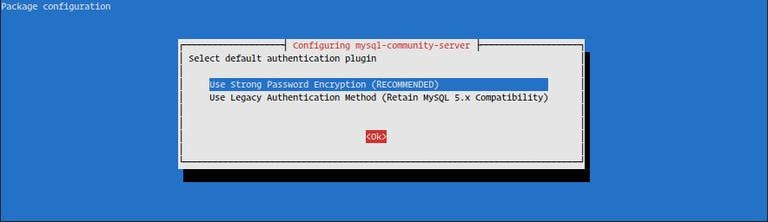
You will be prompted by the installation to enter the MySQL root password. Leave the password blank for the time being; we will set one in the following section.
A message explaining the new MySQL 8 authentication will then be displayed to you. Make sure your application supports the MySQL 8 default authentication plugin before selecting it.
The MySQL service will launch automatically after the installation is complete; you can confirm this by typing:
sudo systemctl status mysql
Output

● mysql.service - MySQL Community Server
   Loaded: loaded (/lib/systemd/system/mysql.service; enabled; vendor preset: en
   Active: active (running) since Fri 2019-07-26 13:23:25 PDT; 37s ago
   ...
Securing MySQL
To secure the MySQL installation and set the root password, issue the mysql_secure_installation command:
sudo mysql_secure_installation
Output

Securing the MySQL server deployment.

Connecting to MySQL using a blank password.

VALIDATE PASSWORD COMPONENT can be used to test passwords
and improve security. It checks the strength of password
and allows the users to set only those passwords which are
secure enough. Would you like to setup VALIDATE PASSWORD component?

Press y|Y for Yes, any other key for No:
You will be prompted to set up the VALIDATE PASSWORD PLUGIN, which checks the strength of MySQL user passwords. The password validation policy has three tiers: low, medium, and strong. If you do not wish to configure the validate password plugin, press ENTER.
Output

Please set the password for root here.

New password:

Re-enter new password:
The next prompt will require you to create a password for the MySQL root user.
Output

By default, a MySQL installation has an anonymous user,
allowing anyone to log into MySQL without having to have
a user account created for them. This is intended only for
testing, and to make the installation go a bit smoother.
You should remove them before moving into a production
environment.

Remove anonymous users? (Press y|Y for Yes, any other key for No) : y
Success.


Normally, root should only be allowed to connect from
'localhost'. This ensures that someone cannot guess at
the root password from the network.

Disallow root login remotely? (Press y|Y for Yes, any other key for No) : y
Success.

By default, MySQL comes with a database named 'test' that
anyone can access. This is also intended only for testing,
and should be removed before moving into a production
environment.


Remove test database and access to it? (Press y|Y for Yes, any other key for No) : y
 - Dropping test database...
Success.

 - Removing privileges on test database...
Success.

Reloading the privilege tables will ensure that all changes
made so far will take effect immediately.

Reload privilege tables now? (Press y|Y for Yes, any other key for No) : y
Success.

All done!
The script will ask you to remove the anonymous user, limit root user access to the local machine, and remove the test database after you have specified the root password. All questions should be answered with a “Y” (yes).
Connecting to the MySQL Server
Use the mysql client, which is installed as a dependency of the MySQL server package, to interact with MySQL through the terminal.
If you chose to use the MySQL server's default authentication method to log in as the root user, type:
sudo mysql
Otherwise, if you decided to log in using the legacy authentication method, type:
mysql -u root -p
The root password that you previously set when the mysql_secure_installation script was run will be requested of you. The MySQL shell will appear when you enter the password, as seen below:
Output

Welcome to the MySQL monitor.  Commands end with ; or \g.
Your MySQL connection id is 10
Server version: 8.0.17 MySQL Community Server - GPL
...
FAQs to Install MySQL on Debian 10 Linux
What is the default root password after installing MySQL on Debian 10?
During the installation, you'll be prompted to set a root password. Use that password to access the MySQL server.
Can I secure the MySQL installation on Debian 10 after installation?
Yes, you can run sudo mysql_secure_installation to set a root password, remove anonymous users, and more.
What are the system requirements for MySQL on Debian 10?
MySQL has modest system requirements. Debian 10 Linux should have sufficient RAM, disk space, and processing power to handle the expected workload efficiently.
How can I access the MySQL command-line client on Debian 10?
Open a terminal and type mysql -u root -p, then enter the root password to access the command-line client.
How do I create a new MySQL user on Debian 10?
Within the MySQL command-line client, run CREATE USER 'username'@'localhost' IDENTIFIED BY 'password';.
How can I install a specific version of MySQL on Debian 10?
By default, Debian installs the latest version. To install a specific version, use sudo apt install mysql-server=<version>.
Where can I find the MySQL configuration file on Debian 10?
The main configuration file is located at /etc/mysql/mysql.conf.d/mysqld.cnf.
Conclusion
You have learned how to install and secure a MySQL server on a Debian 10 server in this tutorial. You have also learned how to connect to the MySQL shell.
MariaDB, the default database system in Debian 10, should be used if your application has no specific requirements.
If you have any queries, feel free to post a comment below, and we'll be happy to answer them.