Introduction
Choose a different version or distribution
Before we begin talking about how to install OpenCart on Ubuntu 18.04, let’s briefly understand - What is OpenCart?
Opencart is an open-source ecommerce platform for online stores. It offers a user-friendly interface, extensive customization options, and a range of features to enhance the shopping experience.
Its SEO-friendly nature helps optimize your site for search engines, increasing visibility and attracting more potential customers. Opencart provides a flexible and scalable solution for small to medium-sized businesses looking to establish their online presence and boost sales.
In this tutorial, you will learn how to install OpenCart on Ubuntu 18.04 server. We will also address a few FAQs on how to install OpenCart on Ubuntu 18.04.
Advantages of OpenCart
- Flexibility: OpenCart offers extensive customization options, allowing you to tailor your online store to your specific needs.
- User-friendly: Its intuitive interface makes it easy to set up and manage your store, even for those without technical expertise.
- Feature-rich: OpenCart provides a range of features, from inventory management to payment gateways, enhancing the shopping experience.
- SEO-friendly: With built-in SEO features, OpenCart helps optimize your site for search engines, increasing visibility and driving more organic traffic.
- Scalability: It enables your business to grow by offering a flexible and scalable solution that can handle increasing product catalogs and customer traffic.
Prerequisites
- A domain name
- Nginx installed on your Ubuntu server
- SSL certificate
Update the system packages to the latest versions and install them using the following command:
sudo apt update && sudo apt upgrade
sudo apt install unzip
Step 1 - Create MySQL Database
1) You may skip this step if your system already has MySQL or MariaDB. If that's not the case, you can download MySQL 5.7 using the following commands:
sudo apt install mysql-server mysql-client
2) After that, log in to the MySQL shell using the following command:
sudo mysql
3) Now, run the following SQL Statement from within the MySQL shell to create a new database named opencart:
CREATE DATABASE opencart;
4) After that, create a MySQL user account named opencart, and grant all necessary permissions to it using the following command:
GRANT ALL ON opencart.* TO 'opencart'@'localhost' IDENTIFIED BY 'change-with-strong-password';
5) When done, exit MySQL with the following command:
EXIT;
Step 2 - Install and Configure PHP
1) The default version which comes with Ubuntu 18.04 is not compatible with the installation. So, we will add PPA for it to install the latest PHP version 8.2. Since Nginx is being used as the web server, you need to install the PHP-FPM package.
Add the PPA for PHP 8.2:
sudo apt update
sudo apt -y install software-properties-common
sudo add-apt-repository ppa:ondrej/php
sudo apt update
Install PHP with its extensions:
sudo apt install php php-common php-cli php-fpm php8.2-opcache php-gd php-mysql php-curl php-intl php8.2-xsl php-mbstring php-zip php-bcmath php-soap
2) Once the PHP packages are installed, they'll start automatically. You can verify that with the help of the following command:
sudo systemctl status php8.2-fpm
3) The output would show that the FPM service is active and running:
Output

 ● php8.2-fpm.service - The PHP 8.2 FastCGI Process Manager
   Loaded: loaded (/lib/systemd/system/php8.2-fpm.service; enabled; vendor preset: enabled)
   Active: active (running) since Mon 2019-02-25 10:45:42 UTC; 53s ago
     Docs: man:php-fpm8.2(8)
 Main PID: 27446 (php-fpm8.2)
   Status: "Processes active: 0, idle: 2, Requests: 0, slow: 0, Traffic: 0req/sec"
    Tasks: 3 (limit: 505)
   CGroup: /system.slice/php8.2-fpm.service
           ├─27446 php-fpm: master process (/etc/php/8.2/fpm/php-fpm.conf)
4) After that, set the PHP options as per requirement by altering the php.ini file with sed:
sudo sed -i "s/memory_limit = .*/memory_limit = 1024M/" /etc/php/8.2/fpm/php.ini
sudo sed -i "s/upload_max_filesize = .*/upload_max_filesize = 256M/" /etc/php/8.2/fpm/php.ini
sudo sed -i "s/zlib.output_compression = .*/zlib.output_compression = on/" /etc/php/8.2/fpm/php.ini
sudo sed -i "s/max_execution_time = .*/max_execution_time = 18000/" /etc/php/8.2/fpm/php.ini
sudo sed -i "s/;date.timezone.*/date.timezone = UTC/" /etc/php/8.2/fpm/php.ini
sudo sed -i "s/;opcache.save_comments.*/opcache.save_comments = 1/" /etc/php/8.2/fpm/php.ini
Set the default PHP version to 8.2:
sudo update-alternatives --config php
select correct no. for PHP 8.2
Output

There are 4 choices for the alternative php (providing /usr/bin/php).

  Selection    Path                  Priority   Status
------------------------------------------------------------
  0            /usr/bin/php.default   100       auto mode
  1            /usr/bin/php.default   100       manual mode
  2            /usr/bin/php7.2        72        manual mode
  3            /usr/bin/php7.4        74        manual mode
* 4            /usr/bin/php8.2        82        manual mode

Press <enter> to keep the current choice[*], or type selection number: 4
Step 3 - Install OpenCart
1) The latest stable version of OpenCart is OpenCart 4.0.2.1 at the time of writing.
Before commencing with the download, create a directory that will store the OpenCart files:
sudo mkdir -p /var/www/html/example.com
2) Now, download the latest version of OpenCart from the OpenCart repository with the following command:
cd /tmp
wget https://github.com/opencart/opencart/releases/download/4.0.2.1/opencart-4.0.2.1.zip
3) Next, extract the OpenCart archive and move the files to the domain's root directory:
unzip opencart-*.zip
sudo mv /tmp/opencart-4.0.2.1/upload/* /var/www/html/example.com/
4) Next, using the cp command, copy the configuration files:
sudo cp /var/www/html/example.com/{config-dist.php,config.php}
sudo cp /var/www/html/example.com/admin/{config-dist.php,config.php}
5) Grant the required permissions so that the web server has complete access to the site's files and directories.
sudo chown -R www-data: /var/www/html
Step 4 - Configure Nginx
1) Now, create the following file:
sudo nano /etc/nginx/sites-available/example.com
If you have a domain name, use the below configuration:
# Redirect HTTP -> HTTPS
server {
    listen 80;
    server_name www.example.com example.com;

    include snippets/letsencrypt.conf;
    return 301 https://example.com$request_uri;
}

# Redirect WWW -> NON WWW
server {
    listen 443 ssl http2;
    server_name www.example.com;

    ssl_certificate /etc/letsencrypt/live/example.com/fullchain.pem;
    ssl_certificate_key /etc/letsencrypt/live/example.com/privkey.pem;
    ssl_trusted_certificate /etc/letsencrypt/live/example.com/chain.pem;
    include snippets/ssl.conf;

    return 301 https://example.com$request_uri;
}

server {
    listen 443 ssl http2;
    server_name example.com;

    root /var/www/html/example.com;
    index index.php;

    # SSL parameters
    ssl_certificate /etc/letsencrypt/live/example.com/fullchain.pem;
    ssl_certificate_key /etc/letsencrypt/live/example.com/privkey.pem;
    ssl_trusted_certificate /etc/letsencrypt/live/example.com/chain.pem;
    include snippets/ssl.conf;
    include snippets/letsencrypt.conf;

    # log files
    access_log /var/log/nginx/example.com.access.log;
    error_log /var/log/nginx/example.com.error.log;

    location = /favicon.ico {
        log_not_found off;
        access_log off;
    }

    location = /robots.txt {
        allow all;
        log_not_found off;
        access_log off;
    }

    location / {
        try_files $uri $uri/ /index.php?$args;
    }

    location ~ \.php$ {
        include snippets/fastcgi-php.conf;
        fastcgi_pass unix:/run/php/php8.2-fpm.sock;
    }

    location ~* \.(js|css|png|jpg|jpeg|gif|ico|svg)$ {
        expires max;
        log_not_found off;
    }

}
Else use the below one to access it with IP address:
server {
    listen 80;
    server_name example.com;

    root /var/www/html/example.com;
    index index.php;

    # log files
    access_log /var/log/nginx/example.com.access.log;
    error_log /var/log/nginx/example.com.error.log;

    location = /favicon.ico {
        log_not_found off;
        access_log off;
    }

    location = /robots.txt {
        allow all;
        log_not_found off;
        access_log off;
    }

    location / {
        try_files $uri $uri/ /index.php?$args;
    }

    location ~ \.php$ {
        include snippets/fastcgi-php.conf;
        fastcgi_pass unix:/run/php/php8.2-fpm.sock;
    }

    location ~* \.(js|css|png|jpg|jpeg|gif|ico|svg)$ {
        expires max;
        log_not_found off;
    }

}
2) Check for any syntax errors before restarting:
sudo nginx -t
3) If there are no errors, you will be able to see the following output:
Output

nginx: the configuration file /etc/nginx/nginx.conf syntax is ok
nginx: configuration file /etc/nginx/nginx.conf test is successful
4) Now link it sites-enabled and unlink the default configuration:
sudo ln -s /etc/nginx/sites-available/example.com /etc/nginx/sites-enabled/
sudo unlink /etc/nginx/sites-enabled/default
4) Now, restart the Nginx server.
sudo systemctl restart nginx
Step 5 - Complete the OpenCart Installation
1) Once OpenCart is downloaded and the server configuration has been done, you need to proceed to the web-based setup.
When you open your browser and enter your domain, you get to see a similar screen as shown below.
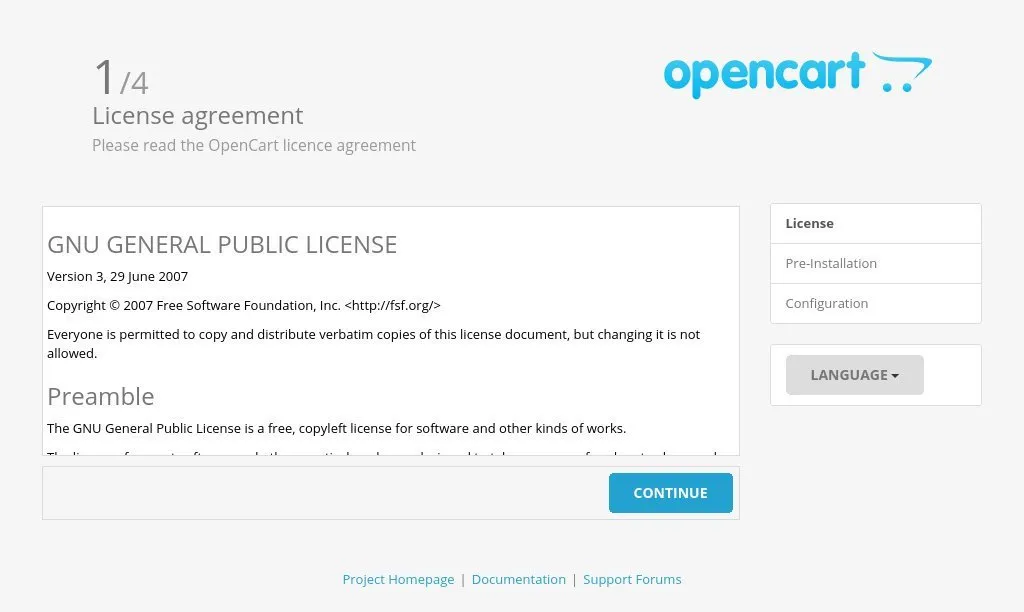
2) Choose the Language you want, then hit Continue after agreeing to the license agreement.
3) This reveals the information tab:
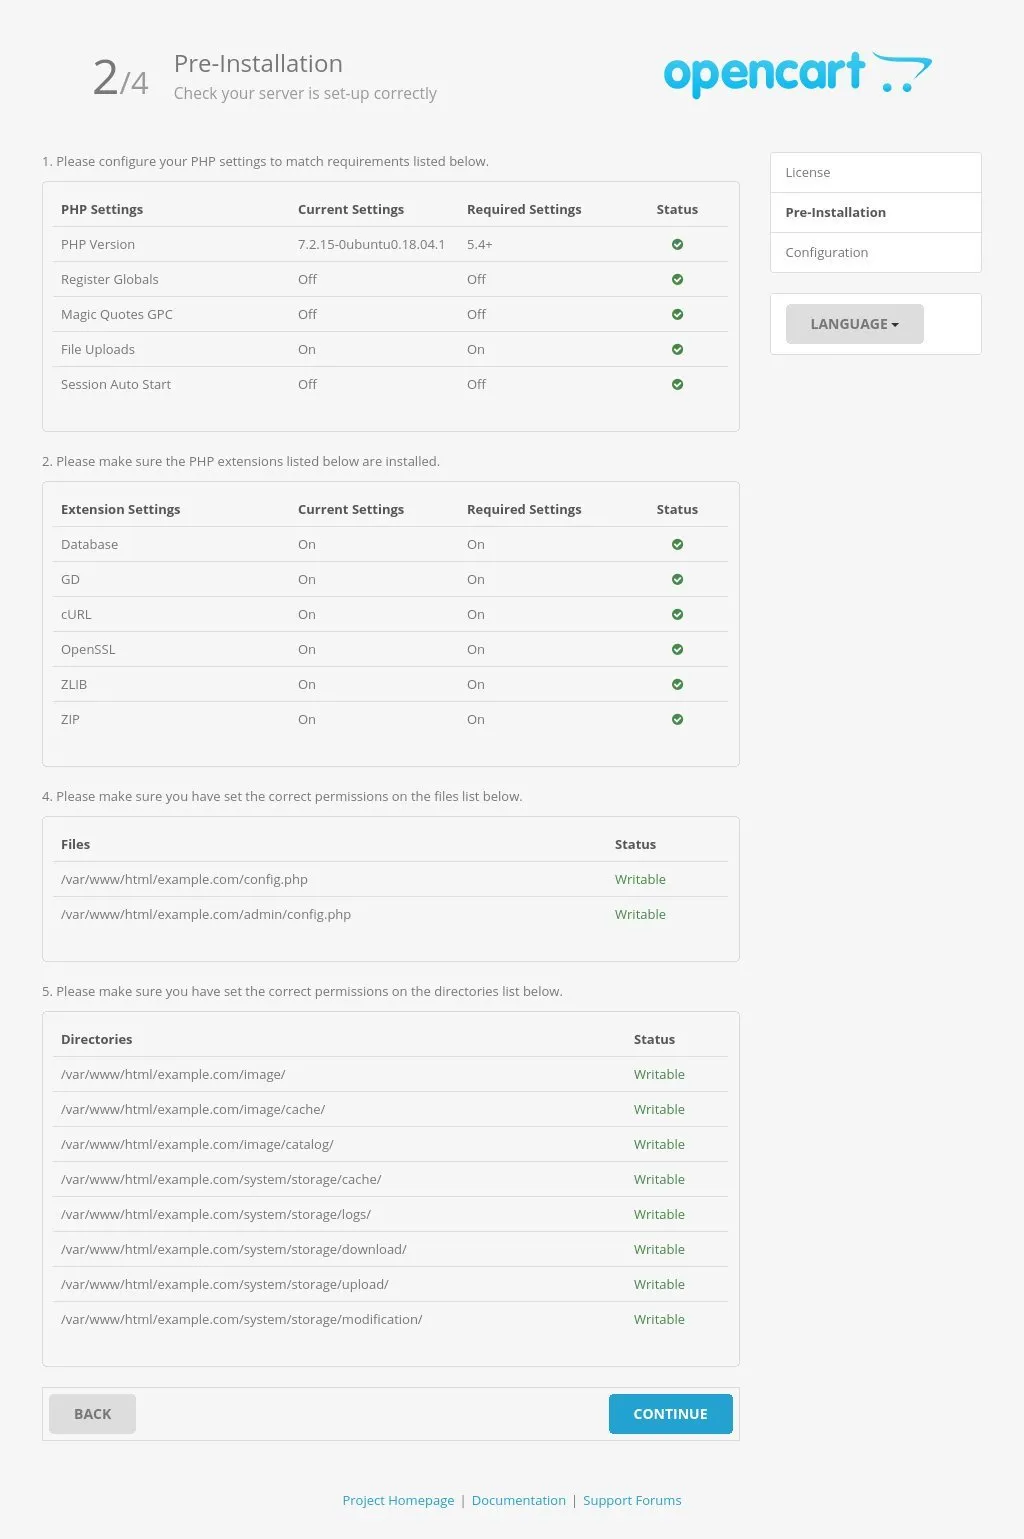
4) Click on Continue once you have cross-checked all pre-installation requirements.
5) The next screen will ask you to enter your database connection details. Enter the MySQL username and details you had created.
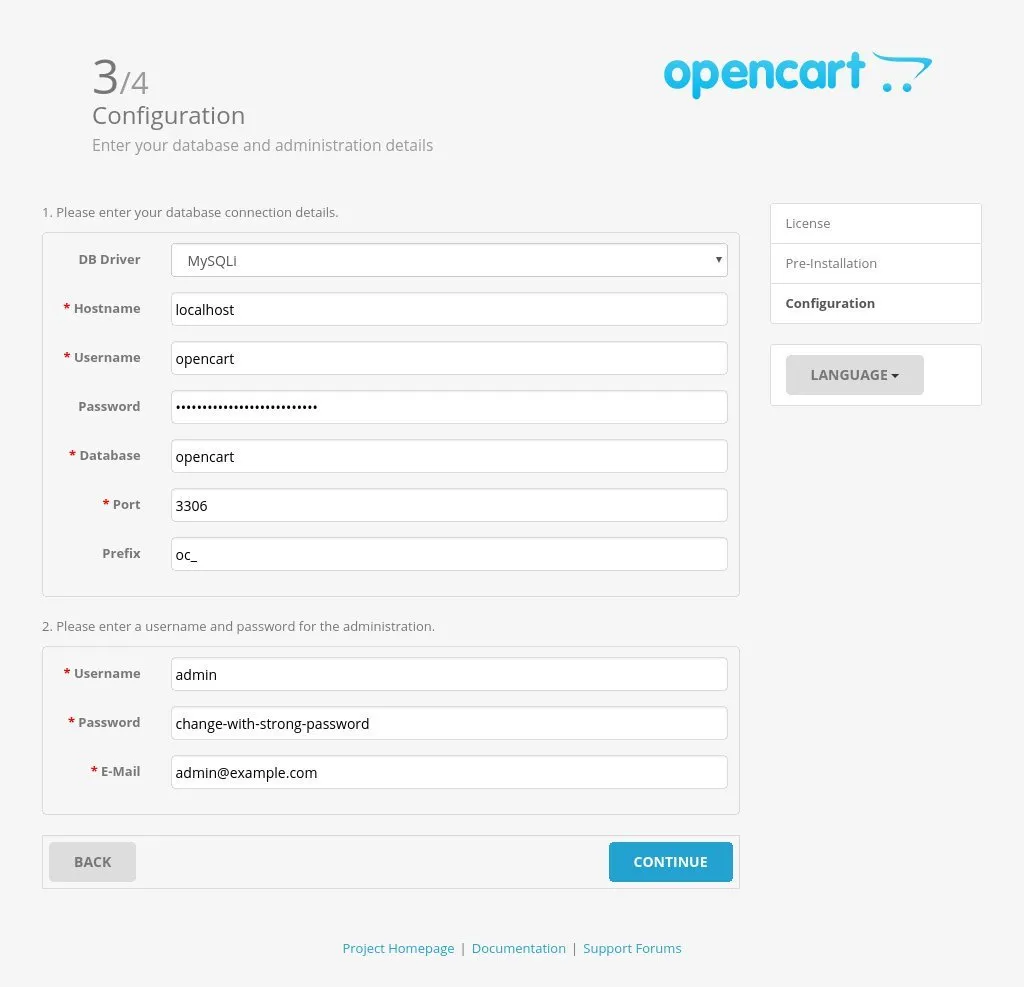
6) Next, enter a username, password, and email address for the administration and select Continue.
7) Now, you'll see a page that confirms installation completion.
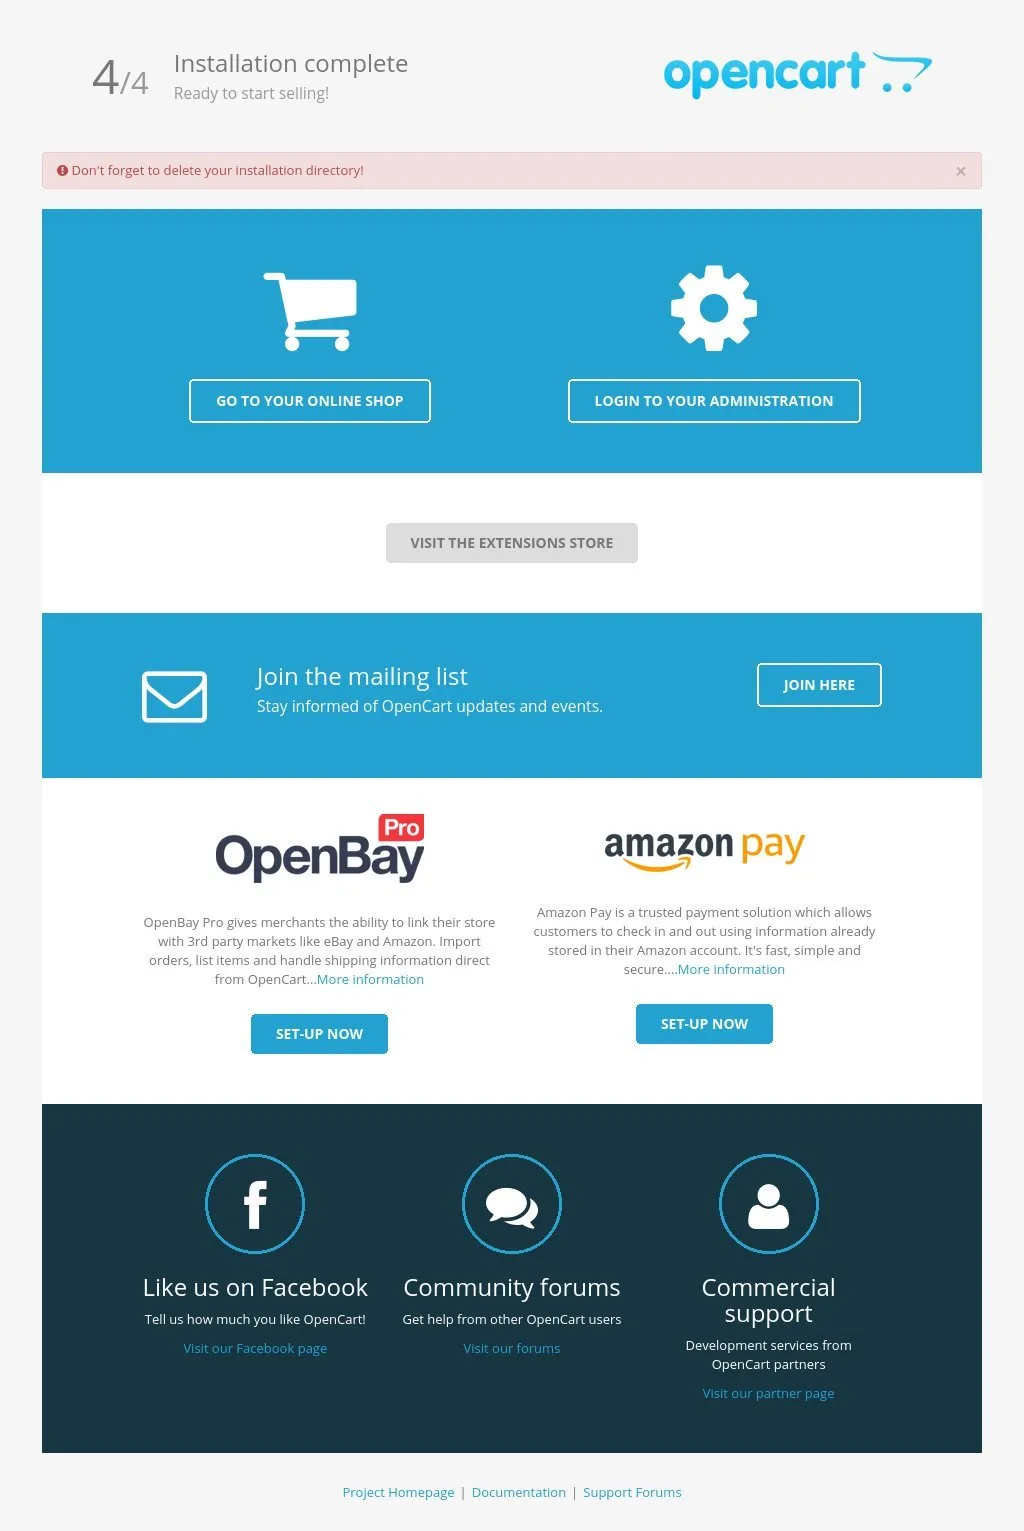
8) Click on the Login to your Administration button to access your OpenCart admin dashboard. Enter the email and password, and you'll be redirected to the admin dashboard.
9) There will be a pop-up that asks you to move the storage directory outside the web directory when you log in for the first time.
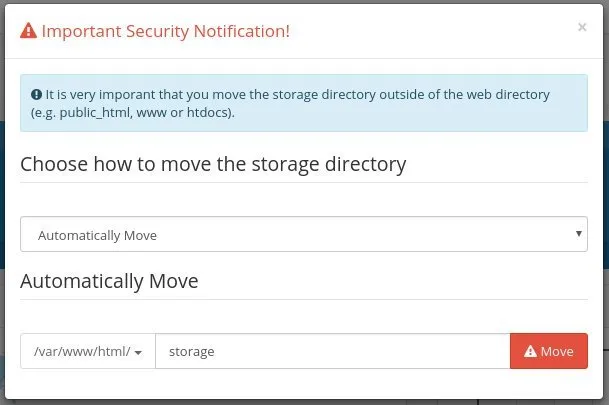
10) Select the default Automatically Move option and click on the red Move button. The directory where you are moving the storage directory must be accessible by the web server.
You can now start customizing your OpenCart installation and add new products.
11) You’ll also need to delete the installation directory. So go back to the terminal and type the following rm command:
sudo rm -rf /var/www/html/example.com/install
FAQs to Install OpenCart on Ubuntu 18.04
Can I install OpenCart using a graphical interface?
Yes, you can install OpenCart using a graphical interface by installing a control panel such as cPanel or Webmin on your Ubuntu 18.04 server. These panels provide an easy-to-use interface for managing your server and installing applications like OpenCart.
What is the recommended directory for installing OpenCart on Ubuntu 18.04?
It is recommended to install OpenCart in the web server's document root directory, typically located at /var/www/html. However, you can choose a different directory as per your preference or server configuration.
How can I secure my OpenCart installation on Ubuntu 18.04?
To secure your OpenCart installation, ensure that you regularly update the application, use strong passwords for admin accounts, enable SSL/TLS for secure connections, and apply security patches promptly. Additionally, configure appropriate file and folder permissions to restrict unauthorized access.
Can I use a different database engine instead of MySQL?
OpenCart primarily uses MySQL by default, but it also supports other database engines such as PostgreSQL or SQLite. You can choose your preferred database engine during the installation process or modify the configuration later.
Is it possible to migrate an existing OpenCart installation to Ubuntu 18.04?
Yes, you can migrate an existing OpenCart installation to Ubuntu 18.04 by following a few essential steps. Backup your existing OpenCart files and database, move them to the new Ubuntu server, restore the backup, and update the configuration files accordingly.
Can I install additional extensions or themes on OpenCart?
Absolutely! OpenCart has a vast library of extensions and themes available for installation. You can browse the official OpenCart marketplace or other trusted sources to find and install the desired extensions and themes for your online store.
How can I update OpenCart to the latest version on Ubuntu 18.04?
To update OpenCart to the latest version, make sure you have a backup of your files and database. Then, download the latest version from the OpenCart website, extract the files, and overwrite the existing files in your installation directory. Finally, run the necessary upgrade scripts as instructed in the documentation.
Conclusion
We hope this detailed guide helped you understand how to install OpenCart on Ubuntu 18.04 server. To learn more about OpenCart installation on Ubuntu 18.04 server, check out the official OpenCart installation document.
If you have any queries, please leave a comment below, and we’ll be happy to respond to them for sure.
