

Introduction
Before we begin talking about how to install Passbolt with PostgreSQL on Ubuntu 22.04, let's briefly understand – What is Passbolt?
Passbolt is an open-source password manager designed for teams to securely store and share sensitive information. It allows users to store passwords, create secure passwords, and manage access with advanced features like user permissions and digital signatures.
Passbolt ensures data safety through end-to-end encryption, making it a reliable solution for organizations looking to enhance their cybersecurity. With Passbolt, teams can collaborate efficiently while keeping their sensitive data protected from unauthorized access.
In this tutorial, you will install Passbolt with PostgreSQL on Ubuntu 22.04. We will also address a few FAQs on how to install Passbolt with PostgreSQL on Ubuntu 22.04.
Advantages of Passbolt with PostgreSQL
- Scalability: Passbolt with PostgreSQL allows for easy scaling to accommodate growing data needs.
- Reliability: PostgreSQL's robust architecture ensures data reliability and system uptime.
- Security: Passbolt combined with PostgreSQL offers advanced security features for protecting sensitive information.
- Performance: PostgreSQL enhances Passbolt's performance, providing fast and efficient data handling.
- Flexibility: The combination of Passbolt and PostgreSQL offers a flexible solution adaptable to diverse organizational.
Requirements
It's critical that your server has email capabilities so that, in the event that you forget your password, you can retrieve your Passbolt account.
You also need a domain name, so you will be able to securely access Passbolt from anywhere with a web browser. Here, domain name is registered under NameCheap, because it offers free whois privacy protection for life at a low price.
Once the above prerequisites are satisfied, install Passbolt by following the directions below.
Step 1: Download Passbolt onto Your Ubuntu 22.04 Server
You must enter your name and email address in order to download Passbolt from the official website. If you'd rather not use that, run the following commands on your server to download the most recent stable version from Github.
sudo apt install git

sudo mkdir -p /var/www/

sudo chown www-data:www-data /var/www/ -R

cd /var/www/

sudo -u www-data git clone https://github.com/passbolt/passbolt_api.git
The files will be kept in the directory called passbolt_api. We call it passbolt now:
sudo mv passbolt_api passbolt
Next, set the owner of this directory to be the web server user (www-data):
sudo chown -R www-data:www-data /var/www/passbolt
To install the PHP modules that Passbolt requires or recommends, run the following command:
sudo apt install apache2 php-imagick php-gnupg php8.1-gnupg php8.1-common php8.1-mysql php8.1-fpm php8.1-ldap php8.1-gd php8.1-imap php8.1-curl php8.1-zip php8.1-xml php8.1-mbstring php8.1-bz2 php8.1-intl php8.1-gmp php8.1-xsl
Next, restart Apache. You don't need to restart Nginx if you use it:
sudo systemctl restart apache2
Change directory:
cd /var/www/passbolt/
Install Composer – the PHP dependency manager:
sudo apt install composer
Create cache directory for Composer:
sudo mkdir -p /var/www/.composer
Make www-data as the owner:
sudo chown -R www-data:www-data /var/www/.composer
Install dependencies using Composer:
sudo -u www-data composer install --no-dev
Select Y if it prompts you to set folder permissions.

Step 2: Create a Database and User for Passbolt
Use this command to set up the Postgresql database server. MariaDB and PostgreSQL can coexist on the same server. MariaDB doesn't have to be removed.
sudo apt install -y postgresql postgresql-contrib
Install PostgreSQL PHP module.
sudo apt install php8.1-pgsql
Log into PostgreSQL as the postgres user.
sudo -u postgres psql
Create the passbolt database.
CREATE DATABASE passbolt TEMPLATE template0 ENCODING 'UNICODE';
Create a user.
CREATE USER passbolt WITH PASSWORD 'passbolt_password';
Grant permissions to the database user.
ALTER DATABASE passbolt OWNER TO passbolt; GRANT ALL PRIVILEGES ON DATABASE passbolt TO passbolt;
To log out of the PostgreSQL console, press Ctrl+D.
Try logging into PostgreSQL with the following command.
psql -h 127.0.0.1 -d passbolt -U passbolt -W
Step 3: Generate OpenPGP Key
Installing the haveged package is advised if you are using a VPS (Virtual Private Server) in order to produce enough entropy.
sudo apt install haveged
Following installation, the haveged.service will launch automatically. Its status can be checked using:
sudo systemctl status haveged
To create a new key pair, execute the following command after that.
sudo -u www-data gpg --quick-gen-key --pinentry-mode=loopback 'first_name last_name <[email protected]>' default default never
- Enter your last name and first name here.
- Email
[email protected]using your actual address. - Make sure to include the angle bracket.
Like this:
sudo -u www-data gpg --quick-gen-key --pinentry-mode=loopback 'VegaStack PeerXP <[email protected]>' default default never
In the event that you are prompted to enter a passphrase, simply hit Enter to bypass it as the php-gnupg module does not currently support passphrases.

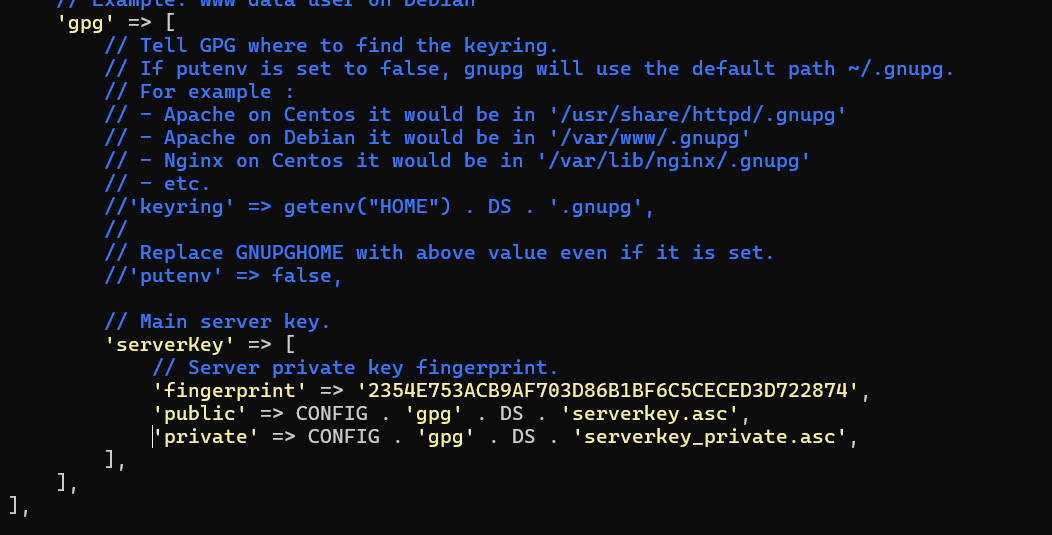
To configure Passbolt, copy the private key to the designated location.
sudo -u www-data gpg --armor --export-secret-keys [email protected] | sudo tee /var/www/passbolt/config/gpg/serverkey_private.asc > /dev/null
Additionally, copy the public key.
sudo -u www-data gpg --armor --export [email protected] | sudo tee /var/www/passbolt/config/gpg/serverkey.asc > /dev/null
It's possible that more than one GPG key is associated with the same email address if GPG displays the following warning. Make sure your email address is distinct.
gpg: WARNING: nothing exported
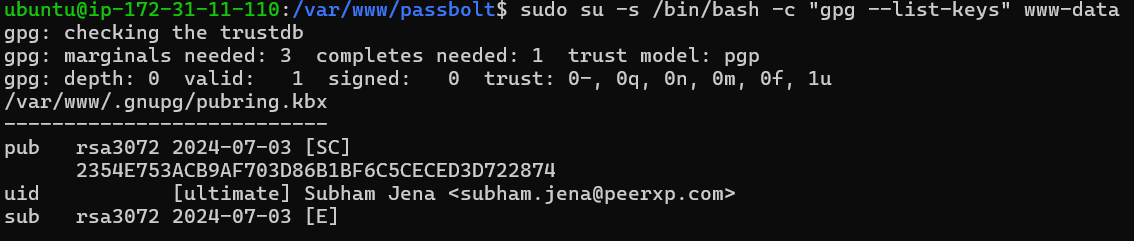
Set up the keyring for the www-data user.
sudo su -s /bin/bash -c "gpg --list-keys" www-data
Step 4: Configure Passbolt
Verify that you are in the directory /var/www/passbolt/.
cd /var/www/passbolt/
To create a production configuration file, copy the sample configuration file.
sudo cp config/passbolt.default.php config/passbolt.php
Use a command-line text editor, like Nano, to make changes to the configuration file.
sudo nano config/passbolt.php
First, locate the line that follows.
'fullBaseUrl' => 'https://www.passbolt.test',
Enter your own URL in place of the provided one, such as https://passbolt.yourdomain.com. Remember to set up DNS A record in your DNS zone editor for this subdomain.
Enter the database name, username, and password that you created in step 2 in the database configuration section.
// Database configuration.
    'Datasources' => [
        'default' => [
            'host' => 'localhost',
            'driver' => \Cake\Database\Driver\Postgres::class,
            //'port' => 'non_standard_port_number',
            'port' => '5432',
            'username' => 'user',
            'password' => 'secret',
            'database' => 'passbolt',
        ],
    ],
Please take note that in order to instruct Passbolt to use PostgreSQL rather than MariaDB, you must add the next two lines.
'driver' => \Cake\Database\Driver\Postgres::class,
'port' => '5432',
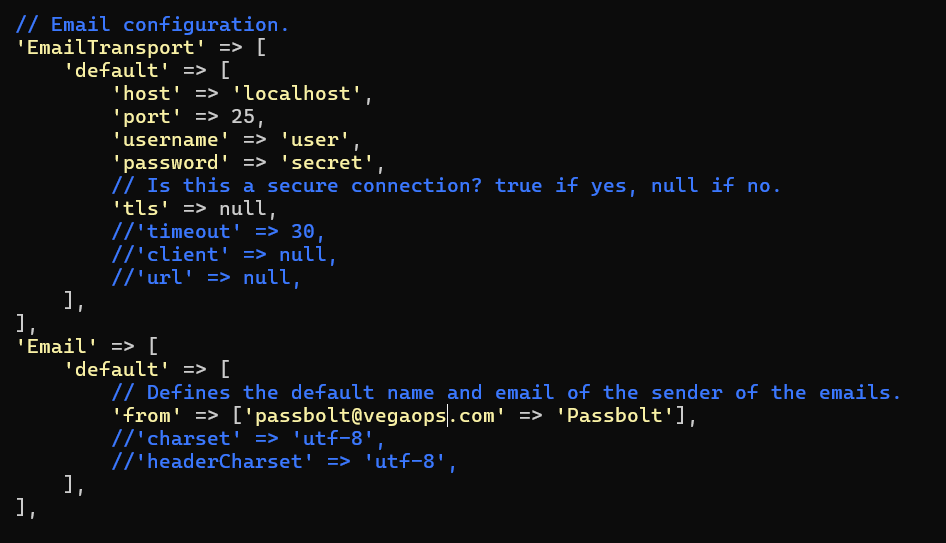
Within the section dedicated to email configuration,
- To enable email sending on your passbolt, provide the SMTP hostname, port number, and login details. Generally, in order to send emails to a remote SMTP server, you must use port 587. To ensure that the SMTP transaction is encrypted, make sure you set
tlstotrue. Enter your Sendinblue login credentials here if you use the Sendinblue SMTP relay service, which is free. - Set the From name and email address as well. For instance, if I change the
From:address to[email protected], Passbolt will use that email address to notify users through email.
// Email configuration.
    'EmailTransport' => [
        'default' => [
            'host' => 'smtp-relay.sendinblue.com',
            'port' => 587,
            'username' => 'smtp_username',
            'password' => 'smtp_password',
            // Is this a secure connection? true if yes, null if no.
            'tls' => true,
            //'timeout' => 30,
            //'client' => null,
            //'url' => null,
        ],
    ],
    'Email' => [
        'default' => [
            // Defines the default name and email of the sender of the emails.
            'from' => ['[email protected]' => 'Passbolt'],
            //'charset' => 'utf-8',
            //'headerCharset' => 'utf-8',
        ],
    ],
Hint 1: You don't need to enter the username and password in the EmailTransport if Passbolt is installed on the same machine as your mail server. To comment out these two lines, just use //. An example configuration for this scenario can be seen in the screenshot that follows.
Hint 2: If you overlook adding the Passbolt Cron job (step 9), Passbolt will not be able to send emails.
Enter the gpg key fingerprint in the designated section as shown below. The fingerprint must be completely free of whitespace.
'fingerprint' => '33B2E593371DE65A35C0B90B5A1F3AF795D461A7',
You can use the following command to obtain your key fingerprint. While creating the PGP key pair, substitute your email address for [email protected].
sudo su -s /bin/bash -c "gpg --list-keys" www-data
Uncomment the next two lines after inputting the fingerprint.
'public' => CONFIG . 'gpg' . DS . 'serverkey.asc',
'private' => CONFIG . 'gpg' . DS . 'serverkey_private.asc',
Save and close the file.
Step 5: Run the Install Script
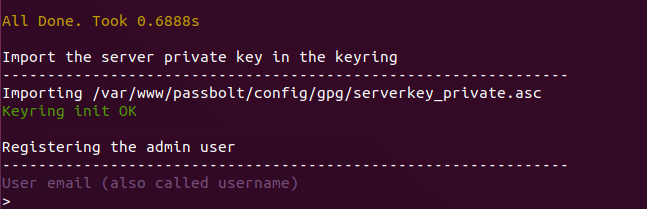
As the www-data user, execute the install script.
sudo su -s /bin/bash -c "/var/www/passbolt/bin/cake passbolt install --force" www-data
Hint: You can ignore deprecated errors if there are a lot of them.
An administrator account must be created before proceeding with the installation. (Take note that the Passbolt notification email address is different from the admin email address.)
You will be given a URL to complete the installation in your web browser after creating an account. We must first use Apache or Nginx to configure the web server before proceeding.
Step 6: Create Apache Virtual Host or Nginx Config File for Passbolt
Apache
Install Apache if that's the web server you prefer to use.
sudo apt install apache2
Create a virtual host for Passbolt.
sudo nano /etc/apache2/sites-available/passbolt.conf
Add the text below to the file. Don't forget to set a DNS A record for your actual domain name and replace passbolt.example.com with it. It should be noted that Passbolt's web root is /var/www/passbolt/webroot/ rather than /var/www/passbolt/.
<VirtualHost *:80>
  ServerName passbolt.exmaple.com
  DocumentRoot /var/www/passbolt/webroot/

  ErrorLog ${APACHE_LOG_DIR}/error.log
  CustomLog ${APACHE_LOG_DIR}/access.log combined

  <Directory />
    Options FollowSymLinks
    AllowOverride All
  </Directory>

  <Directory /var/www/passbolt/>
    Options FollowSymLinks MultiViews
    AllowOverride All
    Order allow,deny
    allow from all
  </Directory>

</VirtualHost>
Save and close the file. Next, use: to enable this virtual host
sudo a2ensite passbolt.conf
For the modifications to take effect, reload Apache.
sudo systemctl reload apache2
Nginx
Install Nginx if you use the Nginx web server.
sudo apt install nginx
Create a virtual host for Passbolt.
sudo nano /etc/nginx/conf.d/passbolt.conf
Add the following text to the document. Make sure you set a DNS A record for your domain name and replace passbolt.example.com with your actual domain name. Notably, Passbolt's web root is /var/www/passbolt/webroot/ rather than /var/www/passbolt/.
server {
   listen 80;
   listen [::]:80;
   server_name passbolt.example.com;

   root /var/www/passbolt/webroot/;
   error_log /var/log/nginx/passbolt.error;
   access_log /var/log/nginx/passbolt.access;

   index index.php index.html index.htm index.nginx-debian.html;

   location / {
     try_files $uri $uri/ /index.php?$query_string;
   }

   location ~ \.php$ {
     # try_files $uri =404;
     fastcgi_split_path_info ^(.+\.php)(/.+)$;
     # NOTE: You should have "cgi.fix_pathinfo = 0;" in php.ini

     fastcgi_pass unix:/var/run/php/php8.1-fpm.sock;
     fastcgi_index index.php;
     fastcgi_param SCRIPT_FILENAME $document_root$fastcgi_script_name;
     include fastcgi_params;

     fastcgi_buffer_size 128k;
     fastcgi_buffers 256 16k;
     fastcgi_busy_buffers_size 256k;
     fastcgi_temp_file_write_size 256k;
   }

    # Don't log favicon
    location = /favicon.ico {
        log_not_found off;
        access_log off;
    }

    # Don't log robots
    location = /robots.txt  {
        access_log off;
        log_not_found off;
    }

    # Deny all attempts to access hidden files/folders such as .htaccess, .htpasswd, .DS_Store (Mac), etc...
    location ~ /\. {
        deny all;
        access_log off;
        log_not_found off;
    }

    # Deny all grunt, composer files
    location ~* (Gruntfile|package|composer)\.(js|json)$ {
        deny all;
        access_log off;
        log_not_found off;
    }
}
Save and close the file. Next, test the Nginx setup.
sudo nginx -t
To make the changes effective, reload Nginx if the test is successful.
sudo systemctl reload nginx
Step 7: Enabling HTTPS
We can enable HTTPS by installing a free TLS certificate provided by Let's Encrypt in order to encrypt HTTP traffic. To install the Let's Encrypt client (certbot) on an Ubuntu 22.04 server, run the following command.
sudo apt install certbot
It is also necessary to install the Certbot Nginx plugin if you use Nginx.
sudo apt install python3-certbot-nginx
After that, execute the subsequent command to acquire and set up the TLS certificate.
sudo certbot --nginx --agree-tos --redirect --hsts --staple-ocsp --email [email protected] -d passbolt.example.com
Install the Certbot Apache plugin if you use Apache.
sudo apt install python3-certbot-apache
And run this command to obtain and install TLS certificate.
sudo certbot --apache --agree-tos --redirect --hsts --staple-ocsp --email [email protected] -d passbolt.example.com
Where
--nginx: Use the nginx plugin.--apache: Use the Apache plugin.--agree-tos: Agree to terms of service.--redirect: Force HTTPS by 301 redirect.--hsts: Add the Strict-Transport-Security header to every HTTP response. Forcing browser to always use TLS for the domain. Defends against SSL/TLS Stripping.--staple-ocsp: Enables OCSP Stapling. A valid OCSP response is stapled to the certificate that the server offers during TLS.
At this point, the certificate ought to be downloaded and installed automatically.

Step 8: Finish Passbolt Installation in Web Browser
Installing the Passbolt extension on your Firefox or Google Chrome browser is the first step.
After the install script has completed, copy the URL and paste it into the address bar of your browser. The web-based setup wizard will appear.
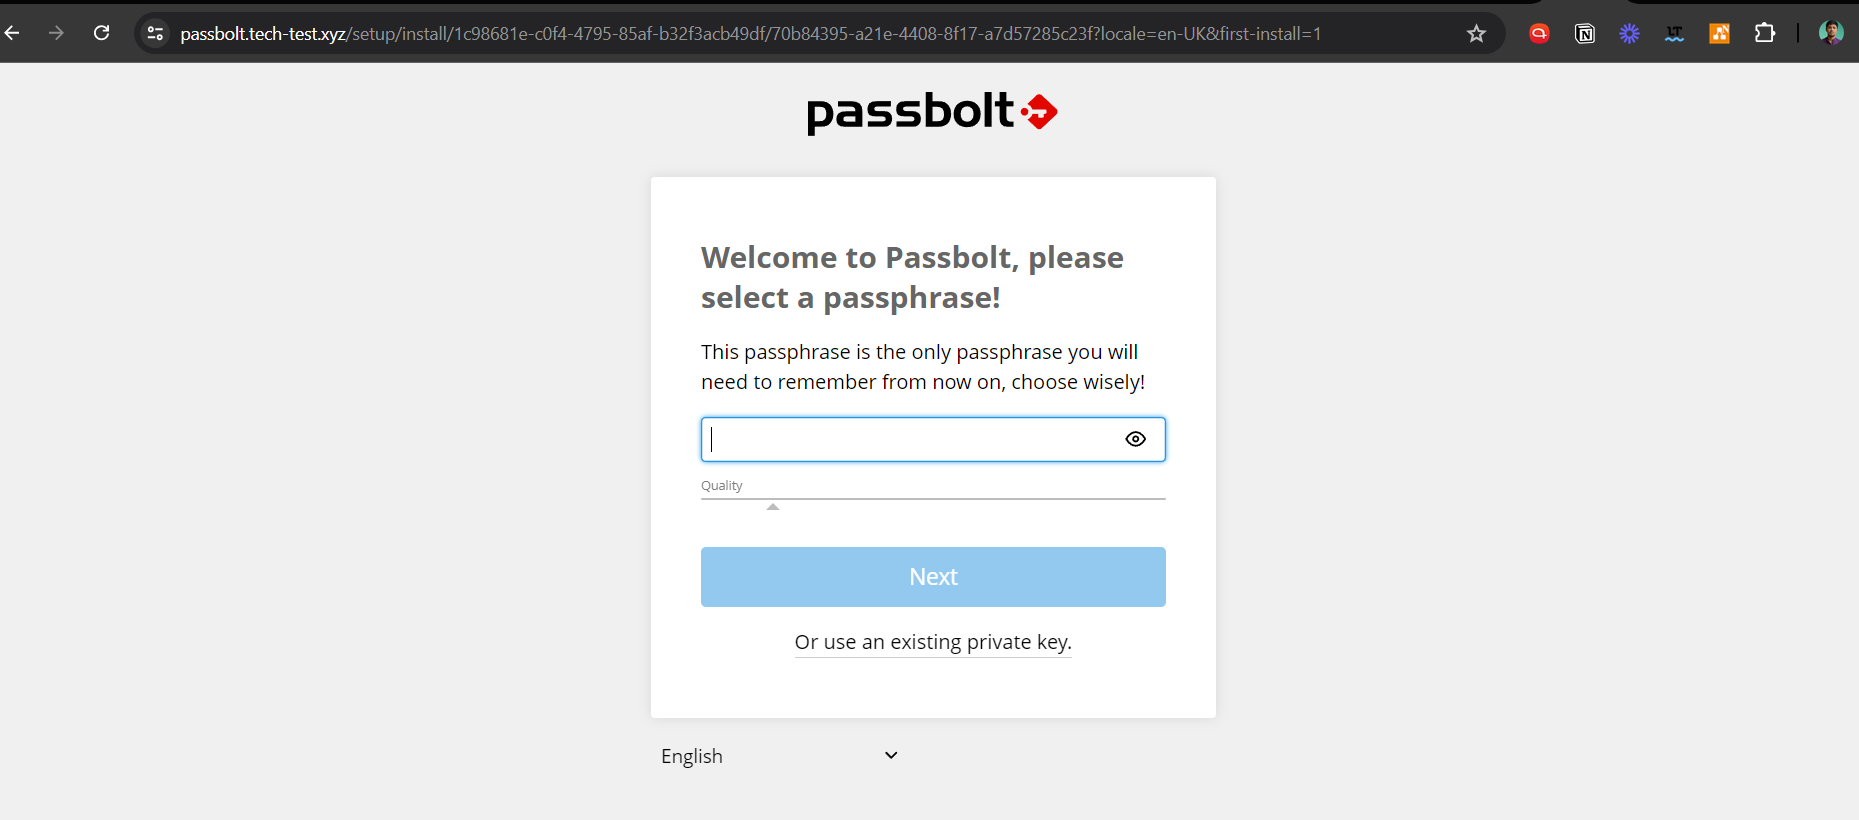
The creation of a passphrase is the first step.
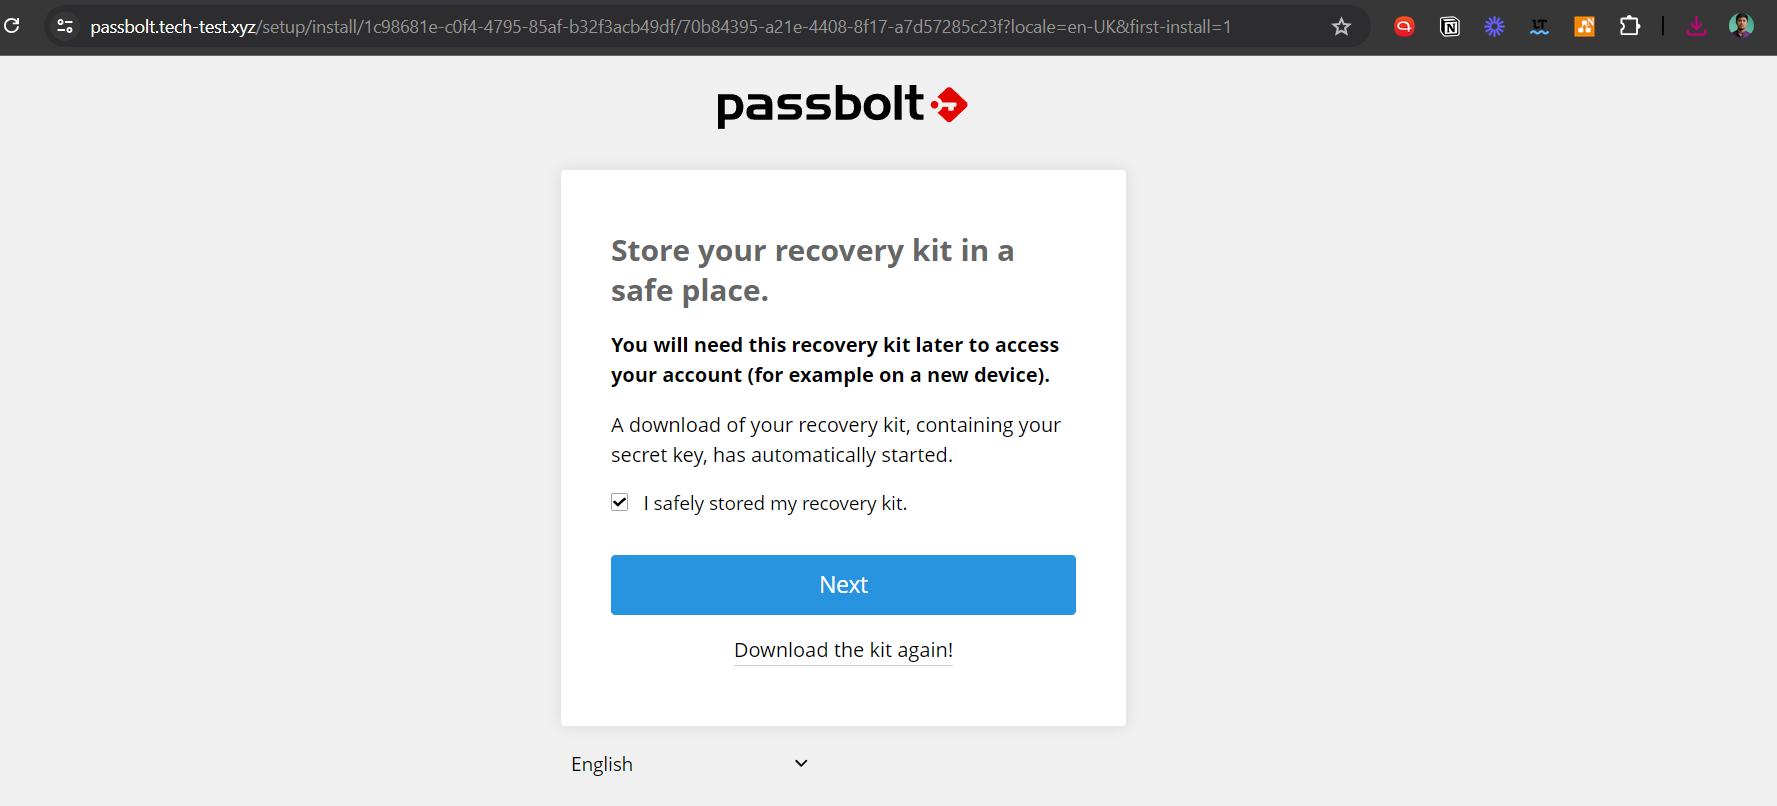
Next, download the kit for recovery.
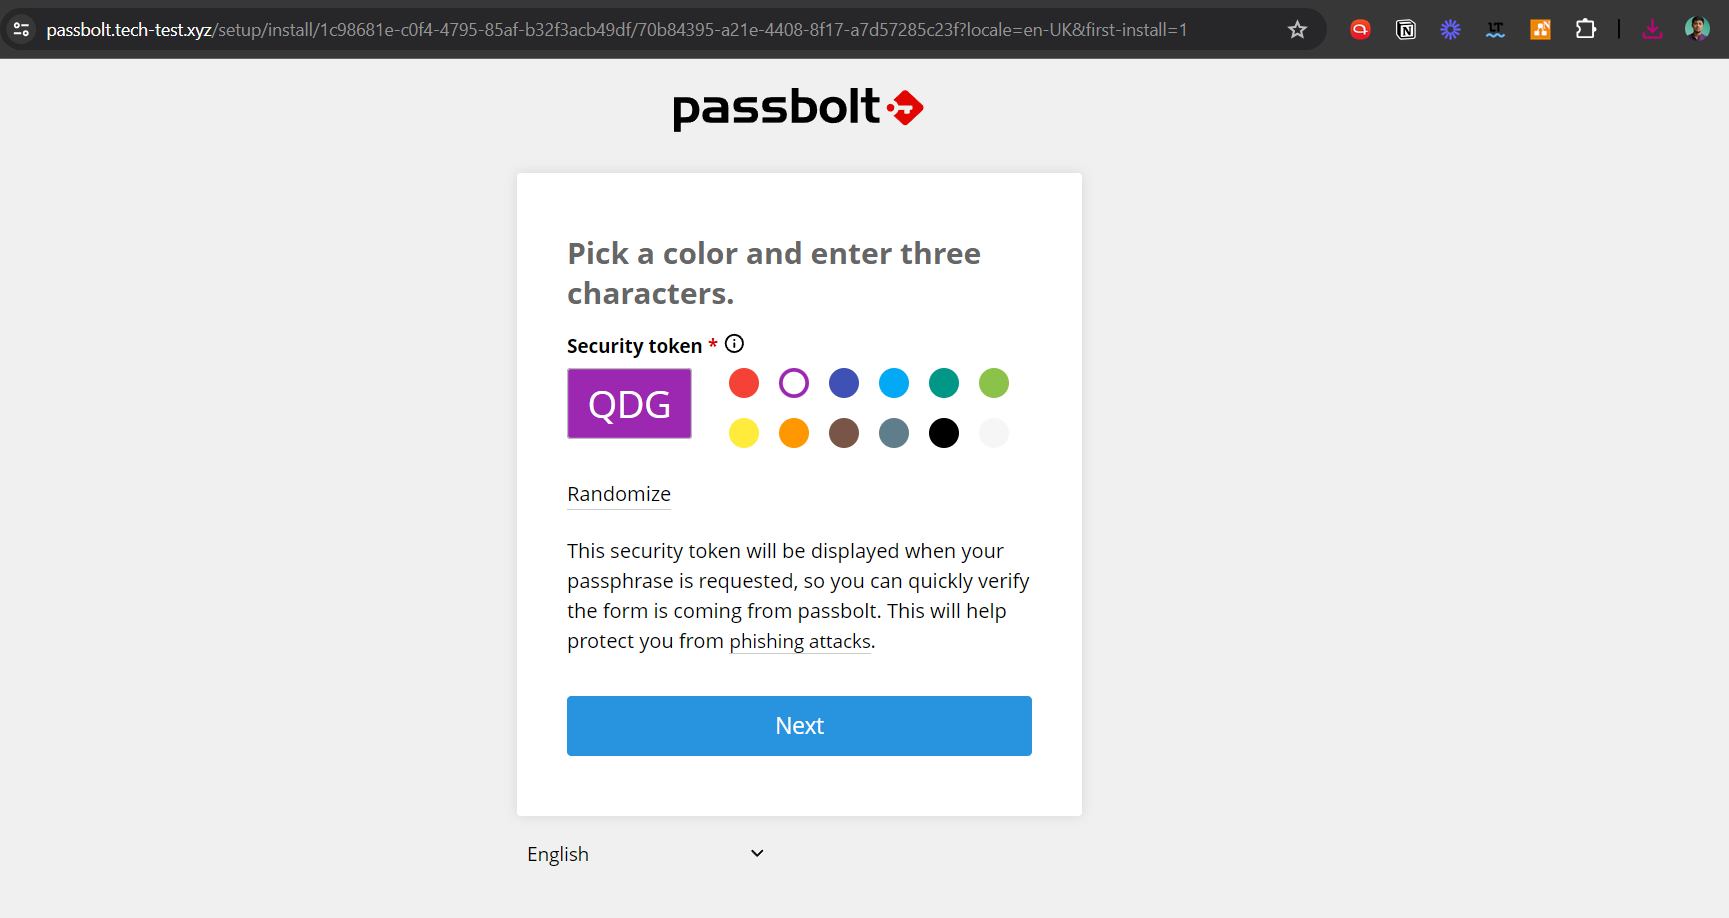
Make a unique security token next.
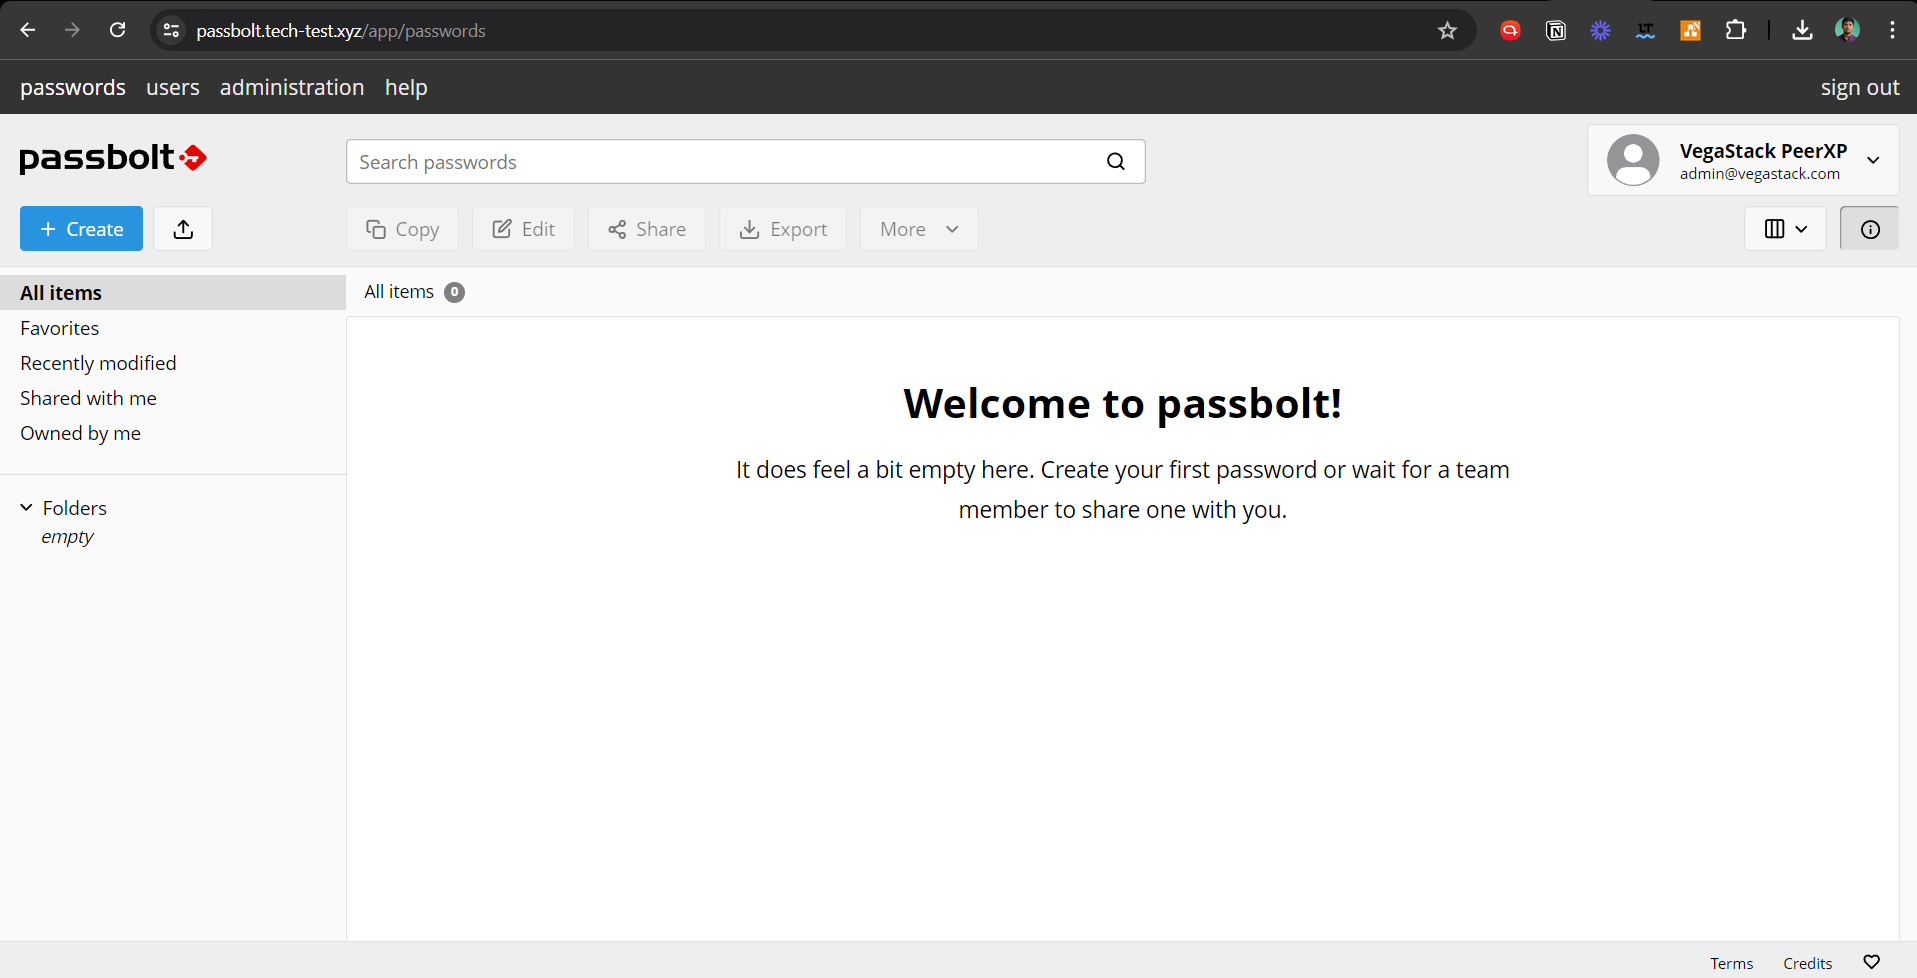
Passbolt has now been successfully installed, and you can import or create passwords from CSV or KDBX files.
Step 9: Set Up Cron Job to Automatically Send Emails
Use the following command to send system emails.
sudo -u www-data /var/www/passbolt/bin/cake EmailQueue.sender
To process emails automatically, you should add the command in the www-data user's Crontab file.
sudo crontab -u www-data -e
Add the next line in the file so that emails are processed once every minute.
* * * * * /var/www/passbolt/bin/cake EmailQueue.sender
Save and close the file.
Step 10: Fixing the Database Encoding Error
Two UTF-8 encoding formats for MySQL/MariaDB are supported by the default Passbolt files:
utf8: incomplete UTF-8 supportutf8mb4: full UTF-8 support
Passbolt uses utf8mb4 by default. Nevertheless, PostgreSQL supports only one UTF8 format: utf8. If the following logs are present in the /var/log/postgresql/ directory.
passbolt@passbolt ERROR:  invalid value for parameter "client_encoding": "utf8mb4"
 passbolt@passbolt STATEMENT:  SET NAMES 'utf8mb4'
 passbolt@passbolt ERROR:  invalid value for parameter "client_encoding": "utf8mb4"
 passbolt@passbolt STATEMENT:  SET NAMES 'utf8mb4'
 passbolt@passbolt ERROR:  invalid value for parameter "client_encoding": "utf8mb4"
 passbolt@passbolt STATEMENT:  SET NAMES 'utf8mb4'
 passbolt@passbolt ERROR:  invalid value for parameter "client_encoding": "utf8mb4"
 passbolt@passbolt STATEMENT:  SET NAMES 'utf8mb4'
It indicates that the utf8mb4 format is not supported byPostgreSQL. Passbolt must be configured to use utf8.
sudo nano /var/www/passbolt/config/app.php
Find the following line:
'encoding' => env('DATASOURCES_DEFAULT_ENCODING','utf8mb4'),
Change it to:
'encoding' => env('DATASOURCES_DEFAULT_ENCODING','utf8'),
Save and close the file.
How to Migrate From MariaDB to PostgreSQL
If you wish to use PostgreSQL after installing Passbolt with MariaDB, you can
- Export the original installation's passwords as a
kdbxfile. - Utilize PostgreSQL to install Passbolt.
- Open the new Passbolt installation and import the passwords (kdbx file).
How to Update Passbolt
Make a backup of the database before updating Passbolt. The passbolt database can be dumped as a .sql file with the following command.
sudo -u postgres pg_dump passbolt > passbolt.sql
An update script that is provided by Passbolt can be called with:
sudo su -s /bin/bash -c "/var/www/passbolt/bin/update" www-data
TroubleShooting
There may be an issue with your Apache or Nginx configuration file if you are attempting to create a password but are stuck at the "breathe deeply and enjoy being in the present moment..." screen. If you replicate the Apache/Nginx setup from the article, setting up a password shouldn't be too difficult.
If the Could not verify the server key error appears after you enabled the ModSecurity web application firewall.
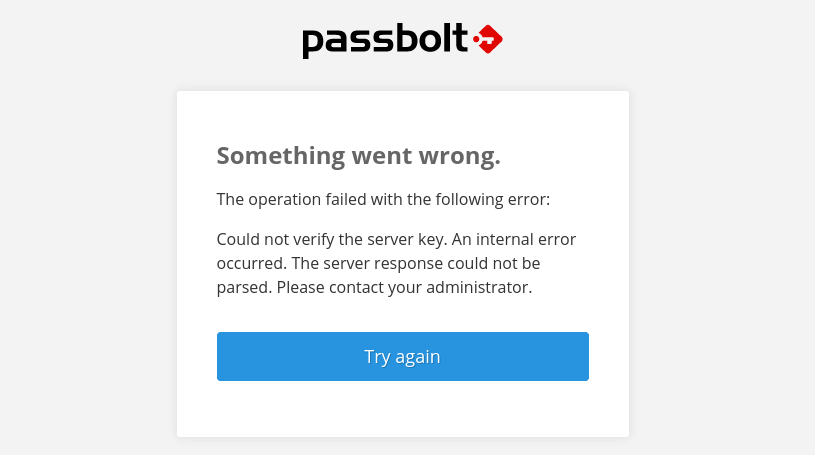
Then the following custom rule exclusion needs to be added to ModSecurity.
SecRule REQUEST_URI "@streq /auth/verify.json?api-version=v2" "id:1060,phase:2,ctl:ruleRemoveById=942100"
And restart your web server.
sudo systemctl restart apache2
or
sudo systemctl restart nginx
How to Back Up and Restore Passbolt Database
Use the pg_dump command line tool to extract the database into a tar archive.
sudo -u postgres -i pg_dump -F t passbolt > passbolt_pgsql.tar
Use the command-line tool pg_restore to restore the database.
sudo -u postgres -i pg_restore --clean --dbname=passbolt /path/to/the/passbolt_pgsql.tar
For backing up the /var/www/passbolt/ folder, it is recommended to use Duplic.
How to Upgrade Passbolt
For current version:
sudo su -s /bin/bash -c "/var/www/passbolt/bin/cake passbolt version" www-data
Change to the passbolt directory:
cd /var/www/passbolt
Get new tags from the Github repository:
sudo -u www-data git fetch --tags
Make a backup of the Passbolt setup file to your home directory:
sudo cp config/passbolt.php ~
Commit local changes:
sudo -u www-data git stash
Switch to the latest version:
sudo -u www-data git checkout v3.9.0
Use Composer to install dependencies:
sudo -u www-data composer install --no-dev
When prompted to adjust folder permissions, select Y. Migrate database:
sudo su -s /bin/bash -c "/var/www/passbolt/bin/cake passbolt migrate" www-data
Check the current version:
sudo su -s /bin/bash -c "/var/www/passbolt/bin/cake passbolt version" www-data
Perform a health check:
sudo su -s /bin/bash -c "/var/www/passbolt/bin/cake passbolt healthcheck --verbose" www-data
If a health check error occurs, Passbolt will provide you with a hint [assistance] on how to fix it. For instance, it will tell you to execute the following command to fix it if there isn't a valid JWT key pair.
sudo su -s /bin/bash -c "/var/www/passbolt/bin/cake passbolt create_jwt_keys" www-data
FAQs to Install Passbolt with PostgreSQL on Ubuntu 22.04
Is Passbolt free to use with PostgreSQL on Ubuntu 22.04?
Yes, both Passbolt and PostgreSQL are open-source software, free to install and use on Ubuntu 22.04.
What are the system requirements for installing Passbolt with PostgreSQL on Ubuntu 22.04?
Ensure your system meets the minimum memory and storage requirements to run Passbolt and PostgreSQL effectively.
How secure is Passbolt with PostgreSQL on Ubuntu 22.04?
The combination provides a robust security framework with data encryption and user permissions, ensuring high levels of security.
Can I host Passbolt with PostgreSQL on a cloud server running Ubuntu 22.04?
Yes, you can host Passbolt with PostgreSQL on cloud services compatible with Ubuntu 22.04 for flexible accessibility.
How can I back up my Passbolt data with PostgreSQL on Ubuntu 22.04?
Regularly backing up your PostgreSQL database ensures that your Passbolt data is safe in case of unforeseen events.
Can users easily manage passwords using Passbolt with PostgreSQL on Ubuntu 22.04?
Yes, users can efficiently manage passwords, create secure credentials, and share access among team members through Passbolt with PostgreSQL.
Can Passbolt with PostgreSQL integrate with existing Single Sign-On (SSO) solutions for user management?
Yes, Passbolt with PostgreSQL supports integration with various Single Sign-On solutions, simplifying user management processes and enhancing overall security.
Conclusion
We hope this tutorial helped you understand how to install Passbolt with PostgreSQL on Ubuntu 22.04.
If you have any queries, please leave a comment below, and we’ll be happy to respond to them for sure.