

Choose a different version or distribution
Introduction
Before, we begin talking about the steps to install PrestaShop on Ubuntu 22.04. First, let's understand - What is PrestaShop?
PrestaShop is a popular e-commerce platform that enables businesses to create and manage their online stores easily. With its user-friendly interface and extensive range of features, PrestaShop allows entrepreneurs to sell products or services effectively.
It offers customizable templates, secure payment gateways, inventory management, and SEO-friendly tools to optimize search engine rankings. PrestaShop empowers businesses of all sizes to establish a strong online presence and grow their sales in the competitive digital marketplace.
In this tutorial, you will install PrestaShop on Ubuntu 22.04. We will also address a few FAQs on how to install PrestaShop on Ubuntu 22.04.
Advantages of PrestaShop
- User-friendly interface: PrestaShop provides a simple and intuitive interface, making it easy for users to set up and manage their online stores.
- Customization options: With a wide range of customizable templates and themes, PrestaShop allows businesses to create unique and attractive storefronts.
- Secure payment gateways: PrestaShop integrates with various secure payment providers, ensuring safe transactions for customers.
- Inventory management: The platform offers robust inventory management tools, helping businesses keep track of stock levels and streamline operations.
- SEO-friendly: PrestaShop includes built-in SEO features to optimize online stores for search engines, increasing visibility and driving organic traffic.
Prerequisites to Install PrestaShop on Ubuntu 22.04
- Should have a domain name pointing to the public server IP.
- Nginx installation on your Ubuntu server.
- An SSL certificate is installed for your domain. It will encrypt the user’s information.
- Also, update the system packages to the latest versions and install the unzip utility, by:
sudo apt update && sudo apt upgrade -y
sudo apt install unzip -y
Step 1 - Create a MySQL Database
1) PrestaShop stores its data in a MySQL database. If MySQL or MariaDB installation is there on your server then skip this step. Otherwise, install the MySQL 5.7 server package. Do it from Ubuntu’s default repositories by using the following command:
sudo apt install mysql-server mysql-client -y
mysql_secure_installation command. It improves the security of your MySQL server.2) Now, to create a database, log in to the MySQL shell:
sudo mysql
3) Next, from within the MySQL shell, run the below SQL statement. It will create a new database as prestashop:
CREATE DATABASE prestashop;
4) Now, you need to create a MySQL user account named prestashop and grant the necessary permissions to the user. Do it by running the below command:
CREATE USER 'prestashop'@'localhost' IDENTIFIED BY 'change-with-strong-password';
GRANT ALL ON prestashop.* TO 'prestashop'@'localhost';
5) After this, exit the MySQL console by typing:
EXIT;
Step 2 – Install and Configuring PHP
1) PHP 7.4 is the default PHP version in Ubuntu 22.04. It is fully supported as well as a recommendation for PrestaShop. So, run the below command to install PHP and all other necessary PHP modules:
sudo apt install php php-common php-cli php-fpm php-opcache php-gd php-mysql php-curl php-intl php-xsl php-mbstring php-zip php-bcmath php-soap -y
2) After this installation process is complete, the PHP-FPM service will automatically start. You can verify it by typing:
sudo systemctl status php8.1-fpm
You will see the below output:
Output

● php8.1-fpm.service - The PHP 8.1 FastCGI Process Manager
     Loaded: loaded (/lib/systemd/system/php8.1-fpm.service; enabled; vendor preset: enabled)
     Active: active (running) since Wed 2023-07-05 12:51:53 UTC; 15s ago
       Docs: man:php-fpm8.1(8)
    Process: 42499 ExecStartPost=/usr/lib/php/php-fpm-socket-helper install /run/php/php-fpm.sock /etc/php/8.1/fpm/pool.d/www.conf 81 (code=exited, status=0/SUCCESS)
   Main PID: 42496 (php-fpm8.1)
     Status: "Processes active: 0, idle: 2, Requests: 0, slow: 0, Traffic: 0req/sec"
3) After that, run the below sed commands. It will set the recommended PHP options:
sudo sed -i "s/memory_limit = .*/memory_limit = 1024M/" /etc/php/8.1/fpm/php.ini
sudo sed -i "s/upload_max_filesize = .*/upload_max_filesize = 256M/" /etc/php/8.1/fpm/php.ini
sudo sed -i "s/zlib.output_compression = .*/zlib.output_compression = on/" /etc/php/8.1/fpm/php.ini
sudo sed -i "s/max_execution_time = .*/max_execution_time = 18000/" /etc/php/8.1/fpm/php.ini
sudo sed -i "s/;date.timezone.*/date.timezone = UTC/" /etc/php/8.1/fpm/php.ini
sudo sed -i "s/;opcache.save_comments.*/opcache.save_comments = 1/" /etc/php/8.1/fpm/php.ini
sudo systemctl restart php8.1-fpm
Step 3 - Download PrestaShop
1) At the time of writing this article, the latest version of PrestaShop is version 8.0.4. Download the latest version from the PrestaShop Downloads Page using the below wget command:
cd /tmp
wget https://assets.prestashop3.com/dst/edition/corporate/8.0.4/prestashop_edition_basic_version_8.0.4.zip
2) After the download is complete, create a directory. It will hold your PrestaShop files:
sudo mkdir -p /var/www/html/example.com
3) Continue to extract the PrestaShop archive:
unzip prestashop_*.zip
4) This archive has another zip file prestashop.zip containing all the PrestaShop files. You will then extract the files. Now, extract the files in the domain's document root directory using the following command:
sudo unzip prestashop.zip -d /var/www/html/example.com
5) Set correct permissions so that the web server can have full access to the site’s files and directories using the belowchown command:
sudo chown -R www-data: /var/www/html
Step 4 - Configure Nginx
1) You should already have Nginx with an SSL certificate installed on your Ubuntu server. Open your text editor and proceed to create the below file:
sudo nano /etc/nginx/sites-available/example.com
server {

    listen 80;
    listen 443 ssl http2; ## Remove this entry if you don't have certificated.

    server_name example.com www.example.com;
    root /var/www/html/example.com;
    index index.php;

## Remove these ssl entries if you don't certificates.
    # SSL parameters
    ssl_certificate /etc/letsencrypt/live/example.com/fullchain.pem;
    ssl_certificate_key /etc/letsencrypt/live/example.com/privkey.pem;
    ssl_trusted_certificate /etc/letsencrypt/live/example.com/chain.pem;
    include snippets/ssl.conf;
    include snippets/letsencrypt.conf;

    # Cloudflare / Max CDN fix
    location ~* \.(eot|otf|ttf|woff(?:2)?)$ {
        add_header Access-Control-Allow-Origin *;
    }

    # Do not save logs for these
    location = /favicon.ico {
        auth_basic off;
        allow all;
        log_not_found off;
        access_log off;
    }

    location = /robots.txt {
        auth_basic off;
        allow all;
        log_not_found off;
        access_log off;
    }

    # Images
    rewrite ^/([0-9])(-[_a-zA-Z0-9-]*)?(-[0-9]+)?/.+.jpg$ /img/p/$1/$1$2$3.jpg last;
    rewrite ^/([0-9])([0-9])(-[_a-zA-Z0-9-]*)?(-[0-9]+)?/.+.jpg$ /img/p/$1/$2/$1$2$3$4.jpg last;
    rewrite ^/([0-9])([0-9])([0-9])(-[_a-zA-Z0-9-]*)?(-[0-9]+)?/.+.jpg$ /img/p/$1/$2/$3/$1$2$3$4$5.jpg last;
    rewrite ^/([0-9])([0-9])([0-9])([0-9])(-[_a-zA-Z0-9-]*)?(-[0-9]+)?/.+.jpg$ /img/p/$1/$2/$3/$4/$1$2$3$4$5$6.jpg last;
    rewrite ^/([0-9])([0-9])([0-9])([0-9])([0-9])(-[_a-zA-Z0-9-]*)?(-[0-9]+)?/.+.jpg$ /img/p/$1/$2/$3/$4/$5/$1$2$3$4$5$6$7.jpg last;
    rewrite ^/([0-9])([0-9])([0-9])([0-9])([0-9])([0-9])(-[_a-zA-Z0-9-]*)?(-[0-9]+)?/.+.jpg$ /img/p/$1/$2/$3/$4/$5/$6/$1$2$3$4$5$6$7$8.jpg last;
    rewrite ^/([0-9])([0-9])([0-9])([0-9])([0-9])([0-9])([0-9])(-[_a-zA-Z0-9-]*)?(-[0-9]+)?/.+.jpg$ /img/p/$1/$2/$3/$4/$5/$6/$7/$1$2$3$4$5$6$7$8$9.jpg last;
    rewrite ^/([0-9])([0-9])([0-9])([0-9])([0-9])([0-9])([0-9])([0-9])(-[_a-zA-Z0-9-]*)?(-[0-9]+)?/.+.jpg$ /img/p/$1/$2/$3/$4/$5/$6/$7/$8/$1$2$3$4$5$6$7$8$9$10.jpg last;
    rewrite ^/c/([0-9]+)(-[.*_a-zA-Z0-9-]*)(-[0-9]+)?/.+.jpg$ /img/c/$1$2$3.jpg last;
    rewrite ^/c/([a-zA-Z_-]+)(-[0-9]+)?/.+.jpg$ /img/c/$1$2.jpg last;

    # AlphaImageLoader for IE and fancybox
    rewrite ^images_ie/?([^/]+)\.(jpe?g|png|gif)$ js/jquery/plugins/fancybox/images/$1.$2 last;

    # Web service API
    rewrite ^/api/?(.*)$ /webservice/dispatcher.php?url=$1 last;

    # Installation sandbox
    rewrite ^(/install(?:-dev)?/sandbox)/(.*) /$1/test.php last;

    #Change this block to your admin folder
    location /admin_CHANGE_ME {
        if (!-e $request_filename) {
            rewrite ^/.*$ /admin_CHANGE_ME/index.php last;
        }
    }

    # File security
    # .htaccess .DS_Store .htpasswd etc
    location ~ /\. {
        deny all;
    }
    # Source code directories
    location ~ ^/(app|bin|cache|classes|config|controllers|docs|localization|override|src|tests|tools|translations|travis-scripts|vendor|var)/ {
        deny all;
    }
    # Prevent exposing other sensitive files
    location ~ \.(yml|log|tpl|twig|sass)$ {
        deny all;
    }

    # Prevent injection of php files
    location /upload {
        location ~ \.php$ {
            deny all;
        }
    }
    location /img {
        location ~ \.php$ {
            deny all;
        }
    }

    # PHP FPM part
    location ~ \.php$ {
        include snippets/fastcgi-php.conf;
        fastcgi_pass unix:/run/php/php8.1-fpm.sock;
    }
}
2) Do not forget to replace example.com with your PrestaShop domain. Also, admin_CHANGE_ME with your admin directory. You will then find the directory name by listing the content of the PrestaShop root directory:
sudo ls -l /var/www/html/example.com | grep admin
3) Remember, to use the correct path to SSL certificate files before restarting the Nginx service. You can check the configuration for syntax errors:
sudo nginx -t
The output will look like this:
Output

nginx: the configuration file /etc/nginx/nginx.conf syntax is ok
nginx: configuration file /etc/nginx/nginx.conf test is successful
4) Link the configuration file sites-enabled and unlink the default page of nginx:
sudo ln -s /etc/nginx/sites-available/example.com /etc/nginx/sites-enabled/
sudo unlink /etc/nginx/sites-enabled/default
4) Finally, restart the Nginx service by typing:
sudo systemctl restart nginx
Step 5 - Install PrestaShop
1) Now, after the PrestaShop download is complete and the server configuration is done, you will finish installation via the web interface. Open your browser, and type your domain.
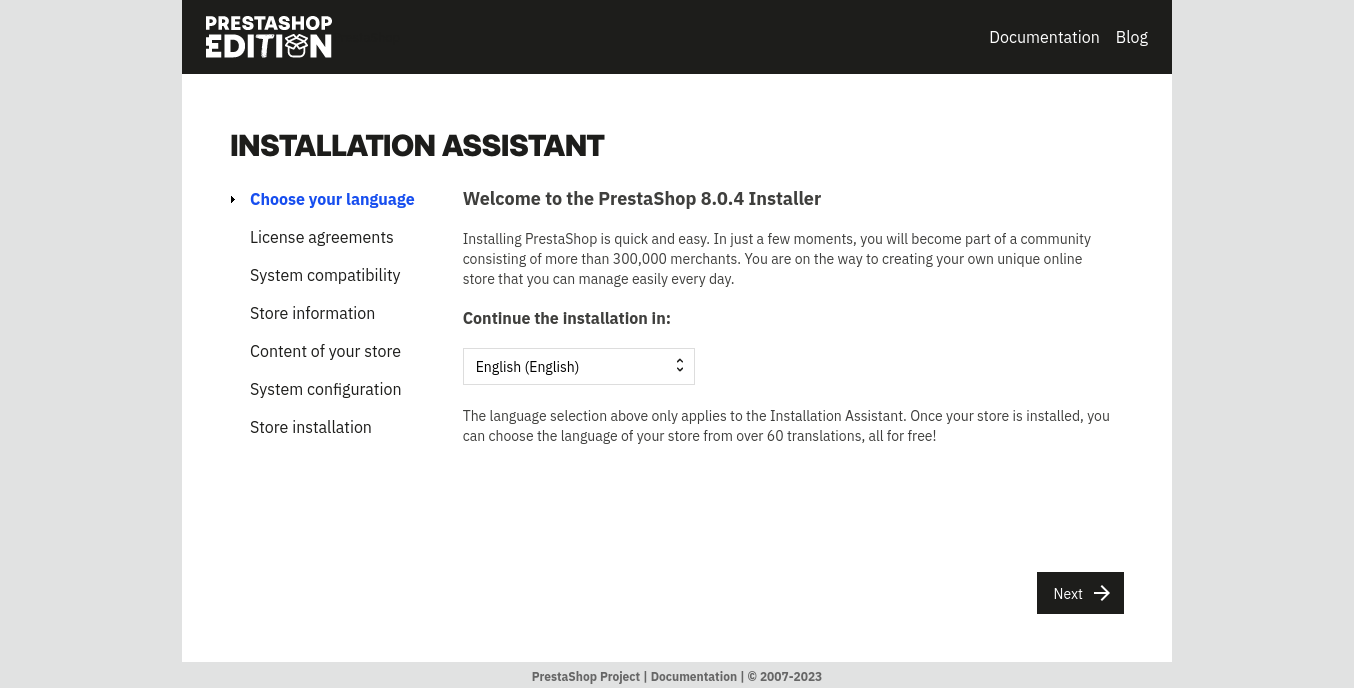
2) You will now select the language you want to use and click on the “Next” button.:
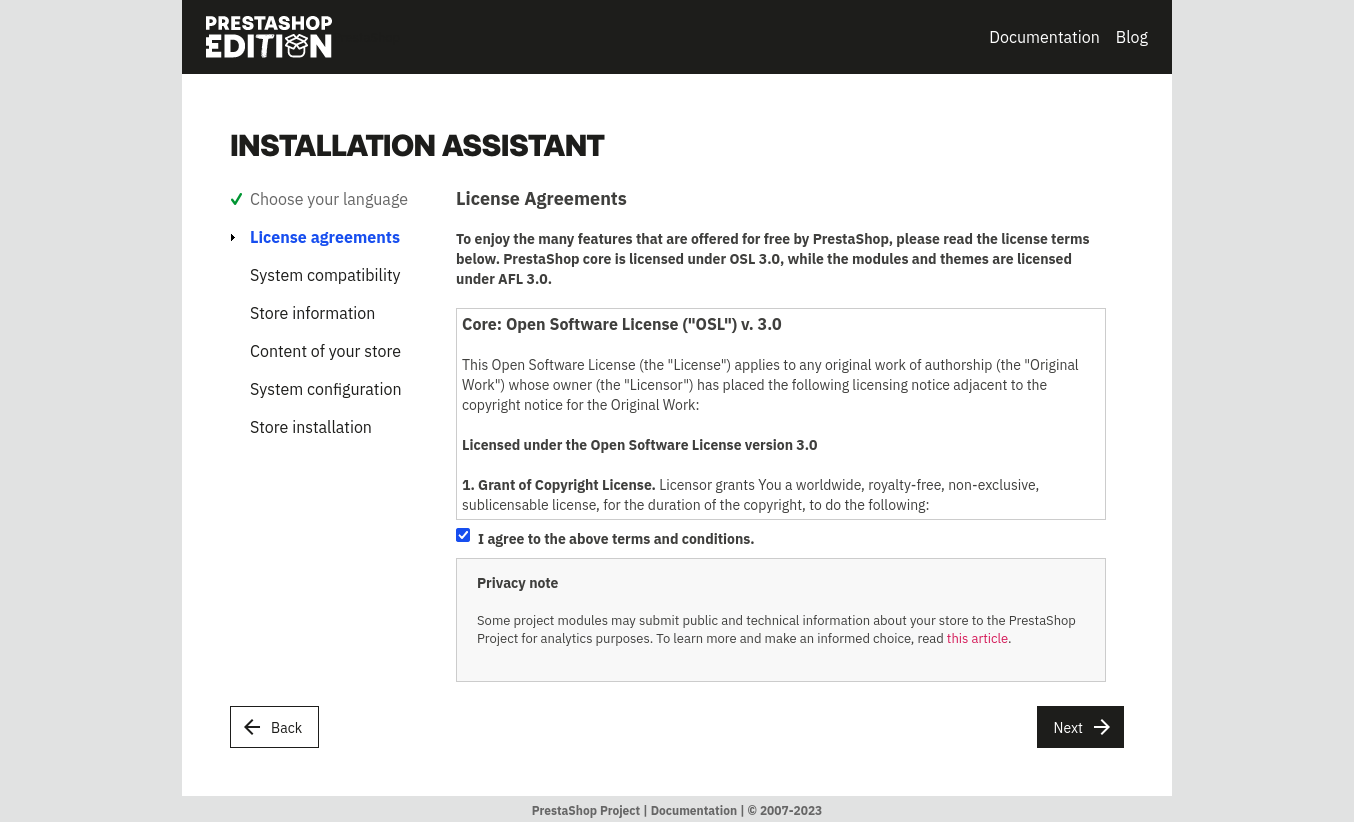
On the next screen, you will get the PrestaShop license agreement. So, read the license carefully and continue to select I agree to the above terms and conditions to continue:
3) Next, you will see the below information page system compatibility:
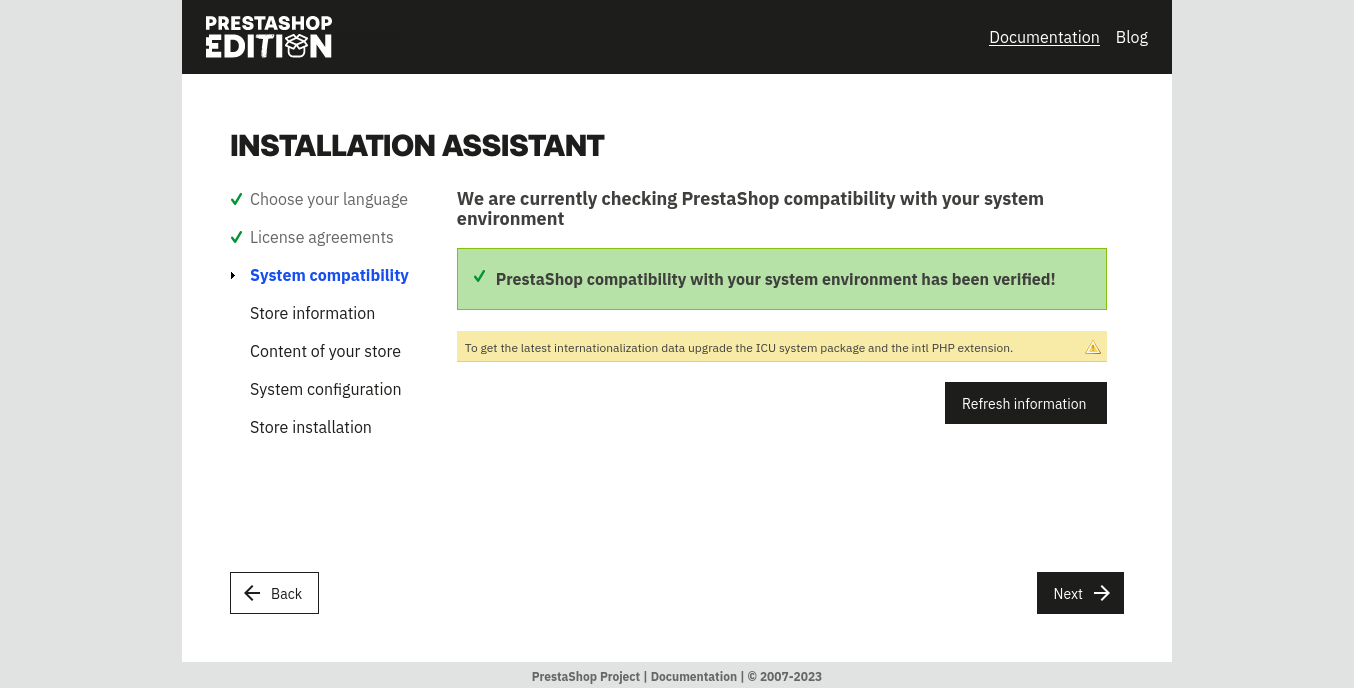
4) Make sure that all pre-installation requirements are met and also that your system is compatible with the PrestaShop.
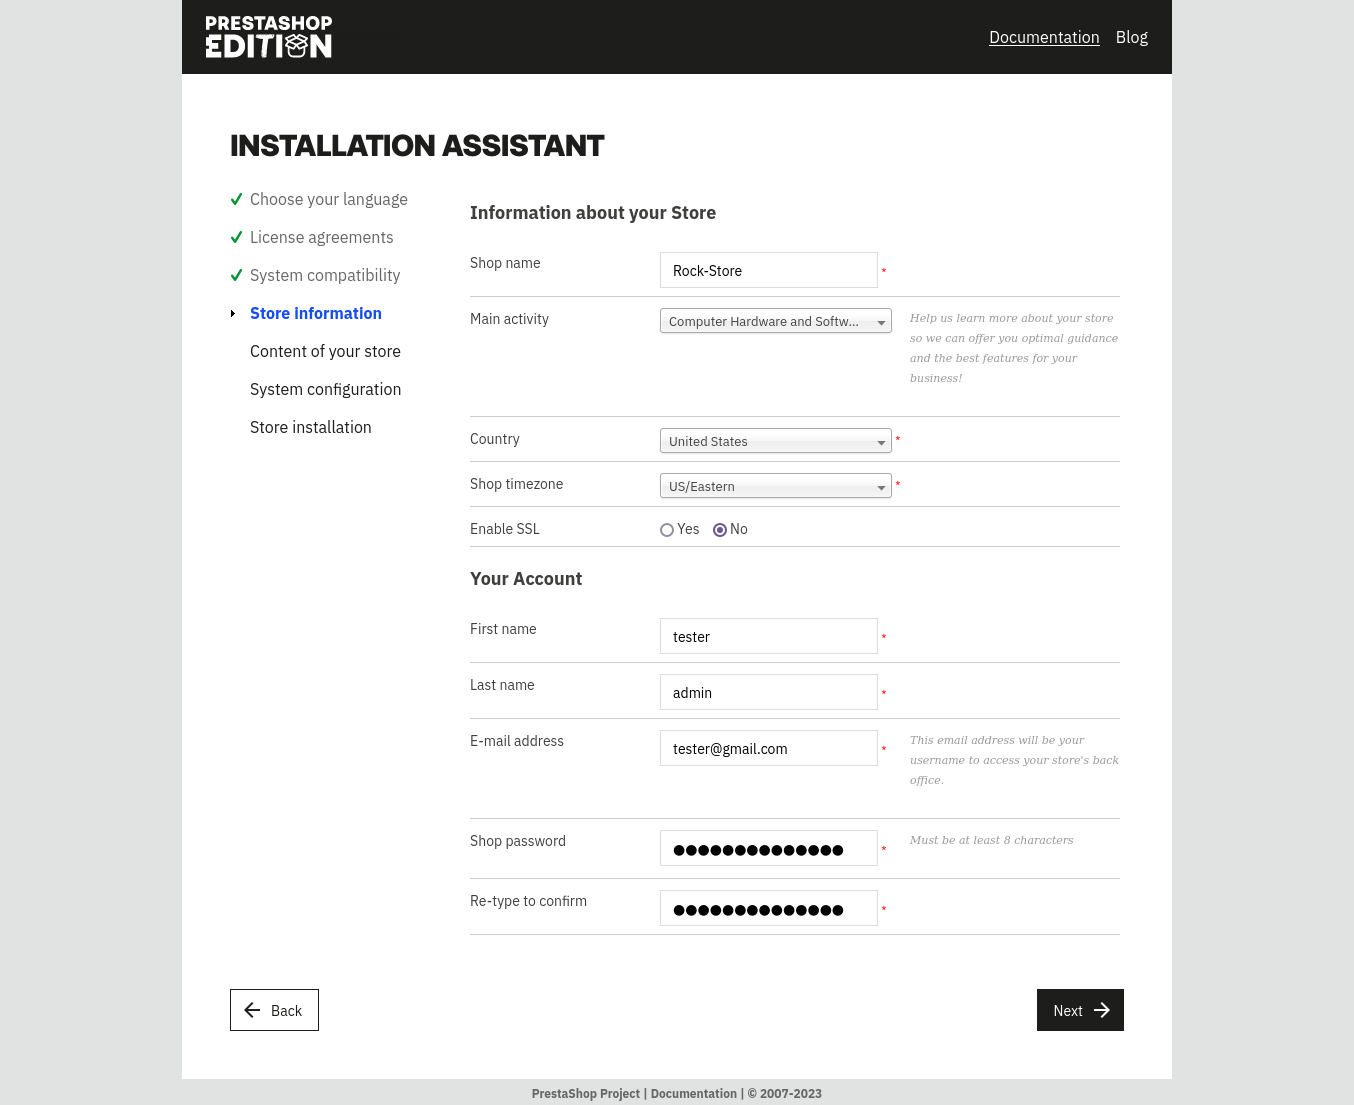
5) On the next screen, you will need to enter your store details. The email address is the username that will allow you to access the PrestaShop administration backend.
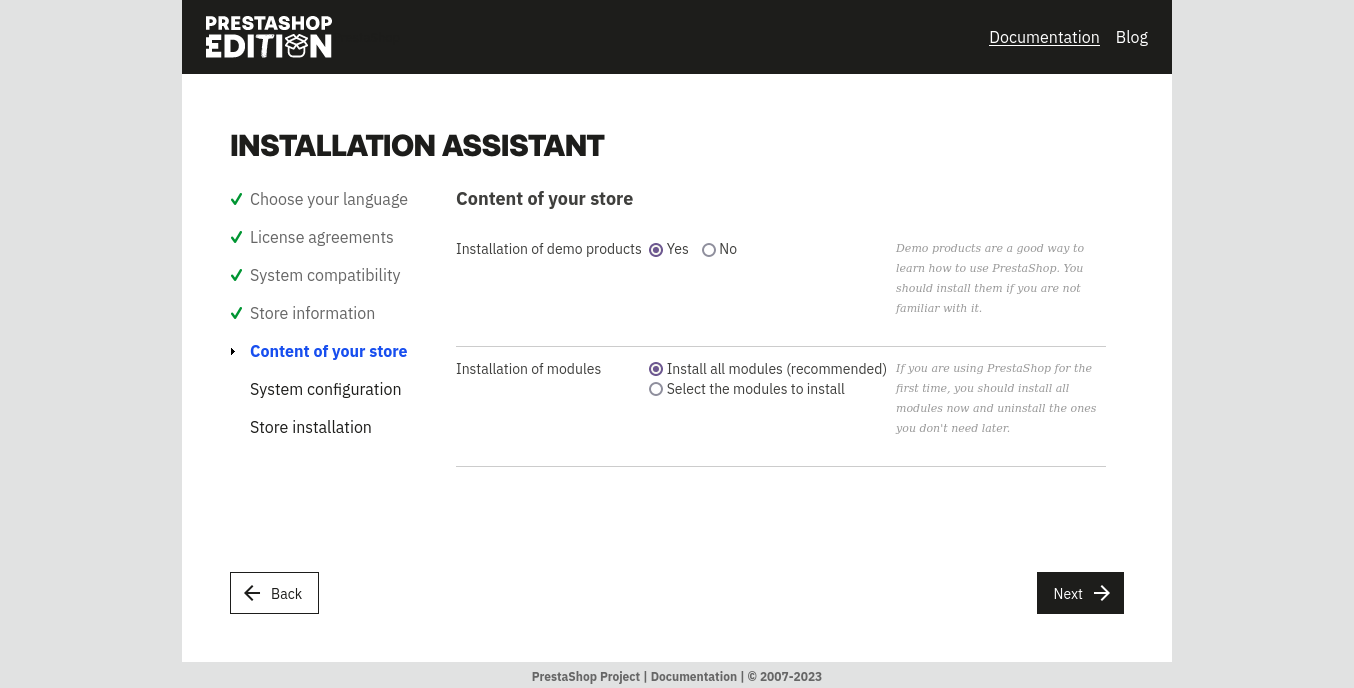
6) Now, select the content of your store:
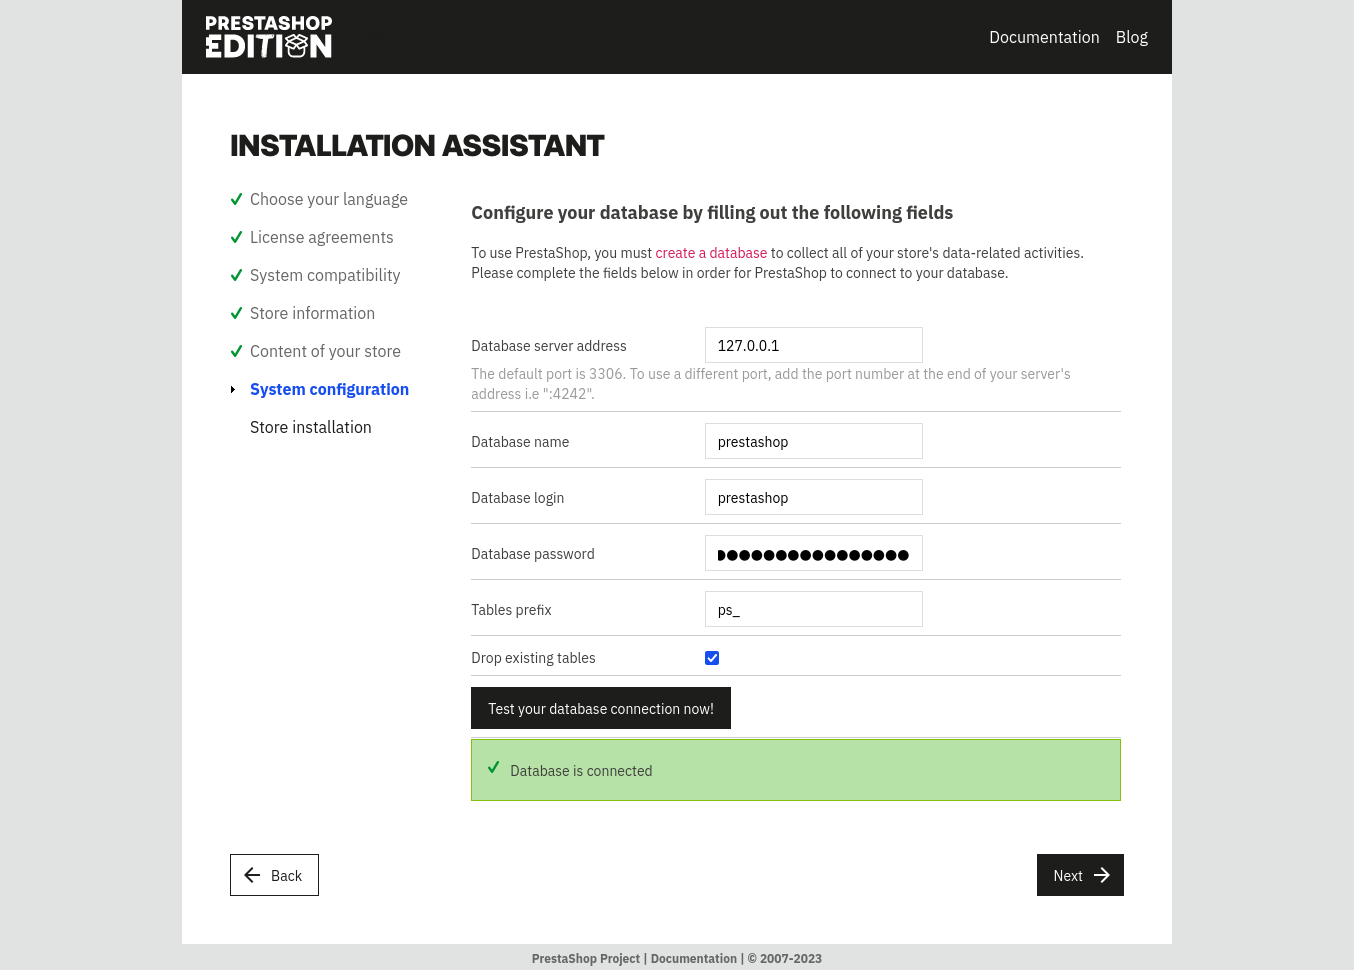
7) After that, you will be asked to enter the database user and connection details that were created by you earlier:
7) Once you click on the “Next” button, the installation will start:
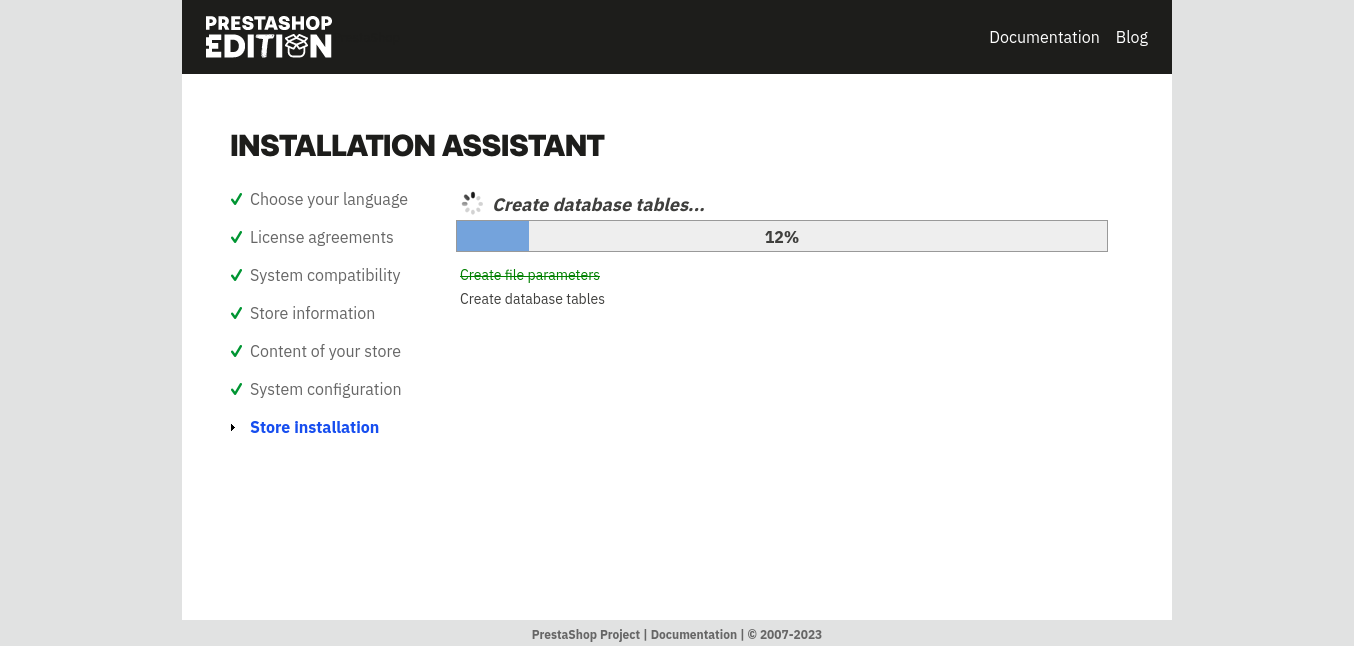
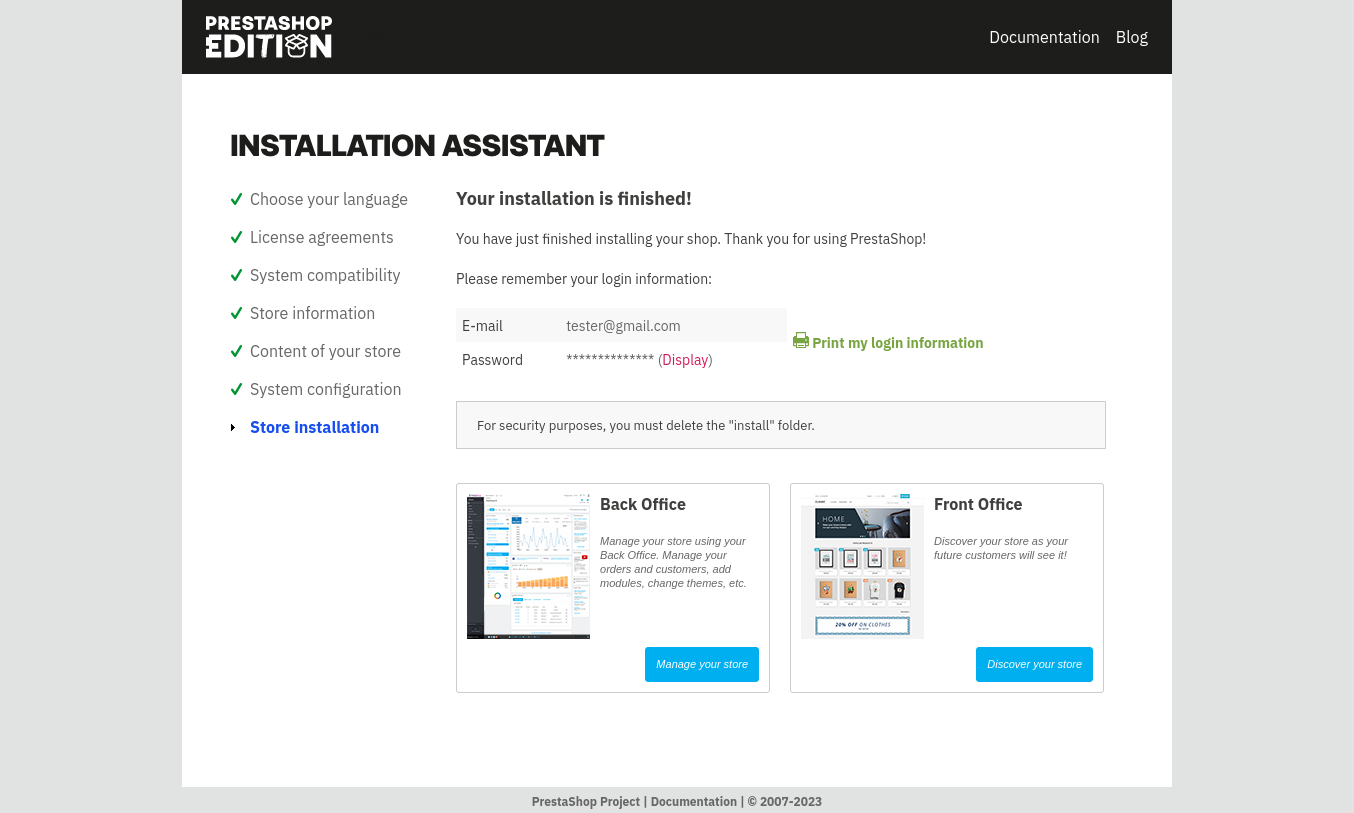
8) The installation will take a few minutes, once it is completed you will get a screen confirming that the PrestaShop has been installed.
9) For security reasons, you will need to delete the installation directory. For this, go back to the terminal and enter the below rm command:
sudo rm -rf /var/www/html/example.com/install
10) To access your PrestaShop administrative dashboard, click on the “Manage your store” button. Enter your email and password.

You will get redirected to the administration dashboard. From here, you will start customizing your PrestaShop installation. Further, you can add new products.
FAQs to Install PrestaShop on Ubuntu 22.04
What are the system requirements for installing PrestaShop on Ubuntu 22.04?
You will need a server running Ubuntu 22.04, Apache 2.4 or Nginx 1.14, MySQL 5.7 or MariaDB 10.2, and PHP 7.2 or higher.
Can I use a different web server instead of Apache for PrestaShop?
Yes, you can use Nginx as an alternative web server for PrestaShop. Just make sure it meets the minimum version requirement.
Is it necessary to have a domain name before installing PrestaShop?
No, a domain name is not required during the installation process. You can use the server's IP address to access your PrestaShop store initially.
What are the recommended file permissions for PrestaShop on Ubuntu 22.04?
The recommended file permissions for PrestaShop are typically set to 755 for directories and 644 for files to ensure proper functionality and security.
Do I need to create a MySQL database before installing PrestaShop?
Yes, you need to create a MySQL database and a dedicated user with appropriate privileges before starting the PrestaShop installation.
Can I install PrestaShop on a shared hosting environment?
Yes, PrestaShop can be installed on a shared hosting environment that meets the minimum system requirements. However, a dedicated server or VPS is recommended for optimal performance.
Conclusion
We hope this detailed tutorial helped you to install PrestaShop on Ubuntu 22.04.
If you have any queries, please leave a comment below, and we’ll be happy to respond to them for sure.