
Choose a different version or distribution
Introduction
Before we begin talking about how to install Rainloop Webmail on Ubuntu 22.04, let's briefly understand – What is Rainloop Webmail?
Rainloop Webmail is a user-friendly web-based email client that allows you to access and manage your emails conveniently from any device with an internet connection. It offers a sleek and intuitive interface, making it easy to compose, send, receive, and organize your emails efficiently.
With its responsive design and customizable features, Rainloop Webmail ensures a seamless and personalized email experience. Stay connected and in control of your messages with this versatile webmail solution.
In this tutorial, you will install and use Rainloop Webmail on Ubuntu 22.04. We will also address a few FAQs on how to install Rainloop Webmail on Ubuntu 22.04.
Advantages of Rainloop Webmail
- User-Friendly Interface: Rainloop Webmail offers a sleek and intuitive interface for easy email management.
- Accessibility: Access your emails conveniently from any device with an internet connection.
- Efficient Organization: Easily compose, send, receive, and organize your emails for improved productivity.
- Responsive Design: Enjoy a seamless email experience with a design that adapts to different screen sizes.
- Customization: Personalize your webmail experience with customizable features to suit your preferences.
Prerequisites to Install Rainloop Webmail on Ubuntu 22.04
- Ubuntu 22.04 running server.
- A server-pointing domain name. We will make use of the domain
rainloop.example.comfor our tutorial. - A non-root user with sudo privileges.
- Make sure everything is updated.
sudo apt update && sudo apt upgrade
- Set up the essential utility packages. Some of these may already be installed in your machine.
sudo apt install wget curl nano unzip -y
Step 1 – Configure Firewall
The first step before installing Rainloop is to set up the firewall. Verify the firewall's condition.
sudo ufw status
You will get an output like below:
Output

Status: active

To                         Action      From
--                         ------      ----
OpenSSH                    ALLOW       Anywhere
OpenSSH (v6)               ALLOW       Anywhere (v6)
For Rainloop to work, HTTP and HTTPS ports are required.
sudo ufw allow http
sudo ufw allow https
For the mail accounts you should use, open ports.
sudo ufw allow 587/tcp
sudo ufw allow 993/tcp
sudo ufw allow 465/tcp
To confirm, check the status:
sudo ufw status
Output


Status: active

To                         Action      From
--                         ------      ----
OpenSSH                    ALLOW       Anywhere
80/tcp                     ALLOW       Anywhere
443                        ALLOW       Anywhere
587/tcp                    ALLOW       Anywhere
993/tcp                    ALLOW       Anywhere
465/tcp                    ALLOW       Anywhere
OpenSSH (v6)               ALLOW       Anywhere (v6)
80/tcp (v6)                ALLOW       Anywhere (v6)
443 (v6)                   ALLOW       Anywhere (v6)
587/tcp (v6)               ALLOW       Anywhere (v6)
993/tcp (v6)               ALLOW       Anywhere (v6)
465/tcp (v6)               ALLOW       Anywhere (v6)
Step 2 – Install Nginx
Nginx is shipped with an outdated version of Ubuntu 22.04. You must obtain the official Nginx repository in order to install the most recent version.
Import the signing key for Nginx.
curl https://nginx.org/keys/nginx_signing.key | gpg --dearmor \
| sudo tee /usr/share/keyrings/nginx-archive-keyring.gpg >/dev/null
Adding the stable version of Nginx's repository.
echo "deb [signed-by=/usr/share/keyrings/nginx-archive-keyring.gpg arch=amd64] \
http://nginx.org/packages/ubuntu `lsb_release -cs` nginx" \
| sudo tee /etc/apt/sources.list.d/nginx.list
Use the following command to update the system repositories.
sudo apt update
Install Nginx.
sudo apt install nginx
Check the installation:
nginx -v
nginx version: nginx/1.22.0
Step 3 – Install and Configure PHP
PHP 8.1 is preinstalled in Ubuntu 22.04 by default. But we must install PHP 8.0 in order for Rainloop to function. The PHP repository maintained by Ondrej must be added first.
sudo add-apt-repository ppa:ondrej/php
Install PHP and the Rainloop required extensions.
sudo apt install php8.0-fpm php8.0-curl php8.0-mbstring php8.0-mysql php8.0-xml php8.0-cli
Confirm the installation.
php --version
Output

PHP 8.0.20 (cli) (built: Jun 25 2022 08:12:05) ( NTS )
Copyright (c) The PHP Group
Zend Engine v4.0.20, Copyright (c) Zend Technologies
    with Zend OPcache v8.0.20, Copyright (c), by Zend Technologies
See the status of the PHP service.
sudo systemctl status php8.0-fpm
Output


? php8.0-fpm.service - The PHP 8.0 FastCGI Process Manager
     Loaded: loaded (/lib/systemd/system/php8.0-fpm.service; enabled; vendor preset: enabled)
     Active: active (running) since Mon 2022-07-04 01:52:55 UTC; 1min 22s ago
       Docs: man:php-fpm8.0(8)
    Process: 12463 ExecStartPost=/usr/lib/php/php-fpm-socket-helper install /run/php/php-fpm.sock /etc/php/8.0/fpm/pool.d/www.conf 80 (code=exited, status=0/SUCCESS)
   Main PID: 12460 (php-fpm8.0)
     Status: "Processes active: 0, idle: 2, Requests: 0, slow: 0, Traffic: 0req/sec"
      Tasks: 3 (limit: 2241)
     Memory: 8.7M
        CPU: 89ms
     CGroup: /system.slice/php8.0-fpm.service
             ??12460 "php-fpm: master process (/etc/php/8.0/fpm/php-fpm.conf)
To edit, access the php.ini file.
sudo nano /etc/php/8.0/fpm/php.ini
To set the maximum mail attachment size at 25 MB, modify the values of the following variables.
upload_max_filesize = 25M
post_max_size = 25M
By hitting Ctrl + X and typing Y when requested, you can save the file.
Open the /etc/php/8.0/fpm/pool.d/www.conf file.
sudo nano /etc/php/8.0/fpm/pool.d/www.conf
Replace the lines in the file that say user=apache and group=apachewith ones mentioned below.
...
; Unix user/group of processes
; Note: The user is mandatory. If the group is not set, the default user's group
;       will be used.
; RPM: apache user chosen to provide access to the same directories as httpd
user = nginx
; RPM: Keep a group allowed to write in log dir.
group = nginx
...
Also, locate listen.owner = www-data and listen.group = www-data and make the following changes to them.
...
; Set permissions for unix socket, if one is used. In Linux, read/write
; permissions must be set in order to allow connections from a web server. Many
; BSD-derived systems allow connections regardless of permissions. The owner
; and group can be specified either by name or by their numeric IDs.
; Default Values: user and group are set as the running user
;                 mode is set to 0660
listen.owner = nginx
listen.group = nginx
...
By hitting Ctrl + X and typing Y when requested, you can save the file.
Start the PHP-FPM service again.
sudo systemctl restart php8.0-fpm
Step 4 – Install MySQL
The most recent version of MySQL is included with Ubuntu 22.04. It may be set up using a single command.
sudo apt install mysql-server
Confirm the MySQL version.
mysql --version
mysql  Ver 8.0.29-0ubuntu0.22.04.2 for Linux on x86_64 ((Ubuntu))
For MySQL versions, 8.0.28 and later, this step is required. Activate the MySQL Shell.
sudo mysql
Execute the following command to change the root user's password. A mix of numerals, uppercase, lowercase, and special characters should be used.
mysql> ALTER USER 'root'@'localhost' IDENTIFIED WITH mysql_native_password BY 'YourPassword12!';
Exit the shell using the below command:
mysql> exit
Execute the script to install MySQL securely.
sudo mysql_secure_installation
You will initially be prompted for your root password. Access it. You will then be prompted to install the component for password validation. It evaluates the security of MySQL passwords. To install it, press Y.
The level of the password validation policy will then need to be configured. The strongest option is 2, therefore pick that one.
Hit N to continue refusing the change of your root password. Moreover, select Y to delete the test database, disable remote root logins, remove anonymous users, and reload the privilege tables.
Step 5 – Configure MySQL
Open the MySQL shell and log in. When prompted, enter your root password.
sudo mysql -u root -p
Make a Rainloop database.
mysql> CREATE DATABASE rainloop;
In order to access the database, create a SQL user. Change yourpassword to a different password of your choosing.
mysql> CREATE USER 'rainuser'@'localhost' IDENTIFIED BY 'YourPassword23!';
Ensure rainuser has database access.
mysql> GRANT ALL ON rainloop.* TO 'rainuser'@'localhost';
Load the privilege table again.
mysql> FLUSH PRIVILEGES;
Exit the shell using:
mysql> exit
Step 6 – Install Rainloop
Make a public directory for Rainloop.
sudo mkdir /var/www/html/rainloop -p
Download the most recent version of Rainloop.
wget https://www.rainloop.net/repository/webmail/rainloop-latest.zip
Execute the following to unzip the downloaded file to the public directory.
sudo unzip rainloop-latest.zip -d /var/www/html/rainloop
Next, change the directory's ownership to Nginx.
sudo chown -R nginx:nginx /var/www/html/rainloop
Grant read and write permissions required by Rainloop.
sudo find /var/www/html/rainloop -type d -exec chmod 755 {} \;
sudo find /var/www/html/rainloop -type f -exec chmod 644 {} \;
Step 7 – Install SSL
To create the free SSL certificates provided by Let's Encrypt, we first install Certbot.
Either use the Ubuntu repository to install Certbot or use Snapd to download the most recent version. The Snapd version is what we'll be using.
Snapd is preinstalled in Ubuntu 22.04 by default. To ensure that your version of Snapd is up-to-date, run the following command:
sudo snap install core
Install Certbot.
sudo snap install --classic certbot
By making a symbolic link to the /usr/bin directory, the following command can be used to make sure that the Certbot command can be executed.
sudo ln -s /snap/bin/certbot /usr/bin/certbot
For Rainloop, create an SSL certificate.
sudo certbot certonly --standalone --agree-tos --no-eff-email --staple-ocsp --preferred-challenges http -m [email protected] -d rainloop.example.com
Create a Diffie-Hellman group certificate.
sudo openssl dhparam -out /etc/ssl/certs/dhparam.pem 4096
Editing can be done by opening the file /etc/letsencrypt/renewal/rainloop.example.com.conf.
sudo nano /etc/letsencrypt/renewal/rainloop.example.com.conf
Add the next line of code to the bottom.
pre_hook = systemctl stop nginx
post_hook = systemctl start nginx
By hitting Ctrl + X and typing Y when requested, you can save the file.
Using Certbot's standalone option, we created the SSL certificate. Nginx should be turned off while the certificate is being renewed because it operates its web server to create the certificate. The pre_hook and post_hook commands automatically shut down and restart the Nginx server before and after the renewal, requiring no additional manual work.
Do a dry run to ensure the SSL renewal is functioning properly.
sudo certbot renew --dry-run
You are good to go if there are no errors. Your certificate will automatically renew each year.
Step 8 – Configure Nginx
To edit, launch the nginx.conf file.
sudo nano /etc/nginx/nginx.conf
Paste the following code beneath the line include /etc/nginx/conf.d/*.conf; that you found.
server_names_hash_bucket_size 64;
By hitting Ctrl + X and typing Y when requested, you can save the file.
The Rainloop configuration file for Nginx should be created and edited.
sudo nano /etc/nginx/conf.d/rainloop.conf
Add the next line of code to it.
server {

    listen 443 ssl http2;
    listen [::]:443 ssl http2;

    server_name rainloop.example.com;
    root /var/www/html/rainloop;

    index index.php;
    client_max_body_size 25M;

    access_log  /var/log/nginx/rainloop.access.log;
    error_log   /var/log/nginx/rainloop.error.log;

    ssl_certificate      /etc/letsencrypt/live/rainloop.example.com/fullchain.pem;
    ssl_certificate_key  /etc/letsencrypt/live/rainloop.example.com/privkey.pem;
    ssl_trusted_certificate /etc/letsencrypt/live/rainloop.example.com/chain.pem;

    ssl_session_timeout  5m;
    ssl_session_cache shared:MozSSL:10m;
    ssl_session_tickets off;

    ssl_protocols TLSv1.2 TLSv1.3;
    ssl_prefer_server_ciphers on;
    ssl_ciphers ECDHE-ECDSA-AES128-GCM-SHA256:ECDHE-RSA-AES128-GCM-SHA256:ECDHE-ECDSA-AES256-GCM-SHA384:ECDHE-RSA-AES256-GCM-SHA384:ECDHE-ECDSA-CHACHA20-POLY1305:ECDHE-RSA-CHACHA20-POLY1305:DHE-RSA-AES128-GCM-SHA256:DHE-RSA-AES256-GCM-SHA384;
    ssl_ecdh_curve X25519:prime256v1:secp384r1:secp521r1;
    ssl_stapling on;
    ssl_stapling_verify on;
    ssl_dhparam /etc/ssl/certs/dhparam.pem;

    location / {
        try_files $uri $uri/ /index.php?$query_string;
    }

    location ~ \.php$ {
        fastcgi_index index.php;
        fastcgi_split_path_info ^(.+\.php)(.*)$;
        fastcgi_keep_conn on;
        include fastcgi_params;
        fastcgi_pass unix:/run/php/php8.0-fpm.sock;
        fastcgi_param SCRIPT_FILENAME $document_root$fastcgi_script_name;
    }

    location ~ /\.ht {
        deny all;
    }

    location ^~ /data {
        deny all;
    }
}
# enforce HTTPS
server {
    listen 80;
    listen [::]:80;
    server_name  rainloop.example.com;
    return 301   https://$host$request_uri;
}
By hitting Ctrl + X and typing Y when requested, you can save the file.
If you don't have a domain, you can use the below configuration:
server {

    listen 80;
    listen [::]:80;

    server_name rainloop.example.com;
    root /var/www/html/rainloop;

    index index.php;
    client_max_body_size 25M;

    access_log  /var/log/nginx/rainloop.access.log;
    error_log   /var/log/nginx/rainloop.error.log;


    location / {
        try_files $uri $uri/ /index.php?$query_string;
    }

    location ~ \.php$ {
        fastcgi_index index.php;
        fastcgi_split_path_info ^(.+\.php)(.*)$;
        fastcgi_keep_conn on;
        include fastcgi_params;
        fastcgi_pass unix:/run/php/php8.0-fpm.sock;
        fastcgi_param SCRIPT_FILENAME $document_root$fastcgi_script_name;
    }

    location ~ /\.ht {
        deny all;
    }

    location ^~ /data {
        deny all;
    }
}
Check the syntax of the Nginx configuration, and remove default conf.
sudo nginx -t
sudo rm /etc/nginx/conf.d/default.conf
Start the Nginx service again.
sudo systemctl restart nginx
Step 9 – Configure and Access Rainloop
The following login screen will appear when you access Rainloop's Administrator page through the URL https://rainloop.example.com/?admin.
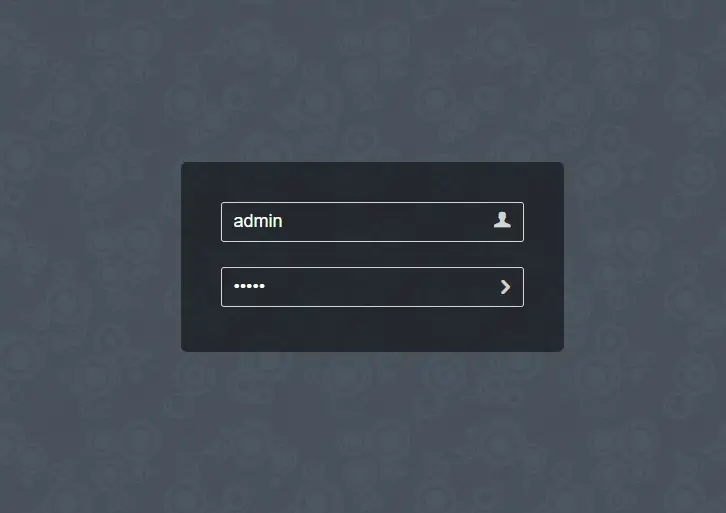
To log in, type the following information and hit Enter.
Username: admin
Password: 12345
A prompt to update your default password will appear when you first access the Rainloop administrator dashboard.
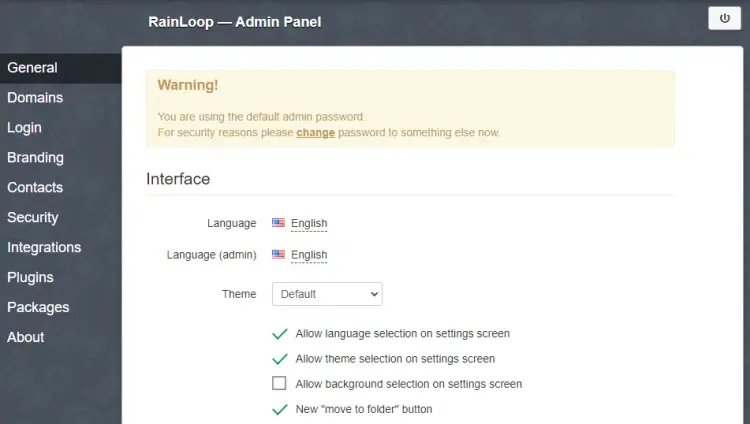
Use the link on the dashboard to alter the default password.
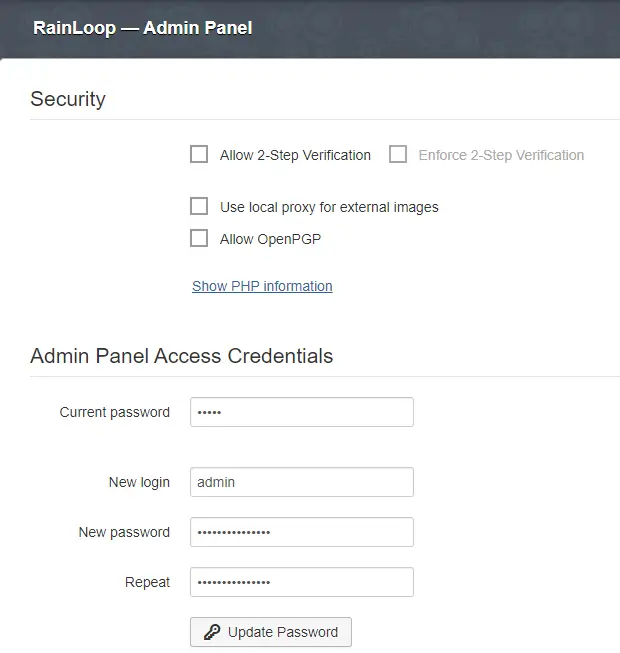
To continue, enter a new password and press the Update Password button.
In order to maintain contact information, Rainloop uses MySQL. Choose MySQL from the dropdown menu on the Contacts page.
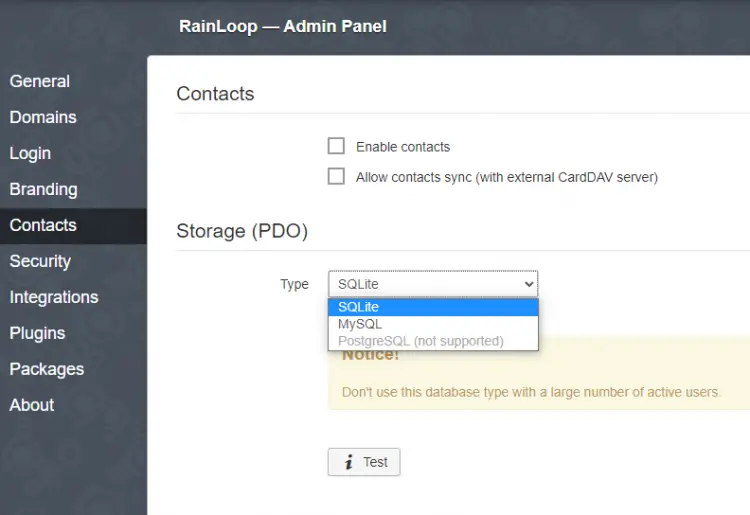
Type in the database credentials you already created.
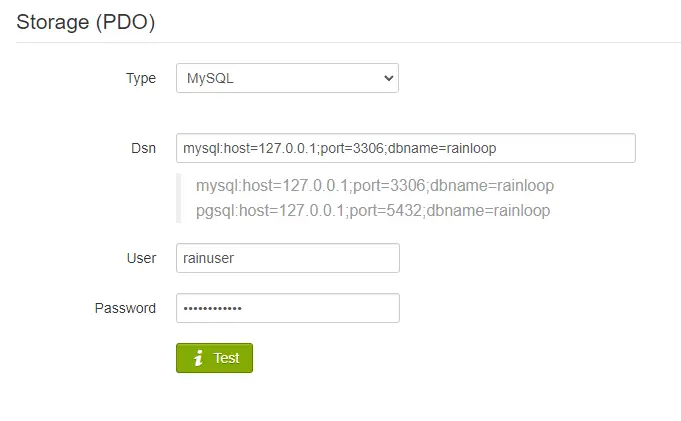
To check the connection and install the tables, click the Test button. The connection is successful if the button turns green.
Add your mail accounts to Rainloop to get started utilizing it.
FAQs to Install Rainloop Webmail on Ubuntu 22.04
Which web server is compatible with Rainloop Webmail on Ubuntu 22.04?
Rainloop Webmail is compatible with popular web servers like Apache, Nginx, and LiteSpeed. You can choose the web server that best suits your needs and configure it accordingly.
Are there any system requirements for installing Rainloop Webmail on Ubuntu 22.04?
Rainloop Webmail has minimal system requirements. It requires a web server, PHP version 5.6 or higher, and various PHP extensions. Ensure that your Ubuntu 22.04 server meets these requirements before installation.
Can I use Rainloop Webmail with an existing email server on Ubuntu 22.04?
Yes, Rainloop Webmail can be integrated with your existing email server on Ubuntu 22.04. You need to configure the settings in Rainloop to connect to your email server, including the server address, port, and authentication details.
Is Rainloop Webmail secure to use on Ubuntu 22.04?
Rainloop Webmail takes security seriously. It supports encryption protocols like SSL/TLS for secure communication between the client and the server. Additionally, it provides options for enabling two-factor authentication for enhanced security.
Can I customize the appearance of Rainloop Webmail on Ubuntu 22.04?
Yes, Rainloop Webmail allows customization of its appearance. You can modify the theme, color scheme, and layout to personalize the webmail interface according to your preferences.
Does Rainloop Webmail support multiple email accounts on Ubuntu 22.04?
Yes, Rainloop Webmail supports multiple email accounts. You can configure and manage multiple email accounts from different providers within the webmail interface.
Can I access Rainloop Webmail from mobile devices on Ubuntu 22.04?
Yes, Rainloop Webmail is mobile-friendly and responsive. You can access your emails, compose messages, and perform other tasks using Rainloop Webmail from your mobile devices.
Is there a limit on the size of attachments in Rainloop Webmail on Ubuntu 22.04?
The attachment size limit depends on your server configuration and email provider's restrictions. Generally, Rainloop Webmail does not impose its own limits on attachment sizes.
Can I import my existing emails and contacts to Rainloop Webmail on Ubuntu 22.04?
Yes, Rainloop Webmail provides options for importing existing emails and contacts. You can import them from other email clients or from standard file formats like EML, MBOX, or CSV.
Conclusion
We hope this detailed tutorial helped you to install and use Rainloop Webmail on Ubuntu 22.04.
If you have any queries or doubts, please leave them in the comment below. We'll be happy to address them.