

Introduction
Before we begin talking about how to install Syncthing on Ubuntu 22.04, let's briefly understand – What is Syncthing?
Syncthing is a powerful file synchronization tool that allows you to share and backup your files securely across multiple devices. It offers a user-friendly interface and works on various operating systems, including Windows, macOS, Linux, and Android. With Syncthing, your data remains private as it utilizes strong encryption to protect your files during transmission.
Whether you want to sync files between your personal devices or collaborate with others, Syncthing provides a seamless and secure solution for hassle-free file sharing.
In this tutorial, you will install Syncthing on Ubuntu 22.04. We will also address a few FAQs on how to install Syncthing on Ubuntu 22.04.
Advantages of Syncthing
- Secure: Syncthing uses strong encryption to keep your files safe and private during synchronization.
- Cross-platform: It supports multiple operating systems, allowing you to sync files seamlessly across different devices.
- Peer-to-peer: No central server means no single point of failure or vulnerability.
- User-friendly: With an intuitive interface, Syncthing is easy to set up and use, even for non-technical users.
- Continuous synchronization: Files are synced in real-time, ensuring that the latest changes are always up to date across devices.
Section 1: Install Syncthing on Update Ubuntu Linux
Step 1: Updating Ubuntu System Packages
Here's how to install it: The first step is to update your system packages. By taking this precaution, you can minimize potential conflicts during the installation of new software by making sure your system is up to date with the most recent patches, fixes, and installed software versions. To update, run the command listed below:
sudo apt update && sudo apt upgrade
This command upgrades the installed packages by first retrieving details about the most recent versions of the packages and their dependencies.
Step 2: Installing Necessary Packages
Subsequently, we will install a few essential packages that help our desired software, Syncthing, install more easily. Execute the subsequent command:
sudo apt install software-properties-common apt-transport-https wget curl -y
Several packages are installed by this command, including:
software-properties-common: This offers helpful scripts for software management.apt-transport-https: This makes it possible to handle https URIs with the APT package handling utility.wgetandcurl: These are web-based file retrieval network utilities.
Step 3: Integrating Syncthing’s Official APT Repository
Although Syncthing can be found in the official Ubuntu repositories, some users may not find the most recent versions of the software there. For the most recent releases, we choose to incorporate the official Syncthing APT repository into our system.
In order to verify that the data from the Syncthing repository is genuine and unaltered, we first add the GPG key. Run the following command:
sudo curl -o /usr/share/keyrings/syncthing-archive-keyring.gpg https://syncthing.net/release-key.gpg
Subsequently, you must integrate the repository for the desired version of Syncthing installation. The stable version is advised for most users. Nonetheless, the candidate (pre-release) version is offered for those who would rather use cutting-edge technology.
Import Stable Version of Syncthing
Importing the stable version requires running the following command:
echo "deb [signed-by=/usr/share/keyrings/syncthing-archive-keyring.gpg] https://apt.syncthing.net/ syncthing stable" | sudo tee /etc/apt/sources.list.d/syncthing.list
Import Candidate (Pre-Release) Version of Syncthing
Execute the below-mentioned command to import the potential version:
echo "deb [signed-by=/usr/share/keyrings/syncthing-archive-keyring.gpg] https://apt.syncthing.net/ syncthing candidate" | sudo tee /etc/apt/sources.list.d/syncthing.list
Step 4: Refreshing the APT Packages Index
It is necessary to update the APT package index to incorporate the recently added software source after integrating the Syncthing version repository of your choice. Execute the subsequent command:
sudo apt update
Step 5: Installing Syncthing
Now that the Syncthing repository is part of your system, use the following command to install Syncthing:
sudo apt install syncthing -y
You must verify that Syncthing was installed correctly after the installation. This can be accomplished by running the following command to see its version:
syncthing --version
Section 2: Establishing the Syncthing Systemd Service
This section will create a background-running Syncthing service that will function whether a user is logged in. This is especially helpful for servers that require Syncthing to run constantly. The Linux system and service manager systemd will be used to oversee this Syncthing service.
Step 1: Understanding the Syncthing Systemd Service File
A systemd service file called [email protected] is generated and added to the /lib/systemd/system directory after Syncthing is installed. The systemd can use this file as a template to launch Syncthing as a service. The user account that Syncthing will run under is indicated by the @ symbol in [email protected]. The service would be referred to as [email protected], for instance, if your username is vegastack.
Step 2: Enabling the Syncthing Service
We need to use the systemctl command to enable the Syncthing service so that it launches automatically when the system boots up. Put your real username in place of "username":
sudo systemctl enable [email protected]
Now that you've run this command, Syncthing will launch automatically whenever your computer boots up.
Step 3: Starting the Syncthing Service Manually
The service is not starting immediately after the enable command, even though it is configured to start automatically when the system boots. Use the systemctl start command to launch the service without having to restart the computer. Here's how to do it:
sudo systemctl start [email protected]
For example, if your username was "joshua", this is how the command would appear:
sudo systemctl start [email protected]
Step 4: Checking the Syncthing Service Status
Checking the status of a service you've just started is always a good idea. Use the following systemctl command to accomplish this:
systemctl status [email protected]
For example, if the username was "joshua," it would appear like this:
systemctl status [email protected]
Step 5: Familiarizing Yourself with the Syncthing Configuration
The configuration files for Syncthing are kept in the directory /home/username/.config/syncthing/. Several configuration files, including the primary configuration file config.xml, are located in this directory. Knowing the location of this file is helpful in case you need to adjust or modify any settings. For example, you may need to set an internal or external IP address in place of the default IP address (127.0.0.1).
Furthermore, Syncthing creates the /home/username/syncthing/ default home folder. In the event that this isn't what you need, you can adjust it later.
Section 3: Configuring the UFW Firewall for Syncthing
We'll go over how to configure Syncthing's Uncomplicated Firewall (UFW) in detail in this section. As a first line of defense, firewalls prevent unauthorized users from accessing your system. To enable Syncthing to effectively communicate with peers over the network, it is imperative to confirm that the firewall is configured correctly.
Step 1: Understanding Syncthing’s Network Requirements
It's critical to comprehend why setting up the firewall is necessary before delving into the specifics of the configuration process. Syncthing uses TCP port 22000 for network communication. For Syncthing to function properly, this port needs to be open for both incoming and outgoing connections. Your firewall's blocking of the port will prevent Syncthing from connecting to its peers, which will restrict its functionality.
Step 2: Allowing Syncthing Through UFW
Ubuntu and other Linux distributions come with a simplified firewall management tool called Uncomplicated Firewall, or UFW. It is a well-liked option for both inexperienced and seasoned users due to its intuitive command-line interface.
The communication port used by Syncthing needs to be specifically allowed if you're running UFW. The following command should be run on UFW in order to open TCP port 22000:
sudo ufw allow 22000/tcp
With this command, UFW is instructed to permit TCP connections on port 22000, both inbound and outbound.
Step 3: Activating UFW
To apply the rules, you must activate UFW if you haven't done so previously or if you recently installed it. The command that follows can be used to accomplish this:
sudo ufw enable
After running this command, the rule you just created will be active and UFW will launch by default upon boot.
Step 4: Verifying UFW Configuration
It's always a good idea to make sure that UFW's rules have been correctly implemented after making adjustments. With the following command, you can view UFW's rules and check its status:
sudo ufw status verbose
The current rules, including the one permitting traffic on TCP port 22000 for Syncthing, will be listed in the output. Your setup was successful if you can see the rule there.
Section 4: Establishing Connection and Syncing with Syncthing WebUI
Syncthing's main function is to link peers and synchronize files or folders between them. We will guide you through the process of setting up the WebUI, synchronizing your data, and connecting two Syncthing peers in this section.
Step 1: Setting Up Multiple Syncthing Instances
You must install Syncthing on a minimum of two different devices or servers in order to take advantage of its peer-to-peer file synchronization feature. Syncthing's cross-platform compatibility—it supports a wide range of operating systems, not just Linux—is a great advantage.
However, it's imperative that you set up your synchronization mode as "Receive Only" if you intend to synchronize data between a Linux system and a non-Linux platform. By doing this, possible problems with file permissions between various operating systems are prevented.
Step 2: Accessing the Syncthing WebUI
The local address of Syncthing's WebUI is http://127.0.0.1:8384 by default. Enter this address into your browser and navigate there.
http://127.0.0.1:8384
When you visit the WebUI for the first time, Syncthing will request your consent to report usage anonymously. Select a course of action that works for you.
Example
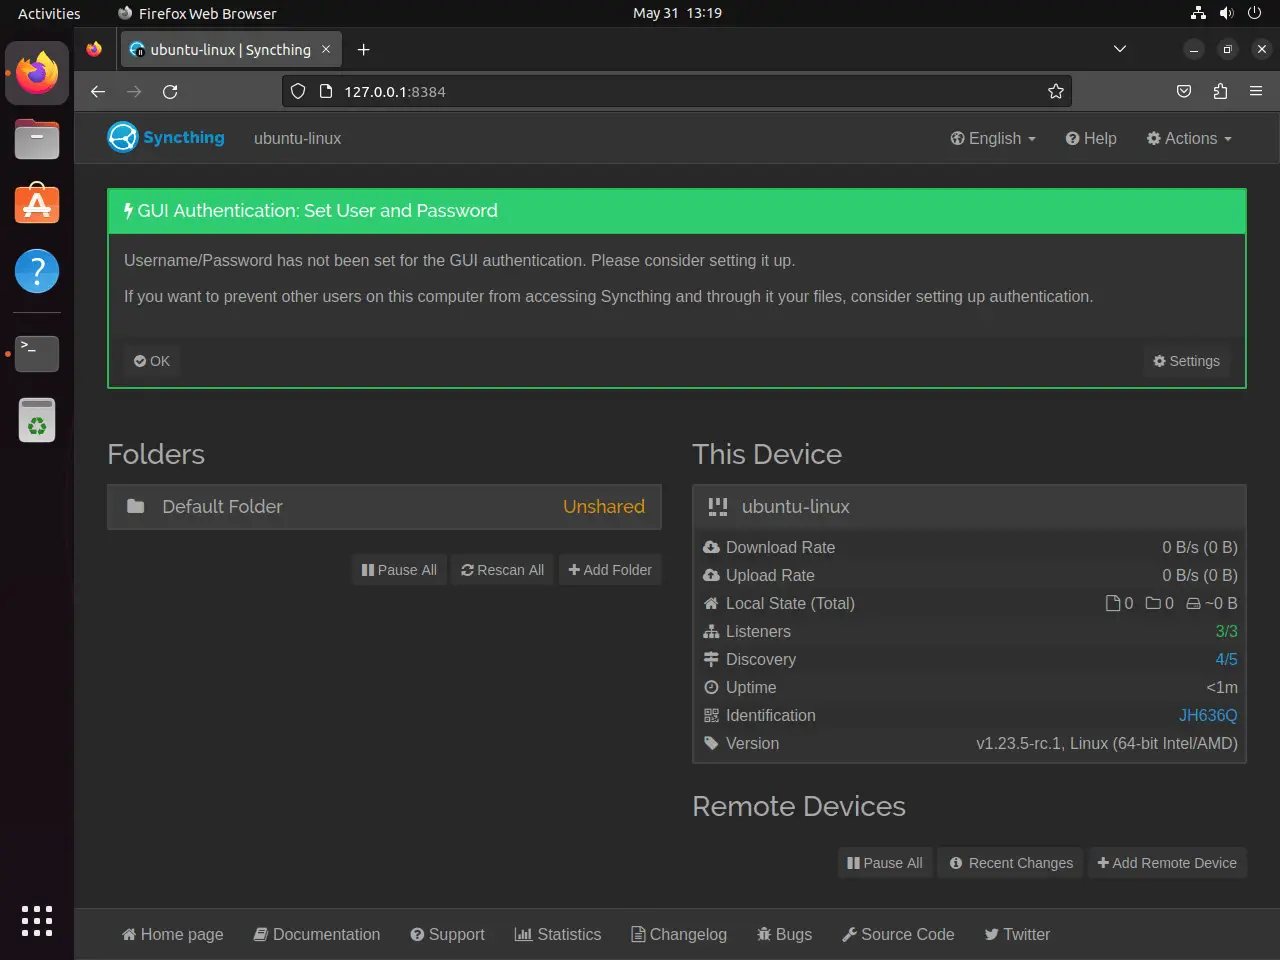
Step 3: Secure Your Syncthing Service
Security is a top priority for Syncthing. It will ask you to create a username and password during your initial run via a "GUI Authentication" notice. To configure this, go to "Settings".
In the GUI settings screen that appears, create a strong username and password. Additionally, you can improve the security of your Syncthing interface interactions by configuring HTTPS for GUI use here.
Once the security has been configured, click "Save" to save your configurations.
Step 4: Repeat the Process for a Second Device
Now, on a second device or server that you plan to use as a Syncthing peer, repeat all of the previous steps. After that, we can begin syncing files and folders across devices.
Step 5: Synchronizing Files and Folders between Devices
We can now set up file or folder synchronization between these peers since we have two active Syncthing clients installed on different devices.
Open the first peer device's WebUI and select Actions > Show ID in the upper-right corner. Your device's ID, a lengthy string of alphanumeric characters, will appear as a result. Make a copy of this ID.
Next, access the second device's WebUI and choose Add Remote Device in the lower right corner. Enter the copied Device ID here, select Save, and give the newly created device a name that makes sense.
You should now see an attempt to connect from the second device on your first device. Make sure your firewall is set up properly to allow this connection if you aren't seeing this.
You can now share directories and files between the two devices after the connection is successful. To set up a shared directory, follow these steps:
- Click Add a Folder in the first device's WebUI.
- Select a directory for the second device to sync with. Assign a special ID to the folder and adjust the path appropriately.
- To share a remote device, navigate to the Sharing tab and choose the desired device—in our example, the second device.
- Select Save.
Return to the second device now. A notice regarding the first device attempting to share a directory will appear on your screen.
Section 5: Configuring Syncthing Permissions
Efficiently handling Syncthing permissions is essential for smooth file synchronization between devices. Sometimes sending or receiving data between remote nodes can present challenges, mostly because of permission conflicts. This section explores how to get past these obstacles and guarantee uninterrupted communication between your Syncthing peers.
Step 1: Install the Access Control List (ACL) Package
Linux systems improve their built-in permissions model by using Access Control Lists (ACLs) to define permissions for every file and directory. We use the setfacl command, which is included in the acl package, to configure these advanced permissions.
Use this command to install the acl package:
sudo apt install acl -y
Step 2: Set Up Advanced Permissions
You will now need to change the ACL of your Syncthing folder using the setfacl command. Replace the path to your Syncthing folder with "/folder/path/" and "username" with your Linux username:
sudo setfacl -R -m u:username:rwx /folder/path/
Here, u:username:rwx grants the user read, write, and execute permissions to the folder; -R makes the command recursive; and -m modifies the ACL.
Step 3: Automate Permissions with a Cron Job
Consider cron jobs if you have files that change frequently and cause permission problems. Cron is a Linux time-based job scheduler that can be used to automate the execution of the setfacl command.
Use the following command to launch the crontab editor:
sudo crontab -e
The following line should be added to the crontab file to create a cron job that modifies the folder's permissions every 5 minutes:
*/5 * * * * sudo setfacl -R -m u:username:rwx /folder/path/ -n
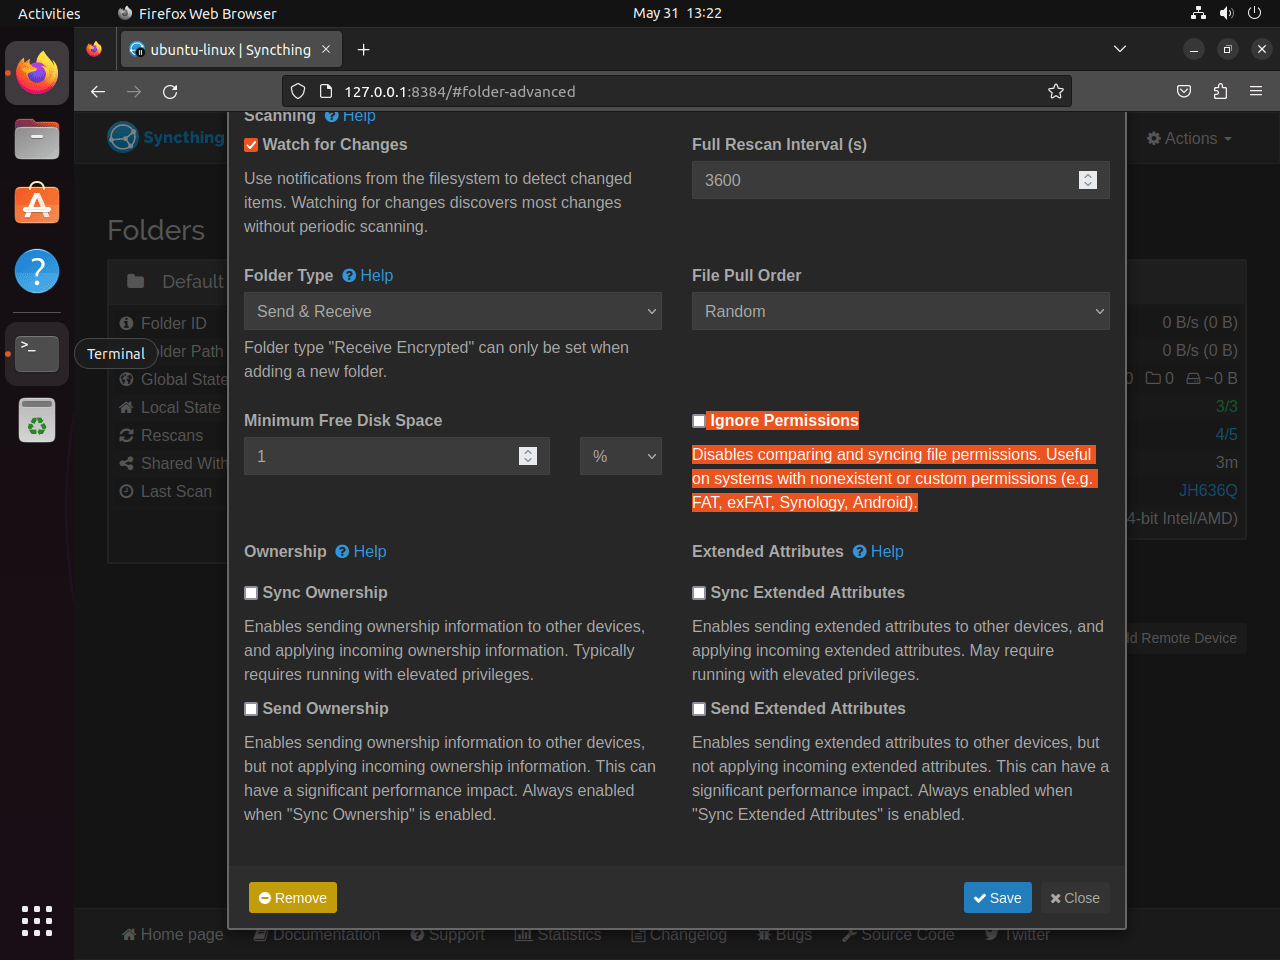
Step 4: Enable Ignore Permissions in Syncthing
The final step entails setting something up in the Syncthing WebUI. Go to the Syncthing WebUI's "Advanced" options and turn on the "Ignore Permissions" feature. This might clear up any potential permission problems.
But keep in mind that utilizing the "Ignore Permissions" feature does not make the ACL configuration unnecessary. To guarantee smooth Syncthing operations, these two tactics frequently cooperate.
Example:
Section 6: Configure Nginx as a Reverse Proxy for Syncthing
There are several advantages to using Nginx as a reverse proxy for Syncthing, including improved security, easier networking setup, and possible performance increases. You will be guided through the process of configuring Nginx for this purpose by this guide.
Step 1: Install the Nginx PPA
Installing Nginx, an incredibly effective open-source web server and reverse proxy, is the first step. We suggest using Ondřej Surþ's Personal Package Archive (PPA), which is well-known for its frequent updates and improved features, for our setup.
Depending on your needs, you can install the most recent stable version of Nginx or the most recent mainline version. Put one of the following commands into action:
To set up the most recent stable version,
sudo add-apt-repository ppa:ondrej/nginx && sudo apt update -y
or the most recent version:
sudo add-apt-repository ppa:ondrej/nginx-mainline && sudo apt update -y
Step 2: Update Your Sources List
Use the following command to update the sources list on your system after adding the PPA:
sudo apt update
Step 3: Install Nginx
Now that Nginx is installed, run the following command to get it started:
sudo apt install nginx-core nginx-common nginx nginx-full -y
Step 4: Create a Server Block for Syncthing
Server blocks are used to encapsulate configuration details in Nginx and work similarly to virtual hosts in Apache. Open a new configuration file in order to create a new server block for Syncthing:
sudo nano /etc/nginx/sites-available/syncthing.conf
Enter the following Nginx server block configuration in this file:
server {
  listen 80;
  server_name syncthing.example.com;

  access_log /var/log/nginx/syncthing.access.log;
  error_log /var/log/nginx/syncthing.error.log;
  location / {
    proxy_pass http://127.0.0.1:8384;
    proxy_set_header X-Real-IP $remote_addr;
    proxy_set_header X-Forwarded-For $proxy_add_x_forwarded_for;
    proxy_set_header X-Forwarded-Proto $scheme;

  ### IP LOCKDOWN FOR MORE SECURITY, UNCOMMENT TO USE WITH YOUR OWN IP ADDRESSES###
  # allow from <ip>;
  # deny all;

  }
}
In case your Syncthing configuration is not the same as the default setup, you might have to adjust the “proxy_pass” line. Once the necessary adjustments have been made, use CTRL+O to save the file and CTRL+X to exit.
Step 5: Verify Your Nginx Configuration
Make sure the configuration syntax is correct before using your newly configured Nginx system. You can accomplish this by executing the subsequent command:
sudo nginx -t
This command checks your configuration files for syntax errors and will notify you if any issues are found. If the syntax is correct, it will produce an output similar to the one below:
nginx: the configuration file /etc/nginx/nginx.conf syntax is ok
nginx: configuration file /etc/nginx/nginx.conf test is successful
Step 6: Restart Nginx Service
Make sure the configuration syntax is correct before using your newly configured Nginx system. You can accomplish this by executing the subsequent command:
sudo systemctl restart nginx
Step 7: Accessing Your Syncthing Server
After setting up successfully, you can go to http://syncthing.example.com to access your Syncthing server. The external server IP address can be used to connect to the server even if you don't have a domain name.
Be aware that your real domain name or server IP address should be used in place of the domain syncthing.example.com. If you are using a domain, make sure it is pointed correctly towards your server.
FAQs to Install Syncthing on Ubuntu 22.04
How can I access Syncthing's web GUI?
Open a web browser and enter localhost:8384 in the address bar. This will take you to the Syncthing web GUI.
Can I use Syncthing on other operating systems?
Yes, Syncthing is compatible with various operating systems, including Windows, macOS, Linux, and Android.
Is Syncthing secure?
Yes, Syncthing uses strong encryption to protect your files during synchronization, ensuring their privacy and security.
Can I sync files between multiple devices?
Absolutely! Syncthing allows you to sync files between multiple devices, regardless of their operating systems, providing seamless file sharing.
Can I specify which folders to sync?
Yes, you have complete control over which folders you want to sync using the Syncthing interface. You can select specific folders for synchronization.
Does Syncthing require an internet connection?
Yes, an internet connection is necessary for Syncthing to sync files between devices over the network.
Is Syncthing a peer-to-peer application?
Yes, Syncthing is a peer-to-peer file synchronization tool. It doesn't rely on a central server, making it more resilient and secure.
Conclusion
We hope this tutorial helped you understand how to install Syncthing on Ubuntu 22.04.
If you have any queries, please leave a comment below, and we’ll be happy to respond to them for sure.