

Introduction
Before we begin talking about how to install Sysdig on Debian 12, let's briefly understand – What is Sysdig?
Sysdig is a powerful monitoring and security platform used to gain deep visibility into containerized environments. It offers comprehensive functionality, including container introspection, troubleshooting, and compliance monitoring. Sysdig enables real-time monitoring, alerting, and deep-dive troubleshooting, allowing users to efficiently manage containerized applications.
With its advanced features, Sysdig helps enhance security, performance, and compliance in modern IT infrastructures. Experience the benefits of Sysdig's advanced monitoring and security capabilities for your containerized environments.
In this tutorial, you will install Sysdig on Debian 12. We will also address a few FAQs on how to install Sysdig on Debian 12.
Advantages of Sysdig
- Deep visibility: Gain comprehensive insights into containerized environments for enhanced monitoring and troubleshooting.
- Real-time monitoring: Monitor and analyze container performance in real-time, allowing efficient resource allocation and optimization.
- Advanced security: Detect and prevent threats with powerful container security features, ensuring a secure environment.
- Compliance monitoring: Ensure compliance with industry regulations through continuous monitoring and auditing of containerized applications.
- Efficient troubleshooting: Identify and resolve issues quickly with deep-dive troubleshooting capabilities, minimizing downtime and improving application availability.
Install Sysdig on Debian 12
Step 1: Update the Debian System Before Sysdig Installation
Make sure your Debian system is up-to-date before installing Sysdig. This increases the stability and security of your system by making sure that all installed packages are updated to the most recent versions.
Use the following command in your terminal to update your system:
sudo apt update && sudo apt upgrade
Step 2: Install Required Packages on Debian
There are a few software packages you need to install before you can install Sysdig on your Debian system. These packages allow Sysdig to work properly and integrate with your system. In your terminal, type the following command to install the necessary packages:
sudo apt install software-properties-common apt-transport-https ca-certificates ncurses-term dkms -y
Step 3: Import Sysdig APT Repository on Debian
By default, the official Debian repository does not contain Sysdig. Nonetheless, the Sysdig developers maintain a dedicated repository.
Take these actions to add this repository to your system:
Import the Sysdig GPG key
Downloaded packages from the Sysdig repository are guaranteed to be authentic and intact thanks to the GPG key. To import the GPG key, execute the following command:
curl -s https://s3.amazonaws.com/download.draios.com/DRAIOS-GPG-KEY.public | gpg --dearmor | sudo tee /usr/share/keyrings/sysdig.gpg
Add the Sysdig APT repository
You can use the following command to add the Sysdig repository to your system's sources list after importing the GPG key:
echo 'deb [signed-by=/usr/share/keyrings/sysdig.gpg] https://download.sysdig.com/stable/deb stable-$(ARCH)/' | sudo tee /etc/apt/sources.list.d/sysdig.list
Keep in mind that Sysdig will automatically substitute the appropriate architecture for the $(ARCH) variable.
Step 4: Refresh APT Cache Index
Once the Sysdig repository has been added to your system, make sure to update your package list to reflect the new repository. This guarantees the availability of the Sysdig package for installation. Use this command to update the package list:
sudo apt update
Step 5: Install Sysdig using APT Command on Debian
You can start installing Sysdig now that you have updated the package list and added the Sysdig repository to your system. In your terminal, type the following command to accomplish this:
sudo apt install linux-headers-$(uname -r) sysdig -y
With this command, you can install the Sysdig package and the Linux headers that are compatible with your kernel version. The installation procedure ought to be rather rapid, taking no more than a few minutes at most.
Step 6: Verify Sysdig Installation
It's crucial to confirm that Sysdig has been installed correctly on your Debian system after the installation is finished. Use the terminal to type the following command to see the Sysdig version and build:
sysdig --version
Getting Started with Sysdig Commands on Debian 12
With the extensive command set provided by Sysdig, you can efficiently monitor and troubleshoot your containerized environments. Some of the most helpful Sysdig commands will be covered in this section; they have been categorized for ease of comprehension. The given examples will assist you in beginning to use Sysdig commands for a variety of uses.
Basic Sysdig Commands
To help you understand the general state of your system, let's start with some basic Sysdig commands before moving on to more advanced features.
List Running Processes
Use the following command to see a list of all active processes on your system:
sysdig -l
This command will give you an overview of the current status of your system by producing a list of processes that are active.
Monitor System Activity
The following command can be used to keep an eye on the activity on your system in real time:
sysdig -c topprocs_cpu
With the help of this command, you can rapidly identify resource-intensive applications and possible performance bottlenecks by seeing which processes are using the most CPU power.
Filtering Sysdig Output
With Sysdig, you can apply filters to the output and concentrate on particular processes, containers, or noteworthy events. Here are some instances of how to use Sysdig commands with filters:
sysdig proc.name=nginx
Filter by Container Name
In a similar vein, events associated with a particular container can be shown by filtering the output. Use the container to accomplish container.name filter as it appears in the example below:
sysdig container.name=my_container
The real name of the container you wish to monitor should be substituted for my_container.
Advanced Sysdig Commands
Additionally, Sysdig provides advanced commands that offer more in-depth analysis of your containerized environments. Examining a few of these commands.
Monitor File I/O Activity
Utilizing the spy_file Sysdig command, you can keep an eye on file I/O activity on your machine. This command will show details about the processes accessing the files, the I/O operations carried out, and the files being accessed. Use this command by running:
sysdig -c spy_file
Analyze Network Connections
Sysdig can assist you in examining the network connections on your system and identifying any possible problems or security risks. With the netstat command, you can see details about network connections as follows:
sysdig -c netstat
A list of all open network connections, complete with ports, source and destination IP addresses, and connection status, will be produced by this command.
Creating Custom Sysdig Views
With Sysdig, you can design personalized views that highlight particular metrics and information pertinent to your requirements. An illustration of a customized Sysdig view can be found here:
Custom View for CPU Usage
Use the following command to create a custom view that shows the CPU usage of individual processes:
sysdig -c topprocs_cpu "evt.type=execve and proc.name=my_process"
The real name of the process you wish to monitor should be substituted for my_process.
Filtered by the given process name, this custom view will show the top processes using the most CPU resources. You can add more metrics or change the filter to personalize this view.
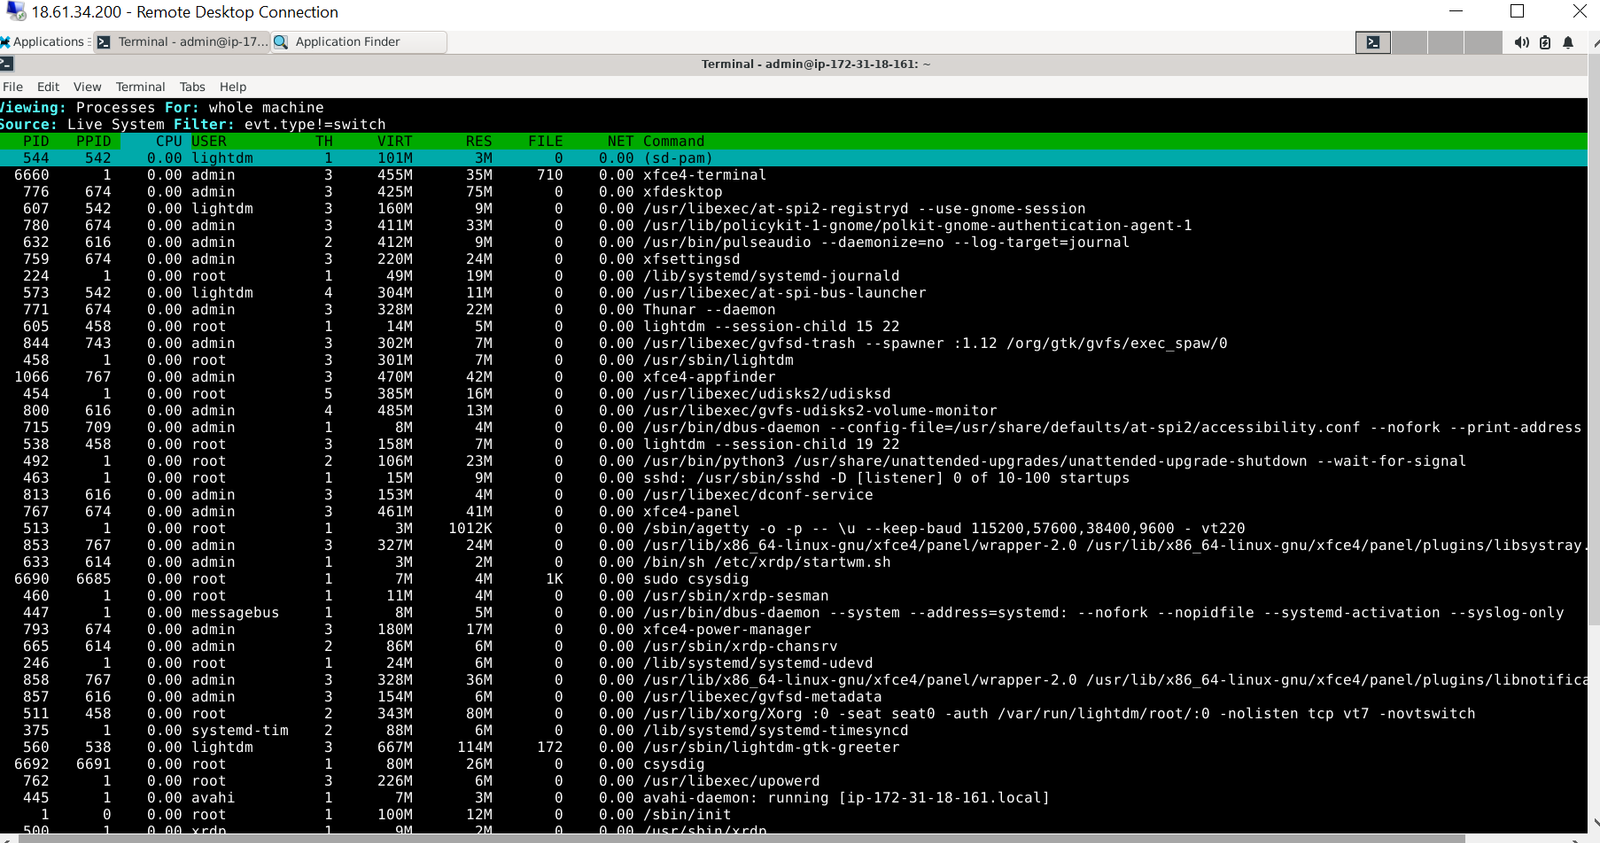
Getting Started with cSysdig Commands on Debian 12
An interactive, terminal-based user interface for Sysdig called cSysdig makes navigating system metrics and events easier for users. Similar to Sysdig commands, cSysdig commands are executed through the cSysdig interface as opposed to the terminal itself. You will learn about cSysdig in this section, along with some useful commands and interface features.
Step 1: Launching cSysdig
Enter the following command in your terminal to start cSysdig:
csysdig
This will launch the cSysdig interface, from which you can run cSysdig commands and examine different views.
Step 2: Navigating the cSysdig Interface
Information is arranged by cSysdig into a number of pre-built views, each of which focuses on a distinct component of your system. By pressing the F2 key or entering : followed by the view name, you can alternate between these views.
Here are a few key cSysdig viewpoints:
- Processes: Shows a list of all active processes along with how much resource they are using. (Shortcut:
:processes) - Connections: Displays the state of open connections on the network, along with the source and destination IP addresses, ports, and other information. (Shortcut:
:connections) - Errors: Draws attention to exceptions and system errors.(Shortcut:
:errors) - Containers: Lists the resources being used by the active containers. (Shortcut:
:containers)
Step 3: cSysdig Commands and Shortcuts
In order to facilitate navigating the interface and interacting with the displayed data, cSysdig offers a number of commands and shortcuts. The following cSysdig commands and shortcuts are helpful:
- F1 or h: Show the help menu to see a list of all the commands and shortcuts that are available.
- F2 or v: Change between the views that are available.
- F4 or l: To modify the current view, apply a filter. You can filter containers by ID or processes by name, for instance.
- F5 or s: Sort this view according to a particular column.
- F6 or a: Can be added or removed from the current view.
- Esc or q: End cSysdig or exit the active menu.
Step 4: Creating Custom Views in cSysdig
Similar to Sysdig, cSysdig allows you to design unique views that highlight particular metrics and information that is pertinent to your requirements. The steps below can be used to create a custom view:
- To access the "Add View" menu, press
F2or type:addview. - Give your custom view a name.
- Enter the names of the columns you want to define and have included in your view.
- Press
F4and enter the filter criteria to add a filter to your custom view. Enterto save your customized view.
Now you can use the F2 key or type :your_view_name to switch to your custom view.
Additional Commands for Sysdig on Debian 12
Additional commands that you might find useful when using Sysdig on Debian are covered in this section. These commands allow you to manage, update, and uninstall Sysdig from your system.
Update Sysdig on Debian
You can quickly and easily update the software because you have imported the official Sysdig APT repository. As with any other system package update, execute the following standard APT commands to update Sysdig:
sudo apt update && sudo apt upgrade
Using this command will guarantee that your system's installed packages, including Sysdig, are up to date.
Remove Sysdig From Debian
If Sysdig is no longer needed on your computer, uninstall it by following these instructions:
Uninstall Sysdig
The Sysdig package can be removed from your system by using the following command:
sudo apt remove sysdig
Remove the Sysdig GPG key
Use the following command to get rid of the GPG key that Sysdig packages use for authentication:
sudo rm /usr/share/keyrings/sysdig.gpg
Remove the Sysdig APT Repository
Lastly, use the following command to remove the Sysdig repository from your system:
sudo rm /etc/apt/sources.list.d/sysdig.list
FAQs to Install Sysdig on Debian 12
Can I install Sysdig without root access?
No, installing Sysdig requires administrator (root) access on the Debian system.
Will installing Sysdig affect my existing applications?
Installing Sysdig should not have any impact on your existing applications as it primarily focuses on monitoring and security aspects.
How can I verify the installation of Sysdig on Debian 12?
After installation, you can verify Sysdig's presence by running the command sysdig --version in the terminal. It should display the installed version.
Can I update Sysdig to a newer version?
Yes, you can update Sysdig to a newer version by running the command sudo apt-get update && sudo apt-get upgrade to upgrade all installed packages, including Sysdig.
Can I use Sysdig on virtualized Debian 12 instances?
Yes, Sysdig can be used on virtualized Debian 12 instances without any compatibility issues.
Are there any alternatives to installing Sysdig on Debian 12?
Yes, you can also install Sysdig using other package managers like Snap or by building from source. However, the recommended method is using the provided APT repository.
Conclusion
We hope this tutorial helped you understand how to install Sysdig on Debian 12.
If you have any queries, please leave a comment below, and we’ll be happy to respond to them for sure.