
Choose a different version or distribution
Introduction
Before we begin talking about how to install Apache Web Server on Debian 11, let's briefly understand – What is Apache Web Server?
Apache HTTP Server is the most well-known web server in the world. Numerous potent features are offered by it, such as dynamically loadable modules, excellent media support, and broad integration with other well-liked applications.
This tutorial will provide an overview of how to install the Apache Web Server on Debian 11, enabling you to set up a robust and secure web server for hosting your websites and applications. We will also address a few FAQs on how to install apache web server on Debian 11.
Advantages of Using the Apache Web Server on Debian 11
- Reliability and Stability: Apache is renowned for its stability and reliability, making it a popular choice among web hosting providers and enterprises worldwide.
- Security Features: Apache offers a range of security features, including SSL/TLS support, access controls, authentication mechanisms, and modules like mod_security for preventing common web application attacks.
- Flexibility and Configurability: Apache allows fine-grained configuration options, enabling you to customize various aspects of its behavior and optimize it to meet your specific needs.
- Scalability and Performance: Apache is designed to handle high traffic loads and can scale to accommodate increased demand. Its modular architecture allows you to add or remove modules based on your performance and functionality requirements.
- Extensive Community Support: Apache has a large and active user community, providing access to a wealth of resources, documentation, and community support for troubleshooting, sharing best practices, and staying up to date with the latest developments.
Prerequisites
You must have a Debian 11 server configured with a non-root user who has sudo access and a firewall that is set to block unnecessary ports before you can start this guide.
Once you've finished configuring, log in as your non-root user and move on to step one.
Step 1 — Installing Apache
Apache can be installed using conventional package management tools because it is part of Debian's normal software repositories.
Start by reflecting the most recent upstream modifications in the local package index:
sudo apt update
After that, set up the apache2 package:
sudo apt install apache2
apt will install Apache and all necessary dependencies once the installation has been confirmed.
Step 2 — Adjusting the Firewall
Before testing Apache, it's crucial to adjust the firewall settings to allow outside access to the standard web ports. Assuming you followed the necessary steps carefully, you should have a UFW firewall configured to restrict access to your server.
Apache registers with UFW after installation in order to offer a few application profiles that can be used to enable or prevent access to Apache through the firewall.
For a list of all ufw application profiles, enter the following:
sudo ufw app list
A list of the application profiles will be sent to you:
Output
Available applications:
  AIM
  Bonjour
  CIFS
. . .
 WWW
 WWW Cache
 WWW Full
 WWW Secure
. . .
The Apache profiles start with the initial WWW:
WWW: Only port80(regular, unencrypted web traffic) is opened by this profile.WWW Cache: Only port8080, which is occasionally used for caching and web proxies, is opened by this profile.WWW Full: Both port80(for regular, unencrypted web traffic) and port443(for TLS/SSL-encrypted traffic) are opened by this profile.WWW Secure: Only port443(TLS/SSL encrypted traffic) is opened by this profile.
It is advised that you activate the most restrictive profile that still permits the configured traffic. In this guide, you haven't yet set up SSL on your server, thus all traffic on port 80 needs to be permitted:
sudo ufw allow 'WWW'
By examining the status, you may confirm the modification:
sudo ufw status
There will be a list of permitted HTTP traffic in the output:
Output
Status: active

To                         Action      From
--                         ------      ----
OpenSSH                    ALLOW       Anywhere
WWW                        ALLOW       Anywhere
OpenSSH (v6)               ALLOW       Anywhere (v6)
WWW (v6)                   ALLOW       Anywhere (v6)
The profile has been activated to permit access to the Apache web server, as shown by the output.
Step 3 — Checking your Web Server
Apache is started by Debian 11 once the installation process is finished. The web server must be operational.
Type the following command to verify that the service is active with the systemd init system:
sudo systemctl status apache2
Output
● apache2.service - The Apache HTTP Server
     Loaded: loaded (/lib/systemd/system/apache2.service; enabled; vendor prese>
     Active: active (running) since Wed 2022-07-06 22:05:45 UTC; 23s ago
       Docs: https://httpd.apache.org/docs/2.4/
   Main PID: 2796 (apache2)
      Tasks: 55 (limit: 9509)
     Memory: 21.0M
        CPU: 67ms
     CGroup: /system.slice/apache2.service
             ├─2796 /usr/sbin/apache2 -k start
             ├─2798 /usr/sbin/apache2 -k start
             └─2799 /usr/sbin/apache2 -k start
This output shows that the service launched properly. The best way to test this, though, is to request a page from Apache.
You can check the program's functionality by visiting the default Apache landing page using your IP address. There are several ways to obtain your server's IP address from the command line if you are unaware of it.
On your server, type the following into the command prompt:
hostname -I
Several addresses will be returned, each one separated by a space. You can check to see if each one works in your web browser.
Another choice is to use the icanhazip.com tool, a website that, when accessed, returns the public IP address of your computer as it was read from another place on the internet. curl can be installed via the command line if it isn't already there:
sudo apt install curl
Afterward, using curl to fetch icanhazip.com over IPv4:
curl -4 icanhazip.com
When you know your server's IP address, type it into the address bar of your browser like follows:
http://your_server_ip
The default Debian 11 Apache web page ought to appear:
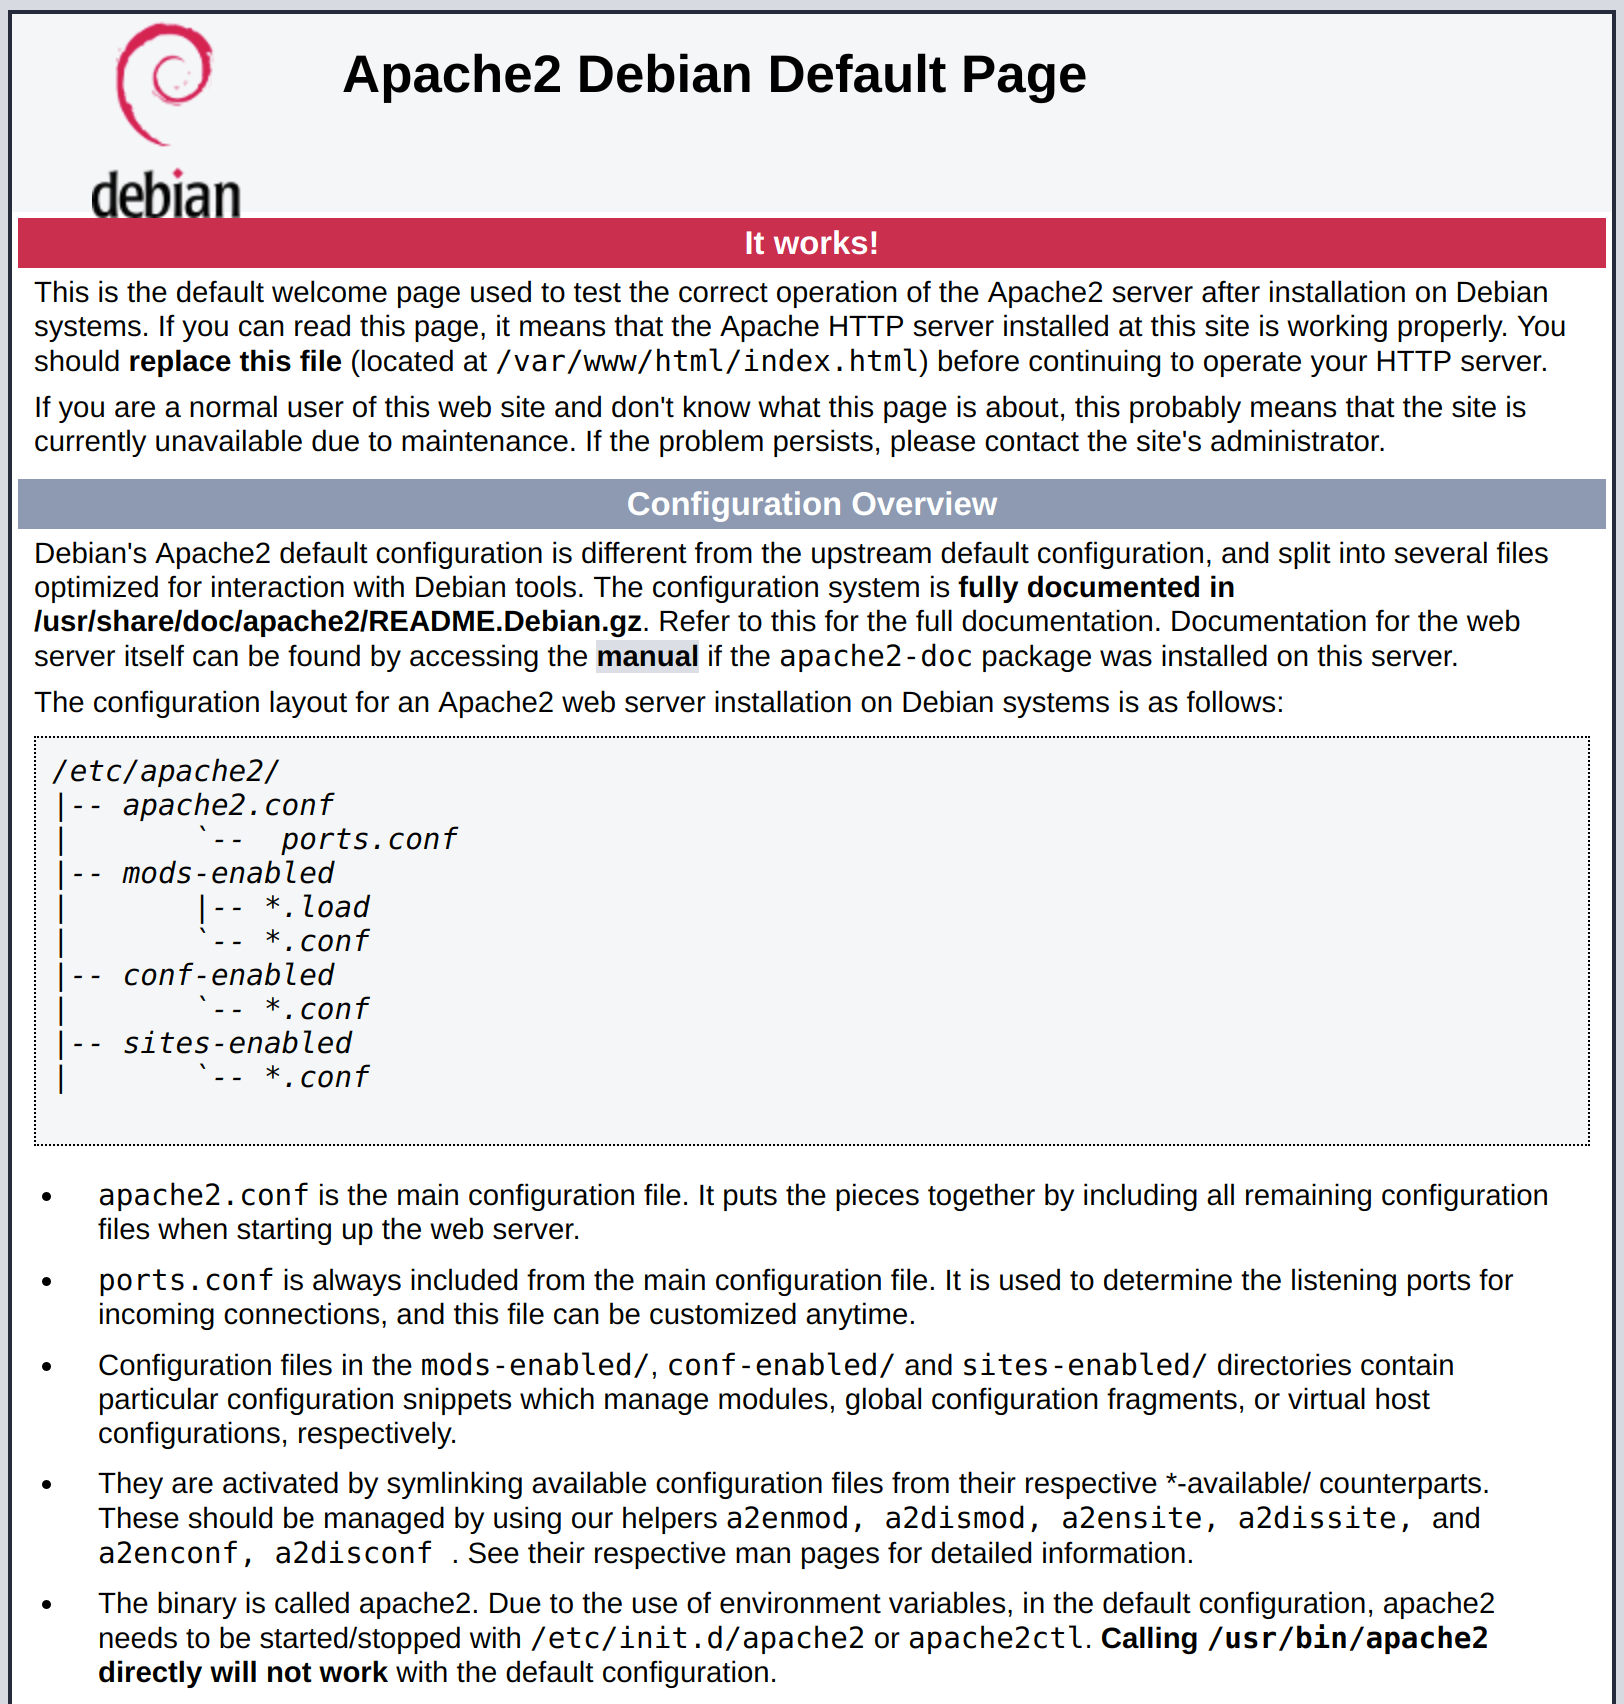
This page shows that Apache is operating properly. Additionally, it contains certain fundamental details regarding the locations of key Apache files and directories.
Step 4 — Managing the Apache Process
Now that your web server is operational, let's cover some fundamental systemctl management commands.
To stop your web server, type:
sudo systemctl stop apache2
Run the following commands to restart the web server once it has been stopped:
sudo systemctl start apache2
Run the following command to stop and restart the service.
sudo systemctl restart apache2
If all that needs to be changed is the configuration, Apache can frequently reload without losing connections. Use the following command to accomplish this:
sudo systemctl reload apache2
When the server boots, Apache is set to launch automatically by default. Run the following command to stop this behaviour if that's not what you want:
sudo systemctl disable apache2
Run the following command to make the service once more bootable:
sudo systemctl enable apache2
When the server restarts, Apache will now start by itself.
Step 5 — Configuring Virtual Hosts (Recommended)
To encapsulate configuration information and host several domains from a single server when using the Apache web server, you can use virtual hosts (similar to server blocks in Nginx). your_domain will be the domain name we create; however, you should substitute your own domain name here.
One server block is enabled by default in Apache on Debian 11, and it is set up to serve files from the /var/www/html directory. While this is effective for a single site, hosting many sites might make it cumbersome. Instead of making changes to /var/www/html, let's construct a directory structure within /var/www for a site under your_domain, leaving /var/www/html in place to act as the default directory if a client request doesn't match any other sites.
The directory for your_domain should be created as follows:
sudo mkdir -p /var/www/your_domain
Next, use the $USER environment variable to specify who owns the directory:
sudo chown -R $USER:$USER /var/www/your_domain
If you haven't changed the umask value, which determines the default file permissions, the permissions of your web roots should be accurate. You can enter the following command to verify that your permissions are valid and provide the owner read, write, and execute access to the files while only providing groups and other users read and execute access:
sudo chmod -R 755 /var/www/your_domain
Next, using nano or your preferred editor, make a sample index.html page as follows:
sudo nano /var/www/your_domain/index.html
Add the following example HTML inside:
<html>
    <head>
        <title>Welcome to your_domain!</title>
    </head>
    <body>
        <h1>Success!  The your_domain virtual host is working!</h1>
    </body>
</html>
When you're done, save and close the file. You can do this in nano by pressing CTRL + X, then Y, and ENTER.
It is important to construct a virtual host file with the appropriate directives in order for Apache to deliver this content. Let's create a new configuration file at /etc/apache2/sites-available/your_domain.conf rather than directly alter the default one at /etc/apache2/sites-available/000-default.conf:
sudo nano /etc/apache2/sites-available/your_domain.conf
The configuration block below should be pasted in; it is similar to the default but adjusted for our new directory and domain name:
<VirtualHost *:80>
    ServerAdmin webmaster@localhost
    ServerName your_domain
    ServerAlias www.your_domain
    DocumentRoot /var/www/your_domain
    ErrorLog ${APACHE_LOG_DIR}/error.log
    CustomLog ${APACHE_LOG_DIR}/access.log combined
</VirtualHost>
You'll see that we've changed ServerAdmin to an email that the your_domain site administrator can access and DocumentRoot to point to our new directory. Additionally, we've introduced two directives: ServerName, which provides the base domain that must match for the definition of this virtual host, and ServerAlias, which specifies additional names that must match as if they were the base name.
Once you're done, save and close the document.
Let's use the a2ensite tool to enable the file:
sudo a2ensite your_domain.conf
The default site specified in 000-default.conf should be disabled:
sudo a2dissite 000-default.conf
Let's now check for configuration errors:
sudo apache2ctl configtest
You should get the following output:
Output
AH00558: apache2: Could not reliably determine the server's fully qualified domain name, using 127.0.1.1. Set the 'ServerName' directive globally to suppress this message
Syntax OK
To put your modifications into effect, restart Apache:
sudo systemctl restart apache2
Your domain name ought should now be served by Apache. You may verify this by going to http://your_domain, where you ought to see the following:

Step 6 – Getting Familiar with Important Apache Files and Directories
You should spend some time getting acquainted with a few significant directories and files now that you are aware of how to control the Apache service itself.
Content
/var/www/html: The/var/www/htmldirectory is used to serve actual web content, which by default just consists of the Apache default page you previously saw. By making changes to the Apache configuration files, this can be adjusted.
Server Configuration
/etc/apache2: The Apache configuration directory. Here are all of the configuration files for Apache./etc/apache2/apache2.conf: The main configuration file for Apache. This can be changed to make changes to the Apache global configuration. This file is in charge of loading several of the other files in the configuration directory./etc/apache2/ports.conf: The ports that Apache will listen on are listed in this file. When a module with SSL capabilities is activated, Apache also listens on port443in addition to port80by default./etc/apache2/sites-available/: The directory in which per-site virtual hosts can be placed. The configuration files in this directory must be linked to thesites-enableddirectory in order for Apache to use them. Typically, all server block configuration is completed in this directory, and the other directory is linked with thea2ensitecommand to enable it./etc/apache2/sites-enabled/: The directory in which activated per-site virtual hosts are stored. These are often made by using thea2ensiteto connect to configuration files located in thesites-availabledirectory. When Apache begins or reloads, it scans the configuration files and links contained in this directory to create a complete setup./etc/apache2/conf-available/,/etc/apache2/conf-enabled/: These directories have the same relationship as thesites-availableandsites-enableddirectories, however they are intended to hold configuration fragments that do not belong in a virtual host. Using thea2enconfanda2disconfcommands, you can enable and disable files in theconf-availabledirectory./etc/apache2/mods-available/,/etc/apache2/mods-enabled/: These directories include the modules that are both available and enabled. Files ending in.loadcontain fragments for loading specific modules, whereas files ending in.confinclude configuration for those modules. Using thea2enmodanda2dismodcommands, modules can be enabled and disabled.
Server Logs
/var/log/apache2/access.log: Unless Apache is set to do otherwise, every request to your web server is by default logged in this log file./var/log/apache2/error.log: By default, this file stores all errors. In the Apache configuration, theLogLeveldirective defines how much detail the error logs will contain.
FAQs: Installing the Apache Web Server on Debian 11
Why choose Apache for web server hosting on Debian 11?
Apache offers several advantages, including its stability, security features, extensibility, flexibility in configuration, and wide community support.
What are the prerequisites for installing Apache on Debian 11?
To install Apache on Debian 11, you need a Debian 11 server with administrative access and a working internet connection.
How do I install Apache on Debian 11?
The installation process for Apache on Debian 11 involves using the apt package manager, updating the system's package lists, and installing the Apache package.
How can I configure Apache after installation?
After installing Apache, the main configuration file is located at /etc/apache2/apache2.conf. You can modify this file and other configuration files in the /etc/apache2 directory to customize Apache's behavior, such as configuring virtual hosts, enabling modules, setting up SSL/TLS, and more.
How can I secure my Apache web server on Debian 11?
Securing Apache involves implementing best practices such as using SSL/TLS encryption, keeping the server patched and up to date, configuring access controls, enabling firewalls, monitoring server logs etc.
Can I host multiple websites on Apache?
Yes, Apache allows you to host multiple websites on the same server using virtual hosts. With virtual hosting, you can configure Apache to serve different websites based on the domain or IP address requested by the client.
Is Apache supported by a wide community?
Apache has a vast and active community of users and developers who constantly contribute to its development, provide support, and share their knowledge through forums, mailing lists, and community-driven resources.
Conclusion
Installing the Apache Web Server on Debian 11 provides you with a powerful and reliable web hosting solution. Apache offers numerous advantages, including its stability, security features, flexibility in configuration, scalability, and extensive community support.
By following the installation process and taking advantage of Apache's features and customization options, you can set up a web server that meets your specific requirements.
If you have any queries, feel free to comment below, and we will be glad to answer them.