Choose a different version or distribution
Introduction
Before discussing how to install Tomcat on Ubuntu 20.04, let's quickly understand what it is. Tomcat is a web server and servlet container developed by the Apache Software Foundation. It is used to deploy Java-based web applications and provides a Java HTTP web server environment for Java code to run in. It provides a robust ecosystem for the add-ons.
Here are four reasons why Apache Tomcat is famous among competitors:
- Apache Tomcat is free and open-source, making it easily accessible to developers.
- It is highly configurable and can be tailored to fit the specific requirements of a project.
- It provides a wide range of features such as session replication, clustering, and security.
- Furthermore, it is easy to install and maintain, making it a great choice for development purposes.
This tutorial will guide you through the process of installing Tomcat 9 on Ubuntu 20.04. Additionally, we'll answer some Frequently Asked Questions (FAQs) about Tomcat.
Prerequisites
- A non-root user with
sudoprivileges. - An Ubuntu 20.04 server.
Step 1 – Install JAVA
1) First, install OpenJDK 11. It is an implementation of the Java Platform. To update the packages index and install the OpenJDK 11 JDK package, run the following commands:
sudo apt update
sudo apt install openjdk-11-jdk
2) After installation, verify it by checking the version of JAVA.
java -version
3) You'll get an output like this:
Output

openjdk version "11.0.7" 2020-04-14
OpenJDK Runtime Environment (build 11.0.7+10-post-Ubuntu-3ubuntu1)
OpenJDK 64-Bit Server VM (build 11.0.7+10-post-Ubuntu-3ubuntu1, mixed mode, sharing)
Step 2 – Create Tomcat User and Group
1) Create a new system user and group with a home directory of /opt/tomcat to run the Tomcat service. Enter the following command:
sudo useradd -m -U -d /opt/tomcat -s /bin/false tomcat
Step 3 – Download Tomcat
1) Check the Tomcat download page to see if a newer version is available.
2) After that, use wget to download the Tomcat zip file to the /tmp directory:
VERSION=9.0.71
wget https://downloads.apache.org/tomcat/tomcat-9/v${VERSION}/bin/apache-tomcat-${VERSION}.tar.gz
3) After downloading, extract the tar file to /opt/tomcat directory.
sudo tar -xf /tmp/apache-tomcat-${VERSION}.tar.gz -C /opt/tomcat/
4) Tomcat is typically updated regularly for security and to introduce new features. For more control, create a symbolic link called "latest" that points to the Tomcat installation directory.
sudo ln -s /opt/tomcat/apache-tomcat-${VERSION} /opt/tomcat/latest
5) Unpack the latest version, then update the symlink to point to it. Additionally, change the directory ownership to the user and group tomcat using:
sudo chown -R tomcat: /opt/tomcat
6) After that, the shell scripts in Tomcat's bin directory need to be made executable.
sudo sh -c 'chmod +x /opt/tomcat/latest/bin/*.sh'
These scripts are useful for starting, stopping, and managing Tomcat instances.
Step 4 – Create the SystemD Unit File
1) Open the text editor and create a tomcat.service unit file in the /etc/systemd/system/ directory.
sudo nano /etc/systemd/system/tomcat.service
2) After that, paste the following configuration in /etc/systemd/system/tomcat.service:
/etc/systemd/system/tomcat.service
[Unit]
Description=Tomcat 9 servlet container
After=network.target
[Service]
Type=forking
User=tomcat
Group=tomcat
Environment="JAVA_HOME=/usr/lib/jvm/java-11-openjdk-amd64"
Environment="JAVA_OPTS=-Djava.security.egd=file:///dev/urandom -Djava.awt.headless=true"
Environment="CATALINA_BASE=/opt/tomcat/latest"
Environment="CATALINA_HOME=/opt/tomcat/latest"
Environment="CATALINA_PID=/opt/tomcat/latest/temp/tomcat.pid"
Environment="CATALINA_OPTS=-Xms512M -Xmx1024M -server -XX:+UseParallelGC"
ExecStart=/opt/tomcat/latest/bin/startup.sh
ExecStop=/opt/tomcat/latest/bin/shutdown.sh
[Install]
WantedBy=multi-user.target
JAVA_HOME variable, if the path to Java installation is different.3) Then, save and close the file. Notify systemd that a new file exists.
sudo systemctl daemon-reload
4) Once done, enable the Tomcat service and start it.
sudo systemctl enable --now tomcat
5) You will need to check the service status.
sudo systemctl status tomcat
6) The result indicates that the Tomcat server is enabled and operational.
Output

tomcat.service - Tomcat 9 servlet container
Loaded: loaded (/etc/systemd/system/tomcat.service; enabled; vendor preset: enabled)
Active: active (running) since Tue 2020-05-12 17:58:37 UTC; 4s ago
Process: 5342 ExecStart=/opt/tomcat/latest/bin/startup.sh (code=exited, status=0/SUCCESS)
Main PID: 5362 (java)
7) Now you can start, stop, even restart Tomcat as any other systemd service. Use the following command:
sudo systemctl start tomcat
sudo systemctl stop tomcat
sudo systemctl restart tomcat
Step 5 – Configure the Firewall
If you wish to access Tomcat from outside the local network, you must open port 8080. To do so, use the following command:
sudo ufw allow 8080/tcp
Step 6 – Configure the Tomcat Web Management Interface
To gain access to the Web Management Interface, you must create a user.
1) Navigate to the tomcat-users.xml file, as this is where Tomcat users and roles are defined.
2) Create a user with both admin-gui and manager-gui roles. This will enable access to the /host-manager/html URL and allow for the creation, deletion, and management of virtual hosts. The manager-gui will also let you deploy and undeploy web-applications without needing to restart the entire container through the /host-manager/html interface.
3) Open the tomcat-users.xml file. Create a new user with the following command:
sudo nano /opt/tomcat/latest/conf/tomcat-users.xml
<tomcat-users>
<!--Comments-->
<role rolename="admin-gui"/>
<role rolename="manager-gui"/>
<user username="admin" password="admin_password" roles="admin-gui,manager-gui"/>
</tomcat-users>
4) To increase security, change your username and password.
5) To access the web interface from a remote IP, remove the restrictions. However, this is not recommended for production systems, as it may have security implications.
You must enable access to the web interface from any location. To do this, open the following two files and comment out or remove the following lines:
For Manager app:
sudo nano /opt/tomcat/latest/webapps/manager/META-INF/context.xml
For Host Manager app:
sudo nano /opt/tomcat/latest/webapps/host-manager/META-INF/context.xml
<ContextantiResourceLocking="false" privileged="true" >

. . .

<!--
<Valve className="org.apache.catalina.valves.RemoteAddrValve"
allow="127\.\d+\.\d+\.\d+|::1|0:0:0:0:0:0:0:1" />
-->

. . .

</Context>
If you want to restrict access to the web interface to a specific IP, add the address to the list.
Use | to separate the IP addresses in the list. You can add a single IP address or can also use a regular expression.
After that, restart the Tomcat service to apply the changes.
Step 7 – Testing the Tomcat Installation
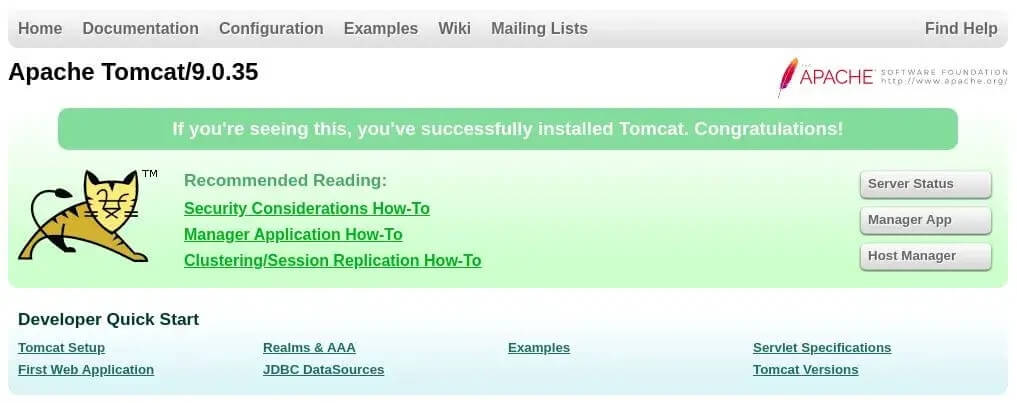
1) Proceed to open the browser, then type http://<your_domain_or_IP_address>:8080. Change your_domain_or_IP_address.
The screen will look like this:
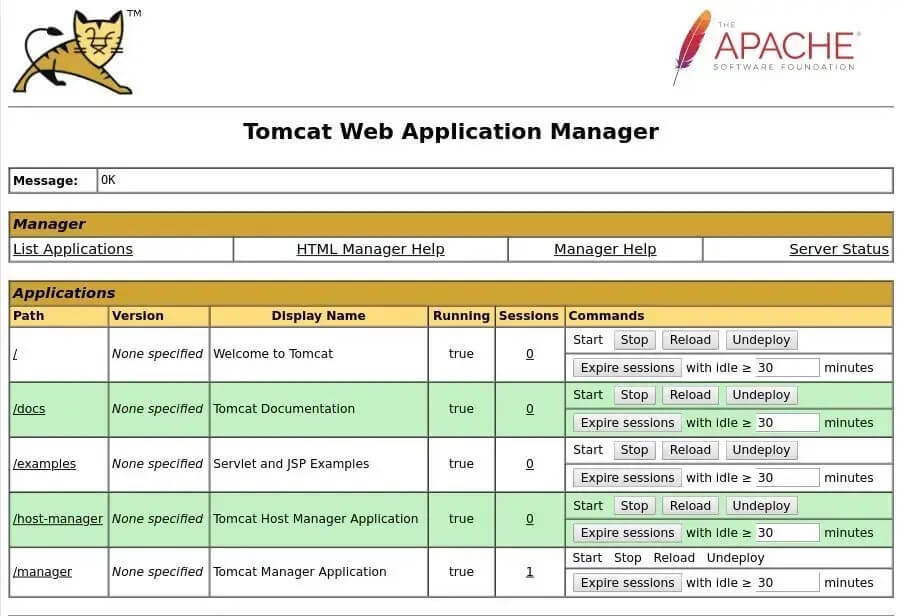
2) The Tomcat web application manager will be accessible at:
http://<your_domain_or_IP_address>:8080/manager/html
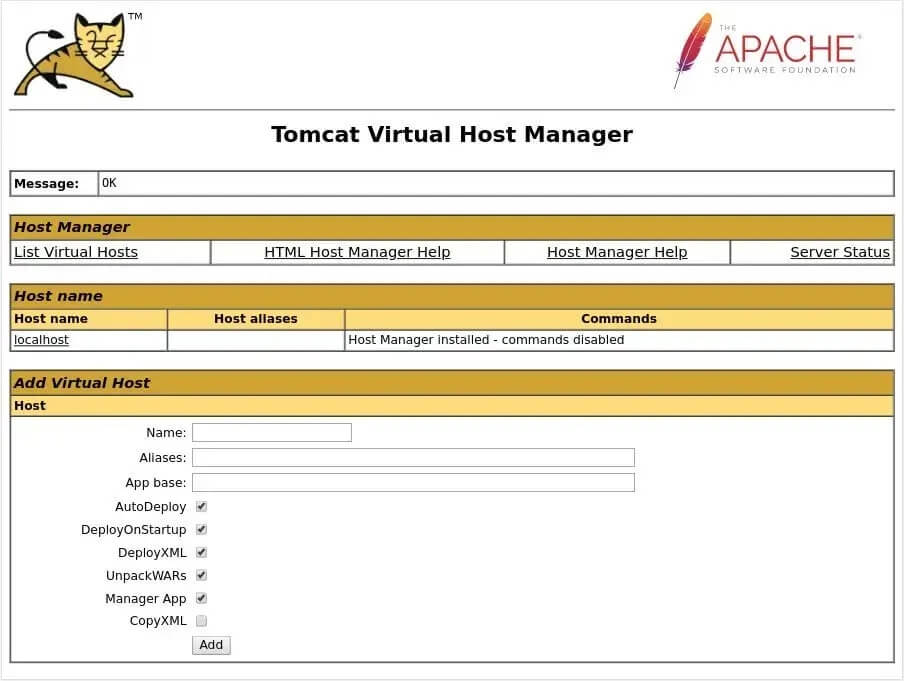
3) Moreover, the Tomcat Virtual Host Manager can be accessed at:
http://<your_domain_or_IP_address>:8080/host-manager/html
FAQs to Install Tomcat 9 on Ubuntu 20.04
What to do when you restart Tomcat, and Apache gets locked?
Usually, the Ajp13 protocol creates an open socket between both Tomcat and Apache. So, the release of mod_jk in J-T-C handles the network failure. Still, with an earlier release of mod_jk, the user will have to restart the Apache too.
What happens when the Tomcat server starts?
The file usually gets compiled into classes. After publishing, the file gets copied directly to the deployment folder. The Tomcat notices that a class file is changed, then reloads the context. In other words, the web application restarts.
Does Apache Tomcat have any security features?
Yes, Apache Tomcat has a number of security features, such as session replication, clustering, and access control. It is also possible to configure the server to use a secure protocol, such as SSL/TLS.
Does Tomcat 9 support HTTP/2?
Yes, Tomcat 9 supports HTTP/2 and allows for faster loading of web pages.
Does Tomcat 9 have an embedded web server?
Yes, Tomcat 9 has an embedded web server and servlet container, making it easier to deploy applications.
Conclusion
We hope this detailed tutorial helped you understand how to install Tomcat 9 on Ubuntu 20.04. To learn more about Tomcat installation on Ubuntu 20.04, check out the official Tomcat installation document.
If you have any queries, please leave a comment below, and we’ll be happy to respond to them for sure.
