

Introduction
Before we begin talking about how to install WildFly on Debian 10, let's briefly understand – What is WildFly?
WildFly, formerly known as JBoss, is an open-source Java application server that provides a platform for developing and deploying enterprise applications. It offers a lightweight and flexible runtime environment, enabling developers to create scalable and robust applications.
With its extensive set of features, including support for Java EE and MicroProfile, WildFly empowers developers to build modern, cloud-native applications. It boasts high performance, efficient resource utilization, and excellent security. WildFly is a popular choice for organizations seeking a reliable and adaptable application server solution.
In this tutorial, you will install WildFly (JBoss) on Debian 10. We will also address a few FAQs on how to install WildFly (JBoss) on Debian 10.
Advantages of WildFly
- Lightweight: WildFly is a lightweight application server, ensuring efficient resource utilization and fast startup times.
- Java EE Compatibility: It offers full support for Java EE standards, enabling developers to leverage a wide range of enterprise technologies.
- High Performance: WildFly delivers excellent performance, allowing applications to handle heavy workloads with ease.
- Flexibility: It provides a flexible runtime environment, accommodating various deployment models and adapting to changing business needs.
- Strong Security: WildFly prioritizes security, offering robust features such as role-based access control and secure communication protocols.
Install WildFly (JBoss) on Debian 10
Refer to the following sections for instructions on installing and configuring WildFly (JBoss) on Debian 10.
Step 1 – Install Java in your Debian system
We will start the setup by installing Java on our Debian system. To install the most recent JDK version available in your OS repository, execute the commands below:
sudo apt update
sudo apt install default-jdk -y
Verify installation afterward by examining the Java version:
java -version
Output

openjdk version "11.0.18" 2023-01-17
OpenJDK Runtime Environment (build 11.0.18+10-post-Debian-1deb10u1)
OpenJDK 64-Bit Server VM (build 11.0.18+10-post-Debian-1deb10u1, mixed mode, sharing)
Once Java is installed and working on our system, we can move on to the next step.
Step 2 – Download WildFly zipped distribution
We will install a complete WildFly server with support for both standalone and managed domain operating modes using the zipped distribution.
Using wget, download the archive file.
sudo apt install wget curl

WILDFLY_RELEASE=$(curl -s https://api.github.com/repos/wildfly/wildfly/releases/latest|grep tag_name|cut -d '"' -f 4)

wget https://github.com/wildfly/wildfly/releases/download/${WILDFLY_RELEASE}/wildfly-${WILDFLY_RELEASE}.tar.gz
Extract the downloaded file:
tar xvf wildfly-${WILDFLY_RELEASE}.tar.gz
Transfer the downloaded document to the /opt directory:
sudo mv wildfly-${WILDFLY_RELEASE} /opt/wildfly
Step 3 - Configure WildFly on Debian Linux system
We will establish a WildFly user and a systemd service unit for WildFly in this section.
sudo groupadd --system wildfly
sudo useradd -s /sbin/nologin --system -d /opt/wildfly  -g wildfly wildfly
Next, a directory containing WildFly configuration file was created.
sudo mkdir /etc/wildfly
To manage the WildFly service, copy all necessary files:
sudo cp /opt/wildfly/docs/contrib/scripts/systemd/wildfly.service /etc/systemd/system/

sudo cp /opt/wildfly/docs/contrib/scripts/systemd/launch.sh /opt/wildfly/bin/

sudo chmod +x /opt/wildfly/bin/launch.sh

sudo cp /opt/wildfly/docs/contrib/scripts/systemd/wildfly.conf /etc/wildfly/
Ensure that directory permissions are correctly configured.
sudo chown -R wildfly:wildfly /opt/wildfly
Reload system components and launch the service:
sudo systemctl daemon-reload
sudo systemctl start wildfly
sudo systemctl enable wildfly
Verify that the WildFly service is currently running:
systemctl status wildfly
Output

● wildfly.service - The WildFly Application Server
   Loaded: loaded (/etc/systemd/system/wildfly.service; enabled; vendor preset: enabled)
   Active: active (running) since Fri 2023-07-07 12:06:36 UTC; 4s ago
 Main PID: 9262 (launch.sh)
    Tasks: 55 (limit: 1163)
   Memory: 122.8M
   CGroup: /system.slice/wildfly.service
           ├─9262 /bin/bash /opt/wildfly/bin/launch.sh standalone standalone.xml 0.0.0.0
           ├─9264 /bin/sh /opt/wildfly/bin/standalone.sh -c standalone.xml -b 0.0.0.0
           └─9365 java -D[Standalone] -Xms64m -Xmx512m -XX:MetaspaceSize=96M -XX:MaxMetaspaceSize=256m -Djava.net.preferIPv4Stack=true -Djboss.modules.system.pkgs=org.jboss.byteman -Djava.aw

Jul 07 12:06:36 ip-172-31-93-178 systemd[1]: Started The WildFly Application Server.
The system's port 8080 will receive a service binding. Verify that no other service is using this port.
ss -tunelp | grep 8080
Output

tcp   LISTEN 0      128                             0.0.0.0:8080        0.0.0.0:*                            uid:998 ino:25240 sk:7 <->
Step 4 – Creating Management / Application users in WildFly
The management interfaces in WildFly are secured by default. The initial administration user is manually created using a script that the application distributes.
The following command can be used to add the first user:
sudo /opt/wildfly/bin/add-user.sh
Choose the kind of user you want to add to the system. For the initial admin user, we will pick a. Choose b if the application was user-created:
What type of user do you wish to add?
  a) Management User (mgmt-users.properties)
  b) Application User (application-users.properties)
 (a): a
Enter the username of the user who is joining the system.
Enter the details of the new user to add.
Using realm 'ManagementRealm' as discovered from the existing property files.
Username : myadminuser
Enter and verify the user password:
Password recommendations are listed below. To modify these restrictions edit the add-user.properties configuration file.
 - The password should be different from the username
 - The password should not be one of the following restricted values {root, admin, administrator}
 - The password should contain at least 8 characters, 1 alphabetic character(s), 1 digit(s), 1 non-alphanumeric symbol(s)
Password : <Enter Password>
Proceed with the configuration as directed by the script:
What groups do you want this user to belong to? (Please enter a comma separated list, or leave blank for none)[  ]:
About to add user 'adminuser' for realm 'ManagementRealm'
Is this correct yes/no? yes
Added user 'adminuser' to file '/opt/wildfly/standalone/configuration/mgmt-users.properties'
Added user 'adminuser' to file '/opt/wildfly/domain/configuration/mgmt-users.properties'
Added user 'adminuser' with groups  to file '/opt/wildfly/standalone/configuration/mgmt-groups.properties'
Added user 'adminuser' with groups  to file '/opt/wildfly/domain/configuration/mgmt-groups.properties'
Step 5 – Accessing WildFly Admin Console
The /opt/wildfly/bin/ directory stores all WildFly scripts and binary files. We should have this directory in our PATH. Let us include it accordingly:
cat >> ~/.bashrc <<EOF
export WildFly_BIN="/opt/wildfly/bin/"
export PATH=\$PATH:\$WildFly_BIN
EOF
Before executing the script, source the bashrc file.
source ~/.bashrc
Access the WildFly CLI console using the jboss-cli.sh command:
jboss-cli.sh --connect
Output

Authenticating against security realm: ManagementRealm
Username: <user>
Password: <password>
Output

[standalone@localhost:9990 /] version
JBoss Admin Command-line Interface
JBOSS_HOME: /opt/wildfly
Release: 20.0.2.Final
Product: WildFly Full 28.0.1.Final
JAVA_HOME: null
java.version: 11.0.18
java.vm.vendor: Debian
java.vm.version: 11.0.18+10-post-Debian-1deb10u1
os.name: Linux
os.version: 4.19.0-24-cloud-amd64
To leave the console, type exit.
[standalone@localhost:9990 /] exit
Step 6 – Accessing WildFly Admin Console from Web Interface
The console is normally available through localhost IP on port 9990.
ss -tunelp | grep 9990
Output

tcp   LISTEN 0      50                            127.0.0.1:9990        0.0.0.0:*                            uid:998 ino:25244 sk:6 <->
We could launch it from a different IP address that is reachable from outside the local server. Make the following changes to /opt/wildfly/bin/launch.sh:
sudo vim /opt/wildfly/bin/launch.sh
#!/bin/bash

if [ "x$WILDFLY_HOME" = "x" ]; then
    WILDFLY_HOME="/opt/wildfly"
fi

if [[ "$1" == "domain" ]]; then
    $WILDFLY_HOME/bin/domain.sh -c $2 -b $3
else
    $WILDFLY_HOME/bin/standalone.sh -c $2 -b $3 -bmanagement=0.0.0.0
fi
We modified the start script line to include -bmanagement=0.0.0.0. This links the “management” interface to every IP address that is accessible.
Restart the WildFly service.
sudo systemctl restart wildfly
Verify the status of the service to ensure it was successful.
systemctl status wildfly
Output

● wildfly.service - The WildFly Application Server
   Loaded: loaded (/etc/systemd/system/wildfly.service; enabled; vendor preset: enabled)
   Active: active (running) since Fri 2023-07-07 12:17:14 UTC; 2s ago
 Main PID: 9650 (launch.sh)
    Tasks: 17 (limit: 1163)
   Memory: 82.5M
   CGroup: /system.slice/wildfly.service
           ├─9650 /bin/bash /opt/wildfly/bin/launch.sh standalone standalone.xml 0.0.0.0
           ├─9651 /bin/sh /opt/wildfly/bin/standalone.sh -c standalone.xml -b 0.0.0.0 -bmanagement=0.0.0.0
           └─9735 java -D[Standalone] -Xms64m -Xmx512m -XX:MetaspaceSize=96M -XX:MaxMetaspaceSize=256m -Djava.net.preferIPv4Stack=true -Djboss.modules.system.pkgs=org.jboss.byteman -Djava.aw

Jul 07 12:17:14 ip-172-31-93-178 systemd[1]: Started The WildFly Application Server.
Verify that port 9990 is listening:
ss -tunelp | grep 9990
Output

tcp   LISTEN 0      50                              0.0.0.0:9990        0.0.0.0:*                            uid:998 ino:38342 sk:b <->
To access the WildFly Web console, open your browser and enter the URL http://serverip:9990.
Enter the previously created username and password to access the WildFly web-based administration console.
After gaining access to the web console successfully, explore sections to become familiar with how it appears and functions. The primary sections of the interface are:
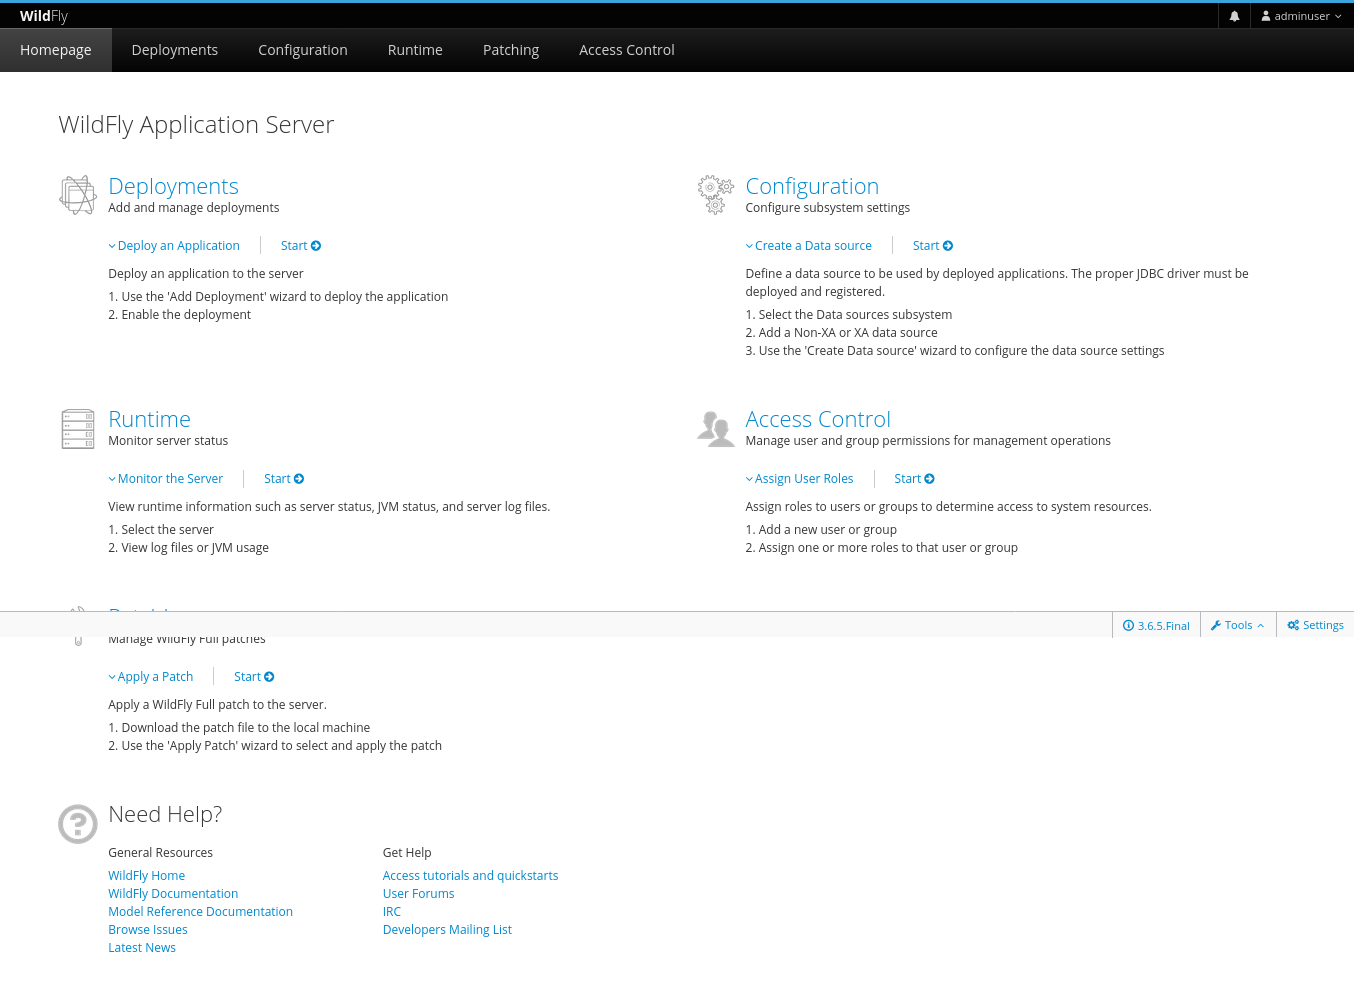
- Deployments: Adding and managing deployments
- Configuration: Configure settings of the subsystem
- Runtime: Status of the monitor server
- Access Control: Oversee user and group permissions for management operations
- Patching: Maintain WildFly Full patches
FAQs to Install WildFly (JBoss) on Debian 10
What are the system requirements for installing WildFly on Debian 10?
The system requirements for installing WildFly on Debian 10 include a compatible version of Java Development Kit (JDK) and sufficient system resources (CPU, RAM, and disk space) to run the server and your applications.
Can I use the default package manager to install WildFly on Debian 10?
No, WildFly is not available in the default Debian package repositories. You need to download and install it manually from the official WildFly website.
How can I configure WildFly after installation?
WildFly configuration is typically done through editing XML configuration files. The main configuration file is standalone.xml, located in the WildFly installation directory. You can modify this file to customize various aspects of WildFly, such as ports, security settings, and database connections.
How can I start or stop WildFly on Debian 10?
You can start WildFly by executing the startup script in the bin directory of your WildFly installation. To stop WildFly, execute the shutdown script located in the same directory.
Can WildFly run multiple instances on the same Debian 10 server?
Yes, WildFly supports running multiple instances on the same server. Each instance can have its own configuration and applications, allowing for better resource management and isolation.
Are there any recommended best practices for deploying applications on WildFly?
Yes, some best practices include packaging your application as a standalone WAR or EAR file, avoiding unnecessary dependencies, and optimizing your application's resource usage. Additionally, following security guidelines and regularly applying updates to WildFly are recommended.
Where can I find more documentation and resources for using WildFly on Debian 10?
You can find official documentation, tutorials, and community resources on the official WildFly website. The WildFly community forums and mailing lists are also helpful for getting support and connecting with other users.
Conclusion
We have so far successfully installed WildFly on a Debian 10 Linux machine. To learn more about the concepts, how it functions, and how to begin hosting your applications on the WildFly application server, visit the WildFly Documentation page.
If you have any queries, feel free to comment below, and we will be glad to answer them.