

Choose a different version or distribution
Introduction
Before we begin talking about how to install Yarn on Ubuntu 24.04, let's briefly understand – What is Yarn?
Yarn is a popular package manager designed for JavaScript developers. It streamlines the process of managing code dependencies, making it easier to install, update, and share packages crucial for web development projects.
By optimizing network performance and enhancing caching mechanisms, Yarn boosts efficiency and speeds up the development process. With Yarn, developers can ensure greater reliability and consistency when working on JavaScript applications, ultimately improving productivity and code quality.
In this tutorial, you will install Yarn on Ubuntu 24.04. We will also address a few FAQs on how to install Yarn on Ubuntu 24.04.
Advantages of Yarn
- Speed: Yarn is faster at installing packages due to optimized algorithms and parallel processing.
- Stability: Yarn ensures consistent package installations, reducing errors and issues.
- Caching: Efficient caching minimizes the need to redownload packages, saving time and bandwidth.
- Network Performance: Yarn manages network requests effectively for quicker installations.
- Lockfile: Yarn's precise lockfile promotes version consistency, preventing conflicts in projects.
How to Install Yarn on Ubuntu
There are several ways to install Yarn on Ubuntu, such as using the NPM package manager, Corepack, or the APT repository. The NPM method installs a stable (though older) version of Yarn, whereas Corepack and APT allow installation of the latest or a specific version.
Choose the method that best suits your needs. For beginners unsure of which method to use, it is recommended to install Yarn via NPM.
Method 1: Install Yarn via NPM Package Manager
Yarn is a JavaScript package manager designed for JavaScript projects and operates within the Node.js runtime environment. It can be easily installed using the Node Package Manager. Before proceeding with the installation, ensure that NPM is already installed; if it isn't, run the following command to install it.
sudo apt install npm
Next, install Yarn by using the npm command with the -g flag, which enables a global installation and allows you to access it from any directory on your system.
sudo npm install -g yarn

Once installed, verify the installation by checking the version of Yarn.
yarn --version

Uninstall
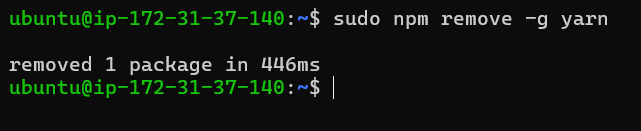
To remove Yarn installed through the NPM package manager, use the following command:
sudo npm remove -g yarn
Method 2: Install Yarn via Corepack
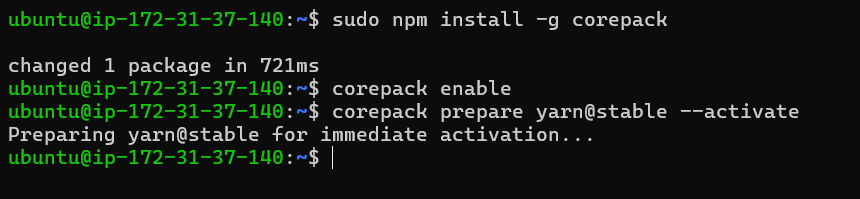
Corepack is a tool that enables the use of third-party package managers such as yarn and pnpm without requiring separate installation. It is included with the latest version of Node.js and only needs to be activated. If it is not installed, you can install it using the following command:
sudo npm install -g corepack
After installing, you need to enable Corepack by running the following command:
corepack enable
Once corepack is installed, you can either activate all package managers or a specific version of a package manager. To enable the stable version of Yarn, run the following command:
corepack prepare yarn@stable --activate
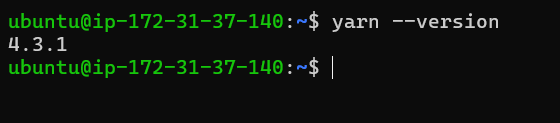
You can now access Yarn from your terminal. Begin by checking its version.
yarn --version
Uninstall
To uninstall Yarn installed through corepack, first disable it and then remove it by running the following two commands:
sudo corepack disable
sudo npm uninstall -g corepack

Method 3: Install Yarn via APT Repository
Yarn offers an official APT repository for stable, release candidate, and nightly versions, enabling you to install the desired version using the apt command. To begin, add the GPG key with the following command:
curl -sS https://dl.yarnpkg.com/debian/pubkey.gpg | sudo apt-key add -
Next, run one of the following commands to add either Yarn's stable, release candidate, or nightly APT repository. If you are uncertain, choose the stable option.
# Stable Version
echo "deb https://dl.yarnpkg.com/debian/ stable main" | sudo tee /etc/apt/sources.list.d/yarn.list

# Release Candidate
echo "deb https://dl.yarnpkg.com/debian/ rc main" | sudo tee /etc/apt/sources.list.d/yarn.list

# Nightly Version
echo "deb https://nightly.yarnpkg.com/debian/ nightly main" | sudo tee /etc/apt/sources.list.d/yarn.list
Finally, update the package database and install Yarn with the following command.
sudo apt update && sudo apt install yarn

Once the installation is complete, be sure to check the version of Yarn that has been installed.
yarn --version
Uninstall
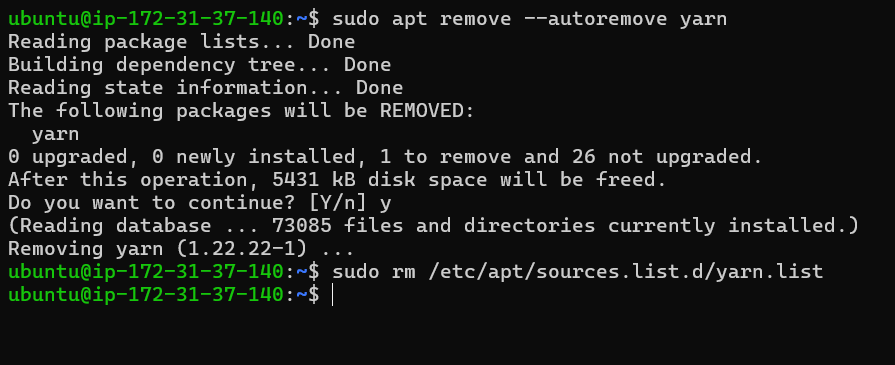
To remove Yarn installed from a custom APT repository, execute the following commands to uninstall both Yarn and the repository.
sudo apt remove --autoremove yarn
sudo rm /etc/apt/sources.list.d/yarn.list
FAQs to Install Yarn on Ubuntu 24.04
Is Yarn secure?
Yarn has security features like dependency checks and vulnerability reporting.
How to check for vulnerabilities in dependencies?
Use yarn audit to check for known vulnerabilities.
Why use Yarn instead of npm?
Yarn offers faster installation, better dependency management, offline mode, and consistent dependency resolution compared to npm.
How to lock dependency versions?
Use yarn lock to create a yarn.lock file.
What is the yarn.lock file?
It stores exact dependency versions for reproducibility.
How to optimize Yarn cache for better performance?
Clear the Yarn cache using yarn cache clean and configure cache directories for better performance.
Can I install a specific Yarn version using npm?
Yes, use npm install -g yarn@<version> to install a specific version.
Conclusion
We hope this tutorial helped you understand how to install Yarn on Ubuntu 24.04.
If you have any queries, please leave a comment below, and we’ll be happy to respond to them for sure.