Choose a different version or distribution
Introduction
Before we begin talking about how to install Zulip on Ubuntu 22.04, let’s briefly understand – What is Zulip?
Zulip is a powerful team collaboration tool that enhances communication efficiency. Unlike traditional chat apps, Zulip organizes conversations into "streams" and "topics", allowing users to focus on relevant discussions easily. With features like fast search, message threading, and file sharing, Zulip improves productivity and keeps projects on track.
Ideal for remote teams, Zulip offers a user-friendly interface and supports integration with popular tools, making it the ultimate solution for seamless and organized teamwork.
In this tutorial, you’ll install Zulip on Ubuntu 22.04. Also, we will answer some FAQs regarding the Zulip installation.
Advantages of Zulip
- Efficient Topic-based Organization- Zulip's unique organization of conversations into streams and topics ensures easy navigation and helps users stay focused.
- Enhanced Productivity- With features like fast search, message threading, and file sharing, Zulip boosts collaboration and keeps projects on track.
- Seamless Teamwork- Ideal for remote teams, Zulip offers a user-friendly interface and supports integration with popular tools, facilitating efficient teamwork.
- Streamlined Communication- Zulip enables clear and concise communication, keeping discussions organized and limiting distractions.
- Customizable and Scalable- Zulip's flexible platform allows users to tailor the tool to their needs and seamlessly scale as the team grows.
Prerequisites to Install Zulip on Ubuntu 22.04
- Ubuntu 20.04 64-bit Operating System
(OR)
- Zulip’s experimental Docker image.
- Make sure you install Zulip's development environment if you are developing for Zulip.
Step 1- Download the Current Release
Firstly, download the latest built server tarball and unpack it with the following commands:
cd $(mktemp -d)
wget https://www.zulip.org/dist/releases/zulip-server-latest.tar.gz
tar -xf zulip-server-latest.tar.gz
Step 2- Install Zulip
After that, run the installer as follows to set up Zulip with the most familiar configuration.
sudo -s  # If not already root
./zulip-server-*/scripts/setup/install --certbot \
    --email=YOUR_EMAIL --hostname=YOUR_HOSTNAME
It might take a few minutes to install, as it also installs Zulip’s dependencies.
If faced an error due to Certbot / LetsEncrypt then try to fix it with the following commands:
sudo apt update && sudo apt install --only-upgrade python3-acme
sudo certbot renew --dry-run
And re-run the Zulip installer:
sudo -s  # If not already root
./zulip-server-*/scripts/setup/install --certbot \
    --email=YOUR_EMAIL --hostname=YOUR_HOSTNAME
cat /var/log/letsencrypt/letsencrypt.logStep 3- Create a Zulip Organization and Login
1) The script prints a URL upon successful installation. If you are importing data from another Zulip server, such as Slack, or another platform, you must stop here and go back to the data instructions.
If not, open a URL in a browser and log in after setting up both your organization and your personal user account as administrators. This URL is only meant to be used once. You can create a new link on the server by executing the command listed below.
su zulip -c '/home/zulip/deployments/current/manage.py generate_realm_creation_link'
2) If you can't access your page, open /etc/zulip/settings.py and in ALLOWED_HOSTS just add your IP address and domain:
...

ALLOWED_HOSTS = ["zulip-alias.example.com", "192.0.2.1", "your_public_ip", "your_domain.com"]

...
After making the changes, just restart the Zulip using the following command and generate a new link:
su zulip -c /home/zulip/deployments/current/scripts/restart-server

su zulip -c '/home/zulip/deployments/current/manage.py generate_realm_creation_link'
3) If still you can't access the page then it might be a domain issue, just change the EXTERNAL_HOST from your domain name to your public IP:
...

EXTERNAL_HOST = 'your_public_ip'

...
Restart the Zulip again after saving the changes and generate a new link:
su zulip -c /home/zulip/deployments/current/scripts/restart-server

su zulip -c '/home/zulip/deployments/current/manage.py generate_realm_creation_link'
server.log if getting issues rather than above mentioned using the command su zulip -c 'cat /var/log/zulip/server.log'Step 4- Configure and Use Zulip
1) Firstly, to unleash Zulip's potential, you have to start using it with your team.
2) Set up an outgoing email so that Zulip can confirm new users' email addresses and send notifications.
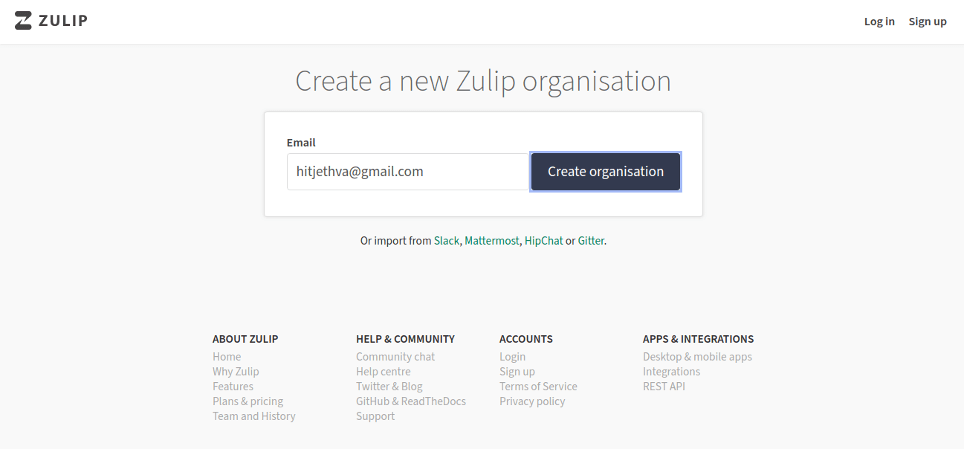
3) Now, open your web browser and type the new generated link from the output of Step 3. You should see the following page:

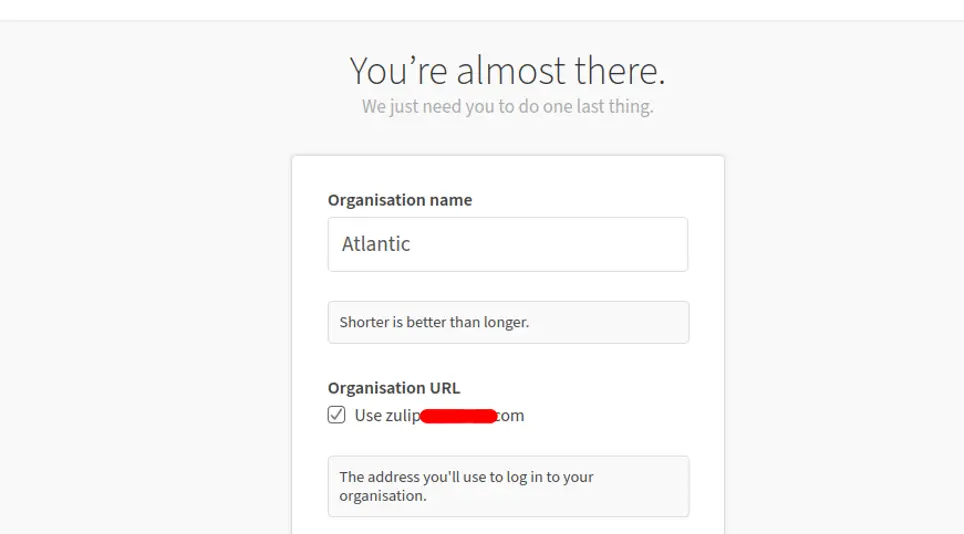
Provide your email address and click on the Create organization button. You should see the following page:


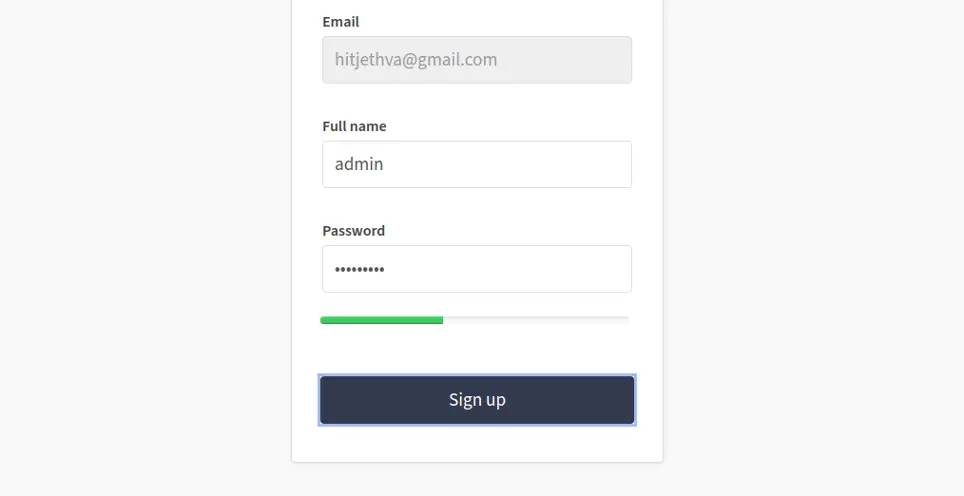
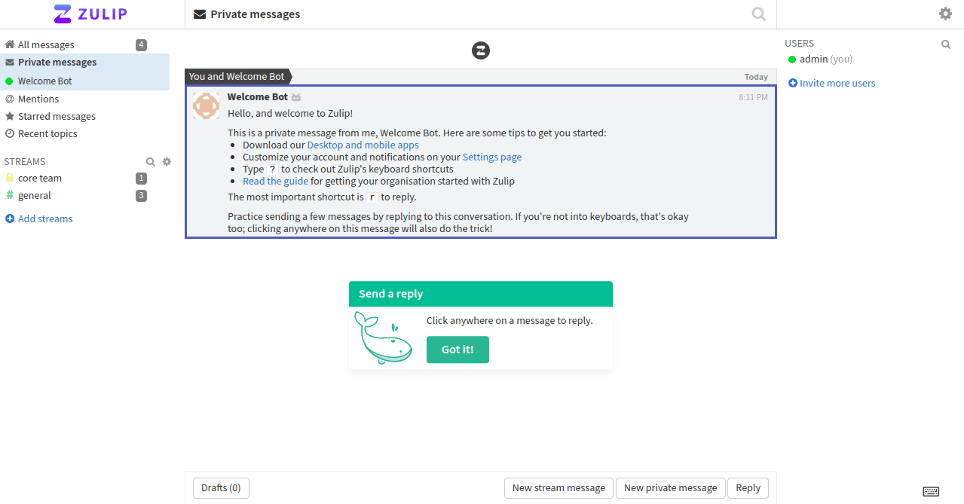
Provide your Organization name, URL, admin username, and password and click on the Login button. You will be redirected to the Zulip dashboard as shown below:

FAQs to Install Zulip on Ubuntu 22.04
How can I access Zulip after installation?
After successful installation, access Zulip through your web browser by entering your server's IP address or domain name.
Can I install Zulip on other Ubuntu versions?
Yes, Zulip supports various versions of Ubuntu, including 22.04, 20.04, and 18.04.
What are the system requirements for installing Zulip?
For smooth installation, ensure that your system meets the minimum requirements: a properly configured Ubuntu 22.04 with internet connectivity and sufficient disk space.
Do I need root access to install Zulip on Ubuntu?
No, you don't need root access. The installation script will guide you through the process and handle the necessary permissions.
Are there any dependencies for Zulip installation?
Yes, Zulip has a few dependencies, such as Python and PostgreSQL. The installation script will automatically handle these dependencies for you.
Can I use Zulip with an existing database setup?
Yes, you can configure Zulip to use an existing PostgreSQL or MySQL database during the installation process.
Does Zulip provide any post-installation configuration steps?
Yes, Zulip's installation documentation covers post-installation configuration steps, including creating an initial administrator account and configuring email settings.
Conclusion
We hope this simple tutorial helped you understand how to install Zulip on your Ubuntu 20.04 machine. Click here to read more about Zulip.
If you have any queries, please leave a comment below, and we’ll be happy to respond to them for sure.

