
Introduction
Before we begin talking about how to scale your Mastodon Server, let's briefly understand – What is Mastodon Server?
Mastodon is a self-hosted, open-source social network. Mastodon is federated, allowing users from many servers to communicate with one another to build a network known as the Fediverse. As a result, numerous instances of Mastodon can work together. The ActivityPub protocol is used by the Fediverse, a network of linked servers, to communicate with one another.
The demand on the servers increases dramatically along with the Mastodon community. Due to peak user activity, Mastodon servers have frequently crashed during the past year. Scaling is necessary to keep the Mastodon server from going down during a user surge.
You have to understand the composition of a Mastodon in order to comprehend how to scale one. The following five elements make up a Mastodon server: Web service, StreamingAPI service, Sidekiq service, Redis, and PostgreSQL.
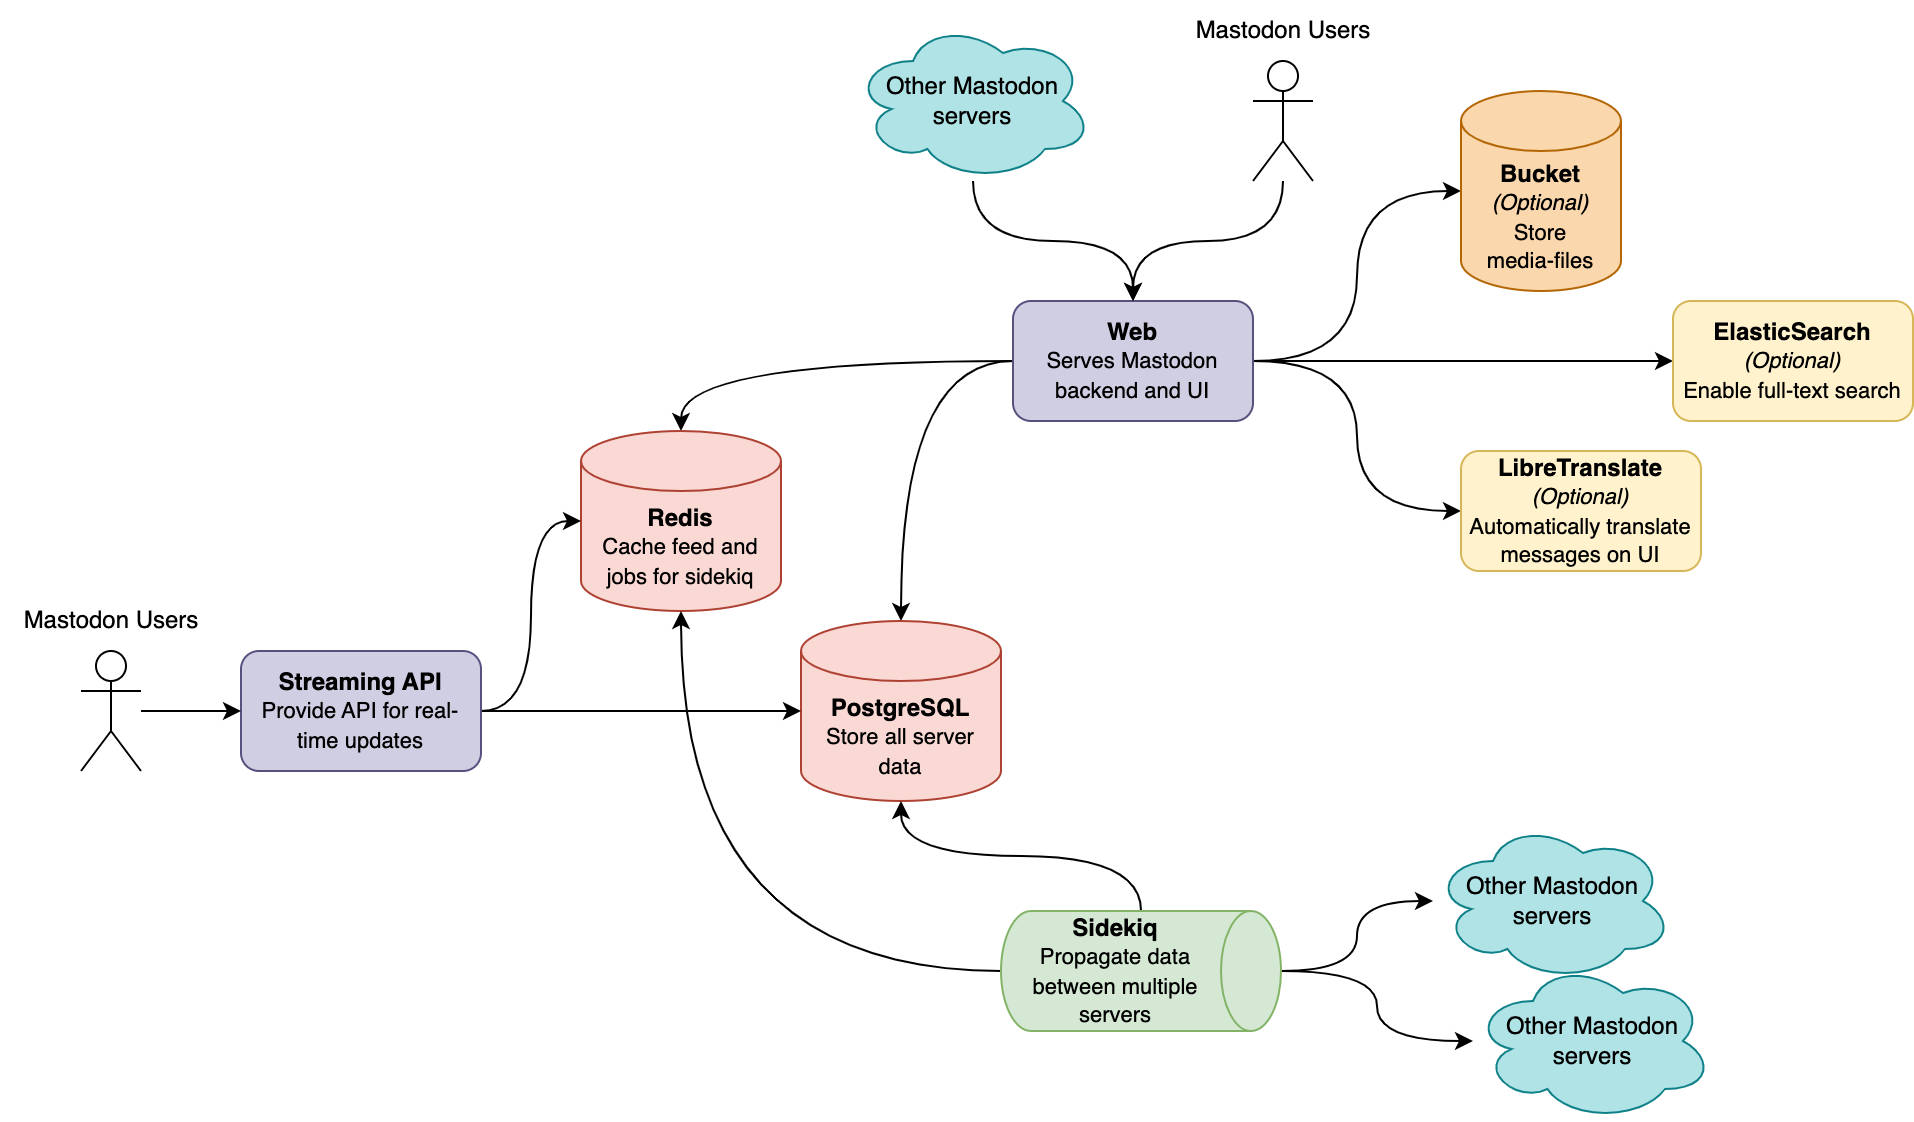
Optionally, object storage can significantly enhance static media file performance and lessen the demand on Web services. ElasticSearch can enable full-text search and LibreTranslate can allow your server to translate messages automatically without improving performance, making your server a little nicer.
In this tutorial, you will learn how to scale your Mastodon Server. We will also address a few FAQs on how to scale your Mastodon Server.
Adavantages of Mastodon Server
- Decentralization: Mastodon offers a decentralized social network, ensuring user privacy and control over data.
- Customization: Users can create their own Mastodon servers with unique rules and themes, fostering diverse and specialized communities.
- Open Source: As an open-source platform, Mastodon encourages transparency, community contributions, and the ability to customize code.
- No Ads or Algorithmic Feeds: Mastodon prioritizes a chronological timeline, free from intrusive ads or algorithms that prioritize certain content.
- Interoperability: Mastodon allows users from different servers to connect and communicate, promoting a broader and more inclusive social experience.
How To Scale Your Mastodon Server
We will discuss different scaling techniques for your Mastodon server in this tutorial:
- Increasing database resources and existing connections.
- Dividing Sidekiq queues up into various processes.
- Setting up resources and threads for every Sidekiq queue.
- Adding object storage to unload a Web service.
- Increasing the number of web service threads and processes.
We advise reading the entire article and scaling each component if you intend to scale your Mastodon server to handle some active users. On the other hand, feel free to skip to the relevant component section if you want to scale a certain component. As a general rule, try to maintain each computer running Mastodon components at an average load of between 60 and 70 percent. Poor service configuration can occasionally lead to both low average load and low performance. The symptoms to identify such cases are listed in each area below.
Improving Database Performance
Your Mastodon server's primary source of truth is PostgreSQL. All user passwords, toots, boosts, user relations, and other information are contained there. Maintaining the database's security and backup is of utmost importance to you.
Mastodon needs a huge number of database connections. Poor Sidekiq performance, hours of delay between feed updates, general slowness, and even the entire server becoming inaccessible are signs of connection starvation.
You will figure out how many connections your server needs in this part and configure the database accordingly. It will prevent connection starvation, which affects the performance of all Mastodon services, without using any additional resources on your server.
max_connections value must ALWAYS be less than the number of connections required for your Mastodon server. To prevent database contention, max_connections should also be as low as possible.You must determine how many connections each component needs in order to determine the total number needed for your Mastodon server:
- The number of connections required for each Web service instance is determined by multiplying
MAX_THREADSbyWEB_CONCURRENCY. - The number of connections required for each StreamingAPI instance is equal to the product of the
STREAMING_CLUSTER_NUMand theDB_POOL. - The necessary connections for each Sidekiq instance are equal to the
DB_POOL.
Add 20 additional connections for maintenance to the total of all those figures. This is your max_connections value.
Info: When scaling Mastodon, properly configuring the database should be your main priority. However, you must first plan how you will scale other services in order to estimate the max_connections number. You can come back to this page to complete the calculation of max_connections once you have made a plan for how to scale other services (which you will find in the following sections).
You will utilize the value you have for max_connections to configure your database now that you know what it is.
Using the PGTune service is a nice approach to produce configuration. You will see the following configuration fields when you first access the PGTune page:
- DB Version: Enter the PostgreSQL version that your Mastodon server is running in this field. Using the following command on the machine running PostgreSQL server, you may locate it:
pg_config --version
- OS Type: The type of operating system used by the machine running PostgreSQL.
- DB Type: The kind of work your PostgreSQL will do. Select Online Transaction Processing System (OLTP in the future) for Mastodon since it generates numerous connections.
- Total Memory (RAM): Amount of memory PostgreSQL will utilize. Try to allot up to half of a machine's physical memory, but watch out not to go above the total RAM if other services are also using the computer. For instance, we specify 4 GB in PGTune for a machine with 8 GB of RAM and only PostgreSQL.
- Number of CPUs: Amount of CPU cores that PostgreSQL will employ. We strongly advise setting this value as high as the maximum number of CPU threads your computer can support because OLTP is CPU-bound.
- Connections: This section is for
max_connections. Data Storage: the type of data storage component used by the PostgreSQL server.
For instance, this is how the setup appears on a system with 8 GB of RAM, 8 threads, and 420 max_connections:

You will obtain configuration parameters after selecting Generate, which you should add to your postgresl.conf file.
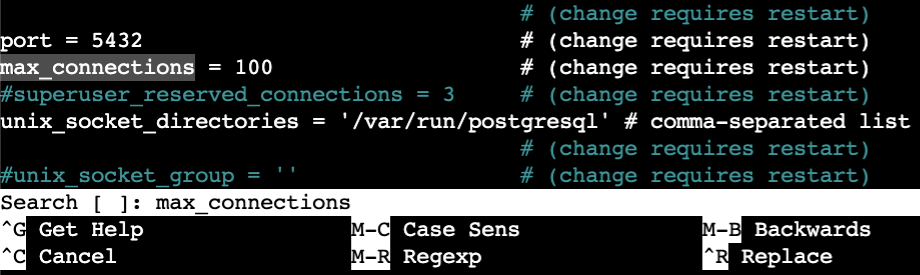
Open postgresql.conf on the computer hosting your PostgreSQL:
sudo nano /etc/postgresql/major version of your PostgreSQL/main/postgresql.conf
For instance, the path of this file would be /etc/postgresql/15/main/postgresql.conf if you were using PostgreSQL version 15.x.
The next step is to find each parameter created by the PGTune in your postgresql.conf file and modify its value. To search in nano, press Ctrl+W, and in vi/vim, press Esc+/. You can add a parameter anywhere in your postgresql.conf file if it is missing.
To apply modifications, lastly restart the PostgreSQL service:
sudo service postgressql restart
You now understand how to implement the new settings and how to optimize your PostgreSQL for Mastodon. You may discover the precise values of all the variables needed to determine max_connections in the section that follows.
Perfecting Sidekiq queues
Ruby's Sidekiq is a worker and a task scheduler. It is in charge of carrying out background tasks including processing likes, creating link previews, propagating articles between servers, and more.
Redis serves as the job queue manager in Sidekiq, and PostgreSQL stores the job results. Many jobs will be created to propagate essential data from one server to another if numerous servers are connected (users are following persons from other servers).
Long feed update latency, backed-up Sidekiq queues, and persistent database load are signs of a Sidekiq bottleneck.
You will get a rough idea of the number of physical computers and Sidekiq queue sizes needed for your server in this section.
For Sidekiq, Mastodon supports a number of queues. However, while some of them completely load the CPU and consume more resources, others scarcely place any demand at all.
| Queue | Priority | Role |
|---|---|---|
| default | Highest | takes care of all tasks affecting local users. |
| ingress | High | takes care of incoming remote activities. When the server is busy, postings from local users are still visible, since they are lower priority than the ones in the default queue. Remember that the ingress queue uses a lot of CPU power. |
| push | Medium | transports payloads to additional servers. |
| pull | Medium | handles responsibilities such handling imports, backups, thread resolution, user deletion, and reply forwarding. |
| mailers | Low | Delivers emails. |
| scheduler | Lowest | oversees cron tasks like log cleanup and updating trending hashtags. |
scheduler queue over multiple processes. Your Mastodon server should have just one process running scheduler.You can allocate machines correctly using the table above, but what about queue configuration? The maximum number of active users that queues can efficiently handle is correlated with the number of threads a particular queue has. Certain queues can accommodate more active users, the more threads are allocated. This limit is also influenced by the queue type; for some queues, fewer threads are needed to service the same number of users than for others. The graph below explains this multifaceted relationship.
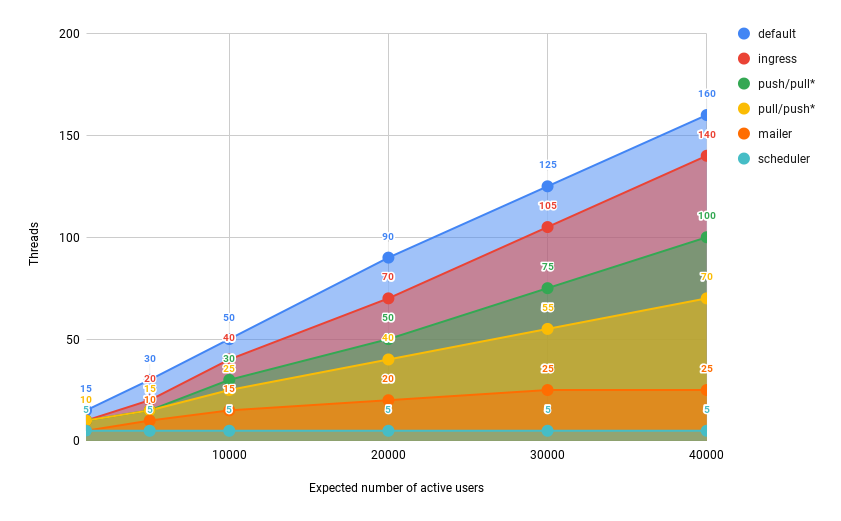
The X-axis shows how many active users Mastodon is anticipated to support, and the Y-axis shows how many threads are anticipated to be needed in each queue to support the corresponding number of active users:
push or pull queues may have varying priorities depending on the server community. Give the push queue precedence if your community and other federations are closely related. Otherwise, you can anticipate a lot of local activity and give priority to pull if your server is focused on a particular area of interest.
For instance, users from your server will mostly communicate with one another if it deals with a particular scientific subject. On the other hand, people from your server might be more inclined to support other politicians if it is a personal political blog. You must keep an eye on the load on your own servers as a Mastodon administrator and scale the components appropriately.
The final significant point regarding Sidekiq queues is that 1 GB of RAM is needed for 10–15 Sidekiq threads. This completes the relationship:

For instance, we predict that only local federation will be used by, 15000 active users. The graph above tells us that we need:
default: about 70 threads in total, 2 services 35 threads each.ingress: about 50 threads in total, 2 services 25 threads each.pull: about 40 threads in total, 1 service with all 40 threads.push: about 30 threads in total, 1 service with all 30 threads.mailer: about 20 threads in total, 1 service with all 20 threads.scheduler: 5 threads in total, 1 service with all 5 threads.
Keep in mind that not many of our users use external federations, thus we give the pull queue priority over the push queue.
Since the scheduler queue has the lowest priority of the two queues, running it concurrently with the default queue won't have any negative effects. They require a total of 70 + 5 = 75 threads, or around 8 GB of RAM. We can utilize a single 4 core, 8 GB system because there is only one heavy queue. As high- and low-priority queues, respectively, ingress and mailer will consume less CPU power than a single default queue, but we'll still employ a 4-core machine. They have a total of 25 + 20 = 45 threads, which equates to about 6 GB of RAM. We will employ 4 cores once more because pull and push queues are both medium priorities, making them slightly more CPU intensive than ingress and mailer. 40 plus 30 is 70 threads, which equates to 8 GB of RAM.
In conclusion, if we want to support, 15000 active users, we will require a total of 3 machines for Sidekiq configuration:
- A 4c/8GB system to serve 2 services of the
defaultqueue with 35 threads each and 1 service ofschedulerqueue with 5 threads. - A 4c/8GB system to serve 1 service of
ingressqueue with 50 threads and 1 service ofmailerqueue with 20 threads. - A 4c/6GB system to serve 1 service of
pullqueue with 40 threads and 1 service ofpushqueue with 30 threads.
Scaling Sidekiq
Sidekiq must be set up with the right number of threads and scaled at the process level in order to make maximum use of the hardware resources. This section explains how to precisely set the number of threads for Sidekiq queues as well as how to use service templates to operate several queues simultaneously on the same computer.
Note: The examples below can be directly inserted into the ExecStart or Docker command fields of a systemd service. Rebuild your containers if you're using Docker after making modifications to the Docker files.
Increasing the number of threads used by a single Sidekiq process
A service is a resource which systemd can maintain, log, auto-restart and so on. One of the simplest ways to deploy an application is to wrap an executable in the service. The most popular way to run Sidekiq queues is via a Systemd service. The location of the Sidekiq service depends on the type of your Mastodon installation. For instance, you can find the Sidekiq service file here if you're using Mastodon Droplet 1-Click:
cat /etc/systemd/system/mastodon-sidekiq.service
Let's quickly review the service file's header:
[Unit]
Description=mastodon-sidekiq
After=network.target

[Service]
Type=simple
User=mastodon
WorkingDirectory=/home/mastodon/live
Environment="RAILS_ENV=production"
Environment="DB_POOL=25"
Environment="MALLOC_ARENA_MAX=2"
Environment="LD_PRELOAD=libjemalloc.so"
ExecStart=/home/mastodon/.rbenv/shims/bundle exec sidekiq -c 25
...

[Install]
WantedBy=multi-user.target
ExecStart and Environment should be the focus of our attention. ExecStart specifies the service's initial beginning point when it starts or restarts. ExecStart receives environment variables defined by Environment.
You should increase the number of threads Sidekiq will utilise in order to scale a single Sidekiq process. The ExecStart field's -c parameter controls this value. Remember to keep the DB_POOL environment variable and the -c parameter in sync. Let's raise the number of threads to 45 as an example. You will alter the values for both -c parameters as well as DB_POOL:
[Unit]
Description=mastodon-sidekiq
After=network.target

[Service]
Type=simple
User=mastodon
WorkingDirectory=/home/mastodon/live
Environment="RAILS_ENV=production"
Environment="DB_POOL=40"
Environment="MALLOC_ARENA_MAX=2"
Environment="LD_PRELOAD=libjemalloc.so"
ExecStart=/home/mastodon/.rbenv/shims/bundle exec sidekiq -c 40
...

[Install]
WantedBy=multi-user.target
DB_POOL environment must always match those of the -c parameter (40 in the previous example). Smaller values will cause Sidekiq performance issues, while greater values will put more strain on the database.Be sure to restart the Sidekiq service and reload unit files after making any modifications to the service file:
sudo systemctl daemon-reload
sudo systemctl restart mastodon-sidekiq.service
Applying the adjustments from this section allowed Sidekiq to use more threads, which allowed it to serve more people.
Specifying a particular queue for a single Sidekiq instance
Analyzing the default Sidekiq service file will be our first step. The Sidekiq service file can be found here if you're using Mastodon Droplet 1-Click:
cat /etc/systemd/system/mastodon-sidekiq.service
As you are aware, Sidekiq data is split up into various queues by Mastodon. The service file by default does not explicitly specify a queue.
[Unit]
Description=mastodon-sidekiq
After=network.target

[Service]
Type=simple
User=mastodon
WorkingDirectory=/home/mastodon/live
Environment="RAILS_ENV=production"
Environment="DB_POOL=25"
Environment="MALLOC_ARENA_MAX=2"
Environment="LD_PRELOAD=libjemalloc.so"
ExecStart=/home/mastodon/.rbenv/shims/bundle exec sidekiq -c 25
...

[Install]
WantedBy=multi-user.target
Sidekiq will likely serve all queues with some default priority if there isn't a specified queue. Running all queues on a single instance of Sidekiq is not ideal because even a single Sidekiq queue is resource-intensive. To accomplish this, divide Sidekiq queues among various Sidekiq instances. This will let you run various queues on various machines and let you select the precise number of threads for each queue. Hopefully, adding a -q argument to the ExecStart field is all that is needed to override the default Sidekiq behaviour.
For illustration let's make Sidekiq solely serve the ingress queue:
[Unit]
Description=mastodon-sidekiq
After=network.target

[Service]
Type=simple
User=mastodon
WorkingDirectory=/home/mastodon/live
Environment="RAILS_ENV=production"
Environment="DB_POOL=25"
Environment="MALLOC_ARENA_MAX=2"
Environment="LD_PRELOAD=libjemalloc.so"
ExecStart=/home/mastodon/.rbenv/shims/bundle exec sidekiq -c 25 -q ingress
...

[Install]
WantedBy=multi-user.target
You can instruct Sidekiq to just serve the ingress queue by setting -q ingress.
ingress unprocessed, which will prevent Mastodon from operating as intended. Make sure you pass through each line at least once. The instructions for running several Sidekiq service instances on a single system are provided in the next section.It is easier to process logs for a single queue when only one queue is processed by the Sidekiq service, it provides per-queue administration and thread control, and it enables distributed configuration by running different queues on different machines. It is regarded as the primary method for scaling Sidekiq queues overall. To run many queues separately on a single machine since it is not always efficient to dedicate all hardware resources to one queue, see the following section.
Using templates to run multiple instances of Sidekiq on a single machine
Running one instance of Sidekiq is not the most effective use of resources. You can run numerous instances of Sidekiq simultaneously to scale it even further. You will learn how to develop a service template to make running many instances of Sidekiq on a single machine easier as the systemd service is the most popular way to run Sidekiq.
Using a single service file as a template, we may generate many services.
Let's start by making a copy of our current Sidekiq service file:
cp /etc/systemd/system/mastodon-sidekiq.service /etc/systemd/system/mastodon-sidekiq-template.service
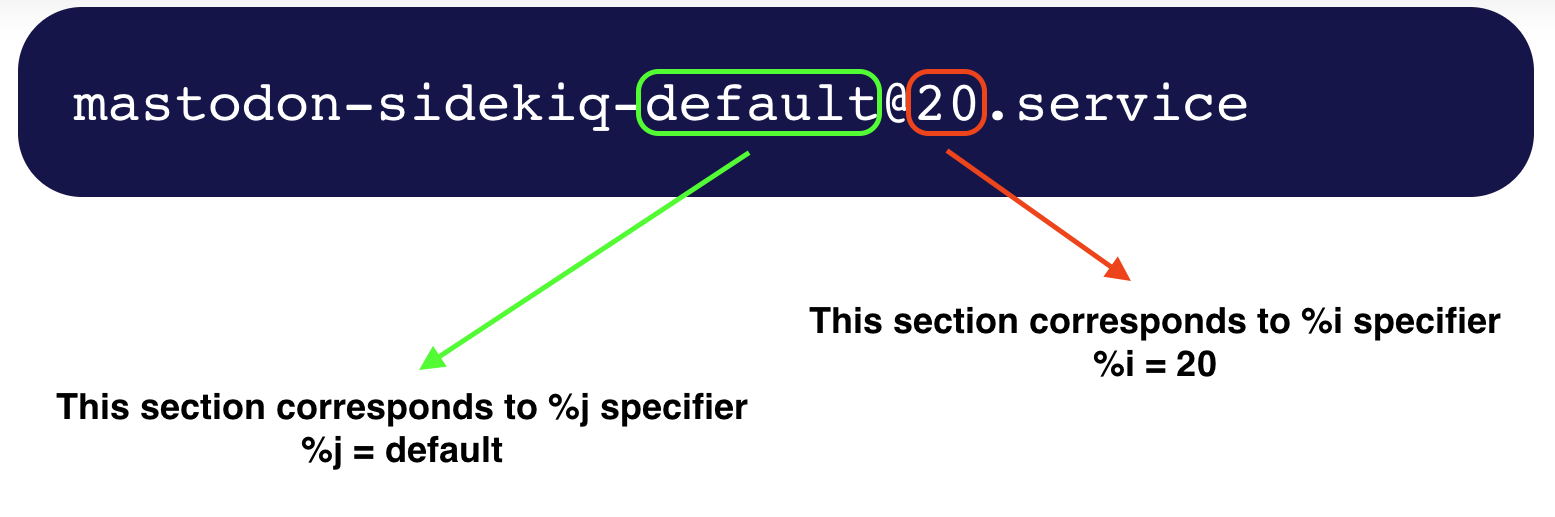
A clone of the current Sidekiq service will be created in a new file called mastodon-sidekiq-template.service as a result. To make this copy into a template, you will edit it. Template specifiers define a template; in this article, you'll utilize two in particular: %i and %j.
%iis the name of the instance. This is the string that appears for instantiated services between the initial "@" symbol and the type suffix.%jis the prefix's final component. This is the string that comes after the last "-" and before the prefix name.
Sounds complicated? For a better understanding, let's move on to the practical part.
To edit your new service file, first open it as follows:
sudo nano /etc/systemd/system/mastodon-sidekiq-template.service
In the service file, now, modify a few values to template specifiers:
- For simpler service monitoring and maintenance, the description field should have a
%jspecifier. - The environment variable DB_POOL needs to match the
%ispecifier. - ExecStart's -c parameter needs to be set to
%i. - ExecStart's -q parameter needs to be set to
%j.
[Unit]
Description=mastodon-sidekiq-%j-queue
After=network.target

[Service]
...
Environment="DB_POOL=%i"
Environment="MALLOC_ARENA_MAX=2"
Environment="LD_PRELOAD=libjemalloc.so"
ExecStart=/home/mastodon/.rbenv/shims/bundle exec sidekiq -c %i -q %j
...
[Install]
WantedBy=multi-user.target
As you might have guessed, the %i and %j specifiers will each hold information on the number of Sidekiq threads and the Sidekiq queue, respectively.
How then may these variables be set? Specific sections of the service file are used to replace specifiers.
Create service files for the desired Sidekiq setups using this template.
To start, duplicate the template and add the queues you wish to run on this system. For instance, to launch the scheduler with default queues:
cp /etc/systemd/system/mastodon-sidekiq-template.service /etc/systemd/system/[email protected]
cp /etc/systemd/system/mastodon-sidekiq-template.service /etc/systemd/system/[email protected]
You can choose from the following names for the queue: default, ingress, push, pull, mailers, scheduler.
You may have observed that nothing was specified following the @ sign. This is due to the fact that you will specify this option when you enable the service. Let's use 5 threads for the scheduler queue and 20 threads for the default queue to enable new services:
sudo systemctl enable [email protected]
sudo systemctl enable [email protected]
Finally, once you have enabled your new services, you may launch them all at once by using the command:
sudo systemctl start mastodon-sidekiq*
Now that you've finished creating a template service file, you can use it to start several Sidekiq services with different queues and threads.
Changing the configuration of running template services
For instance, you need first disable the current service before changing the default service's thread count from 20 to 40:
sudo systemctl stop    mastodon-sidekiq-default.service
sudo systemctl disable [email protected]
Take note of the fact that you just supply the quantity of threads for the disable command, not stop.
You can build a new service with 40 threads rather than 20 once you've disabled the old push service:
sudo systemctl enable [email protected]
sudo systemctl start  mastodon-sidekiq-default.service
Running multiple services of the same Sidekiq queue
As you are aware, Sidekiq shouldn't run more than 50 threads per instance. It takes two services, each with 30 threads, to run a queue with 60 threads.
To do that, you must repeatedly replicate the template using the same queue while also adding an index. Simply said, an index is a number used to identify each service file. Repeat the first template several times, but each time the same queue repeats, increase the index. To produce two service files for the default queue, for instance:
cp /etc/systemd/system/mastodon-sidekiq-template.service /etc/systemd/system/[email protected]
cp /etc/systemd/system/mastodon-sidekiq-template.service /etc/systemd/system/[email protected]
/etc/systemd/system/mastodon-sidekiq-default-2@service, SHOULD NOT have an index appended to it. As a result, the template will treat 2 as the queue's name, which will certainly result in a failure. Add index here only BEFORE the name of a queue.Let's enable them with 40 threads for the first instance of the default queue and 60 threads for the subsequent instance:
sudo systemctl enable [email protected]
sudo systemctl enable [email protected]
Finally, once your services have been enabled, you can run them all by using the command:
sudo systemctl start mastodon-sidekiq*
Now that you've successfully established many instances of the same queue, you may divide a lot of threads in a useful way.
You discovered several methods for setting up the Sidekiq service(s). A single default service may be sufficient in some circumstances, whereas many services may be needed on a single system or even multiple instances of the same queue on different machines. The quantity of active users you intend to support will determine everything.
Adding object storage
Users of your server may store media files they have uploaded using object storage, also known as bucket. This consists of photos, videos, gifs, audio files, and so on.
Moving from the filesystem to object storage speeds up and expands storage space, but it also lessens the pressure on Mastodon services. Additionally, the majority of cloud-based object storages offer CDN, which will speed up the delivery of media files to consumers.
Since object storage is only utilised by the Web service, you can add the necessary variables directly to the configuration of computers executing Mastodon if you unintentionally forgot to configure object storage during Mastodon initialization.
Open .env.production in your favourite text editor on the computer(s) hosting the Web service; if you're using Mastodon, Droplet 1-Click env.production is placed at /home/mastodon/live:
sudo nano .env.production
Replace the highlighted text with your own data when adding the following lines to your .env.production file(s). These variables can still be changed if their values are incorrect even if they already exist, indicating that object storage was configured during setup:
...
S3_ENABLED=true
S3_PROTOCOL=https
S3_BUCKET=your bucket name
S3_REGION=your bucket region
S3_HOSTNAME=your bucket hostname
S3_ENDPOINT=your bucket endpoint
AWS_ACCESS_KEY_ID=your bucket secret ID
AWS_SECRET_ACCESS_KEY=your bucket secret key
...
The aforementioned variables stand for S3 interface connection parameters. Use the appropriate S3 mapping from your object storage provider for the connection settings.
After saving, close the editor.
After saving changes, make sure to restart the Web service(s):
sudo systemctl restart mastodon-web.service
You now know how to manually set up Mastodon's object storage in the event that the automatic setup fails, a human makes a mistake, or a manual installation. Using object storage will improve upload/download speeds for media assets on your server and lessen the burden on your Mastodon Web service(s).
Scaling the Web service
The web service, a Ruby-on-Rails HTTPS server, handles user requests and provides the Mastodon UI. The number of active users directly relates to the demand on the online service. A single request can be answered simultaneously by each thread. The next request must wait if all threads are active. A timeout error is returned if the request is left waiting for too long. Long request processing delays, such as delayed page opening, postings being created with a visible lag, or timeout issues appearing on logs, are indicators of web service bottlenecks.
You must raise the total number of threads the Web service uses in order to handle more users. The environment variables WEB_CONCURRENCY (the number of workers) and/or MAX_THREADS (the number of threads per worker) can be raised to achieve this. The total number of threads is equal to WEB_CONCURRENCY multiplied by MAX_THREADS because each worker has a maximum of MAX_THREADS threads.
While raising WEB_CONCURRENCY tends to increase RAM usage, increasing MAX_THREADS tends to increase CPU usage. For Mastodon version 4.0.2, the typical estimate for a single worker is 2-3 GB of RAM. The estimated amount of RAM required in the aforementioned case with WEB_CONCURRENCY = 3 is 9 GB. We advise starting with a general figure for MAX_THREADS, such as 15, and increasing it until an average CPU utilisation of 70% is reached. This means that in order to determine whether you can squeeze in more threads, you must monitor the machines that are running your Web services.
WEB_CONCURRENCY and MAX_THREADS variables to match the requirements of your platform.Open the web service file first:
sudo nano /etc/systemd/system/mastodon-web.service
You will see a Web service systemd file that appears as follows:
[Unit]
Description=mastodon-web
After=network.target

[Service]
...
Environment="LD_PRELOAD=libjemalloc.so"
ExecStart=/home/mastodon/.rbenv/shims/bundle exec puma -C config/puma.rb
ExecReload=/bin/kill -SIGUSR1 $MAINPID
...
[Install]
WantedBy=multi-user.target
Add two additional fields with the variables WEB_CONCURRENCY and MAX_THREADS just above ExecStart field:
[Unit]
Description=mastodon-web
After=network.target

[Service]
...
Environment="LD_PRELOAD=libjemalloc.so"
Environment="WEB_CONCURRENCY=your concurrency value"
Environment="MAX_THREADS=your threads value"
ExecStart=/home/mastodon/.rbenv/shims/bundle exec puma -C config/puma.rb
ExecReload=/bin/kill -SIGUSR1 $MAINPID
...
[Install]
WantedBy=multi-user.target
These new values will override default values for WEB_CONCURRENCY and MAX_THREADS with your own values.
After saving, close the editor.
After saving changes, make sure to restart the service and reload the unit files:
sudo systemctl daemon-reload
sudo systemctl restart mastodon-web.service
You've now increased the Web service configuration's default values. This led to more active users using your Mastodon frontend. Always maintain a performance buffer to ensure that your Mastodon server won't throttle under heavy user loads.
Increasing StreamingAPI throughput
A NodeJS server called StreamingAPI hosts real-time update API. Users are able to get a stream of events straight from the server. The number of concurrent users that StreamingAPI can serve is constrained. The STREAMING_CLUSTER_NUM environment setting serves as the limit's connection.
Service log analysis can reveal the congestion in the StreamingAPI. A node like node[1201554]: ERR! error: sorry, too many clients already indicates that there are more users than the StreamingAPI can support, and any more users are automatically disconnected.
Scaling the StreamingAPI is rather simple. StreamingAPI will be able to serve more users if the STREAMING_CLUSTER_NUM environment variable is increased. Increase STREAMING_CLUSTER_NUM by 1.5x–2x if you notice a lot of error: sorry, too many clients alreadymessages in your logs. For instance, change the value to 4 if your current setup for STREAMING_CLUSTER_NUM is 2.
Open the StreamingAPI service file on the computer that is running StreamingAPI:
sudo nano /etc/systemd/system/mastodon-streaming.service
Edit the STREAMING_CLUSTER_NUM variable's value as follows:
[Unit]
Description=mastodon-streaming
After=network.target

[Service]
...
Environment="STREAMING_CLUSTER_NUM=your new value"
ExecStart=/usr/bin/node ./streaming
...
After making modifications, save the file, reload unit files, and restart the service.
sudo systemctl daemon-reload
sudo systemctl restart mastodon-streaming.service
Additionally, the DB_POOL variable is not set by default in StreamingAPI. Without a specific setting for this variable, StreamingAPI will make 10 connections. STREAMING_CLUSTER_NUM variable without explicitly increasing DB_POOL, but if you wish to do that, you can just add a new environment variable to a StreamingAPI service file.
Open the StreamingAPI service file on the computer that is running StreamingAPI:
sudo nano /etc/systemd/system/mastodon-streaming.service
Set up a new environment variable called DB_POOL:
[Unit]
Description=mastodon-streaming
After=network.target

[Service]
...
Environment="DB_POOL=your value"
Environment="STREAMING_CLUSTER_NUM=your value"
ExecStart=/usr/bin/node ./streaming
...
After making modifications, save the file, reload unit files, and restart the service.
sudo systemctl daemon-reload
sudo systemctl restart mastodon-streaming.service
This will override the DB_POOL default value and make it evident how many database connections are required for your instance of StreamingAPI.
If you don't specifically specify a value for DB_POOL, the max_connections variable will use the number 10 as DB_POOL.
Now that the StreamingAPI settings has been modified, more throughput is possible. This will enable your StreamingAPI to successfully serve more concurrent users. You could have specified the DB_POOL environment variable manually to streamline your database setting process, or you could have left it alone and selected 10 as the value for DB_POOL for StreamingAPI.
FAQs to Scale Your Mastodon Server
What does scaling a Mastodon server mean?
Scaling involves optimizing your server infrastructure to handle increased traffic, user activity, and data storage requirements.
How can I determine if my Mastodon server needs scaling?
Monitor server performance, response times, and user complaints about slow loading or downtime to identify signs that scaling is required.
Q: What are some effective ways to scale a Mastodon server?
Scaling options include vertical scaling (upgrading hardware/resources) and horizontal scaling (distributing load across multiple servers).
Can I scale my Mastodon server on my own hardware?
Yes, you can scale your Mastodon server on your own hardware or use cloud-based hosting providers for scalability, flexibility, and ease of management.
Are there any specific hardware or software requirements for scaling a Mastodon server?
While specific requirements may vary, generally, you will need sufficient CPU, RAM, storage, and a capable database server to handle increased load.
Are there any risks involved in scaling a Mastodon server?
Scaling introduces complexities and potential challenges, such as data synchronization, network latency, and increased server administration.
How can I backup my Mastodon server before scaling?
Take regular backups of your Mastodon server database, configuration files, and user-generated media to safeguard data before making any scaling changes.
Conclusion
You've learned how to locate and fix bottlenecks in PostgreSQL, Sidekiq, Web services, and StreamingAPI through this tutorial.
Scaling strategies can constantly be enhanced and improved; for instance, more complex Sidekiq configurations could be templated. Some other perspectives on how to scale and optimise your server are included in the official Mastodon scaling guide.
Enabling full-text search using ElasticSearch is another excellent approach to enhance user experience on your server. Users will be able to do this to find results based on their bookmarks, favourites, mentions, and status updates.
By turning on LibreTranslate, users can also force Mastodon to translate toots and other messages into user language.
If you have any queries, please leave a comment below, and we’ll be happy to respond to them for sure.