
Choose a different version or distribution
Introduction
Before we begin talking about how to set DNS Nameservers on Ubuntu 22.04, let's briefly understand – What are DNS Nameservers?
DNS Nameservers are a crucial part of the internet infrastructure. They act as address books that translate human-readable domain names (like example.com) into the corresponding IP addresses (like 192.0.2.1) that computers understand.
Nameservers store and manage these mappings, ensuring that when you type a website address, your browser can locate the correct server. Reliable and fast nameservers are essential for smooth internet browsing. Understanding DNS Nameservers is vital for website owners and administrators to manage their domains effectively.
In this tutorial, you will set DNS Nameservers on Ubuntu 22.04. We will also address a few FAQs on how to set DNS Nameservers on Ubuntu 22.04.
Advantages of DNS Nameservers
- Efficient address resolution: DNS nameservers quickly translate domain names into IP addresses, enabling fast and seamless website access.
- Load distribution: Nameservers distribute incoming traffic across multiple servers, preventing overload and ensuring optimal performance.
- Redundancy and reliability: Multiple nameservers provide backup and redundancy, minimizing downtime and ensuring continuous availability of websites.
- Easy domain management: Nameservers simplify domain management tasks, allowing website owners to update DNS records and make changes effortlessly.
- Scalability: Nameservers support the scalability of websites by efficiently handling increased traffic and accommodating growth without performance issues.
Method 1: How to Set DNS Nameserver Using CLI
Users can take the following actions to configure the DNS name servers on Ubuntu 22.04 using the command line:
Configure resolv.conf file
With the sudo privileges, open the /etc/resolv.conf file in a nano text editor:
sudo nano /etc/resolv.conf
For each DNS name server you plan on using, add a line to the file. The nameserver with the IP address should be the first thing on the line:
nameserver 8.8.8.8
nameserver 8.8.4.4
Save the file, then close the text editor.
Verify the DNS Nameservers
To verify the DNS Nameserver, run the script following with the sudo privilege:
sudo resolvectl status
The output verifies that DNS nameservers 8.8.8.8 and 8.8.4.4 have been configured.
Alternative Method: Configure “01-network-manager-all.yaml” File Via netplan
A tool for configuring networking on Linux systems is called Netplan. You can select which DNS nameservers should be used by your system to resolve hostnames.
You must modify the Netplan configuration file for your network interface in order to set the DNS nameservers. The configuration file has a .yaml file format and is typically found in /etc/netplan/.
sudo nano /etc/netplan/01-network-manager-all.yaml
Below is an example of how the DNS nameservers can be set in a Netplan configuration file. The following is a description of the script:
network:
  version: 2
  renderer: networkd
  ethernets:
    enp0s3:
      dhcp4: no
      addresses: [192.168.157.140/24]
      gateway4: 192.168.157.140
      nameservers:
        addresses: [8.8.8.8,8.8.4.4]
The nameservers part of this example states that the system should resolve hostnames using Google's public DNS servers (8.8.8.8 and 8.8.4.4). Also, the machine has the IP address 192.168.157.140 and the subnet mask 24. 192.168.157.140 is the gateway via which traffic flows.
After making modifications to the configuration file, execute the following command to put the changes into effect:
sudo netplan apply
By doing this, you will be able to use the nameservers listed in the configuration file and update the system's DNS settings.
Let us look at the same method in the GUI.
Method 2: How to Set DNS Nameserver Using GUI
Domain names that can be supplied in the network configuration files are resolved by Ubuntu's DNS name servers. Using an Ubuntu GUI, these configuration files can be changed as shown below:
Step 1: Open the Network Settings Window
Click the Network icon in the top right corner of the desktop screen, then select Wired Settings`:

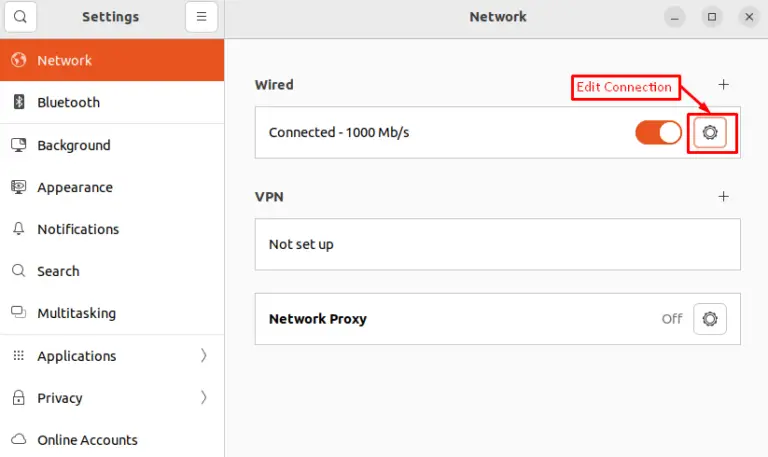
Step 2: Edit Connection
It goes on to the Settings window's Network section. For the connection you want to configure DNS nameservers for, click the Edit button:
Step 3: Check the Automatic (DHCP)
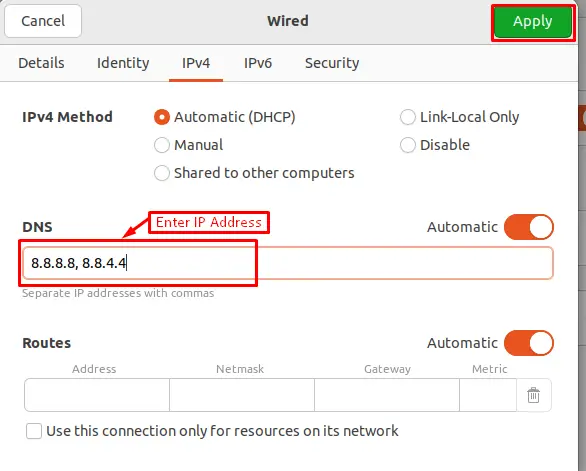
See if Automatic (DHCP) addresses is enabled or disabled under the IPv4 Settings tab. If not, pick this one:

Step 4: Enter the IP Addresses of DNS
In the DNS Servers field, type the DNS nameservers' IP addresses. After that, click Apply to save the address:
FAQs to Set DNS Nameservers on Ubuntu 22.04
Can I set multiple DNS nameservers?
Yes, you can add multiple nameservers in the /etc/netplan/01-netcfg.yaml file by listing them one after another under the nameservers section.
How do I verify the DNS nameservers after setting them?
You can use the systemd-resolve --status command to view the currently configured DNS nameservers and their associated settings.
Are there any alternative methods to set DNS nameservers on Ubuntu 22.04?
Yes, you can also modify the /etc/resolv.conf file directly. However, note that changes made to this file may be overwritten by certain network management tools.
Do I need to restart my system after changing the DNS nameservers?
No, you don't need to restart your system. After making changes to the nameservers configuration, you can simply run the sudo netplan apply command to apply the new settings.
Can I use DNS nameservers from different providers?
Yes, you can use nameservers from different providers. Just make sure to list them in the order of preference, as the system will try each nameserver in sequence.
How can I troubleshoot DNS resolution issues after setting nameservers?
You can use tools like dig or nslookup to test DNS resolution and verify if the configured nameservers are working correctly.
Are there any specific DNS nameservers recommended for Ubuntu 22.04?
There are no specific recommendations, but you can consider using reputable public DNS nameservers like Google DNS (8.8.8.8, 8.8.4.4) or Cloudflare DNS (1.1.1.1, 1.0.0.1).
Conclusion
We hope this detailed tutorial helped you understand how to set DNS Nameservers on Ubuntu 22.04.
If you have any suggestions or queries, kindly leave them in the comments section.
