

Choose a different version or distribution
Introduction
Before we begin talking about how to Set Up a Firewall with UFW on Ubuntu 22.04, let's first understand – What is Firewall with UFW?
UFW, or Uncomplicated Firewall, is a user-friendly tool for managing firewall rules on Linux. It safeguards your computer or network from unauthorized access and potential threats.
With UFW, you can easily allow or block incoming and outgoing network traffic, making it a powerful and simple security solution. Protect your system with UFW's intuitive interface and robust functionality.
This tutorial explains how to manage and configure a firewall on Ubuntu 22.04 using the UFW tool. A properly configured firewall is one of the most crucial components of overall system security. We will also address a few FAQs on setting up a Firewall with UFW on Ubuntu 22.04.
Advantages of Firewall with UFW
- Easy to Use: UFW provides a simple and intuitive interface, making it effortless to manage firewall rules.
- Security: UFW protects your system from unauthorized access and potential threats, ensuring your data and network remain safe.
- Flexibility: UFW allows you to easily configure rules for incoming and outgoing traffic, providing granular control over network access.
- Integration: UFW seamlessly integrates with other Linux security tools, enhancing the overall protection of your system.
- Community Support: UFW has a large and active user community, providing ample resources and assistance for troubleshooting and customization.
Prerequisites to Set Up a Firewall with UFW on Ubuntu 22.04
The system firewall can only be managed by root or users with sudo privileges. The ideal approach is to conduct administrative tasks as a sudo user.
Install UFW
UFW is a component of the standard Ubuntu 22.04 installation and has to be installed on your machine. If for some reason it is not already installed, you can do so by typing:
sudo apt update
sudo apt install ufw
Check UFW Status
By default, UFW is disabled. The following command can be used to determine the UFW service's current status:
sudo ufw status verbose
The following output indicates that the firewall is inactive:
Output

Status: inactive
When UFW is enabled, the output will resemble the following:
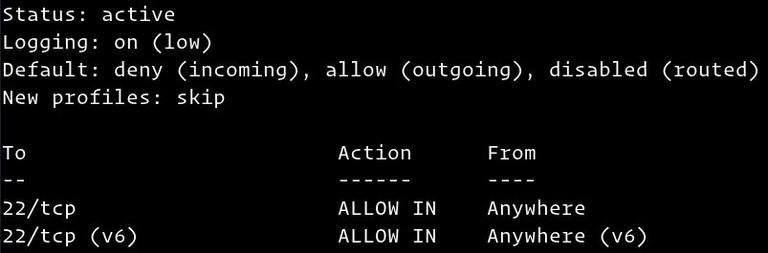
UFW Default Policies
The UFW Firewall's default setting is to allow all outbound traffic while blocking all incoming and forwarding traffic. This implies that unless you open the port directly, no one will be able to connect to your server. The applications and services that are running on your server will have access to the outside world.
The /etc/default/ufw document includes the default policies, which can be modified manually or using the sudo ufw default policy> chain> command.
Firewall policies serve as the framework for more intricate and user-defined rules. The initial UFW Default Policies are usually a good place to start.
Application Profiles
An application profile is a text file in INI format that specifies the service and includes firewall rules for the service. During package installation, application profiles are created in the /etc/ufw/applications.d directory.
By running the following command, you can find a list of every application profile on your server:
sudo ufw app list
The output will look like the following, depending on the packages that are installed on your system:
Output

Available applications:
  Nginx Full
  Nginx HTTP
  Nginx HTTPS
  OpenSSH
Use the following command to learn more about a specific profile and its rules:
sudo ufw app info 'Nginx Full'
It can be seen from the output that the “Nginx Full” profile opens ports 80 and 443.
Output

Profile: Nginx Full
Title: Web Server (Nginx, HTTP + HTTPS)
Description: Small, but very powerful and efficient web server

Ports:
  80,443/tcp
Not only that, but you can also design personalized profiles for your applications.
Enabling UFW
You must specifically permit incoming SSH connections if you are accessing your Ubuntu from a remote location before activating the UFW firewall. If not, you will not be able to connect to the system anymore.
Type the following command to set up your UFW firewall to accept incoming SSH connections:
sudo ufw allow ssh
Output

Rules updated
Rules updated (v6)
You must open that port if SSH is using a non-standard port.
For instance, enter the following command to permit connections on port 7722, assuming your ssh daemon listens on that port:
sudo ufw allow 7722/tcp
You can enable incoming SSH connections now that the firewall is set to allow them by typing:
sudo ufw enable
Output

Command may disrupt existing ssh connections. Proceed with operation (y|n)? y
Firewall is active and enabled on system startup
When prompted that enabling the firewall can disrupt existing ssh connections, simply type y and press Enter.
Opening Ports
You might also need to open additional ports, depending on the applications that are running on the system. The following is the standard syntax for opening a port:
ufw allow port_number/protocol
Some methods for enabling HTTP connections are listed below.
The first method is to use the service name. UFW verifies the /etc/services file for the port and protocol of the given service:
sudo ufw allow http
Additionally, you can define the protocol and port number:
sudo ufw allow 80/tcp
The UFW sets rules for both tcp and udp when no protocol is specified.
Another alternative is to use the application profile; in this case, 'Nginx HTTP':
sudo ufw allow 'Nginx HTTP'
Port Ranges
You may open port ranges with UFW as well. You must specify the protocol, either tcp or udp, and the start and finish ports are separated by a colon (:).
Furthermore, you should use the following command, for instance, to allow ports 7100 to 7200 on both tcp and udp:
sudo ufw allow 7100:7200/tcp
sudo ufw allow 7100:7200/udp
Specific IP Address and port
Use the from keyword followed by the source IP address to enable connections on all ports from that source IP.
Here is an example of how to whitelist an IP address:
sudo ufw allow from 64.63.62.61
Use the to any port keyword followed by the specified port number if you want to restrict access to a single port for the specified IP address.
For instance, use the following command to permit access on port 22 from a system with the IP address 64.63.62.61:
sudo ufw allow from 64.63.62.61 to any port 22
Subnets
When using a subnet of IP addresses, the syntax is the same as when using a single IP address. The only distinction is that the netmask must be specified.
An example of how to grant access to port 3360 (MySQL) for IP addresses spanning from 192.168.1.1 to 192.168.1.254 is provided below:
Specific Network Interface
Use the in on keyword followed by the name of the network interface to accept connections on that specific network interface:
sudo ufw allow in on eth2 to any port 3306
Denying connections
The default policy for all incoming connections is set to deny, and if you have not revised it, UFW will block all incoming connections unless you explicitly open the connection.
Writing deny rules is identical to writing allow rules; the only difference is that you use the deny keyword instead of allow.
Assume you opened ports 80 and 443, and your server is under attack from the 23.24.25.0/24 network. You would use the following command to block all connections from 23.24.25.0/24:
sudo ufw deny from 23.24.25.0/24
You can use the following command to prohibit access exclusively to ports 80 and 443 from 23.24.25.0/24:
sudo ufw deny proto tcp from 23.24.25.0/24 to any port 80,443
Deleting UFW Rules
UFW rules can be deleted in two different ways, by stating the actual rule and by using the rule number.
Deleting rules by rule number is simpler, especially if you are new to UFW. You must first locate the number of the rule you wish to delete in order to delete it by rule number. Use the ufw status numbered command to acquire a list of numbered rules:
sudo ufw status numbered
Output

Status: active

     To                         Action      From
     --                         ------      ----
[ 1] 22/tcp                     ALLOW IN    Anywhere
[ 2] 80/tcp                     ALLOW IN    Anywhere
[ 3] 8080/tcp                   ALLOW IN    Anywhere
You would do the following to remove rule number 3, which permits connections over port 8080:
sudo ufw delete 3
The actual rule can be specified in order to delete a rule using the second method. For instance, you could use the following syntax to remove a rule that was applied to open port 8069:
sudo ufw delete allow 8069
Disabling UFW
If you want to halt UFW and deactivate all the rules for any reason, use the following syntax:
sudo ufw disable
If you want to re-enable UTF and activate all rules later, simply type:
sudo ufw enable
Resetting UFW
Resetting UFW will disable UFW and remove all currently active regulations. If you want to start over and undo all of your changes, this is useful.
Enter the following command to reset UFW:
sudo ufw reset
IP Masquerading
IP Masquerading is a type of NAT (network address translation) in the Linux kernel that translates network traffic by rewriting the source and destination IP addresses and ports. You can use IP Masquerading to allow one or more machines in a private network to communicate with the Internet through a single Linux machine acting as a gateway.
There are various steps involved in configuring IP Masquerading with UFW.
You must first turn on IP forwarding. Open the /etc/ufw/sysctl.conf file to accomplish that:
sudo nano /etc/ufw/sysctl.conf
Locate and remove the comment from the line that reads net.ipv4.ip_forward = 1:
net/ipv4/ip_forward=1
The next step is to set up UFW to accept forwarded packets. To begin, open the UFW configuration file:
sudo nano /etc/default/ufw
The value of the DEFAULT_FORWARD_POLICY key should be changed from DROP to ACCEPT:
DEFAULT_FORWARD_POLICY="ACCEPT"
In the nat table and the masquerade rule, you must now set the default policy for the POSTROUTING chain. To achieve this, edit the /etc/ufw/before.rules file and add the following lines, which are highlighted in yellow:
sudo nano /etc/ufw/before.rules
Add these lines at the end:
#NAT table rules
*nat
:POSTROUTING ACCEPT [0:0]

# Forward traffic through eth0 - Change to public network interface
-A POSTROUTING -s 10.8.0.0/16 -o eth0 -j MASQUERADE

# don't delete the 'COMMIT' line or these rules won't be processed
COMMIT
Do not forget to change eth0 to the name of the public network interface in the -A POSTROUTING line:
Save your work and then exit the file.
In order to reload the UFW rules, disable and enable UFW as follows:
sudo ufw disable
sudo ufw enable
FAQs to Set Up a Firewall with UFW on Ubuntu 22.04
How do I enable UFW?
To enable UFW, run the command: sudo ufw enable. This will activate the firewall and start protecting your system.
How do I allow incoming traffic?
You can allow incoming traffic by specifying the port number or service name. For example, sudo ufw allow 22 allows SSH connections.
How do I block incoming traffic?
To block incoming traffic, use the command: sudo ufw deny <port or service>. For instance, sudo ufw deny 80 blocks incoming HTTP traffic.
How do I check the status of UFW?
To check the status of UFW, use the command: sudo ufw status. It will show the current firewall rules and whether UFW is enabled or disabled.
How do I disable UFW?
If needed, you can disable UFW by running the command: sudo ufw disable. This turns off the firewall protection.
How do I reset UFW to its default settings?
To reset UFW to its default settings, use the command: sudo ufw reset. This clears all rules and returns UFW to its initial state.
Conclusion
In this tutorial, you installed and configured a UFW firewall on your Ubuntu 22.04 server. It is important to only accept incoming connections that are required for your system to operate properly, and to reject any connections that are extraneous.
Visit the UFW man page for further details on this subject.
If you have any queries, please leave a comment below and we’ll be happy to respond to them.