

Introduction
Before we begin talking about how to set up V2Ray Proxy on Ubuntu 22.04, let's briefly understand – What is V2Ray Proxy?
V2Ray Proxy is a powerful tool designed to enhance online privacy and security. It acts as a middleman between your device and the internet, allowing you to mask your IP address and encrypt data traffic, shielding you from cyber threats. V2Ray Proxy offers advanced features like traffic routing and obfuscation, making it a reliable option for bypassing censorship and accessing geo-blocked content.
With its user-friendly interface and robust encryption protocols, V2Ray Proxy has become a popular choice for tech-savvy individuals seeking a safer online experience. Whether you're a frequent traveler or simply value your privacy, V2Ray Proxy can help you navigate the digital world securely and anonymously.
In this tutorial, you will set up V2Ray Proxy on Ubuntu 22.04. We will also address a few FAQs on how to set up V2Ray Proxy on Ubuntu 22.04.
Advantages of V2Ray Proxy
- Enhanced Privacy: V2Ray Proxy encrypts your internet traffic, ensuring your online activities remain private and protected from prying eyes.
- Bypass Censorship: V2Ray Proxy enables users to bypass government restrictions and access blocked websites and content, promoting free and unrestricted internet access.
- Improved Security: It adds an extra layer of security by masking your IP address, reducing the risk of cyberattacks and safeguarding personal data from potential threats.
- Optimized Performance: V2Ray Proxy offers advanced traffic routing capabilities, ensuring faster connection speeds and smoother browsing experiences.
- User-Friendly Interface: With its intuitive design and customizable settings, V2Ray Proxy is easy to set up and use, making it accessible to both beginners and advanced users looking for a reliable privacy.
Requirements
You will need a VPS (Virtual Private Server) that can freely access blocked websites (beyond your country's borders or through an Internet filtering system) in order to follow this tutorial. Here, Kamatera VPS is used because of its features.
- 30-day complimentary trial period.
- Costs $4 per month to start (1GB RAM).
- Globally, there are high-performance KVM-based VPS
- 9 data centers located in the US, Canada, UK, Germany, The Netherlands, Hong Kong, and Israel.
Once your VPS is up and running Ubuntu 22.04, proceed as directed below.
Step 1: Install V2Ray on Ubuntu 22.04 Server
Access your remote Ubuntu server via SSH. It is advised to manually install V2Ray if using Ubuntu 22.04, as the repository's v2ray package has an issue that arises when you try to start it. Execute the subsequent command to install packages that depend on it.
sudo apt install curl unzip
Get the official V2Ray installation script here. (Although it is generally advised against using third-party scripts to install software, the user employs this one since it originates from the official V2Ray developers.)
curl -O https://raw.githubusercontent.com/v2fly/fhs-install-v2ray/master/install-release.sh
Execute the installation script.
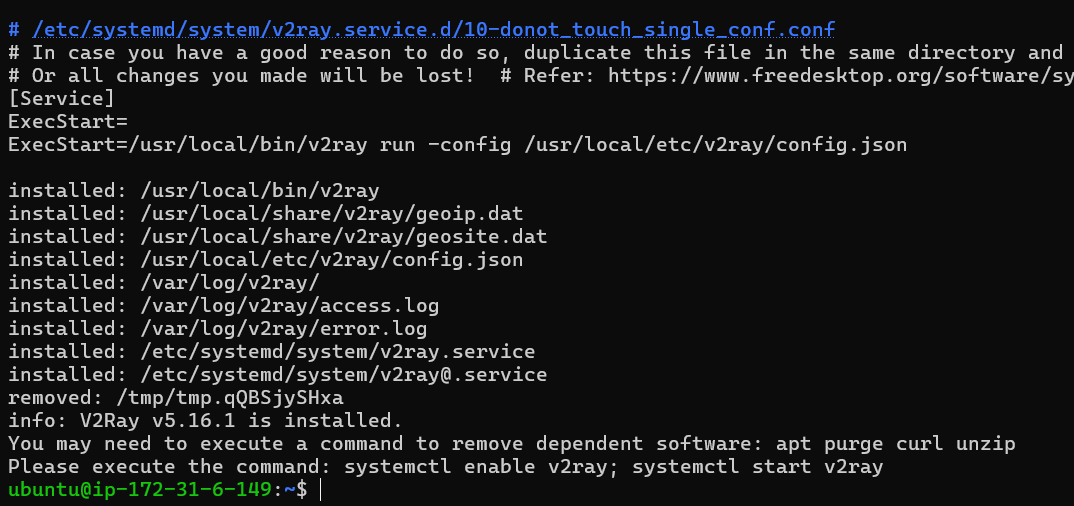
sudo bash install-release.sh
Sample output:
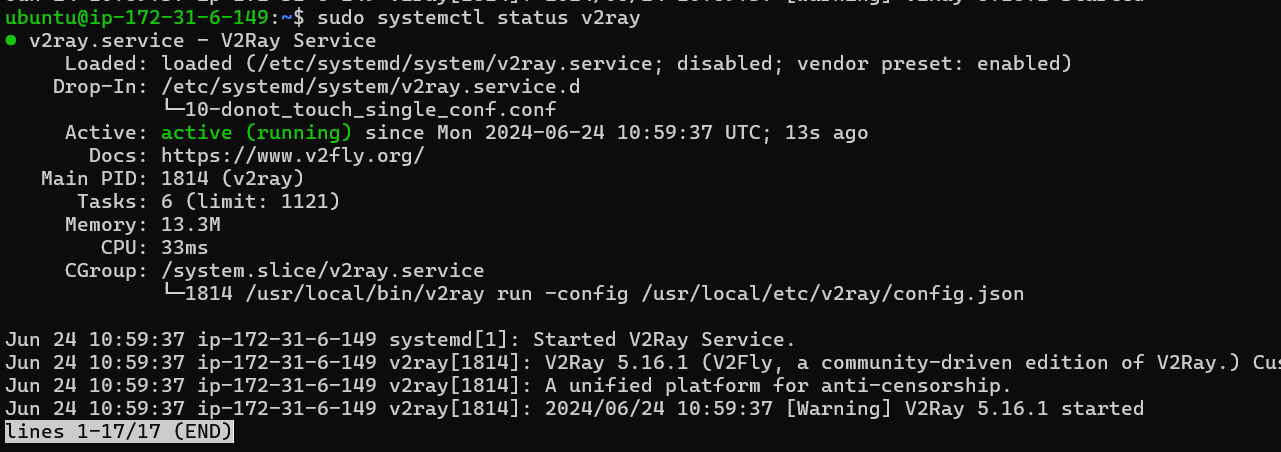
Check status:
sudo systemctl status v2ray
If it’s not running, then restart it.
sudo systemctl restart v2ray
When the system boots up, enable auto-start.
sudo systemctl enable v2ray
Step 2: Set Up NTP Time Sync
Your server's time must be precise in order for V2Ray to function. This is to give users the best possible security. Verify the server's time.
timedatectl
Sample output:
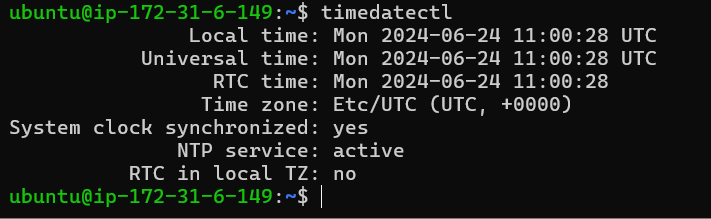
The server's system clock is synchronized, as can be observed. If this is not the situation on their server, they should set up NTP time synchronization by following the instructions provided in the link.
Step 3: Configure V2Ray on the Server
Use a command-line text editor, like Nano, to edit the V2Ray configuration file.
sudo nano /usr/local/etc/v2ray/config.json
After deleting everything from this file, add the lines that follow. Change the ID to a random string in UUID format. An online UUID generator is available for use.
{
  "log": {
    "loglevel": "warning",
    "access": "/var/log/v2ray/access.log",
    "error": "/var/log/v2ray/error.log"
  },
  "inbounds": [
    {
      "port": 10000,
      "listen":"127.0.0.1",
      "protocol": "vmess",
      "settings": {
        "clients": [
          {
            "id": "b831381d-6324-4d53-ad4f-8cda48b30811",
            "alterId": 64
          }
        ]
      },
      "streamSettings": {
        "network": "ws",
        "wsSettings": {
        "path": "/ray"
        }
      }
    }
  ],
  "outbounds": [
    {
      "protocol": "freedom",
      "settings": {}
    }
  ]
}
Save and close the file. On port 10000, the V2Ray server will be listening. To make the changes take effect, restart V2Ray after that.
sudo systemctl restart v2ray
Check the ports that are listening.
sudo ss -lnpt | grep v2ray
Sample Output:
Output

LISTEN 0      4096                 127.0.0.1:10000            *:*    users:(("v2ray",pid=701205,fd=3))
Step 4: Configure Reverse Proxy
Install Nginx web server.
sudo apt install nginx
Create a virtual host file for V2Ray.
sudo nano /etc/nginx/conf.d/v2ray.conf
In this file, add the following lines. Change example.com to the name of your own domain. A sub-domain is an additional option.
server {
  listen 80;
  server_name example.com;

  index index.html;
  root /usr/share/nginx/html/;

  access_log /var/log/nginx/v2ray.access;
  error_log /var/log/nginx/v2ray.error;

    location /ray { # Consistent with the path of V2Ray configuration
      if ($http_upgrade != "websocket") { # Return 404 error when WebSocket upgrading negotiate failed
          return 404;
      }
      proxy_redirect off;
      proxy_pass http://127.0.0.1:10000; # Assume WebSocket is listening at localhost on port of 10000
      proxy_http_version 1.1;
      proxy_set_header Upgrade $http_upgrade;
      proxy_set_header Connection "upgrade";
      proxy_set_header Host $host;
      # Show real IP in v2ray access.log
      proxy_set_header X-Real-IP $remote_addr;
      proxy_set_header X-Forwarded-For $proxy_add_x_forwarded_for;
    }
}
Save and close the file. Then test Nginx configuration.
sudo nginx -t
If the test is successful, reload Nginx.
sudo systemctl reload nginx
Step 5: Enable HTTPS
To ensure that your national firewall is unaware that you are using a proxy, we enable HTTPS.
Download and install the most recent Let's Encrypt client certbot version from the Snap store.
sudo apt install snapd sudo snap install certbot --classic
After that, execute the subsequent command to get a free Let's Encrypt certificate.
sudo /snap/bin/certbot --webroot -i nginx --agree-tos --hsts --staple-ocsp -d example.com -e [email protected] -w /usr/share/nginx/html/
Your Nginx web server will automatically install it after it has been obtained.
Step 6: Configure Firewall
If your server is protected by an iptables firewall, you must execute the following command to permit traffic to TCP port 443.
sudo iptables -I INPUT -p tcp --dport 443 -j ACCEPT
Execute the following commands if you are using a UFW firewall:
sudo ufw allow 443/tcp
Step 7: Install and Configure V2Ray on Client Computer
Linux Desktop
Please install V2Ray on a Linux desktop by following the same steps as in step 1. Edit the configuration file when it's finished.
sudo nano /usr/local/etc/v2ray/config.json
Delete everything in this file, then add the following lines.
{
  "inbounds": [
    {
      "port": 1090,
      "listen": "127.0.0.1",
      "protocol": "socks",
      "sniffing": {
        "enabled": true,
        "destOverride": ["http", "tls"]
      },
      "settings": {
        "auth": "noauth",
        "udp": false
      }
    }
  ],
  "outbounds": [
    {
      "protocol": "vmess",
      "settings": {
        "vnext": [
          {
            "address": "example.com",
            "port": 443,
            "users": [
              {
                "id": "b831381d-6324-4d53-ad4f-8cda48b30811",
                "alterId": 0
              }
            ]
          }
        ]
      },
      "streamSettings": {
        "network": "ws",
        "security": "tls",
        "wsSettings": {
          "path": "/ray"
        }
      }
    }
  ]
}
The V2Ray server's and the client's id parameters have to match. Pre-shared passwords are analogous to this. To enable the AEAD encryption algorithm, the V2Ray client needs to set the alterId to 0.
Save and Close the file. To make the changes take effect, restart V2Ray after that.
sudo systemctl restart v2ray
Check listening ports.
sudo ss -lnpt | grep v2ray
Sample output:
Output

LISTEN 0      4096       127.0.0.1:1090       0.0.0.0:*    users:(("v2ray",pid=495211,fd=3))
The V2Ray server is listening on port 10086, and requests are redirected to it by the V2Ray client, which listens on port 1090 (for web browsers).
Windows
The V2Ray client can be downloaded for Windows users from its Github release page. The V2Ray Windows ZIP file can be found by clicking the Show all assets link.
Open the file and unzip it. There is a file called config.json. To open this file, use NotePad or your preferred text editor. After deleting everything from this file, add the lines that follow..
{
  "inbounds": [
    {
      "port": 1090,
      "listen": "127.0.0.1",
      "protocol": "socks",
      "sniffing": {
        "enabled": true,
        "destOverride": ["http", "tls"]
      },
      "settings": {
        "auth": "noauth",
        "udp": false
      }
    }
  ],
  "outbounds": [
    {
      "protocol": "vmess",
      "settings": {
        "vnext": [
          {
            "address": "example.com",
            "port": 443,
            "users": [
              {
                "id": "b831381d-6324-4d53-ad4f-8cda48b30811",
                "alterId": 0
              }
            ]
          }
        ]
      },
      "streamSettings": {
        "network": "ws",
        "security": "tls",
        "wsSettings": {
          "path": "/ray"
        }
      }
    }
  ]
}
Enter the IP address of your server in place of server_ip_address. Both the V2Ray client's and server's id parameters must match. It functions similarly to a password that has been shared in advance.
Shut down and save the file. Then, assuming the v2ray-windows-64 folder has been extracted in your Desktop folder, launch Window Powershell and execute the following command to launch v2ray.
. \\Desktop\v2ray-windows-64\v2ray run
Step 8: Configure Web Browser to Use V2Ray Proxy
Your program needs to support SOCKS proxy in order to use V2Ray proxy. Users can use proxies with programs like Dropbox, Google Chrome, and Firefox.
Firefox
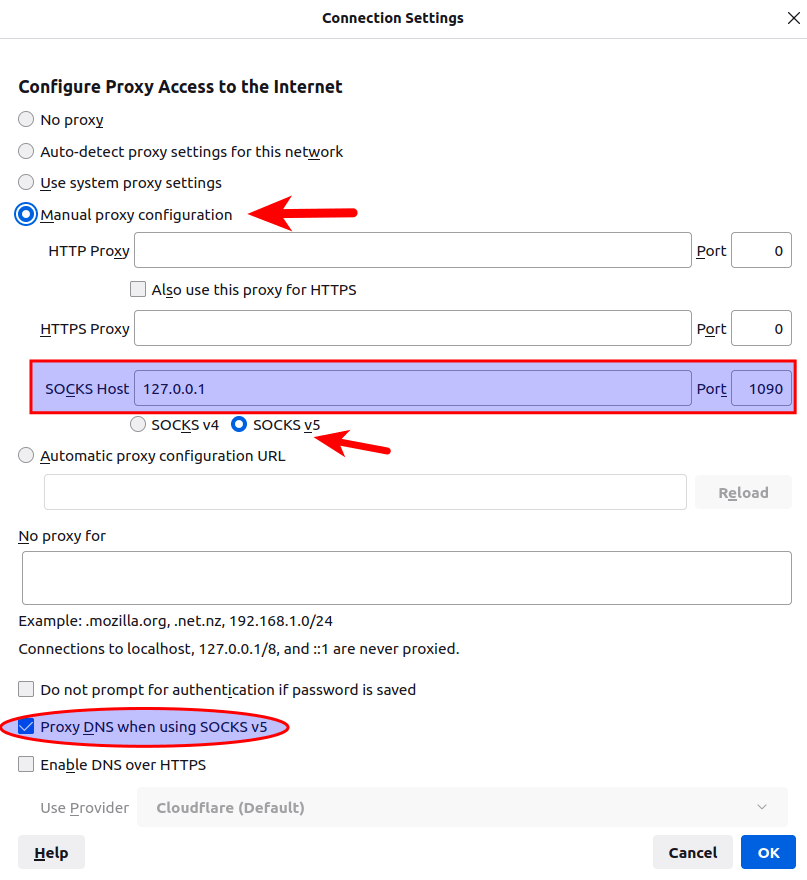
In Firefox, select Edit > Preferences > General (or Tools -> Options -> General). Next, select Network Setting by scrolling to the bottom and clicking Settings.
Click the Manual Proxy Configuration option in the Connection Settings window. Since V2Ray is a Socks5 proxy, choose SOCKS v5. Put 1090 in the port field and 127.0.0.1 in the SOCKS Host field. When using SOCKS v5, make sure Proxy DNS is activated. To apply these changes, click OK.
Google Chrome
It is recommended to install the Proxy SwitchyOmega extension to manage proxies for Google Chrome
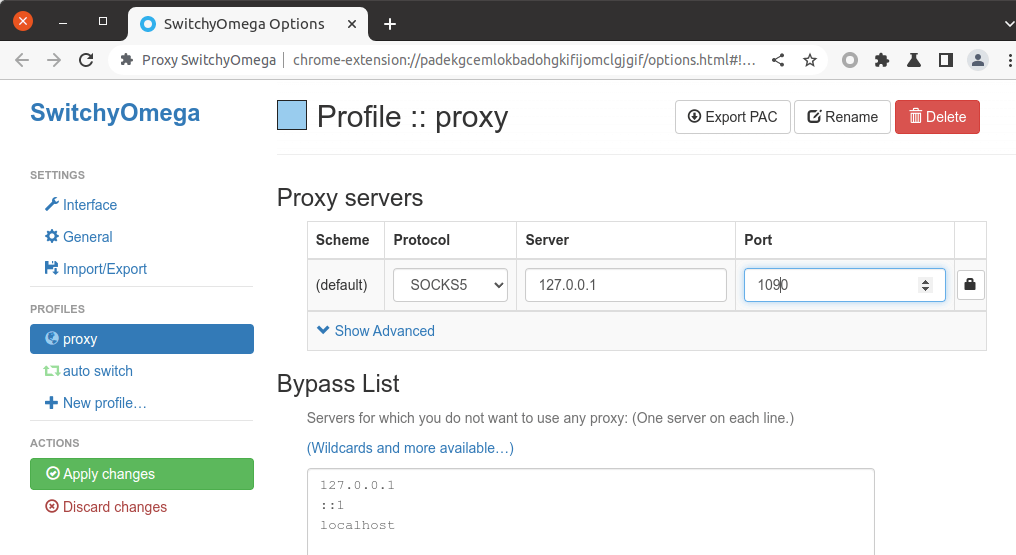
After installing the extension in Google Chrome, set up a proxy server using the following settings:
- Choose the
SOCKS5protocol. - Set
127.0.0.1as the server address. - Set
1090as the port number.
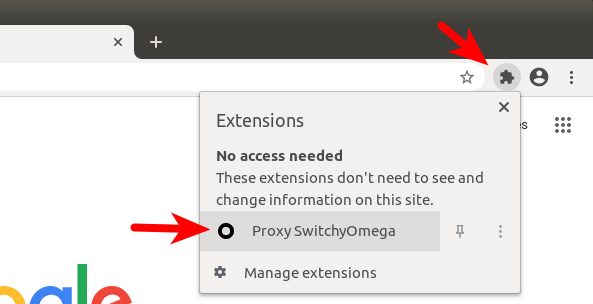
Implement the modifications. Next, select Proxy SwithyOmega by clicking on the extensions icon in the top-right corner.
SwithyOmega uses the operating system's proxy settings by default. It must be switched from the system proxy to a proxy.
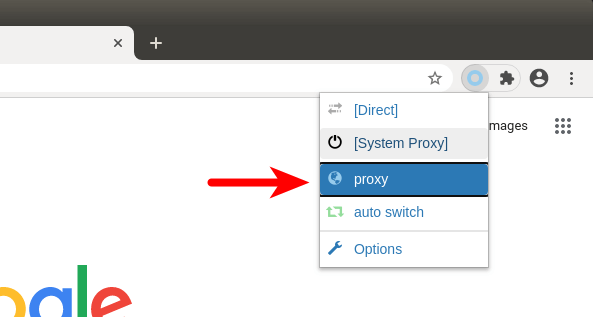
Your proxy should now be operational.
Step 9: DNS Leak Test
Visit dnsleaktestest.com. The IP address of your V2Ray server will be displayed to you, proving that your V2Ray proxy is operational.
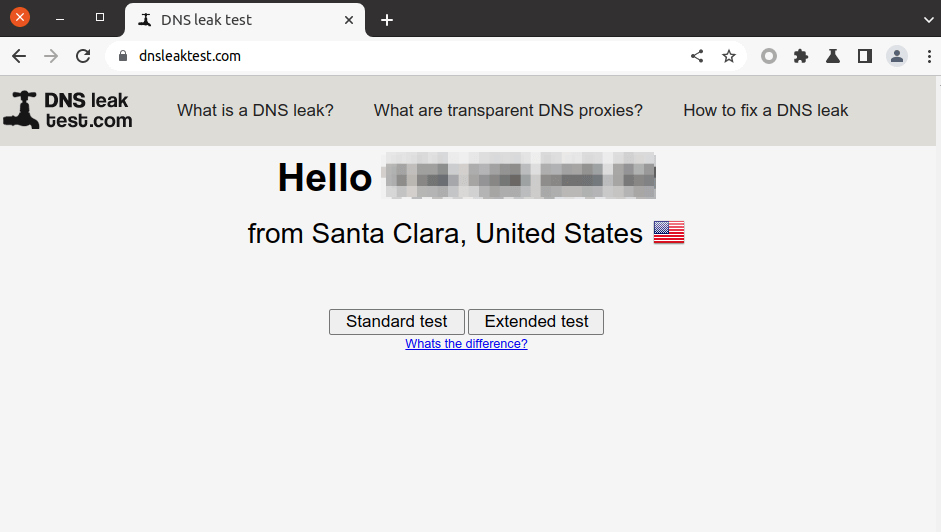
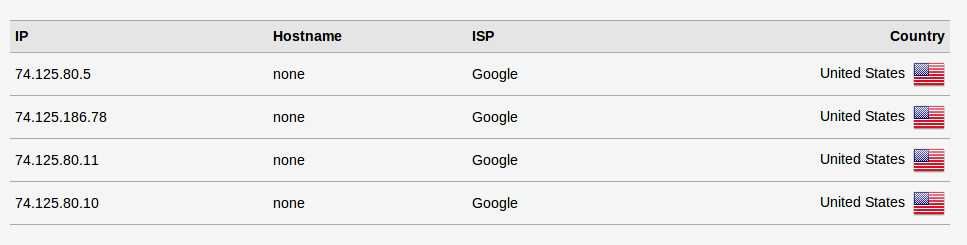
Select the Standard test by clicking on it. Verify that the test results do not include your local ISP.
Step 10: Enable TCP BBR
The TCP congestion control algorithm known as TCP BBR can significantly increase connection speed. The TCP BBR algorithm can be enabled by running the next two commands.
echo "net.core.default_qdisc=fq" | sudo tee -a /etc/sysctl.d/60-custom.conf
echo "net.ipv4.tcp_congestion_control=bbr" | sudo tee -a /etc/sysctl.d/60-custom.conf
Next, use the command below to apply the changes. Sysctl settings can be loaded from the /etc/sysctl.d/60-custom.conf file by using the -p option. Our changes will be retained by this command even after system reboots.
sudo sysctl -p /etc/sysctl.d/60-custom.conf
Troubleshooting
If V2Ray isn't working, please look through the error.log and access.log logs located at /var/log/v2ray/.
A misaligned client time is probably the reason for the following error. Set up time synchronization, please.
rejected proxy/vmess/encoding: failed to read request header > websocket: close 1000 (normal)
To enable AEAD, please set alterId to 0 in the V2Ray client configuration file if you encounter the following error.
invalid user: VMessAEAD is enforced and a non VMessAEAD connection is received.
iOS Client
For iOS users, OneClick is a free V2Ray client.
Use these parameters when you launch OneClick after installing it, choose Add Configuration > VMESS, and then click OK.
- Remarks: Enter whatever you want in this text field.
- Address/IP: Enter your domain as is in the Nginx configuration file. (example.com)
- Port: 443
- ID/UUID: Enter the UUID as is in the V2Ray server config file.
- Alert ID: 0
- Toggle on Enable TLS.
- Select ws as the stream setting
- Host: Enter your domain as is in the Nginx configuration file. (example.com)
- Path:
/ray - Leave other fields empty.
Note: VMESS-AEAD doesn't appear to be supported by OneClick. On the V2Ray server, you must disable it.
sudo systemctl edit v2ray.service
Enter the following lines.
[Service] Environment=V2RAY_VMESS_AEAD_FORCED=false
Save and close the file. Then restart V2Ray.
sudo systemctl restart v2ray
Global Mode on Linux Desktop
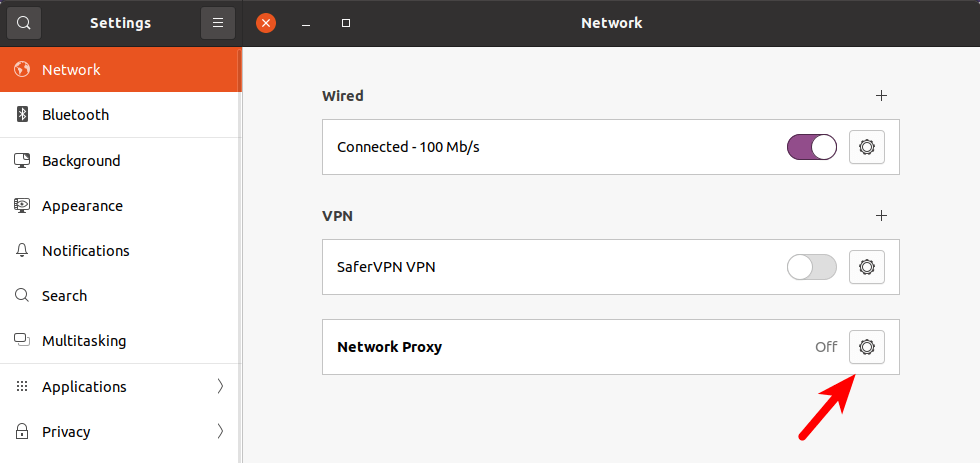
Actually, you can use the V2Ray proxy for all of your Internet traffic (not just web browser traffic) if you use Desktop Linux. Navigate to System Preferences > Network > Network Proxy.
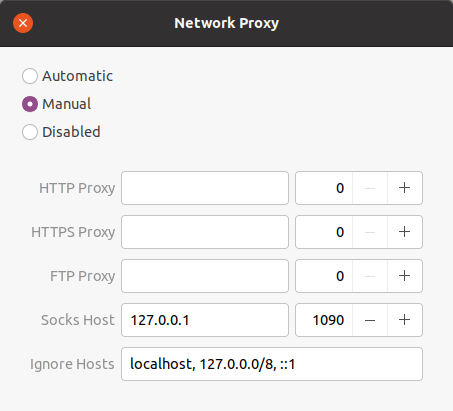
Next, choose Sock Host (127.0.0.1: 1090) under Manual. It will recognize the SOCK protocol (SOCKS4 or SOCK5) automatically.
How to Upgrade V2Ray
Run the install script again.
sudo bash install-release.sh
FAQs to Set Up V2Ray Proxy on Ubuntu 22.04
Can V2Ray Proxy help me bypass internet censorship on Ubuntu 22.04?
Yes, V2Ray Proxy can help you bypass censorship, granting access to restricted content.
Is my privacy ensured when using V2Ray Proxy on Ubuntu 22.04?
V2Ray Proxy encrypts your traffic, adding an extra layer of protection to safeguard your online activities.
Will setting up V2Ray Proxy slow down my internet connection on Ubuntu 22.04?
V2Ray Proxy is optimized for performance, ensuring minimal impact on your connection speed.
Does V2Ray Proxy support multiple protocols on Ubuntu 22.04?
Yes, V2Ray Proxy supports a variety of protocols, allowing flexibility in connection configurations.
Can I integrate V2Ray Proxy with other tools on Ubuntu 22.04 for added security?
V2Ray Proxy can be integrated with other security tools to enhance your overall privacy and protection.
Is V2Ray Proxy open-source and free to use on Ubuntu 22.04?
Yes, V2Ray Proxy is open-source software, providing free access to its features for users.
Is V2Ray Proxy compatible with all web browsers on Ubuntu 22.04?
V2Ray Proxy can work with most web browsers, providing protection and privacy across different platforms.
Conclusion
We hope this tutorial helped you understand how to set up V2Ray Proxy on Ubuntu 22.04.
If you have any queries, please leave a comment below, and we’ll be happy to respond to them for sure.