Choose a different version or distribution
Introduction
Before we begin talking about how to install InvoiceNinja on Ubuntu 18.04, let’s briefly understand - What is InvoiceNinja?
InvoiceNinja is an open-source platform, usually used for billing, creating invoices and managing payments. It is specifically created to simplify financial interactions between freelancers and small to medium scale enterprises.
In this tutorial, you will install InvoiceNinja on Ubuntu 18.04. We will also address some FAQs related to the InvoiceNinja installation.
Prerequisites
- A Linux server with at least 512 MB RAM is required to install InvoiceNinja
- Ubuntu 18.04 on your server
- Set up a LAMP stack or LEMP stack before installation
- A domain name so your clients can view your invoices under your domain name
Step 1 - Download and Install InvoiceNinja
1) First of all, login to your Ubuntu 18.04 server through SSH. After that, run the following command to download the updated compressed version of InvoiceNinja.
wget -O invoice-ninja.zip https://download.invoiceninja.com/
2) Then use unzip to extract the archive.
sudo apt install unzip

sudo unzip invoice-ninja.zip -d /var/www/
3) The target directory is indicated by -d option. InvoiceNinja web files will be extracted to /var/www/ninja. For better identification of your directory, rename it to invoice-ninja using the following:
sudo mv /var/www/ninja /var/www/invoice-ninja
4) To enable webserver to write on the directory, change the owner of the directory to www-data using the following command:
sudo chown www-data:www-data /var/www/invoice-ninja/ -R
5) Then, you must change the permission of the storage directory.
sudo chmod 755 /var/www/invoice-ninja/storage/ -R
Step 2 - Create a Database and User in MariaDB
After completing the first step, login into your MariaDB database server using the following command:
sudo mysql
2) After that, create the InvoiceNinja database. In this tutorial, the database name invoiceninja has been used. You may use whichever name you prefer.
create database invoiceninja;
3) The next step is to create the database user. Use any name for the same. Replace "your-password" with any password which you prefer.
create user ninja@localhost identified by 'your-password';
4) Grant the above-created database user the privileges on your database using this:
grant all privileges on invoiceninja.* to ninja@localhost;
5) Lastly, flush privileges and then exit.
flush privileges;

exit;
Step 3 - Setting Up Web Server
1) Apache or Nginx web server can be used for this purpose.
Apache
1) If you use Apache, then, to create a virtual host file for InvoiceNinja, use the following:
sudo nano /etc/apache2/sites-available/invoice-ninja.conf
2) Type the following into the file. A domain name is required to be set beforehand.
<VirtualHost *:80>
    ServerName invoice.yourdomain.com
    DocumentRoot /var/www/invoice-ninja/public

    <Directory /var/www/invoice-ninja/public>
       DirectoryIndex index.php
       Options +FollowSymLinks
       AllowOverride All
       Require all granted
    </Directory>

    ErrorLog ${APACHE_LOG_DIR}/invoice-ninja.error.log
    CustomLog ${APACHE_LOG_DIR}/invoice-ninja.access.log combined

</VirtualHost>
3) After saving and closing the file, enable virtual host.
sudo a2ensite invoice-ninja.conf
4) Then enable the rewrite module using the following command:
sudo a2enmod rewrite
5) You must restart Apache to effect the changes.
sudo systemctl restart apache2
6) After restarting, visit the link invoice.yourdomain.com that will redirect you to the Invoice Ninja setup wizard page. In case, the default Apache page appears instead of the setup wizard page, then immediately disable the default virtual host using the following:
sudo a2dissite 000-default.conf
7) Restart Apache once again.
sudo systemctl restart apache2
8) Before putting any information on the setup wizard, enable HTTPS.
Nginx
1) If you use Nginx, then first and foremost, create an invoice-ninja.conf file in /etc/nginx/conf.d/ directory.
sudo nano /etc/nginx/conf.d/invoice-ninja.conf
2) Enter the below-given text into the file. Don't forget to replace invoice.yourdomain.com with your own domain name.
server {
    listen      80;
    server_name invoice.yourdomain.com;

    root /var/www/invoice-ninja/public/;
    index index.php index.html index.htm;
    charset utf-8;

    location / {
        try_files $uri $uri/ /index.php?$query_string;
    }

    location = /favicon.ico { access_log off; log_not_found off; }
    location = /robots.txt  { access_log off; log_not_found off; }

    access_log  /var/log/nginx/invoiceninja.access.log;
    error_log   /var/log/nginx/invoiceninja.error.log;

    location ~ \.php$ {
        fastcgi_split_path_info ^(.+\.php)(/.+)$;
        fastcgi_pass unix:/run/php/php7.2-fpm.sock;
        fastcgi_index index.php;
        include fastcgi_params;
        fastcgi_param SCRIPT_FILENAME $document_root$fastcgi_script_name;
        fastcgi_intercept_errors off;
        fastcgi_buffer_size 16k;
        fastcgi_buffers 4 16k;
    }

    location ~ /\.ht {
        deny all;
    }
}
3) Then, you must save and close it. Test Nginx configuration using the following command:
sudo nginx -t
4) If successful, reload Nginx to apply the changes.
sudo systemctl reload nginx
5) After reloading, go to invoice.yourdomain.com and you would be redirected to the InvoiceNinja setup wizard page invoice.yourdomain.com/setup. Again, before putting any information on the setup wizard, enable HTTPS.
Step 4 - Enabling HTTPS
1) To encrypt the HTTP traffic, you could enable HTTPS by installing a TLS certificate issued by Let’s Encrypt without incurring any charges. Use this command to install Let’s Encrypt client on Ubuntu 18.04 server.
sudo apt install certbot
2) In case you use Nginx, there is an additional step where you need to install the Certbot Nginx plugin using:
sudo apt install python3-certbot-nginx
3) Then, run this to successfully procure and install TLS certificate.
sudo certbot --nginx --agree-tos --redirect --hsts --staple-ocsp --email [email protected] -d invoice.yourdomain.com
4) If you use Apache, use this to install the Certbot plugin.
sudo apt install python3-certbot-apache
5) The next step is to run this to successfully procure and install TLS certificate.
sudo certbot --apache --agree-tos --redirect --hsts --staple-ocsp --email [email protected] -d invoice.yourdomain.com
Where
--nginx: Use the Nginx plugin.--apache: Use the Apache plugin.--agree-tos: Agree to terms of service.--redirect: Force HTTPS by 301 redirect.--hsts: To every HTTP response, add the Strict-Transport-Security header. This will force the browser to use TLS for the domain. It protects against SSL/TLS Stripping.--staple-ocsp: Allows OCSP Stapling. A valid OCSP response is stapled to the certificate that the server offers while TLS.
Step 5 - Install PHP Modules
1) Now, to install PHP modules required or recommended by InvoiceNinja, run the following command.
sudo apt install php-imagick php7.4-common php7.4-gd php7.4-json php7.4-curl php7.4-zip php7.4-xml php7.4-mbstring php7.4-bz2 php7.4-intl php7.4-gmp libapache2-mod-php7.4
2) Restart Apache. (If you use Nginx, you don't have to restart it)
sudo systemctl restart apache2
3) The following error will appear if the modules are not installed properly.
Whoops, looks like something went wrong.
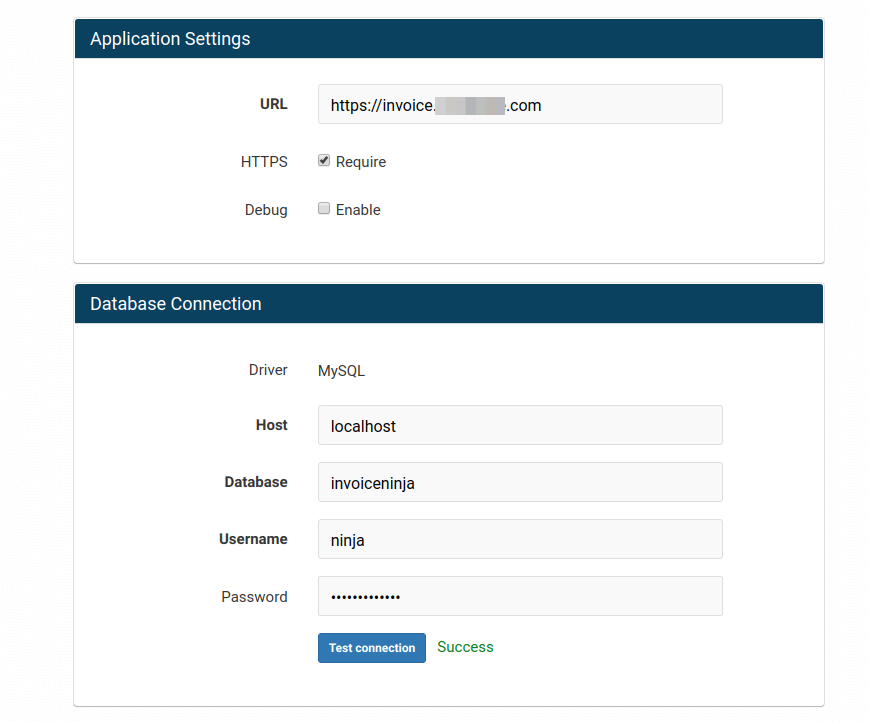
Step 6 - Finish Installation using the Setup Wizard
1) Next step is to visit invoice.yourdomain.com and put the information of database, SMTP settings and create an admin user.
2) If you are using your server, you can select either of these drivers: SMTP and Sendmail.
- Choose
SMTPif you operate a mail server and InvoiceNinja on two different hosts. - Choose
Sendmailif they run on the same host.
If you use SMTP, use these settings similar to:
- host: mail.yourdomain.com port: 587 Encryption: TLS. And enter your username and password.
If you choose Sendmail, then use something like this:
- host: 127.0.0.1 port: 25 Encryption: none. You don’t need to enter a username or password.
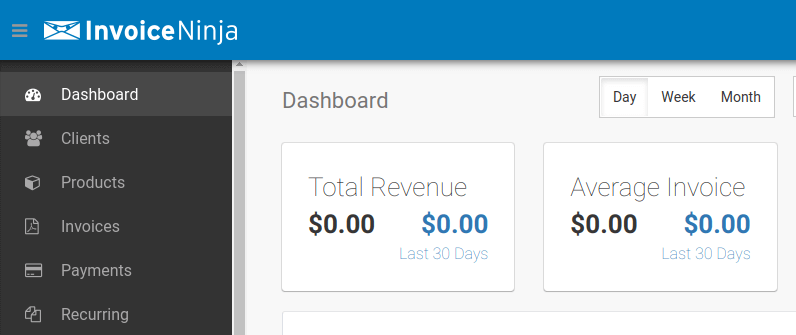
3) Login to InvoiceNinja after generating admin user.
Step 7 - Set Up Cron Jobs
1) Cron jobs are to be setup for sending recurring invoices and repeated emails. Start by editing the crontab file of root user.
sudo crontab -e
2) Put this at the very end of the file.
#InvoiceNinja
0 9 * * * /usr/bin/php7.2 /var/www/invoice-ninja/artisan ninja:send-invoices > /dev/null
0 9 * * * /usr/bin/php7.2 /var/www/invoice-ninja/artisan ninja:send-reminders > /dev/null
3) After putting this text, automatic Cron jobs will run at 9 AM each day. For manually running it, use this command.
sudo /usr/bin/php7.2 /var/www/invoice-ninja/artisan ninja:send-invoices
FAQs to Install InvoiceNinja on Ubuntu 18.04
1) What are partial payments?
Partial payments enable clients to partially pay the invoice at different intervals, instead of doing a full invoice payment in a one-time transaction. You could easily locate the “Partial” box at the top of an existing or new invoice. Just put the partial payment amount, and the live PDF will be modified accordingly. After the payment by the client of the partial amount, the invoice will be updated by itself which will show the remaining balance due.
2) How do I convert a quote to an invoice?
In the Quote section, select a quote from your quote library, locate the “Action” drop-down on the far right, and select “Convert to Invoice”.
3) How do I apply a credit to a payment?
When you generate a new invoice and select an existing client with credit, on the “Enter Payment” page you can choose “Apply Credit”.
Conclusion
We hope this detailed guide helped you understand how to install InvoiceNinja on Ubuntu 18.04 server. To learn more about InvoiceNinja, check out the official InvoiceNinja Installation Document.
If you have any queries, please leave a comment below and we’ll be happy to respond to them for sure.
