
Choose a different version or distribution
Introduction
Before we get started, let's quickly define Minikube before discussing how to install Kubernetes with it on Ubuntu 22.04.
Minikube is a popular open-source tool used for locally running and testing Kubernetes clusters. It allows developers to set up a single-node Kubernetes cluster on their local machine, making it easier to develop and test applications before deploying them to a production environment.
Minikube provides a lightweight and convenient way to experiment with Kubernetes features and functionalities, making it an essential tool for developers and enthusiasts in the world of containerized applications.
In this tutorial, you will install Kubernetes with Minikube on Ubuntu 22.04. We will also address a few FAQs on how to install Kubernetes with Minikube on Ubuntu 22.04.
Advantages of Kubernetes
- Local Kubernetes Testing: Minikube enables developers to test Kubernetes applications locally, avoiding the need for a full-scale cluster.
- Easy Setup: It offers a simple and straightforward setup process, allowing developers to quickly create a single-node Kubernetes cluster on their own machine.
- Rapid Prototyping: Minikube facilitates fast prototyping by providing a local environment for developing and iterating on Kubernetes applications.
- Learning Tool: It serves as an excellent learning tool for developers to gain hands-on experience with Kubernetes without the complexities of a production environment.
- Compatibility: Minikube is compatible with various operating systems and can be used across different development environments, making it accessible and versatile for developers.
Prerequisites to Install Kubernetes with Minikube on Ubuntu 22.04 LTS
- Ubuntu 22.04 desktop installed on your system
- A root password set up on your system
Step 1 – Updating the system
1) Make sure that the system is running on the latest versions.
sudo apt-get update && sudo apt-get upgrade -y
2) Restart the computer to have the modifications take effect.
3) Then, download a few packages that would be useful.
sudo apt-get install curl wget apt-transport-https -y
Step 2 – Install VirtualBox Hypervisor
1) Since both KVM and VirtualBox Hypervisor are supported by Minikube, you can select which one to install. The following command can be used to install the VirtualBox Hypervisor:
sudo apt-get install virtualbox virtualbox-ext-pack
Step 3 – Install Minikube
1) Download the latest version of Minikube with the help of the following command:
sudo wget https://storage.googleapis.com/minikube/releases/latest/minikube-linux-amd64
2) You need to copy the downloaded file to /usr/local/bin.
sudo cp minikube-linux-amd64 /usr/local/bin/minikube
3) After that, give execution permission to Minikube.
sudo chmod 755 /usr/local/bin/minikube
4) Then check the version of Minikube using the following command:
minikube version
5) You'll be able to see the following output:
minikube version: v1.30.1
Step 4 – Install Kubectl
1) Kubectl, a tool, is used to deploy and manage applications on Kubernetes. You must download them and add them to your system's repository because it is not included in the Ubuntu 20.04 repositories.
2) Download the GPG key, then add it.
curl -s https://packages.cloud.google.com/apt/doc/apt-key.gpg | sudo apt-key add -
3) Then, add Kubernetes apt repository with the following command:
echo "deb http://apt.kubernetes.io/ kubernetes-xenial main" | sudo tee /etc/apt/sources.list.d/kubernetes.list
4) Update the repository and install Kubectl.
sudo apt-get update -y
sudo apt-get install kubectl -y
5) You can then check the version of Kubectl installed with the help of the following command:
kubectl version -o json
6) You'll be seeing the following output:
Output

{
  "clientVersion": {
    "major": "1",
    "minor": "27",
    "gitVersion": "v1.27.3",
    "gitCommit": "25b4e43193bcda6c7328a6d147b1fb73a33f1598",
    "gitTreeState": "clean",
    "buildDate": "2023-06-14T09:53:42Z",
    "goVersion": "go1.20.5",
    "compiler": "gc",
    "platform": "linux/amd64"
  },
  "kustomizeVersion": "v5.0.1"
}
Step 5 – Start Minikube
1) Now, you can start the Minikube:
minikube start
If you are using an AWS EC2 or any other VM then you might face an error while using virtualbox driver. So, to fix that you have to enable virtualization, or you can use docker instead:
sudo apt install docker.io
sudo systemctl start docker
sudo usermod -aG docker $USER
exit
Now, re-login and start the minikube:
minikube delete
minikube start --driver=docker
2) The VirtualBox image will be downloaded, and the Kubernetes cluster will be set up as described below:
o   minikube v1.30.1 on linux (amd64)
>   Creating virtualbox VM (CPUs=2, Memory=2048MB, Disk=20000MB) ...
@   Downloading Minikube ISO ...
 184.30 MB / 184.30 MB [============================================] 100.00% 0s
-   "minikube" IP address is 192.168.99.100
-   Configuring Docker as the container runtime ...
-   Preparing Kubernetes environment ...
@   Downloading kubeadm v1.13.3
@   Downloading kubelet v1.13.3

-   Pulling images required by Kubernetes v1.13.3 ...
-   Launching Kubernetes v1.13.3 using kubeadm ...
-   Configuring cluster permissions ...
-   Verifying component health .....
+   kubectl is now configured to use "minikube"
=   Done! Thank you for using minikube!
3) You may also check the status of the cluster:
kubectl cluster-info
4) After that, you will get the output like the below:
Output


Kubernetes master is running at https://192.168.99.100:8443
KubeDNS is running at https://192.168.99.100:8443/api/v1/namespaces/kube-system/services/kube-dns:dns/proxy

To further debug and diagnose cluster problems, use 'kubectl cluster-info dump'.
5) Additionally, you can examine the Kubectl default configuration:
kubectl config view
6) You will get output like the below:
Output

apiVersion: v1
clusters:
- cluster:
    certificate-authority: /home/ubuntu/.minikube/ca.crt
    extensions:
    - extension:
        last-update: Mon, 19 Jun 2023 05:50:42 UTC
        provider: minikube.sigs.k8s.io
        version: v1.30.1
      name: cluster_info
    server: https://192.168.49.2:8443
  name: minikube
contexts:
- context:
    cluster: minikube
    extensions:
    - extension:
        last-update: Mon, 19 Jun 2023 05:50:42 UTC
        provider: minikube.sigs.k8s.io
        version: v1.30.1
      name: context_info
    namespace: default
    user: minikube
  name: minikube
current-context: minikube
kind: Config
preferences: {}
users:
- name: minikube
  user:
    client-certificate: /home/ubuntu/.minikube/profiles/minikube/client.crt
    client-key: /home/ubuntu/.minikube/profiles/minikube/client.key
7) The following command can be used to check the active nodes:
kubectl get nodes
Output

NAME       STATUS   ROLES           AGE   VERSION
minikube   Ready    control-plane   47s   v1.26.3
8) You can then use Minikube VirtualBox:
minikube ssh
9) You will get a shell prompt of your minikube like the one below:
Output

docker@minikube:~$
10) Exit the VirtualBox shell after that:
exit
11) Kubernetes clusters can even be stopped and deleted at any time:
minikube stop
minikube delete
12) Use this command to view Minikube's current status:
minikube status
You will get an output like the one below:
Output

minikube
type: Control Plane
host: Running
kubelet: Running
apiserver: Running
kubeconfig: Configured
Step 6 – Access Kubernetes Dashboard
1) By default, Kubernetes comes with a web dashboard that you can use to control your cluster. All Minikube add-ons can be listed using:
minikube addons list
You will get an output like below:
Output

|-----------------------------|----------|--------------|--------------------------------|
|         ADDON NAME          | PROFILE  |    STATUS    |           MAINTAINER           |
|-----------------------------|----------|--------------|--------------------------------|
| ambassador                  | minikube | disabled     | 3rd party (Ambassador)         |
| auto-pause                  | minikube | disabled     | Google                         |
| cloud-spanner               | minikube | disabled     | Google                         |
| csi-hostpath-driver         | minikube | disabled     | Kubernetes                     |
| dashboard                   | minikube | disabled     | Kubernetes                     |
| default-storageclass        | minikube | enabled ✅   | Kubernetes                     |
| efk                         | minikube | disabled     | 3rd party (Elastic)            |
| freshpod                    | minikube | disabled     | Google                         |
| gcp-auth                    | minikube | disabled     | Google                         |
| gvisor                      | minikube | disabled     | Google                         |
| headlamp                    | minikube | disabled     | 3rd party (kinvolk.io)         |
| helm-tiller                 | minikube | disabled     | 3rd party (Helm)               |
| inaccel                     | minikube | disabled     | 3rd party (InAccel             |
|                             |          |              | [[email protected]])            |
| ingress                     | minikube | disabled     | Kubernetes                     |
| ingress-dns                 | minikube | disabled     | Google                         |
| istio                       | minikube | disabled     | 3rd party (Istio)              |
| istio-provisioner           | minikube | disabled     | 3rd party (Istio)              |
| kong                        | minikube | disabled     | 3rd party (Kong HQ)            |
| kubevirt                    | minikube | disabled     | 3rd party (KubeVirt)           |
| logviewer                   | minikube | disabled     | 3rd party (unknown)            |
| metallb                     | minikube | disabled     | 3rd party (MetalLB)            |
| metrics-server              | minikube | disabled     | Kubernetes                     |
| nvidia-driver-installer     | minikube | disabled     | Google                         |
| nvidia-gpu-device-plugin    | minikube | disabled     | 3rd party (Nvidia)             |
| olm                         | minikube | disabled     | 3rd party (Operator Framework) |
| pod-security-policy         | minikube | disabled     | 3rd party (unknown)            |
| portainer                   | minikube | disabled     | 3rd party (Portainer.io)       |
| registry                    | minikube | disabled     | Google                         |
| registry-aliases            | minikube | disabled     | 3rd party (unknown)            |
| registry-creds              | minikube | disabled     | 3rd party (UPMC Enterprises)   |
| storage-provisioner         | minikube | enabled ✅   | Google                         |
| storage-provisioner-gluster | minikube | disabled     | 3rd party (Gluster)            |
| volumesnapshots             | minikube | disabled     | Kubernetes                     |
|-----------------------------|----------|--------------|--------------------------------|
2) Next, use the command below to list every running container image in the cluster:
kubectl get pods --all-namespaces
You will get the below output:
Output

NAMESPACE     NAME                                   READY   STATUS    RESTARTS   AGE
kube-system   coredns-86c58d9df4-76dkf               1/1     Running   0          4m30s
kube-system   coredns-86c58d9df4-wdtwb               1/1     Running   0          4m29s
kube-system   etcd-minikube                          1/1     Running   0          8m17s
kube-system   kube-addon-manager-minikube            1/1     Running   0          8m6s
kube-system   kube-apiserver-minikube                1/1     Running   1          8m13s
kube-system   kube-controller-manager-minikube       1/1     Running   1          8m13s
kube-system   kube-proxy-5k8qf                       1/1     Running   0          4m33s
kube-system   kube-scheduler-minikube                1/1     Running   0          8m2s
kube-system   kubernetes-dashboard-ccc79bfc9-z827s   1/1     Running   0          4m17s
kube-system   storage-provisioner                    1/1     Running   0          4m13s
3) Then, using the command below, you can obtain the Kubernetes dashboard's URL:
minikube dashboard --url
The result would look like this:
Output

🔌  Enabling dashboard ...
    ▪ Using image docker.io/kubernetesui/dashboard:v2.7.0
    ▪ Using image docker.io/kubernetesui/metrics-scraper:v1.0.8
💡  Some dashboard features require the metrics-server addon. To enable all features please run:

	minikube addons enable metrics-server


🤔  Verifying dashboard health ...
🚀  Launching proxy ...
🤔  Verifying proxy health ...
http://127.0.0.1:38513/api/v1/namespaces/kubernetes-dashboard/services/http:kubernetes-dashboard:/proxy/
Or if you want to access it over public IP then use the command:
kubectl proxy --address='0.0.0.0' --disable-filter=true
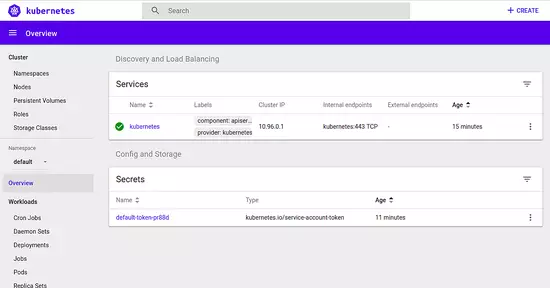
4) Paste the following URL into the address bar:
Localhost: http://127.0.0.1:56508/api/v1/namespaces/kube-system/services/http:kubernetes-dashboard:/proxy/
Public: http://<public_ip>:8001/api/v1/namespaces/kube-system/services/http:kubernetes-dashboard:/proxy/
The page displayed below:
FAQs to Install Kubernetes with Minikube on Ubuntu 22.04 LTS
What are the system requirements for running Minikube on Ubuntu?
To run Minikube on Ubuntu, you need a machine with at least 2 CPU cores, 2GB of RAM, and approximately 20GB of free disk space.
How can I verify the Minikube installation on Ubuntu?
After installing Minikube, you can open a terminal and run the minikube version command. It will display the installed Minikube version if the installation was successful.
Can I access the Minikube cluster using kubectl?
Yes, you can use the kubectl command-line tool to interact with the Minikube cluster. After starting the cluster, run kubectl cluster-info to verify the connection.
How can I stop or delete the Minikube cluster?
To stop the Minikube cluster, use the minikube stop command. If you want to delete the cluster completely, use minikube delete.
Can I use Minikube for production deployments?
Minikube is primarily intended for local development and testing. For production deployments, it's recommended to use full-scale Kubernetes clusters rather than Minikube.
Conclusion
We hope that this detailed tutorial helped you understand how to set up Minikube for Kubernetes on an Ubuntu 22.04 server. Visit the official Kubernetes installation document for further information on installing it on an Ubuntu 22.04 server.
Please leave a comment below if you have any questions, and we'll answer them.