Introduction
You might experience several network connection errors, such as localhost refused to connect or the ERR_Connection_Refused error.
When working on local machines, it is a common error that can occur. When you try to connect to an IP address, you normally try to connect to a separate computer. Yet, connecting to localhost entails connecting to your own computer because it makes use of the loopback address network.
As there is less chance of disrupting a live site when using localhost, many people, including developers and network administrators, use it to test programs or websites that are still under development.
As a result, you will not be able to access your project in a local environment if you can not access localhost.
According to the list below, there are numerous sources of this error:
Error code - Localhost Refused to Connect
Error type - Browser/Firewall
Error variations - ERR_CONNECTION_REFUSED
127.0.0.1 refused to connect
This site can’t be reached localhost refused to connect.
Error causes - Server blocked by firewall, browser settings need to be reconfigured, server running on an incorrect port, and the Apache server is not functioning properly.
Additionally, you must be on your local machine to access your localhost; it cannot be accessed from any other device.
This tutorial will explain what the localhost refused to connect error is and five ways to fix it. We will also address a few FAQs on fix the Localhost Refused to Connect Error.
What Is the Localhost Refused to Connect Error?
When working on local machines, it is a common error that can occur. The localhost simulates the operation of a web server on your machine. A misconfigured port is the most common reason why "localhost refused to connect" errors occur. Some common causes include insufficient permissions and an improperly running Apache webserver.
Additionally, when attempting to connect to localhost, you may face two potential errors: ERR_CONNECTION_REFUSED and ERR_CONNECTION_TIMEOUT. While they are both closely related, they require different solutions.
ERR_CONNECTION_REFUSED localhost error means the server declined the connection attempt, whereas an ERR_CONNECTION_TIMEOUT error means nothing happened and the client is still waiting for a response.
As the firewall is what rejects the data packets, you must check it to resolve the ERR_CONNECTION_REFUSED localhost issue. Also, you must check the Listen directive in the httpd.conf file to ensure that it is correctly configured.
You must examine your connection settings in the meanwhile to fix ERR CONNECTION TIMEOUT on Chrome, which indicates that the service is either not working properly or was not installed correctly.
Five Ways to Solve the Localhost Refused to Connect Error
Here are five solutions to the localhost refused to connect error, listed in no particular order.
1. Temporarily Disable Your Firewall
A firewall is a security system that tracks and filters your traffic, preventing possible threats. Despite being a crucial tool, the detection techniques might occasionally operate incorrectly.
A firewall may inadvertently deny access to secure websites or inbound connections. Hence, it is recommended to temporarily disable the firewall while working on a website if you are developing it and need to access the locally hosted version. This will prevent the blocking of your test site.
Remember to re-enable your firewall as soon as the website goes online, and you no longer get the ERR CONNECTION REFUSED localhost error message.
Below are the steps for disabling the firewall on Mac, Windows, and Linux, respectively.
How to Disable the Firewall on Mac
01. Go to System Preferences.
02. Choose Security and Privacy.
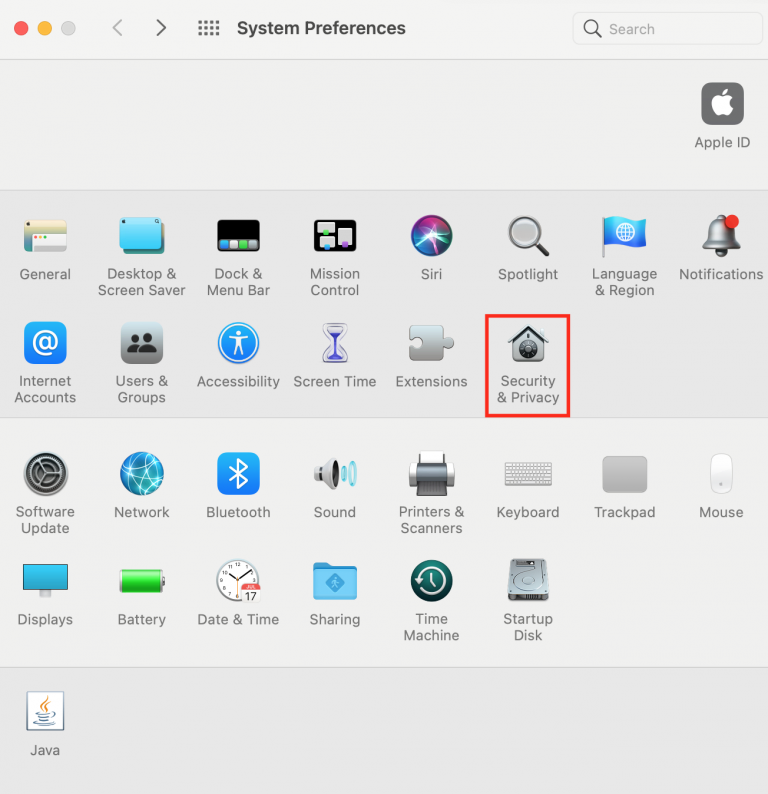
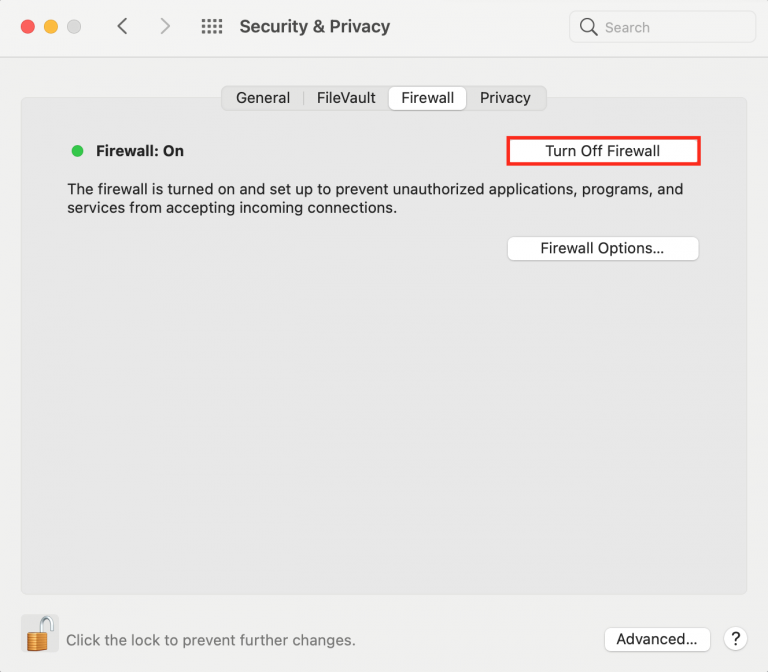
03. Click on the Firewall tab to view the complete firewall settings.
04. Click the lock icon, then type your username and password.
05. If you disable the firewall, you will accept any incoming connections, including those that may include potentially unauthorized resources, you will get a message informing you of this. Press the Turn off Firewall button.
06. To prevent further changes to this setting without your approval, click the lock.
It is important to note that the procedures to disable the firewall on Mac may differ significantly depending on the version of macOS you are using.
How to Disable the Firewall on Windows
Both the control panel and the command prompt can be used to disable the firewall on Windows 10, 8, 7, and Vista.
To disable the firewall from the control panel, follow these steps:
01. Open the control panel, then go to System and Security -> Windows Defender Firewall.
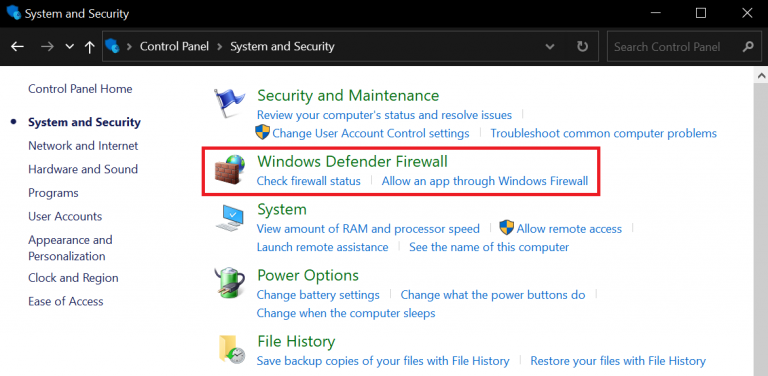
02. Click Turn Windows Defender Firewall on or off.
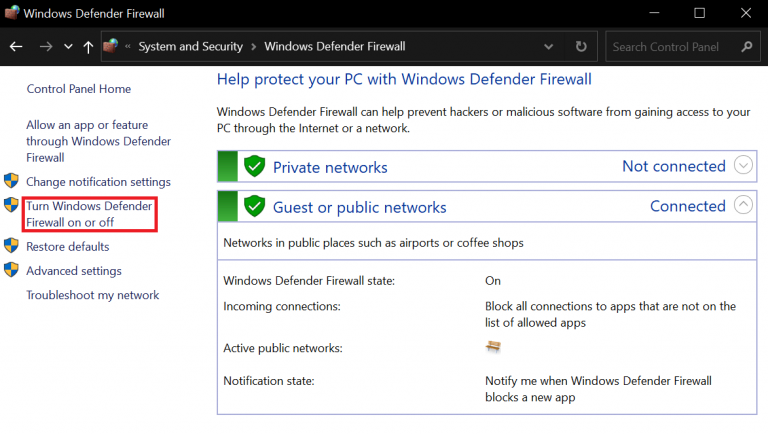
03. Turn off the firewalls on both the private and public network settings.

04. To make the changes effective, click the OK button.
If you can not click on the option, another security program is in charge of the firewall settings. If so, you might want to start by uninstalling the application.
To disable the firewall using the command prompt in the meantime, follow these instructions:
- Open the command prompt as administrator.
- Run the following command:
netsh advfirewall set allprofiles state off
How to Disable the Firewall in Linux
Depending on your Linux distribution, there are several procedures to halt and disable the firewall.
If you are running Ubuntu or Debian, ufw should manage your firewall. If you run CentOS or RHEL, the default firewall management tool will be firewalld.
Follow the below steps to disable the firewall on ufw:
1) With the following command, stop the ufw:
sudo ufw disable
2) After successfully terminating the firewall, execute a command to disable the ufw service at boot time.
sudo systemctl disable ufw
3) Make sure the ufw is disabled by executing the following command:
sudo ufw status
sudo systemctl status ufw
4) Enable the ufw again:
sudo systemctl enable ufw
sudo ufw enable
## verify that ufw started ##
sudo ufw status
Alternatively, these are the steps to stop and disable the firewall on firewalld:
1) Use the following command to terminate firewalld.
sudo systemctl stop firewalld
2) By executing this command, disable firewalld at boot time.
sudo systemctl disable firewalld
sudo systemctl mask --now firewalld
3) You may easily check if the firewalld has been disabled by running this command.
sudo systemctl status firewalld
4) Use the commands below to re-enable firewalld.
sudo systemctl unmask --now firewalld
sudo systemctl enable firewalld
sudo systemctl start firewalld
## verify that the firewalld started ##
sudo firewall-cmd --state
2. Flush Your DNS
The DNS cache saves information from websites you visit, making it easier for you to access these websites later.
The DNS could, however, stop working if it has an excessive number of records.
To fix this, flush the DNS to erase the records:
1) Enter cmd in the search box next to the start menu to launch the command prompt.
2) Type the following command:
ipconfig /flushdns
3) Check to see if the 127.0.0.1 refused to connect issue has been resolved or not.
3. Connect with Specified Port
The web server's default port number is 80. If your web server is not set up to use the default port, and you try to visit it by typing localhost into your browser, which will take you to localhost:80, you will get the localhost error or a 127.0.0.1 refused to connect message.
But, port 80 may be used by another application on your computer from time to time. For instance, you would not be able to run the Apache server on the same port if Skype was already using it.
To fix this issue first, let’s check whether port 80 is available. For this, we are going to use XAMPP.
XAMPP is a web server solution stack that is used to develop websites on a local web server. It is a cross-platform tool that works on Windows, Mac, and Linux. It is widely used to install WordPress on a local computer.
To check a free port number on Windows and Linux, follow these steps- On Mac, it will be slightly different.
1) In order to launch XAMPP, click the Start Menu.
2) On the right side of the control panel, click the Netstat button.
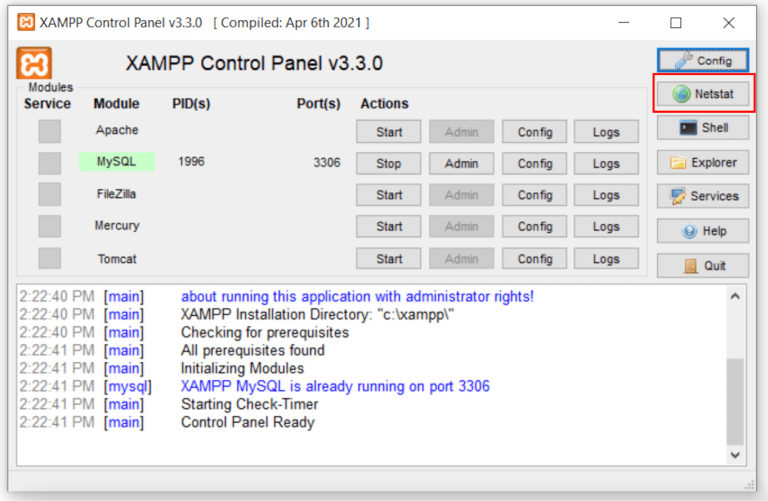
3) You will get a list of all the ports that have been used on your computer. Check to see if port 80 is free or being used by another application.
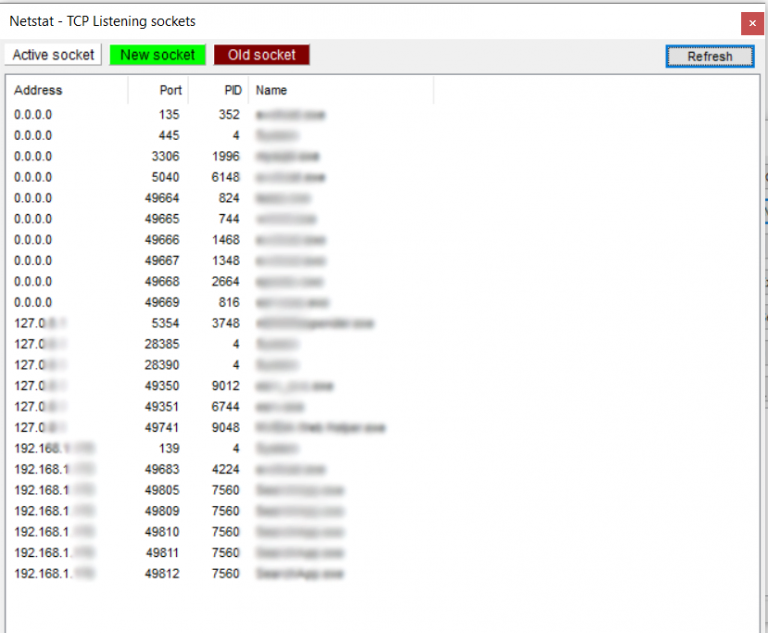
4) Use a different port number, such as port 8080, if port 80 is already in use by another application.
Let us now use the listen command to establish a connection to the correct port number.
Apache HTTPd must be told to listen only on a certain set of ports or IP addresses using the listen command. If this command is missing from the config file, your server will not start.
The steps to modify Apache is port in XAMPP are as follows:
1) In order to launch XAMPP, click the Start Menu.
2) The XAMPP icon will appear in the system tray of your taskbar. Double-click it.
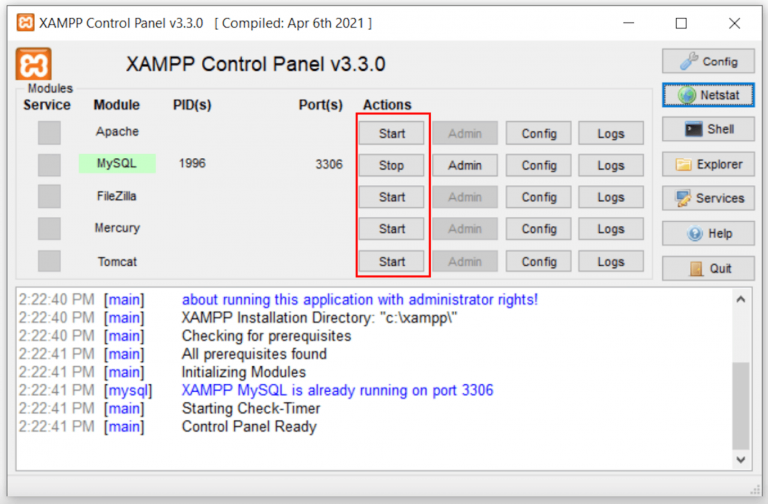
3) It will then display the XAMPP control panel window. A list of all services that are active right now will be displayed.
4) Choose the Stop option next to Apache.
5) Locate the httpd.conf file in the config folder using the file explorer. It can be found in the C:\xampp\apache\conf directory if you are using Windows. It will be located in bin/apache if you use Linux. The location is Applications/XAMPP/xamppfiles/etc/httpd.conf on a Mac.
6) Use Notepad or another text editor to open it. then scan the file for the following lines:
Listen 80
ServerName localhost:80
7) Make sure the port number in the Listen command matches the port number for the localhost if your port 80 is available. If another application is using port 80, switch it out for another one that is available. We will modify it to port 8080 for this example.
Listen 8080
ServerName localhost:8080
8) Save the file. Choose Yes when asked whether you want administrative privileges.
9) Reopen the XAMPP control panel and start the Apache web server.
To verify whether localhost is functioning, go to http://localhost:8080 or https://127.0.0.1:8080/.
Use these instructions to change the running port if you are using WAMP, a Windows solution stack.
1) Right-click the taskbar and click Task Manager.
2)If there are any WAMP instances that are still running, click End Task.
3) Then, open file explorer and go to the config folder in C:\wamp\apache2\conf.
4) Find the HTTPD config file. Using a text editor like Notepad, open it.
5) Check inside the file for the following lines:
Listen 80
ServerName localhost:80
6) Just make sure the port number in the listen command matches the port number for the localhost if your port 80 is available. If another program is already using port 80, use a different port instead.
Listen 8080
ServerName localhost:8080
7) Save the file.
8) Reopen WAMP to see if you get the same error.
4. Ensure Apache Is Running
You will not be able to visit localhost if your Apache web server is not running.
Depending on the distribution you use, there may be a different command to verify the status of your Apache.
The command for Debian or Ubuntu is as follows:
sudo systemctl status apache2
The command for CentOS, RHEL, and Fedora is as follows:
systemctl status httpd
Your server's status check result will indicate whether it is running or not.
If it indicates that the server is stopped, use the following command to restart it in an effort to troubleshoot the issue.
For Debian and Ubuntu:
sudo systemctl restart apache2
For CentOS/RHEL/Fedora:
systemctl restart httpd
The restart command's output will appear as follows:
Output
* Restarting web server apache2  [ OK ]
You will see an error message if the restart attempt fails. Depending on the distribution method you choose, the message may change, but it will generally follow these lines:
apache2: unrecognized service
Failed to restart apache2.service: Unit apache.service failed to load: No such file or directory.
Reinstalling the service may help if you get these error messages. Use the corresponding command to restart the web server once you are certain that it was installed correctly.
5. Go Through Browser Settings
Due to the fact that every web browser has a unique configuration and set of features, your browser settings may also be to cause the 127.0 0.1 refused to connect error.
For example, when you enter an HTTP web address, some browsers will automatically redirect you to its HTTPS equivalent. However, you will receive the localhost refused to connect error message if that website has an invalid SSL certificate or none at all.
Follow these procedures if you are using the Chrome browser:
1) Type chrome://net-internals/#hsts in the address bar of your browser.
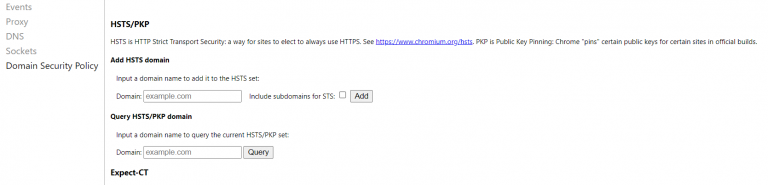
2) Find Delete domain security policies, then enter localhost.

3) Start the browser again.
FAQs on fix the Localhost Refused to Connect Error
How can I fix the "localhost refused to connect" error?
Here are some potential solutions to try: - Ensure that the server or application you are trying to access is running. - Confirm that the server is configured to listen on the correct port. - Check if any firewall or antivirus software is blocking the connection. - Verify that the URL or IP address you are using is correct. - Clear your browser's cache and cookies. - Restart your computer and try again.
Is the "localhost refused to connect" error specific to a certain browser?
No, the error can occur on various browsers, including Google Chrome, Mozilla Firefox, Microsoft Edge, etc.
Could there be an issue with my server configuration causing the error?
Yes, it's possible that misconfigured server settings or incorrect application setup may result in the "localhost refused to connect" error. Double-check your server configuration, ports, and any relevant settings.
Can firewall or antivirus software block the localhost connection?
Yes, sometimes firewall or antivirus software can mistake the local server for a potential threat and block the connection. Check your security software settings and temporarily disable them if necessary.
What should I do if the server is running, but the error persists?
If the server is running, make sure it is configured to listen on the correct port, and ensure that there are no conflicting services or processes occupying that port.
Should I try accessing the localhost from a different browser to troubleshoot the error?
Yes, attempting to access the localhost from a different browser can help identify if the issue is specific to one particular browser or if it's a broader problem.
Could there be an issue with my hosts file causing the error?
It's possible that the localhost entry in your hosts file may be incorrect. Verify that the hosts file has the correct mapping for the localhost.
Conclusion
When working on a project on your local web server, you could see a particular type network connection error known as localhost refused to connect.
It is triggered if the firewall incorrectly blocks your server or if you are using the incorrect port. The localhost error can also appear if the configuration of your Chrome browser or Apache web server is incorrect.
The localhost refused to connect error can be fixed using one of five methods:
- Disable our firewall temporarily - By turning off your firewall, you can prevent it from blocking access to the localhost project and flagging it as dangerous.
- Flush DNS – Erase existing browser data.
- Connect using the given port - Verify that the Apache web server is running on port 80 or a different port number specified for localhost.
- Check that Apache is running - Ensure that the Apache web server is configured properly and is functioning.
- Go to the browser settings - Enable connections to sites that do not have an SSL certificate, such as your test site.
If you have any suggestions or queries, kindly leave them in the comments section.