
Choose a different version or distribution
Introduction
Before we start talking on how to configure WireGuard VPN on Debian 11, let's briefly understand - What is WireGuard?
WireGuard is a free and open-source VPN that employs innovative cryptography. VPN represents Virtual Private Network. It is a modern and highly efficient VPN (Virtual Private Network) protocol known for its simplicity and security.
It provides a secure connection between two or more devices over the internet, offering privacy and data protection.
This tutorial will guide you through setting up a WireGuard VPN on Debian 11, enabling you to create your own private network.
Step1: Installing WireGuard on Debian 11
First, let's install the WireGuard VPN. Repositories for back ports can be used to install it. The command that follows will allow us to add it to our system:
echo 'deb http://ftp.debian.org/debian buster-backports main' | sudo tee /etc/apt/sources.list.d/buster-backports.list
Update our apt-cache now that the repository has been activated. To accomplish this, execute the following command:
sudo apt update
We must install the WireGuard module and tools after updating. To accomplish this, enter or copy the following command:
sudo apt install wireguard
It should be noted that WireGuard functions as a kernel module.
Step2: WireGuard Configuration
Let's configure WireGuard now that it has been installed on Debian 11. WireGuard may be managed and configured with the help of the wg and wg-quick commands.
As we stated in the beginning, every device in the WireGuard VPN network has a public and private key. The following command must be run in order to produce a key pair for this purpose:
wg genkey | sudo tee /etc/wireguard/privatekey | wg pubkey | sudo tee /etc/wireguard/publickey
Once you have executed the above command, you will be able to see the key as seen in the screenshot. The /etc/wireguard directory is where the key pair files were created. In Debian 11, we can use the cat or less commands to see file content.
Note that the private key is confidential and must never be disclosed to anybody.
The pre-shared key is another key that WireGuard supports. This key's purpose is to provide an additional layer of symmetric key cryptography. It should be noted that this key is absolutely optional. Additionally, each peer pair's unique key should be used.
Configuring the tunnel device is the next stage in the WireGuard configuration process. Our VPN traffic will be able to be routed through the tunnel device. Let's configure our device using the command line interface for this purpose.
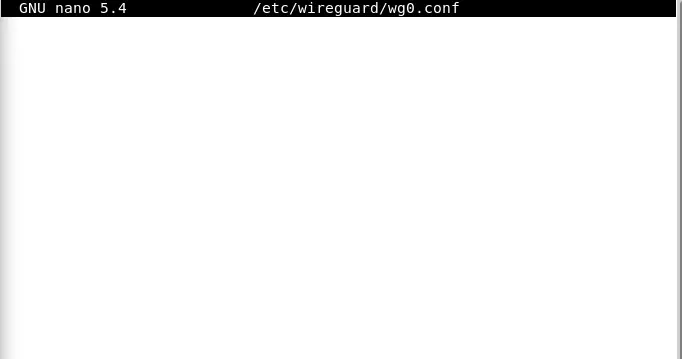
We'll launch the editor and make an entirely new file called wg0.conf. We must use a text editor to create the configuration. To launch the editor and start a new file, enter the following command:
sudo nano /etc/wireguard/wg0.conf
Add the following to your open editor:
[Interface]
Address = 10.0.0.1/24
SaveConfig = true
ListenPort = 51820
PrivateKey = SERVER_PRIVATE_KEY
PostUp = iptables -A FORWARD -i %i -j ACCEPT; iptables -t nat -A POSTROUTING -o enp0s3 -j MASQUERADE
PostDown = iptables -D FORWARD -i %i -j ACCEPT; iptables -t nat -D POSTROUTING -o enp0s3 -j MASQUERADE
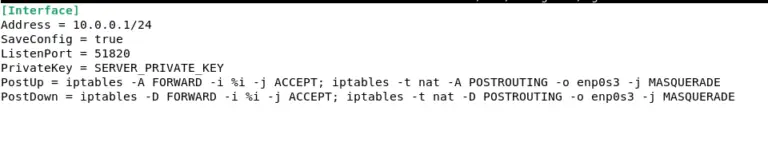
Replace SERVER_PRIVATE_KEY with your server private key.
Press CTRL+S to save the file and CTRL+X to close it after that.
Before proceeding, it is critical that you replace the SERVER_PRIVATE_KEY in the above code with your private key. The following command will generate a private key for you:
umask 077 /etc/wireguard
wg genkey | tee privatekey | wg pubkey > publickey
You can use the command below to view the private key:
sudo cat /etc/wireguard/privatekey
Remember that the public network interface needs to be substituted for enp0s3, which is found after the Postrouting, in the above commands. You can use the following command to locate your public interface:
ip -o -4 route show to default | awk '{print $5}'
Using the properties in the config file, we must activate the wg0 interface after you have finished editing the file in the editor. To accomplish this, execute the following command:
sudo wg-quick up wg0
The output will appear as follows:
With the following command, we can view the settings and the interface state:
sudo wg show wg0
WireGuard must be brought up at boot time as the final configuration step. This is due to the fact that WireGuard can be controlled by systemd. Enter the command as follows:
sudo systemctl enable wg-quick@wg0
Step3: Server Networking and Configuration of Firewall
Networking and firewall configuration are done in this step. You must first turn on IP forwarding for NAT to function. To accomplish this, execute the following command:
sudo nano /etc/sysctl.conf
The sysctl.conf file will be opened as a result. The following line has to be added to that file:
net.ipv4.ip_forward=1
After inserting the aforementioned line, save the document by clicking CTRL+S, and then press CTRL+X to exit the document.
In the terminal after that, enter the following command:
sudo sysctl -p
The last step is to manage our firewall. Port 51820 must be made available for UDP traffic. Only if one is utilizing the UFW, though. To accomplish this, execute the following command:
sudo ufw allow 51820/udp
Congratulations! The Debian peer has been set up effectively. Now it will function as a server.
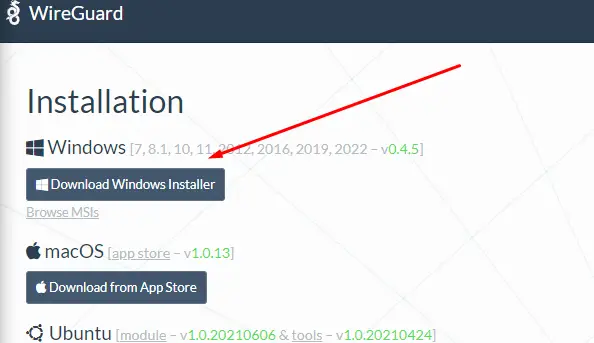
Step 4: Setup of Windows Client
We now need to set up a client after configuring the server. We'll select windows for this purpose. Install the MSI package for the window in your browser by clicking the following link:
https://www.wireguard.com/install/
Click "Add Tunnel" in the bottom left corner after installing the downloaded file.
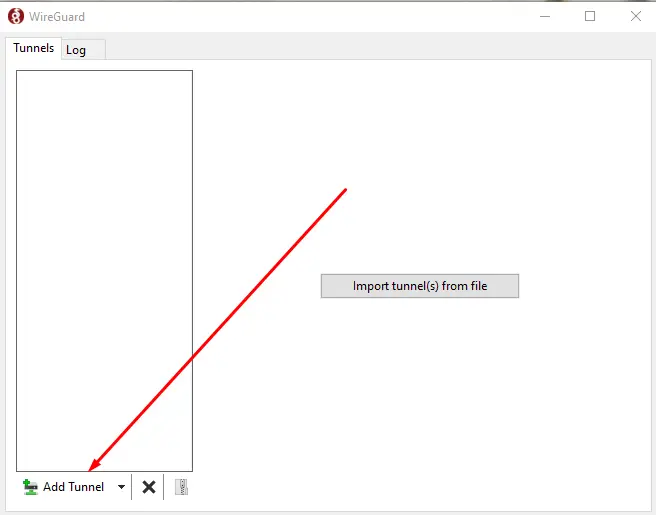
Then a drop-down menu will appear. Select "Add empty tunnel" from the menu. When finished, the following screen will appear:

Here, add the following lines to the file:
[Interface]
PrivateKey = CLIENT_PRIVATE_KEY
Address = 10.0.0.2/24
[Peer]
PublicKey = SERVER_PUBLIC_KEY
Endpoint = SERVER_IP_ADDRESS:51820
AllowedIPs = 0.0.0.0/0
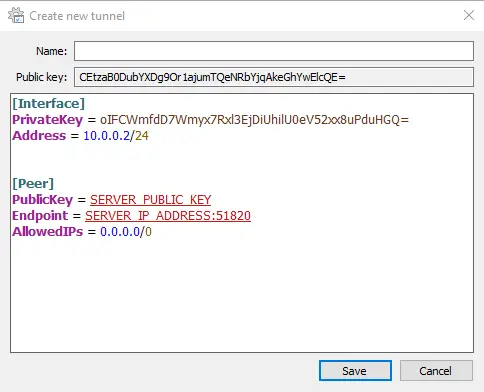
It's important to keep in mind that you must enter both your private key and the server you built, which is a public key, in the respective fields. Additionally, you need to include the server IP address in place of the "Server_IP_ADDRESS" keyword. Set the name after that, then click "Save."
Step 5: Client Peer and Server Connection
The client and server are added in Step 5. The second-to-last step is when we connect the client's public key and IP address to the server. Run the following command on your Debian 11 server once more:
sudo wg set wg0 peer CLIENT_PUBLIC_KEY allowed-ips 10.0.0.2
Change the public key with your client's public key. The client public key is located in the Window WireGuard application.
Once you have completed the previous steps, open the Windows WireGuard App on your client machine.
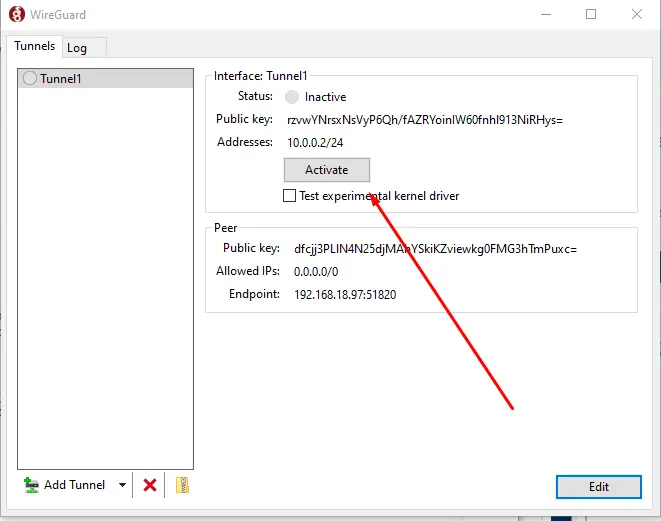
Step 6: Windows Client
You only need to click the "Activate" in the WireGuard App tunnel button in the final step to complete it.
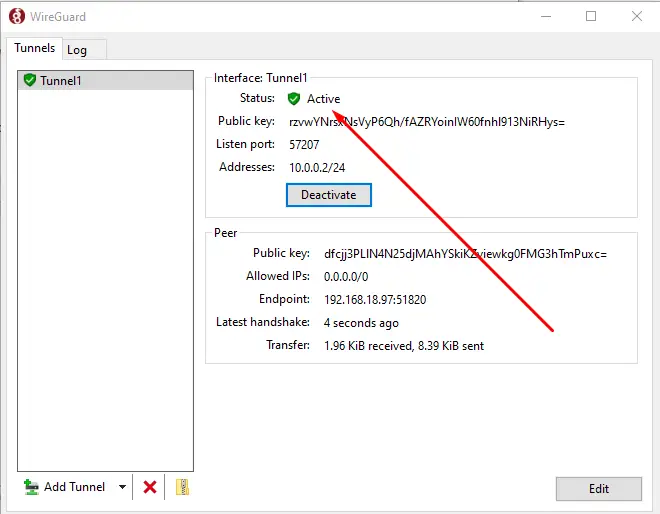
The status of the tunnel will automatically change to Active after you click the activate button. And with that, we're done. Congratulations!
FAQs on Configuring WireGuard VPN on Debian 11
What are the requirements for setting up WireGuard on Debian 11?
To set up WireGuard on Debian 11, you need a Debian 11 system with root access, a public IP address, and basic knowledge of networking concepts.
Is WireGuard compatible with Debian 11?
Yes, WireGuard is fully compatible with Debian 11, providing a straightforward setup process.
How can I install WireGuard on Debian 11?
To install WireGuard on Debian 11, you need to add the WireGuard PPA (Personal Package Archive) repository, update the package list, and then install the necessary packages using the apt package manager.
Do I need a static IP address for setting up WireGuard on Debian 11?
Having a static IP address for the WireGuard server is recommended for easier access and configuration.
Can I set up WireGuard on a VPS (Virtual Private Server) or cloud provider like AWS or DigitalOcean?
Yes, WireGuard can be set up on a VPS or cloud provider like AWS or DigitalOcean. The process is similar to setting up WireGuard on a local Debian 11 system.
Do I need to forward ports on my router for WireGuard to work?
Yes, to establish a connection from outside your network, you need to forward the WireGuard listening port (usually UDP) on your router to the WireGuard server.
Can I set up a site-to-site VPN using WireGuard?
Yes, WireGuard supports site-to-site VPN setups, allowing you to connect multiple networks together securely.
Conclusion
Setting up a WireGuard VPN on Debian 11 offers numerous advantages for secure and private networking. With its simplicity, efficiency, and strong security features, WireGuard stands as a modern and robust VPN protocol.
By following the installation and configuration steps mentioned in the tutorial, you can create your own private network and enjoy the benefits of a secure connection.
If you have any queries, please leave a comment below, and we’ll be happy to respond to them.