
Introduction
Before we begin talking about how to ensure code quality with SonarQube on Ubuntu 18.04, let us first understand - What is SonarQube?
SonarQube is an open-source platform that helps developers ensure the quality of their code. It performs static code analysis, scanning for bugs, vulnerabilities, and coding rule violations. With compatibility for multiple programming languages, SonarQube provides detailed reports to facilitate manual and automated code reviews.
By integrating with existing build processes and CI/CD pipelines, it enables continuous monitoring of code quality. Customize coding rules, address false positives, and analyze third-party libraries effortlessly. With SonarQube, developers can confidently improve the overall quality of their code.
In this tutorial, you will learn how to deploy a SonarQube server and scanner to scan your code and generate a code quality report. Also, we will answer some FAQs regarding the Memgraph installation.
Prerequisites
- Ubuntu 18.04 server with 3GB or more memory
- A sudo non-root user and a firewall
- Oracle Java 8 installed on the server
- Nginx and MySQL
- Certbot (the Let’s Encrypt client)
- A fully-qualified domain name and an A record directing towards the server where SonarQube would be installed. For this tutorial, we shall use the domain name
sonarqube.example.com
Step 1 - Preparing for the Install
For installing the SonarQube, you are required to complete a few steps beforehand. Since SonarQube is a Java application that would operate as a service, and because running services as the root user is not recommended, you should create another system user specifically to run the SonarQube services. Following that, create an installation directory and set its permissions, and then, generate a MySQL database and user to use SonarQube.
1) The first step is to create the SonarQube user.
sudo adduser --system --no-create-home --group --disabled-login sonarqube
2) This user would specifically be utilized to execute the SonarQube service, so this creates a system user that cannot log in to the server directly.
3) After that, create the directory for installing SonarQube.
sudo mkdir /opt/sonarqube
4) SonarQube releases are packaged in zip format, accordingly, install the unzip utility which lets you extract zipped files.
sudo apt-get install unzip
5) In the next step, create a database and credentials which SonarQube would utilize. Log on to the MySQL server as the root user.
sudo mysql -u root -p
6) Then you need to create the SonarQube database.
CREATE DATABASE sonarqube;
7) At this point, generate the credentials which SonarQube would utilize to gain access to the database.
CREATE USER sonarqube@'localhost' IDENTIFIED BY 'some_secure_password';
8) Following the above step, permissions are to be granted to the newly created user so it can make changes to the SonarQube database:
GRANT ALL ON sonarqube.* to sonarqube@'localhost';
9) After applying the permission changes, exit from MySQL console using the following command:
FLUSH PRIVILEGES;
EXIT;
In the next step, you will download and install the SonarQube server.
Step 2 - Downloading and Installing SonarQube
1) Initiate the process by navigating from the current working directory to the SonarQube installation directory.
cd /opt/sonarqube
2) After that, go to the SonarQube downloads page and click on the download link for SonarQube 7.5 Community Edition. Although there are numerous versions of Sonarqube, in this tutorial, we will use SonarQube 7.5 Community Edition.
3) After you get the link, download the file by running the following command:
sudo wget https://binaries.sonarsource.com/Distribution/sonarqube/sonarqube-7.5.zip
4) After that, extract the files.
sudo unzip sonarqube-7.5.zip
5) After unzipping the file, delete the downloaded zip file.
sudo rm sonarqube-7.5.zip
6) Lastly, update the permissions to ensure that SonarQube user owns these files, and are able to read and write files in this particular directory.
sudo chown -R sonarqube:sonarqube /opt/sonarqube
Now, we shall configure the SonarQube server.
Step 3 - Configuring the SonarQube Server
1) Before proceeding further, edit the following things in the SonarQube configuration file:
- Specify the username and password which SonarQube server would utilize for the database connection.
- Direct SonarQube to utilize MySQL for the back-end database.
- Instruct SonarQube to operate in server mode, this shall yield improved performance.
- Direct SonarQube to only listen to the local network address as we will use a reverse proxy.
2) Initiate the process by opening the SonarQube configuration file using:
sudo nano sonarqube-7.5/conf/sonar.properties
3) Then, amend the username and password that SonarQube would utilize to gain access to the database to the username and password which was created for MySQL.
...

    sonar.jdbc.username=sonarqube
    sonar.jdbc.password=some_secure_password

...
4) After that, instruct SonarQube to utilize MySQL as the database driver.
   ...

    sonar.jdbc.url=jdbc:mysql://localhost:3306/sonarqube?useUnicode=true&characterEncoding=utf8&rewriteBatchedStatements=true&useConfigs=maxPerformance&useSSL=false

    ...
5) Since this instance of SonarQube would run as a dedicated server, we can add the -server option to enable SonarQube’s server mode.
6) Nginx shall communicate between SonarQube clients and your server, therefore, you have to instruct SonarQube to only listen to the local address.
    ...

    sonar.web.javaAdditionalOpts=-server
    sonar.web.host=127.0.0.1
7) After updating these values, save and close the file.
8) In the next step, utilize Systemd to configure SonarQube to execute as a service so that it would initiate automatically upon a reboot.
Generate the service file.
sudo nano /etc/systemd/system/sonarqube.service
9) After that, add the following content to the sonarqube.service file that specifies the way in which SonarQube service will launch and stop:
[Unit]
Description=SonarQube service
After=syslog.target network.target

[Service]
Type=forking

ExecStart=/opt/sonarqube/sonarqube-7.5/bin/linux-x86-64/sonar.sh start
ExecStop=/opt/sonarqube/sonarqube-7.5/bin/linux-x86-64/sonar.sh stop

User=sonarqube
Group=sonarqube
Restart=always

[Install]
WantedBy=multi-user.target
Select the JDK 11 version
Set the JDK 11 version in wrapper.conf vi /opt/sonar/conf/wrapper.conf wrapper.java.command=/usr/lib/jvm/java-11-openjdk-11.0.13.0.8-3.el8_5.x86_64/bin/java
10) Close and save the file following which initiate the SonarQube service:
sudo service sonarqube start
11) Verify the status of the SonarQube service to make sure that it is initiated and is running as per your expectations:
service sonarqube status
12) In case the service has successfully initiated, a line saying “Active” similar to this will appear.
Output

● sonarqube.service - SonarQube service
   Loaded: loaded (/etc/systemd/system/sonarqube.service; enabled; vendor preset
   Active: active (running) since Sat 2019-01-05 19:00:00 UTC; 2s ago
13) After that, configure the SonarQube service to initiate automatically on boot using the following command:
sudo systemctl enable sonarqube
14) Now the SonarQube server would take a few minutes to fully activate. You may verify if the server has been initiated by the HTTP port:
curl http://127.0.0.1:9000
Step 4 - Configuring the Reverse Proxy
1) At this stage we will configure Nginx, which shall be the reverse proxy and HTTPS terminator for the SonarQube instance.
2) Initiate this process by generating a new Nginx configuration file for the site:
sudo nano /etc/nginx/sites-enabled/sonarqube
3) Add the following configuration to ensure that Nginx would route the incoming traffic to SonarQube:
server {
    listen 80;
    server_name sonarqube.example.com;

    location / {
        proxy_pass http://127.0.0.1:9000;
    }
}
4) Save the configuration and then close the file.
5) In the next step, ensure that the configuration file contains no syntax errors:
sudo nginx -t
6) If any errors are spotted then resolve them and run sudo nginx -t command once again. When you see no errors, restart Nginx:
sudo service nginx restart
7) To quickly test, you may visit http://sonarqube.example.com at this point in your web browser. You’ll see the SonarQube web UI.
8) After that, use Let’s Encrypt to generate HTTPS certificates for the installation so that data would be safely transferred from the server and to your local machine. Utilize certbot to generate the certificate for Nginx.
sudo certbot --nginx -d sonarqube.example.com
9) In case this is your first interaction with Let’s Encrypt certificate, Certbot will prompt you to enter email address and accept EULA agreement. Do the same.
10) Certbot would then inquire as to the way in which you will configure your security settings. Select the option to redirect all requests to HTTPS. This would make sure that all communications are encrypted.
Step 5 - Securing SonarQube
SonarQube operates with a default administrator username and password of admin. This default password is not secured, hence, update it to something more secure.
1) Firstly, visit the URL of your installation, and log in utilizing the default username and password. In case you are prompted to start a tutorial, click on Skip this tutorial to get to the dashboard.
2) After logging in, click on the tab which says Administration and choose Security from the drop-down list, and then select Users:
3) After that, hit the small cog on the right of the “Administrator” account row and choose the option “Change password”.
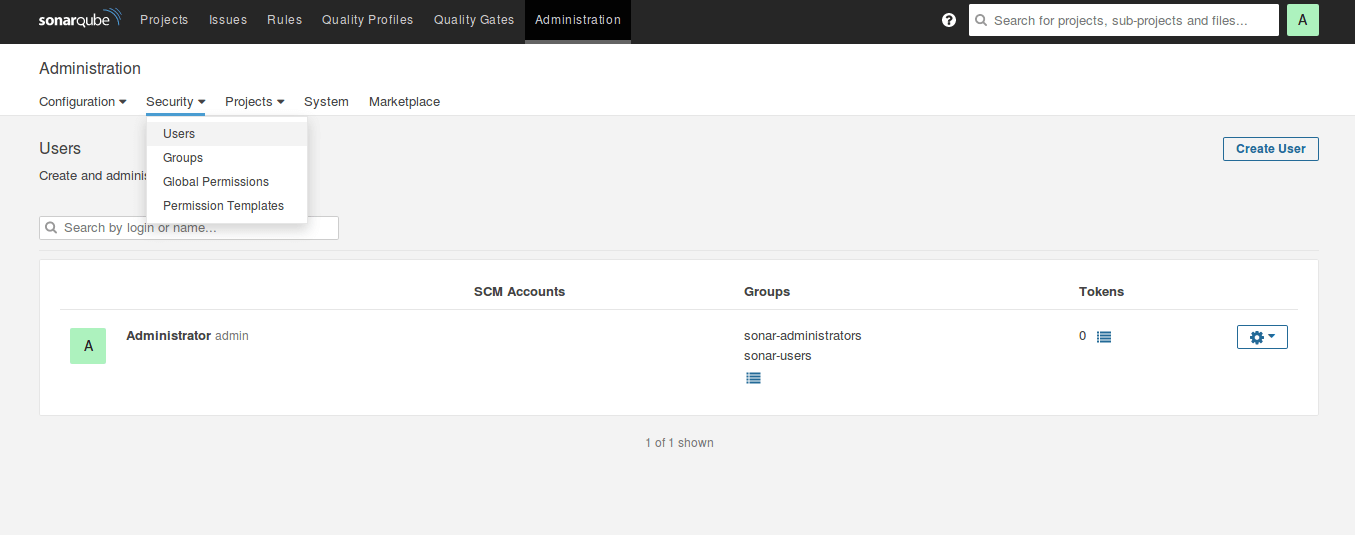
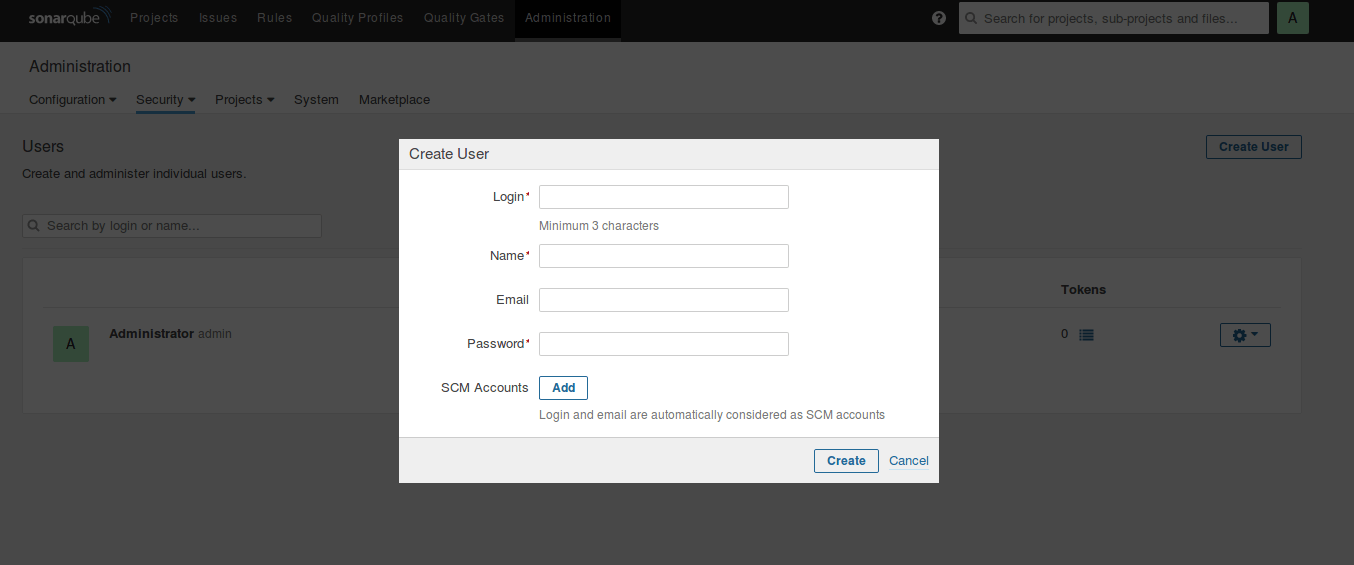
4) Now you need to create a normal user that can be used to create projects and submit analysis results to the server through the same page. Hit the Create User button on the top-right of the page:
5) After that, generate a token for a specific user by hitting the button in the “Tokens” column and giving a name to this token. Later on, this token would be needed when a code scanner is invoked.
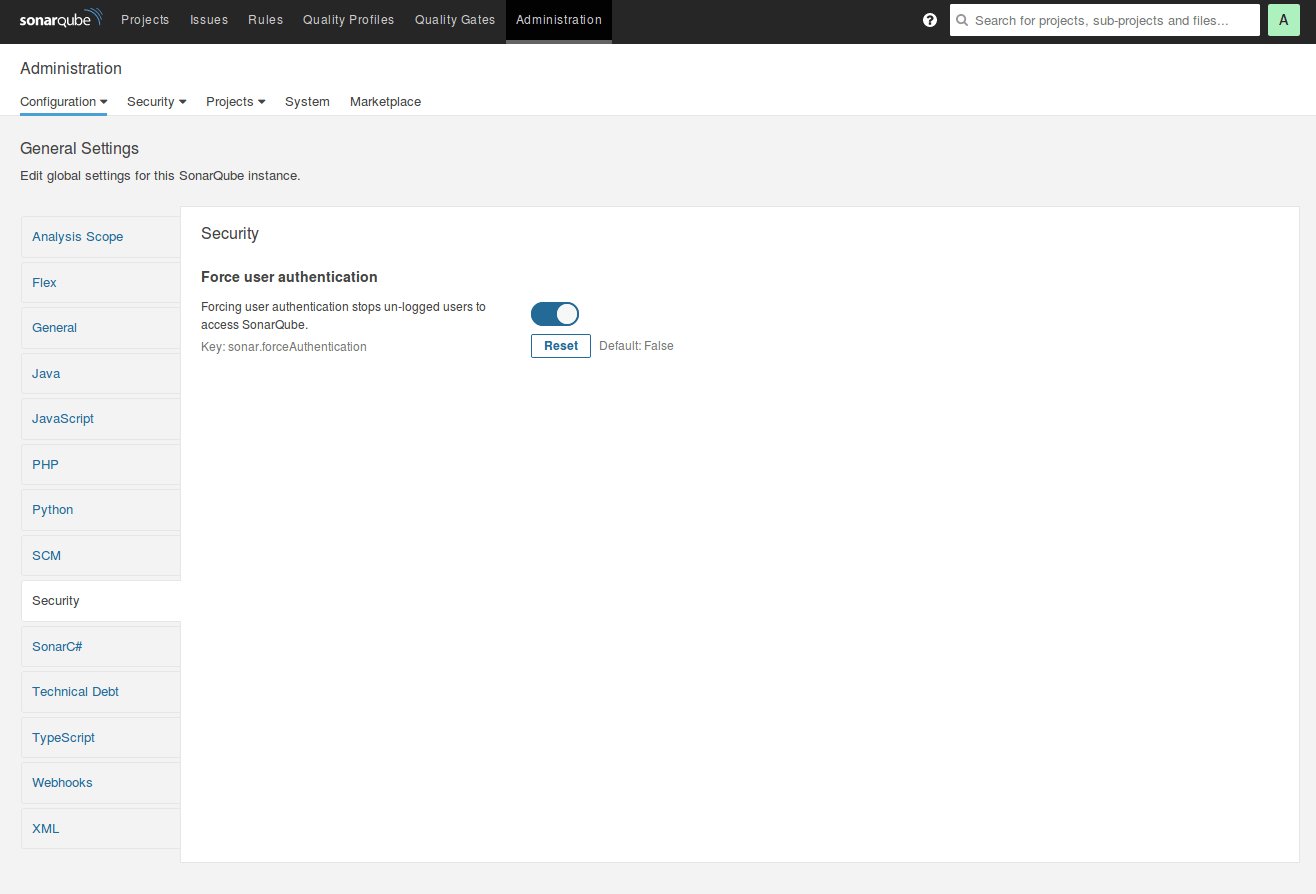
6) Now, you will notice that the SonarQube instance is to be accessed publicly, and anyone can view analysis results and the source code. Naturally, this is extremely insecure, hence, configure SonarQube to only let users which are logged-in to the dashboard. Then, from the Administration tab, hit Configuration, then General Settings, and then Security on the left pane. Flip the switch that says Force user authentication to activate authorization, then hit the Save button which is below the switch.
Step 6 - Setting Up the Code Scanner
SonarQube’s code scanner is a separate package that can be installed in a machine that is different from the one on which the SonarQube server is operating, like your local development workstation or a continuous delivery server.
In this tutorial, we will install the code scanner on the very same server which hosts our SonarQube server.
1) To start off, create a directory for the scanner.
sudo mkdir /opt/sonarscanner
2) After that, change into that directory.
cd /opt/sonarscanner
3) Download the SonarQube scanner for Linux using the command wget.
sudo wget https://binaries.sonarsource.com/Distribution/sonar-scanner-cli/sonar-scanner-cli-3.2.0.1227-linux.zip
4) Then, extract the scanner.
sudo unzip sonar-scanner-cli-3.2.0.1227-linux.zip
5) After that, remove the zip archive file.
sudo rm sonar-scanner-cli-3.2.0.1227-linux.zip
6) After that, tweak a few settings to have the scanner working with your server installed. Open the configuration file and edit in the following manner:
sudo nano sonar-scanner-3.2.0.1227-linux/conf/sonar-scanner.properties
7) Then, direct the scanner to submit the code analysis results to a particular location. Un-comment the line which starts with sonar.host.url and set it to the URL of the SonarQube server.
sonar.host.url=https://sonarqube.example.com
8) Save and close the file and make the scanner binary executable.
sudo chmod +x sonar-scanner-3.2.0.1227-linux/bin/sonar-scanner
9) Then generate a symbolic link to call the scanner without specifying the path:
sudo ln -s /opt/sonarscanner/sonar-scanner-3.2.0.1227-linux/bin/sonar-scanner /usr/local/bin/sonar-scanner
Step 7 - Run a Test Scan on SonarQube Projects
1) Generate a new working directory inside the home directory, then change to the directory.
cd ~
mkdir sonar-test && cd sonar-test
2) Then download the example project.
wget https://github.com/SonarSource/sonar-scanning-examples/archive/master.zip
3) After that, extract the project and then delete the archive file.
unzip master.zip
rm master.zip
4) In the next step, switch to the example project directory using.
cd sonar-scanning-examples-master/sonarqube-scanner
5) Execute the scanner, passing it the token you generated earlier.
sonar-scanner -D sonar.login=your_token_here
6) This could take some time. After the completion of scanning, the following will appear on the console:
Output

INFO: Task total time: 14.128 s
INFO: ------------------------------------------------------------------------
INFO: EXECUTION SUCCESS
INFO: ------------------------------------------------------------------------
INFO: Total time: 21.776s
INFO: Final Memory: 17M/130M
INFO: ------------------------------------------------------------------------
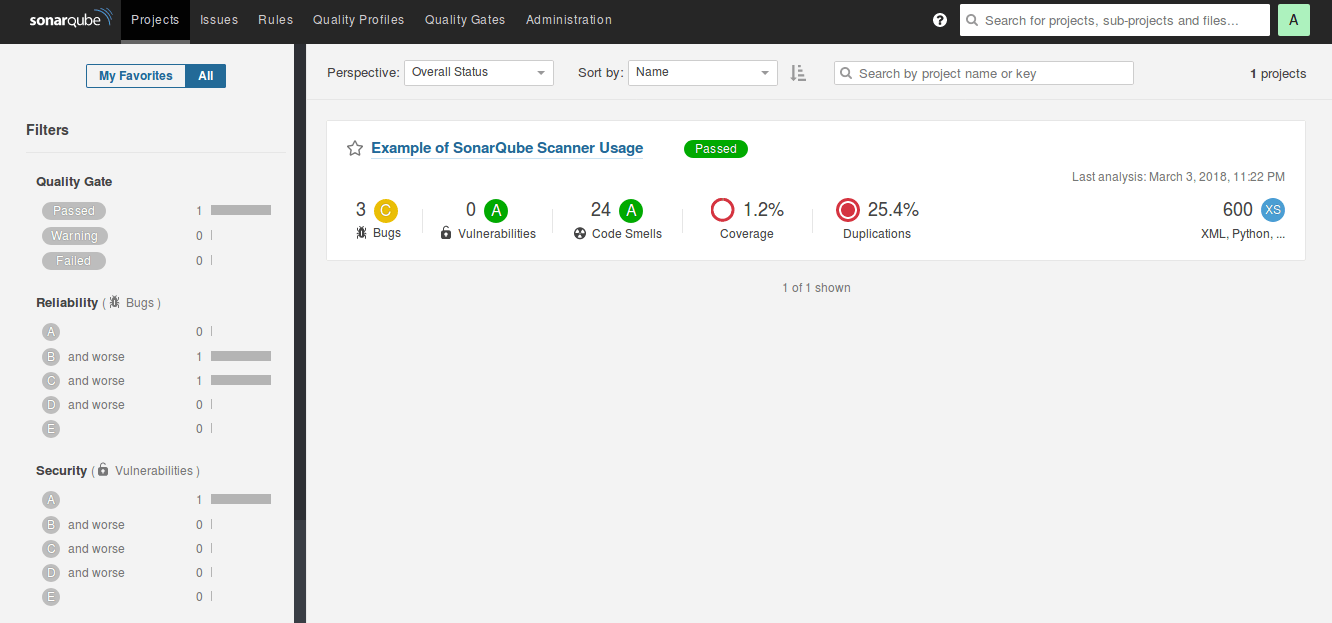
7) At this stage, an example project’s report would be on the SonarQube dashboard:
Step 8 - Run a Scan on Code
To direct SonarQube analyze your code, commence the process by transferring the code to the server, or refer to Step 6 for installing and configuring the SonarQube scanner on your workstation and configure it so as to direct it towards your SonarQube server.
1) Following that, in your project’s root directory, generate a SonarQube configuration file:
nano sonar-project.properties
2) You’ll use this file to tell SonarQube a few things about your project.
3) Then define a project key, which shall be the unique ID for the project. This ID is required to be unique for your SonarQube instance.
    # Unique ID for this project
    sonar.projectKey=foobar:hello-world

    ...
4) Then, mention the project name and version which will lead to SonarQube displaying the following information in the dashboard.
    ...

    sonar.projectName=Hello World Project
    sonar.projectVersion=1.0

    ...
5) Lastly, inform SonarQube as to the location where code files are stored. It is to be noted here that this is relative to the directory that contains the configuration file. Set it to the current directory using the following:
# Path is relative to the sonar-project.properties file. Replace "\" by "/" on     Windows.
sonar.sources=.
6) After that, the file is to be saved and closed.
7) At this stage, you can run a code quality examination on your own code. Execute the sonar-scanner again, passing it your token.
sonar-scanner -D sonar.login=your_token_here
8) After the completion of scanning, something similar to the following will appear:
Output

INFO: Task total time: 5.417 s
INFO: ------------------------------------------------------------------------
INFO: EXECUTION SUCCESS
INFO: ------------------------------------------------------------------------
INFO: Total time: 9.659s
INFO: Final Memory: 39M/112M
INFO: ------------------------------------------------------------------------
The code quality report of the project can be found on the SonarQube dashboard.
FAQs to Ensure Code Quality with SonarQube on Ubuntu 18.04
1) How to trigger a full ElasticSearch reindex?
Currently, the only way to force a reindex is to:
- Stop your server
- Remove the contents of the
$SQ_HOME/data/es6directory - Start your server
Before doing this, you should be aware first that processes are in place on the SonarQube side that out-of-sync indices are detected and corrected, and second that a full re-index can be quite lengthy depending on the size of your instance.
How to get rid of issues that are False-Positives?
It is possible to mark individual issues as False Positive or won't Fix using the issues interface. Issue marked as False Positive or Won't Fix will retain the status even after merge if you are using PR analysis. This is the preferred approach.
Can SonarQube be used for both manual and automated code reviews?
Yes, SonarQube facilitates both manual and automated code reviews. It provides detailed reports showing code quality issues, technical debt, and best practice violations. These reports help developers, code reviewers, and project managers to assess and improve overall code quality.
Can SonarQube be used in a continuous integration/continuous delivery (CI/CD) pipeline?
Yes, SonarQube is often integrated into CI/CD pipelines to ensure that code quality is maintained throughout the development lifecycle. It can be easily integrated with CI/CD tools like Jenkins, GitLab, and Azure DevOps to automatically trigger code analysis and generate quality reports.
Can SonarQube analyze third-party libraries and frameworks incorporated into my project?
Yes, SonarQube can analyze third-party libraries and frameworks integrated into your project. It can detect issues related to those libraries, such as security vulnerabilities or compatibility problems.
Does SonarQube perform only static analysis?
SonarQube primarily performs static code analysis but also supports a range of dynamic analysis plugins. Static analysis is based on source code, while dynamic analysis examines code behavior during runtime.
How can I integrate SonarQube with my existing build process?
SonarQube offers multiple integration options. You can use build tools like Maven, Gradle, or Jenkins to integrate SonarQube into your existing build process. SonarScanner is another option to initiate code analysis from the command line.
Conclusion
We hope this detailed guide helped you understand how to ensure code quality with SonarQube on Ubuntu 18.04. To learn more about SonarQube installation, check out the official SonarQube Scanner documentation.
If you have any queries, please leave a comment below and we’ll be happy to respond to them for sure.