
Choose a different version or distribution
Introduction
Before we get started, let's quickly define Minikube before discussing how to install Kubernetes with it on Ubuntu 18.04.
Minikube is an open-source tool that allows you to run a single-node Kubernetes cluster on your local machine. It is designed for local development, testing, and learning purposes.
Installing Kubernetes with Minikube on Ubuntu 18.04 allows you to set up a lightweight, single-node Kubernetes cluster on your local machine. This provides a convenient way to explore Kubernetes features, experiment with containerized applications, and understand the basics of Kubernetes orchestration.
In this tutorial, you will install Kubernetes with Minikube on Ubuntu 18.04. Also, we will answer some FAQs regarding the code-server installation.
Advantages to Install Kubernetes with Minikube on Ubuntu 18.04
- Easy Setup: Installing Kubernetes with Minikube on Ubuntu 18.04 is straightforward, allowing quick setup of a local Kubernetes cluster for learning and experimentation.
- Learning Platform: Minikube provides a safe environment to explore Kubernetes concepts, experiment with deployments, services, and other resources without the complexities of a production environment.
- Portability: With Minikube, you can easily migrate and test your applications across different Kubernetes clusters without worrying about compatibility or infrastructure dependencies.
- Resource Efficiency: Minikube runs a lightweight Kubernetes cluster on a single node, making efficient use of your machine's resources while still providing a complete Kubernetes experience.
- Local Development & Testing: Minikube enables you to build and test your applications locally, providing a rapid development cycle and reducing time spent on deployment and debugging in a remote environment.
Prerequisites
- Ubuntu 18.04 desktop installed on your system
- A root password set up on your system
Step 1 - Updating the system
1) Make sure that the system is running on the latest versions.
sudo apt-get update -y
sudo apt-get upgrade -y
2) Once done, restart the system to apply the changes.
3) Then, download certain packages which would come in handy.
sudo apt-get install curl wget apt-transport-https -y
Step 2 - Install Minikube
1) Download the latest version of Minikube with the help of the following command:
wget https://storage.googleapis.com/minikube/releases/latest/minikube-linux-amd64
2) You need to copy the downloaded file to /usr/local/bin.
sudo cp minikube-linux-amd64 /usr/local/bin/minikube
Copy
3) After that, give execution permission to Minikube.
sudo chmod 755 /usr/local/bin/minikube4) Then check the version of Minikube using the following command:
minikube version
5) You'll be able to see the following output:
minikube version: v0.34.1since we are trying to run Kubernetes on an AWS machine a virtual box won't be supported, thus we are installing dockerd to run the cluster
6) To install on a Linux system that uses systemd, and already has Docker Engine installed:
#! Run these commands as root !#

##Install GO

wget https://storage.googleapis.com/golang/getgo/installer_linux
chmod +x ./installer_linux
./installer_linux
source ~/.bash_profile

## Install cri-dockerd

git clone https://github.com/Mirantis/cri-dockerd
cd cri-dockerd
mkdir bin
go build -o bin/cri-dockerd
mkdir -p /usr/local/bin
install -o root -g root -m 0755 bin/cri-dockerd /usr/local/bin/cri-dockerd
cp -a packaging/systemd/* /etc/systemd/system
sed -i -e 's,/usr/bin/cri-dockerd,/usr/local/bin/cri-dockerd,' /etc/systemd/system/cri-docker.service
systemctl daemon-reload
systemctl enable cri-docker.service
systemctl enable --now cri-docker.socket
7) Start the minikube
sudo minikube start --force
Step 3 - Install Kubectl
1) Applications are deployed and managed on Kubernetes with the help of a tool named Kubectl. It is not available with Ubuntu 18.04 repositories, hence, you need to download them and add to your system's repository.
Download and add the GPG key.
curl -s https://packages.cloud.google.com/apt/doc/apt-key.gpg | sudo apt-key add -
2) Then, add Kubernetes apt repository with the following command:
echo "deb http://apt.kubernetes.io/ kubernetes-xenial main" | sudo tee /etc/apt/sources.list.d/kubernetes.list
3) Update the repository and install Kubectl.
sudo apt-get update
sudo apt-get install kubectl -y
4) You can then check the version of Kubectl installed with the help of the following command:
kubectl version -o json
5) You'll be seeing the following output:
Output

{
  "clientVersion": {
    "major": "1",
    "minor": "13",
    "gitVersion": "v1.13.4",
    "gitCommit": "c27b913fddd1a6c480c229191a087698aa92f0b1",
    "gitTreeState": "clean",
    "buildDate": "2019-02-28T13:37:52Z",
    "goVersion": "go1.11.5",
    "compiler": "gc",
    "platform": "linux/amd64"
  }
}
7) You can check the running nodes with the help of the following command:
sudo kubectl get nodes
Output:

NAME       STATUS   ROLES    AGE     VERSION
minikube   Ready    master   2m45s   v1.13.3
8) Then, you may access Minikube VirtualBox:
sudo minikube ssh
9) The following output should be seen:
            _         _ ( )           ( )
  ___ ___  (_)  ___  (_)| |/')  _   _ | |_      __
/' _ ` _ `\| |/' _ `\| || , <  ( ) ( )| '_`\  /'__`\
| ( ) ( ) || || ( ) || || |\`\ | (_) || |_) )(  ___/
(_) (_) (_)(_)(_) (_)(_)(_) (_)`\___/'(_,__/'`\____)
10) Then, exit the VirtualBox shell:
$exit
11) You can even stop and delete Kubernetes clusters at any given point in time:
sudo minikube stop
sudo minikube delete
12) To check the status of Minikube use the following command:
minikube status
13) Below is what the output would be like:
host: Running
kubelet: Running
apiserver: Running
kubectl: Correctly Configured: pointing to minikube-vm at 192.168.99.100
Step 4 - Access Kubernetes Dashboard
1) Kubernetes ships with a web dashboard that can be used to manage your cluster by default. You can list all Minikube add-ons by using:
minikube addons list
2) You will get the following output:
Output

- addon-manager: enabled
- dashboard: disabled
- default-storageclass: enabled
- efk: disabled
- freshpod: disabled
- gvisor: disabled
- heapster: disabled
- ingress: disabled
- logviewer: disabled
- metrics-server: disabled
- nvidia-driver-installer: disabled
- nvidia-gpu-device-plugin: disabled
- registry: disabled
- registry-creds: disabled
- storage-provisioner: enabled
- storage-provisioner-gluster: disabled
3) Then, list all the container images running in the cluster with the following command:
sudo kubectl get pods --all-namespaces
4) The following will be the output:
Output

NAMESPACE     NAME                                   READY   STATUS    RESTARTS   AGE
kube-system   coredns-86c58d9df4-76dkf               1/1     Running   0          4m30s
kube-system   coredns-86c58d9df4-wdtwb               1/1     Running   0          4m29s
kube-system   etcd-minikube                          1/1     Running   0          8m17s
kube-system   kube-addon-manager-minikube            1/1     Running   0          8m6s
kube-system   kube-apiserver-minikube                1/1     Running   1          8m13s
kube-system   kube-controller-manager-minikube       1/1     Running   1          8m13s
kube-system   kube-proxy-5k8qf                       1/1     Running   0          4m33s
kube-system   kube-scheduler-minikube                1/1     Running   0          8m2s
kube-system   kubernetes-dashboard-ccc79bfc9-z827s   1/1     Running   0          4m17s
kube-system   storage-provisioner                    1/1     Running   0          4m13s
5) You can then get the URL of the Kubernetes dashboard with the following command:
sudo minikube dashboard --url
6) The output would be as follows:
Output

-   Enabling dashboard ...
-   Verifying dashboard health ...
-   Launching proxy ...
-   Verifying proxy health ...
http://127.0.0.1:56508/api/v1/namespaces/kube-system/services/http:kubernetes-dashboard:/proxy/
7) Then, paste http://127.0.0.1:56508/api/v1/namespaces/kube-system/services/http:kubernetes-dashboard:/proxy/ in your browser and you shall land on the page shown below:
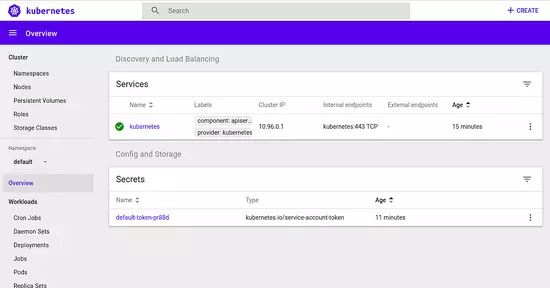
minikube start --extra-config kubeadm.ignore-preflight-errors=SystemVerification
FAQs to Install Kubernetes with Minikube on Ubuntu 18.04
How do I install Minikube on Ubuntu 18.04?
You can install Minikube on Ubuntu 18.04 by downloading the Minikube binary, making it executable, and placing it in a directory included in your system's PATH.
How do I start a Kubernetes cluster using Minikube on Ubuntu 18.04?
After installing Minikube, you can start a Kubernetes cluster by running the command minikube start. This will set up a single-node cluster on your local machine.
What are the minimum system requirements for running Minikube on Ubuntu 18.04?
Minikube has certain system requirements, such as having a hypervisor installed (like VirtualBox), sufficient RAM (at least 2GB), and CPU virtualization support enabled in your BIOS.
How do I access and interact with the Kubernetes cluster once it's running?
You can interact with the Kubernetes cluster in multiple ways. The kubectl command-line tool is the most common way to manage and control the cluster. You can also access the Kubernetes Dashboard, which provides a web-based graphical interface.
Can I access the deployed applications running on the Minikube cluster from my local machine?
Yes, you can access the deployed applications running on the Minikube cluster by exposing services and using port forwarding to access them from your local machine's browser.
How do I upgrade Minikube and the Kubernetes cluster to newer versions?
Minikube can be upgraded by downloading and replacing the Minikube binary. To upgrade the Kubernetes cluster, you can use the minikube delete command followed by minikube start with the desired Kubernetes version.
What are some useful Minikube commands for managing the cluster?
Some useful Minikube commands include minikube stop to stop the cluster, minikube delete to delete the cluster, and minikube status to check the status of the cluster.
Conclusion
Installing Kubernetes with Minikube on Ubuntu 18.04 opens up a world of possibilities for learning and experimenting with container orchestration. Minikube allows you to set up a single-node Kubernetes cluster on your local machine, providing an easy and convenient way to explore Kubernetes features without the complexity of a multi-node setup.
By following the installation steps and leveraging tools like kubectl and the Kubernetes Dashboard, you can interact with the cluster, deploy and test containerized applications, and gain hands-on experience with Kubernetes concepts.
If you have any queries, please leave a comment below, and we’ll be happy to respond to them for sure.
