

Introduction
Before we begin talking about how to install Mailtrain on Ubuntu 22.04 without Docker, let's first understand - What is Mailtrain?
Mailtrain is an open-source and self-hosted application that is used to send emails to your subscribers via any SMTP relay services like Mailjet and AmazonSES or through your own email server. With Mailtrain, users can easily create and customize email templates, build subscriber lists, and track important metrics like open rates and click-through rates.
This user-friendly tool enables businesses to engage with their audience, increase brand awareness, and drive conversions. Enjoy the benefits of Mailtrain's intuitive interface and extensive automation features to streamline your email marketing efforts.
In this tutorial, you will install Mailtrain on Ubuntu 22.04 without Docker. We will also address a few FAQs on how to install Mailtrain on Ubuntu 22.04 without Docker.
Advantages of Mailtrain
- Email campaign management: Mailtrain simplifies the process of creating and sending bulk emails to subscribers, saving businesses time and effort.
- User-friendly interface: With an intuitive design, Mailtrain makes it easy for even non-technical users to navigate and operate the platform.
- Automation capabilities: Businesses can leverage automation features to send targeted and personalized emails based on subscriber behavior and preferences.
- Subscriber management: Mailtrain provides tools for managing and segmenting subscribers, allowing businesses to target specific groups with tailored messages.
- Comprehensive analytics: Gain insights into email performance and optimize campaigns for better results and return on investment.
Prerequisites
- 1 GB RAM
- Ubuntu 22.04 server
Step 1- Add Sudo User
Using sudo, the user sets up Mailtrain on Ubuntu 22.04. Additionally, it is recommended to use a sudo user instead of root to ensure optimal results while following this tutorial. The following command can be executed on the server to add a sudo user.
sudo adduser username
sudo adduser username sudo
Change to the new user after that.
su - username
Step 2 - Install MariaDB Database Server
1) Enter this command to install MariaDB on Ubuntu 22.04.
sudo apt install mariadb-server mariadb-client
2) Once installed, MariaDB will start automatically. You can check the status using the following command:
systemctl status mariadb
You will get the following output:
Output

● mariadb.service - MariaDB 10.1.34 database server
   Loaded: loaded (/lib/systemd/system/mariadb.service; enabled; vendor preset: enabled)
   Active: active (running) since Sat 2018-09-08 11:13:27 UTC; 21s ago
     Docs: man:mysqld(8)
           https://mariadb.com/kb/en/library/systemd/
 Main PID: 3473 (mysqld)
   Status: "Taking your SQL requests now..."
    Tasks: 27 (limit: 505)
   CGroup: /system.slice/mariadb.service
           └─3473 /usr/sbin/mysqld
3) If MariaDB is not running, use the following alternative command:
sudo systemctl start mariadb
4) To enable MariaDB to start at system boot time, use the following command:
sudo systemctl enable mariadb
5) After that, run a security script:
sudo mysql_secure_installation
6) Press the ENTER key when the MariaDB root password is asked (password is not set at this point in time) and then press y to set the root password.
7) Press the ENTER key to answer all remaining questions.
8) Now, to check the version information of MariaDB server, enter the following command:
mariadb --version
The following should be the output:
Output

mariadb Ver 15.1 Distrib 10.1.34-MariaDB, for debian-linux-gnu (x86_64) using readline 5.2
Step 3 - Create a User and Database for Mailtrain
1) Log in to the MariaDB console and create a user. MariaDB package on Ubuntu uses unix_socket to authenticate user login by default, which means the username and password of the OS can be used to log into the console of MariaDB.
After that, you can run the following command to log in without providing the root password of MariaDB:
sudo mariadb -u root
2) Use the following command to create a database. (Don’t miss out on the semicolon):
create database mailtrain;
3) Create a user and grant all the privileges using the following command. Replace pwsuser and pwsuser_password with your preferred username and password.
grant all privileges on mailtrain.* to pwsuser@localhost identified by 'pwsuser_password';
4) After that, create a user with read-only access to your mailtrain database.
grant select on mailtrain.* TO pws_readonly@localhost identified by 'pws_readonly_password';
5) Flush the privileges table for the changes to take effect and sign out of the MariaDB console.
flush privileges;

exit;
Step 4 - Install Node.js
1) Now you need to install the Node.js (V14.x) or greater from the NodeSource repository.
sudo apt install npm -y

sudo npm install -g n

sudo n 14
2) npm (Node.js package manager) is available in nodejs package. To check your Node.js and npm version, run
node -v

npm -v
3) To compile and install native addons from npm, install the build tools:
sudo apt install -y build-essential
4) Installing ImageMagick is required in order to edit images in the HTML and email template editors.
sudo apt install imagemagick
Step 5: Install Redis Cache
Redis server can be installed for session caching. If you have a large number of email subscribers, this will enable Mailtrain to run five processes rather than the default one, which will speed up email delivery (Note that this will increase the memory usage like about 250MB).
sudo apt install redis -y
Redis should launch on its own when installed. Here's how to find out its status:
systemctl status redis
Sample Output:
● redis-server.service - Advanced key-value store
     Loaded: loaded (/lib/systemd/system/redis-server.service; enabled; vendor preset: enabled)
     Active: active (running) since Wed 2021-10-27 20:01:10 HKT; 4 days ago
       Docs: http://redis.io/documentation,
             man:redis-server(1)
   Main PID: 1359 (redis-server)
      Tasks: 4 (limit: 15514)
     Memory: 10.8M
     CGroup: /system.slice/redis-server.service
             └─1359 /usr/bin/redis-server 127.0.0.1:6379
If it's not working, you can use:
sudo systemctl start redis
Activate auto-start upon bootup:
sudo systemctl enable redis
Step 6 - Run Mailtrain
1) For this step, you should be working in your home directory.
cd ~
2) Afterward, download Mailtrain files from Github. (When executing the git commands, kindly refrain from using sudo.)
sudo apt install git

git clone https://github.com/Mailtrain-org/mailtrain.git

cd mailtrain/

git checkout v2
3) Use the following command to import the initial SQL data into the mailtrain database. The password for the mailtrain user that was created in step three must be entered.
mysql -u pwuser -p pwuser_password < ~/mailtrain/server/setup/sql/mailtrain.sql
4) Using a command-line text editor such as Nano, create the production.yaml configuration file.
nano ~/mailtrain/server/config/production.yaml
5) You can add configurations to this file that take precedence over the ~/mailtrain/server/config/default.yaml file's default configurations. Just the following configurations need to be added. Keep in mind that every colon should be followed by a space character.
user: mailtrain
group: mailtrain
roUser: nobody
roGroup: nobody

www:
  host: 127.0.0.1
  proxy: true
  secret: "Replace this with some random characters"
  trustedUrlBase: http://mailtrain.example.com
  sandboxUrlBase: http://sbox-mailtrain.example.com
  publicUrlBase: http://newsletter.example.com

mysql:
  user: mailtrain
  password: mailtrain_password
  database: mailtrain
redis:
  enabled: true

log:
  level: info

builtinZoneMTA:
  enabled: false

queue:
  processes: 5
Mailtrain requires you to use 3 URL endpoints.
mailtrain.example.com: The trusted URL that users who are logged in use.sbox-mailtrain.example.com: This is not visible to users; it is used to host template editors.newsletter.example.com: The URL that visitors can view publicly.
6) Save and Close the file. Next, set up the mailtrain group and user that the mailtrain daemon will use to operate. Observe that this user doesn't require a password, so we create a system user rather than a regular user.
sudo adduser --system --group --no-create-home mailtrain
7) Make a report worker configuration file.
nano ~/mailtrain/server/services/workers/reports/config/production.yaml
8) Include the following setups.
log:
  level: warn
mysql:
  user: mailtrain
  password: mailtrain_password
  database: mailtrain
9) Save and Close the file.
Verify that you are currently in the ~/mailtrain/ directory.
cd ~/mailtrain
10) Install the node packages that are needed. There is just one command in this list. Do not use sudo.
for idx in client shared server mvis/client mvis/server mvis/test-embed mvis/ivis-core/client mvis/ivis-core/server mvis/ivis-core/shared mvis/ivis-core/embedding; do
(cd $idx && npm install && npm audit fix)
done
11) You can disregard the following error message if you see it.
-bash: cd: mvis/ivis-core/client: No such file or directory
-bash: cd: mvis/ivis-core/server: No such file or directory
-bash: cd: mvis/ivis-core/shared: No such file or directory
-bash: cd: mvis/ivis-core/embedding: No such file or directory
12) Make the directory change to ~/mailtrain/client/.
cd ~/mailtrain/client
13) Build the packages for the node.
npm run build
14) To /var/www/, copy the mailtrain folder.
sudo mkdir -p /var/www/

cd ~

sudo cp ~/mailtrain /var/www/mailtrain -r
15) Then change the permission of /var/www/mailtrain/
sudo chown mailtrain:mailtrain /var/www/mailtrain/ -R

sudo chmod o-rwx /var/www/mailtrain/server/config/
16) For mailtrain, create a systemd service unit file.
sudo nano /etc/systemd/system/mailtrain.service
17) Add the following lines to this file.
[Unit]
Description=Mailtrain server
After=syslog.target network.target mariadb.service redis-server.service

[Service]
Environment="NODE_ENV=production"
WorkingDirectory=/var/www/mailtrain/server
ExecStart=/usr/bin/node index.js
Type=simple
Restart=always
RestartSec=10

[Install]
WantedBy=multi-user.target
18) Save and close this file. Then start mailtrain.service.
sudo systemctl enable --now mailtrain.service
19) Check its status. Make sure it is running.
sudo systemctl status mailtrain.service
Sample output:
● mailtrainv2.service - Mailtrain server
     Loaded: loaded (/etc/systemd/system/mailtrainv2.service; enabled; vendor preset: enabled)
     Active: active (running) since Mon 2021-11-01 16:42:10 HKT; 8s ago
   Main PID: 2794663 (mailtrain)
      Tasks: 25 (limit: 15514)
     Memory: 258.0M
     CGroup: /system.slice/mailtrainv2.service
             ├─2794663 mailtrain
             ├─2794693 mailtrain: worker executor
             └─2794701 /usr/bin/node /var/www/mailtrainv2/server/services/importer.js
If it’s not running, you can check the log.
sudo journalctl -eu mailtrain
20) The following command can be used to see which ports mailtrain.service is using if it is currently running.
sudo netstat -lnpt | grep mailtrain
21) Now the Mailtrain is running, and you can access its web interface via port 3000.
your-server-ip:3000
Step 7 - Set up Reverse Proxy and Enable HTTPS
1) Before using the web interface of Mailtrain, firstly you should keep it behind Nginx and enable HTTPS. Install Nginx web server on Ubuntu 22.04.
sudo apt install nginx
2) Now, copy the example mailtrain-nginx.conf file to /etc/nginx/conf.d/ directory.
sudo cp /var/www/mailtrain/setup/mailtrain-nginx.conf /etc/nginx/conf.d/
3) Open mailtrain-nginx.conf file.
sudo nano /etc/nginx/conf.d/mailtrain-nginx.conf
4) Search the following line.
server_name mailtrain.org www.mailtrain.org;
5) After this, change server_name to your own domain name like newsletter.your-domain.com. Make sure to create an A record for the sub-domain.
server_name newsletter.your-domain.com;
6) Save and close the file. Then test if the Nginx configuration is working perfectly.
sudo nginx -t
7) If the test is successful, reload Nginx so that the changes can come into effect.
sudo systemctl reload nginx
Now, you will be able to access Mailtrain via: newsletter.your-domain.com.
8) Now edit /var/www/mailtrain/config/production.toml file.
sudo nano /var/www/mailtrain/config/production.toml
9) Now, you have to add the following two lines in the [www] section, to indicate that mailtrain is behind the Nginx and to make it listen to localhost address only.
host="127.0.0.1"
proxy=true
10) Save and close the file. After that, restart Mailtrain so that the changes can come into effect.
sudo systemctl restart mailtrain
Apache
11) Install Apache web server.
sudo apt install apache2
12) Create 3 Apache virtual hosts for the 3 URL endpoints.
sudo nano /etc/apache/sites-enabled/mailtrain.example.com.conf

sudo nano /etc/apache/sites-enabled/sbox-mailtrain.example.com.conf

sudo nano /etc/apache/sites-enabled/newsletter.example.com.conf
The content of the 3 files are as follows:
mailtrain.example.com
<VirtualHost *:80>
    ServerName mailtrain.example.com
    ServerSignature Off

    ProxyPreserveHost On
    ProxyPass / http://127.0.0.1:3000/
    ProxyPassReverse / http://127.0.0.1:3000/

    ErrorLog /var/log/apache2/mailtrain.vegastack.org.error
</VirtualHost>
sbox-mailtrain.example.com
<VirtualHost *:80>
    ServerName sbox-mailtrain.example.com
    ServerSignature Off

    ProxyPreserveHost On
    ProxyPass / http://127.0.0.1:3003/
    ProxyPassReverse / http://127.0.0.1:3003/

    ErrorLog /var/log/apache2/sbox.mailtrain.vegastack.org.error
</VirtualHost>
newsletter.example.com.conf
<VirtualHost *:80>
    ServerName newsletter.example.com
    ServerSignature Off

    ProxyPreserveHost On
    ProxyPass / http://127.0.0.1:3004/
    ProxyPassReverse / http://127.0.0.1:3004/

    ErrorLog /var/log/apache2/newsletter.vegastack.org.error
</VirtualHost>
13) Save and close the files. 03 modules need to be enabled in Apache.
sudo a2enmod proxy proxy_http headers
Then enable the 3 virtual hosts.
sudo a2ensite mailtrain.example.com.conf newsletter.example.com.conf sbox-mailtrain.example.com.conf
Restart Apache web server.
sudo systemctl restart apache2
Step 8 - Enable HTTPS With Let’s Encrypt
1) Now you'll install Let’s Encrypt client (certbot) on your Ubuntu 22.04 server.
sudo apt install software-properties-common

sudo add-apt-repository ppa:certbot/certbot

sudo apt install certbot python3-certbot-nginx
2) To use the Nginx plugin to install a TLS certificate, run the following command.
sudo certbot --nginx --agree-tos --redirect --hsts --staple-ocsp --email your-email-address -d newsletter.your-domain.com
3) Now access your web interface via your domain name and a secure HTTPS connection.
4) If you have installed Mailtrain on your email server, use the following SMTP settings. Keep the hostname 127.0.0.1 and Port should be 25. As you are talking to localhost, there is no need to enable the encryption of authentication.
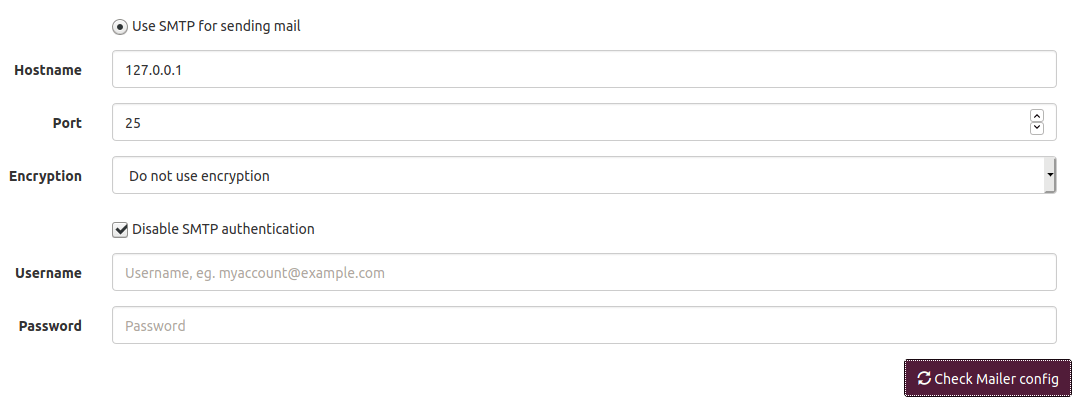
Save your settings and you can now explore the functionalities of Mailtrain.
How to Handle Bounce Messages in Mailtrain
Your email list will eventually include addresses to which you are unable to send emails. For instance, an email address used by a subscriber who quits will be removed from the corporate database. Consequently, a bounce notice stating that the email cannot be sent will be sent to your email server.
An SMTP relay provider will take care of bounce messages if you send emails through them. You must manage bounce messages in Mailtrain if you send emails using your own email server. Mailtrain provides two methods for managing mails that bounce.
- via VERP
- via Postfix log
VERP Bounce Handling
Each subscriber's envelope address is used uniquely by your email list manager when you use VERP (variable envelope return path). Edit the production.toml file to enable VERP.
sudo nano /var/www/mailtrain/config/production.toml
Add the following text if the SMTP server on your Mailtrain host is not currently operating.
[verp]
enabled=true
port=25
disablesenderheader=true
Add the following text if an SMTP server, such as Postfix, is up and running on your Mailtrain server. On 127.0.0.1:2525, the bounce handling server is going to be listening.
[verp]
enabled=true
port=2525
host="127.0.0.1"
disablesenderheader=true
Save and close the file. For the modifications to take effect, restart Mailtrain after that.
sudo systemctl restart mailtrain
In Mailtrain web interface, go to Settings -> VERP Bounce Handlding. Check Use VERP to catch bounces. Save your settings.
To enable bounce messages to be forwarded to your Mailtrain host, you must first add an A record pointing to your Mailtrain host and create an MX record for the server hostname (bounces.your-domain.com). Every list subscriber will have a distinct envelope address, such as [email protected].
Take note that the SPF alignment needs to be in relaxed mode if you have deployed a DMARC record for your domain name. Your mailing may not pass the DMARC check if it is configured in strict mode.
You must set up a transport map so that Postfix may relay the bounce message to Mailtrain if the Mailtrain bounce handling server is listening on port 2525 of 127.0.0.1 and the Postfix SMTP server is listening on port 25 of the public IP address. Make the file for the transit map.
sudo nano /etc/postfix/transport
To this file, append the following line. This instructs Postfix to forward emails to the Mailtrain bounce handling server with addresses like [email protected].
bounces.your-domain.com smtp:[127.0.0.1]:2525
Save and close the file. Then generate the index file.
sudo postmap /etc/postfix/transport
Edit Postfix main configuration file.
sudo nano /etc/postfix/main.cf
Add the following line to the file.
transport_maps = hash:/etc/postfix/transport
Note: The transport_maps parameter has different values if your mail server was configured using iRedMail. The value should be added at the end, as seen below.
transport_maps =
     proxy:mysql:/etc/postfix/mysql/transport_maps_user.cf
     proxy:mysql:/etc/postfix/mysql/transport_maps_maillist.cf
     proxy:mysql:/etc/postfix/mysql/transport_maps_domain.cf
     hash:/etc/postfix/transport
Save and close the file. Then restart Postfix for the change to take effect.
sudo systemctl restart postfix
Handling Bounced Messages via Postfix Log
By locating lines with the status=bounced, Mailtrain can identify bounced messages from Postfix mail logs. You must first enable the log reading server for Postfix logs. Modify the file production.toml.
sudo nano /var/www/mailtrain/config/production.toml
Add the following text.
[postfixbounce]
enabled=true
Save and close the file. Then restart Mailtrain for the changes to take effect.
sudo systemctl restart mailtrain
Currently, 127.0.0.1:5699 is being listened to by the Postfix log reading server. Use this command to enable it to view Postfix logs.
tail -F /var/log/mail.log | nc localhost 5699 -
You can construct a systemd service unit to run it in the background.
sudo nano /etc/systemd/system/bouncetail.service
Add the following text.
[Unit]
Description=Postfix bounce notifier
After=mailtrain.service

[Service]
ExecStart=/bin/sh -c '/usr/bin/tail -F /var/log/mail.log | nc localhost 5699 -'
Type=simple
Restart=always
RestartSec=10

[Install]
WantedBy=multi-user.target
Save and close the file. Then start this service and enable auto-start at boot time.
sudo systemctl start bouncetail
sudo systemctl enable bouncetail
After you restart mailtrain service, be sure you restart bouncetail as well. We don't utilize this strategy because we discovered that the bouncetail service uses a lot of CPU power on my server.
Update
The following are some other reasons that causes soft bounces.
- The recipient’s mailbox is full.
- Your IP address is on a blacklist.
- The email server of the recipient is unavailable or down.
A hard bounce occurs when the email address of the recipient is invalid. Allowing multiple soft bounces before unsubscribing a faulty email address is a good idea. By default, Mailtrain unsubscribes an email address if one bounce is detected. This is acceptable for hard bounces.
If you changed the SMTP sending settings in Mailtrain, but it seems still using the old settings, then you should try restarting Mailtrain and Redis.
sudo systemctl restart mailtrain redis-server
How to Re-send Bounced Emails
You can resend bounced emails using Mailtrain if you believe that any of the emails you received were returned by your mail server due to technical issues.
The campaign ID, which may be found in the campaign URL such as https://newsletter.your-domain.com/campaigns/view/818, must first be known. 818 is the campaign ID.
Then log into MariaDB/MySQL console:
sudo mysql -u root
Select the mailtrain database.
use mailtrain;
Show the campaign table.
select * from campaign__818;
Sample output:
Output

MariaDB [mailtrain]> select * from campaign__818;
+-----+------+---------+--------------+--------+---------------------------------------------+
| id  | list | segment | subscription | status | response                                    |
+-----+------+---------+--------------+--------+---------------------------------------------+
|   1 |    1 |      10 |         6194 |      1 | 250 2.0.0 Ok: queued as DC5E4660FAE         |
|   2 |    1 |      10 |         6560 |      3 | Greeting never received                     |
|   3 |    1 |      10 |         6616 |      1 | 250 2.0.0 Ok: queued as 2CA9C660FB1         |
|   4 |    1 |      10 |         6750 |      3 | Greeting never received                     |
|   5 |    1 |      10 |         6870 |      3 | Greeting never received                     |
This displays the status of each email sent. An email with status 3 has bounced. Remove the record that bounced from the table.
DELETE FROM campaign__818 WHERE status = 3;
To send emails to recipients who bounced back, click the Continue button on the Mailtrain campaign page.
Uploading Images in Mailtrain
Installing the imagemagick package is required in order to post photos to Mailtrain. If you don't have it, Mailtrain may encounter problems when you upload photos.
sudo apt install imagemagick
How to Insert a Signup Form on Your Website
Enabling cross-origin resource sharing is the first step. Modify the file production.toml.
sudo nano /var/www/mailtrain/config/production.toml
Add the following line in the file to whitelist your website.
[cors]
# Allow subscription widgets to be embedded
origins=['https://www.example.com']
Save and close the file. Then restart Mailtrain for the change to take effect.
sudo systemctl restart mailtrain
Next, to display the sign-up form on your website, add the following code. Replace the text according to your Mailtrain domain name and the list ID.
<div data-mailtrain-subscription-widget data-url="https://newsletter.your-domain.com/subscription/8ljDT9KMGr/widget">
     <a href="https://newsletter.your-domain.com/subscription/8ljDT9KMGr">Subscribe to our list</a>
</div>
<script src="https://newsletter.your-domain.com/subscription/widget.js"></script>
How to Create Additional Users in Mailtrain
The administrator of Mailtrain v2 will be able to add several users with customizable sharing options and fine-grained permissions. However, as of version 1.24.1, the database is the sole way to create users. Open the MariaDB/MySQL console.
sudo mysql -u root
Use the mailtrain database.
USE mailtrain;
Then create a user entry with the following SQL command.
INSERT INTO `users` (`username`, `password`, `email`, `access_token`, `reset_token`, `reset_expire`, `created`) VALUES ('your-username',PASSWORD("your-password"),'[email protected]',NULL,NULL,NULL,NOW());
Exit the database server.
EXIT;
It has been observed that users created in this manner may encounter difficulties accessing the Mailtrain web interface initially. In such cases, users are required to utilize the "forgot password" link provided on the login page to reset their password. Once the password has been reset, the user should be able to log in successfully. Additionally, it should be noted that all users possess administrative permissions within the Mailtrain web interface.
How To Import Email List From MailChimp
You must first navigate to your MailChimp dashboard's Audience tab. Click View Contacts to display all of your subscribers. After that, to export your list as a CSV file, click the Export Audience button.
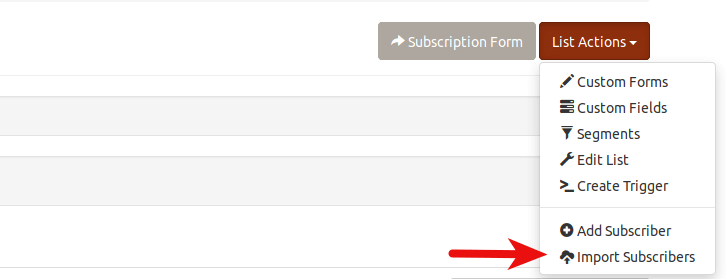
Choose your email list on the Mailtrain dashboard after that. After choosing List Actions from the drop-down menu, click Import Subscribers.
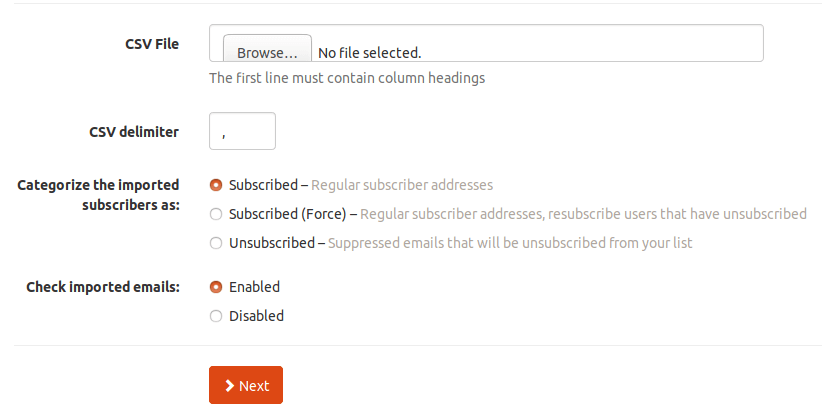
You must upload the CSV file that you downloaded from MailChimp on the following page.
Next, you must match the fields in your Mailtrain email list with the fields in MailChimp. You can add new fields to the Mailtrain email list if there are any that aren't already there using the MailChimp dashboard.
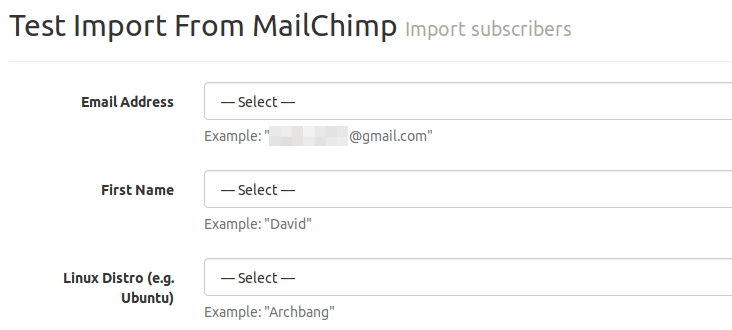
Please take note that you need create radio buttons in Mailtrain fields if you have them in your MailChimp fields. Nonetheless, you must divide your MailChimp list into pieces according to the radio button's value, export each section to a separate CSV file, and then import each segment into Mailtrain one at a time. This is a result of Mailtrain's inability to match each radio button's MailChimp values.
Cron Job to Automatically Clean Unsubscribed Email Addresses
While the Mailtrain web-based admin panel allows you to manually remove unsubscribed email addresses, utilizing MySQL/MariaDB commands to do so is far more effective. A Cron job may then be created to automate this process.
First, log into MySQL/MariaDB database server.
sudo mysql -u root
Then connect to the mailtrain database.
use mailtrain;
The subscribers’ info are stored in the subscription tables. If you have several mailing lists, then you will have several subscription tables. You can list all these tables using the following SQL command.
show tables like 'subscription%';
Output on the server:
Output

+-------------------------------------+
| Tables_in_mailtrain (subscription%) |
+-------------------------------------+
| subscription                        |
| subscription__1                     |
| subscription__2                     |
+-------------------------------------+
The first table does not contain any data. In Mailtrain, two lists, namely "subscription__1" and "subscription__2," are maintained. These tables store the subscriber information. Subscribed email addresses are assigned a status code of 1, whereas unsubscribed email addresses have a status code of 2. Hence, one can utilize the following SQL instructions to eliminate email addresses that are not subscribed.
DELETE FROM subscription__1 where status = '2';
DELETE FROM subscription__2 where status = '2';
To exit MySQL/MariaDB database server, run
exit;
Now open the root user’s crontab file.
sudo crontab -e
Add the following two lines.
# Delete unsubscribed email addresses from mailing list daily
@daily /usr/bin/mysql -u root mailtrain -Bse "DELETE FROM subscription__1 where status = '2';DELETE FROM subscription__2 where status = '2';"
Save and close the file. And you’re done.
How to Export Your Email Lists in Mailtrain
Within the Mailtrain admin panel, there isn't an export button. On the other hand, you can export your email lists from the server if you have installed phpMyAdmin. In phpMyAdmin, choose the mailtrain database and then the table containing your email lists. In my instance, subscriber data is stored in the subscription__1 and subscription__2 databases.
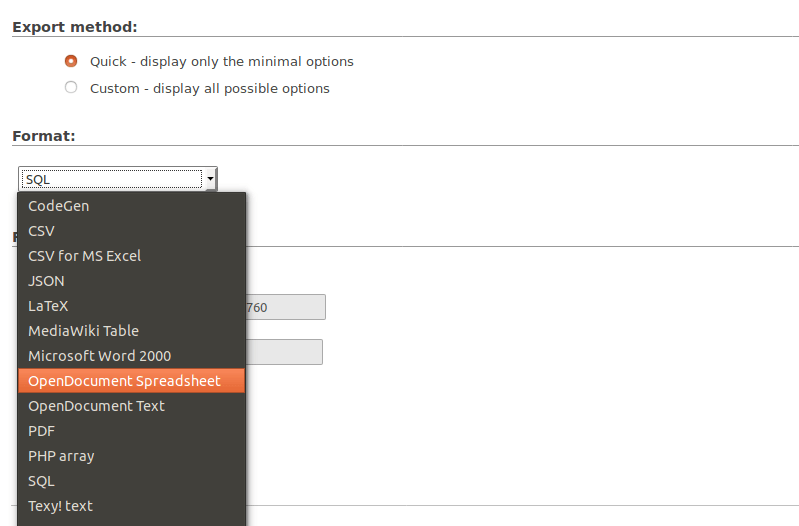
After that, to save the table as a file, click the export button. There are two export buttons, as you can see. In order to export the whole table, you must click the second export button. Only the currently displayed records in the table will be exported when you use the first export button.

The export file's file format can then be selected. Lastly, press the "Go" button.
How to Hide the Mailtrain Home Page
If you don’t want visitors to see your mailtrain home page, you can set up a 301 permanent redirect to redirect visitors to your website’s home page, by adding the following code in Mailtrain’s Nginx configuration file.
location = / {
   return 301 http://www.your-domain.com;
}
Save and close the file. Then reload Nginx for the change to take effect.
sudo systemctl reload nginx
You need to remember the Mailtrain login URL.
https://newsletter.your-domain.com/users/login
By default, the login button will redirect you to the Mailtrain home page, so you need to remember another URL.
https://newsletter.your-domain.com/lists
How to Insert Options on the Signup Form
You must build custom fields if you wish to offer options for the visitor to choose from on the signup form. Go to your list, click the List Actions drop-down menu, choose Custom Fields, and then create a new custom field.
The field that will serve as the option list's heading question must first be created. You can choose checkboxes (for numerous selections) or radio buttons (for a single choice) under Field Type. Don't select anything in Group because the selections in this field will be grouped together.
Next, make a custom field for every choice. It is necessary to select the group value option in Field Type and the prior custom filed name in Group.
How to Change Field Type
Modifications to the field type within the mailtrain database can be implemented; however, the Mailtrain web interface does not offer a built-in option for such alterations. For instance, the conversion of a checkbox field type to a radio button field needs to be performed manually.
To ensure data security, it is highly recommended to create a backup of the database prior to executing any database changes. To back up the mailtrain database, utilize the following command.
sudo mysqldump -u root mailtrain > mailtrain.sql
Then log into MariaDB database server.
sudo mysql -u root
Use the mailtrain database.
USE mailtrain;
All custom fields are stored in the custom_fields table. You can check its content with:
SELECT * FROM custom_fields;
To change the type of a custom field, locate it and execute the SQL query below. Put your own ID number in place of the original.
UPDATE custom_fields SET type = 'radio' Where id = 3;
Exit the database server.
EXIT;
How to Clean Your Email List in Mailtrain
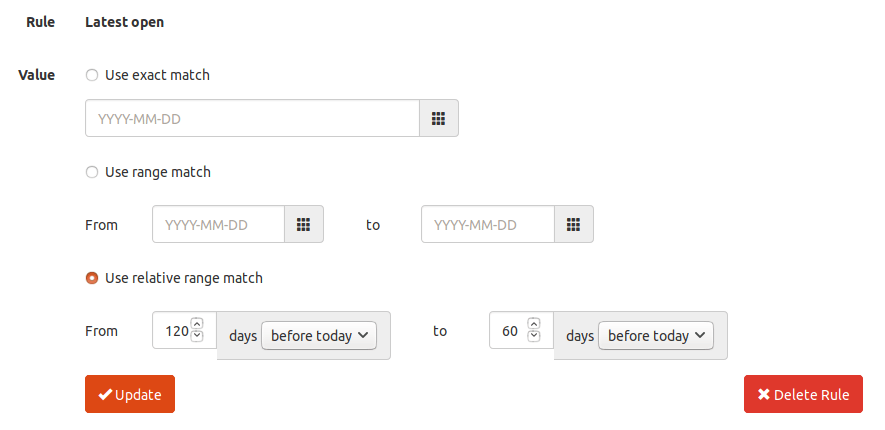
Unengaged subscribers cost you money and damage the reputation of your site because they don't open your emails, according to mailbox providers. Take disengaged subscribers from your email list to ensure that future emails get in the inbox.
For those who haven't opened your email in the previous 60 days, you can make a segment and then remove their email addresses. The following is the rule for this segment:
FAQs to Install Mailtrain on Ubuntu 22.04 without Docker
Is it necessary to have programming knowledge to install Mailtrain without Docker?
Some technical knowledge is required, such as working with the command line, navigating the file system, and configuring software. However, there are detailed installation guides available to assist you.
What is the configuration process for Mailtrain?
Configure Mailtrain by creating a .env file and setting up your database connection, SMTP settings, and other required parameters.
How can I access the Mailtrain web interface?
Once the application is running, you can access the Mailtrain web interface by visiting http://localhost:3000 or using your server's IP address.
Can I use an existing Ubuntu server for Mailtrain installation?
Yes, you can use an existing Ubuntu server, given that it meets the required system specifications and prerequisites.
Can I integrate Mailtrain with an existing email server?
Yes, Mailtrain can integrate with third-party SMTP servers or you can configure it as your standalone email server.
Are there any security considerations when installing Mailtrain without Docker?
Yes, it is important to follow security best practices, such as securing server access, using SSL certificates, and implementing firewall rules, to protect your Mailtrain installation.
Is it necessary to have a domain name for Mailtrain installation?
Yes, you need a domain name to access Mailtrain and send emails. Configure your domain's DNS settings to point to the server where Mailtrain is installed.
Conclusion
We hope this simple guide helped you understand how to install Mailtrain on Ubuntu 22.04. To learn more about Mailtrain, visit Mailtrain Wiki.
If you have any queries, please leave a comment below and we’ll be happy to respond to them for sure.