Introduction
Before we begin talking about how to install WordPress with LEMP, let’s briefly understand – What is WordPress?
WordPress is a popular and user-friendly content management system (CMS) used for creating websites and blogs. It offers a wide range of customizable themes and plugins, allowing users to build sites without coding knowledge.
As a powerful tool, WordPress enables easy content publishing and site management, making it a top choice for beginners and experienced web creators alike.
In this tutorial, you will install WordPress with LEMP stack on an Ubuntu 18.04 server. Let's get started.
Advantages of WordPress
- User-friendly interface: WordPress offers an intuitive platform for easy website management.
- Customization: With a vast selection of themes and plugins, it allows personalized site designs and functionalities.
- SEO-friendly: Built-in features help improve search engine rankings, boosting website visibility.
- Active community: Benefit from continuous updates, support, and resources from a large WordPress user community.
- Mobile responsiveness: Websites created with WordPress are optimized for seamless viewing on various devices.
Prerequisites to Install WordPress with LEMP on Ubuntu 18.04
- A
sudouser on your server. - Install a LEMP stack.
- A secured site with an SSL certificate.
After completing the setup steps, log into your server as a root user, and follow the below steps.
Step 1 - Create MySQL Database and a WordPress User
As a first step to install WordPress you need to make a database using MySQL and create a WordPress user.
1) After that, log into your MySQL root account. You can log into the MySQL admin account using sudo if MySQL is configured with auth_socket authentication plugin.
sudo mysql
If your authentication method is to use a password for the MySQL root account then you should use the following format:
mysql -u root -p
After that, you will get a prompt for the password for the MySQL root account.
2) Moving forward you need to create a separate database for WordPress. Use the following command to create a database:
CREATE DATABASE wordpress DEFAULT CHARACTER SET utf8 COLLATE utf8_unicode_ci;
3) Create a separate MySQL user account to operate your new database. It's good to use one-function databases and accounts for management and security. We will use the pwsuser in this tutorial as a username. You can keep it whatever you want.
After that, you will create this account, set a password, and grant access to the database created by you. Make sure you keep a strong password and run the following command:
CREATE USER 'wordpressuser'@'localhost' IDENTIFIED BY 'ubuntu
';
GRANT ALL ON wordpress.* TO 'wordpressuser'@'localhost';
4) Flush the privileges so that your current MySQL knows about the recent changes.
FLUSH PRIVILEGES;
5) Exit from your MySQL using the following command:
EXIT;
After that, you will return to the regular Linux shell.
Step 2 - Installing PHP Extensions
1) For PHP to communicate with MySQL you will need a minimal set of extensions. But for WordPress, you will need more PHP extensions which you can download and install using the following command.
sudo apt update
sudo apt install php-curl php-gd php-intl php-mbstring php-soap php-xml php-xmlrpc php-zip
Each WordPress plugin has its own set of requirements therefore it is necessary to check your plugin documentation to discover its PHP requirements.
2) After that, restart the PHP-FPM process to leverage the newly installed features.
apt install php8.1-fpm
sudo systemctl restart php8.1-fpm
You now have all the required PHP extensions required for WordPress.
Step 3 - Configure Nginx
Now, you need to make some minor changes in the Nginx server block files. We are going to use /var/www/wordpress as the root directory of our WordPress install. You need to use the webroot specified in your own configuration.
1) Open your site’s server block file with sudo privileges.
sudo nano /etc/nginx/sites-available/wordpress
2) After that, add a few location blocks within the main server block.
3) Start creating exact-matching location blocks for requests to /favicon.ico and /robots.txt.
Now, you will use a regular expression location to match requests for static files. Now, turn off the logging for these requests and make them cacheable.
server {
    . . .

    location = /favicon.ico { log_not_found off; access_log off; }
    location = /robots.txt { log_not_found off; access_log off; allow all; }
    location ~* \.(css|gif|ico|jpeg|jpg|js|png)$ {
        expires max;
        log_not_found off;
    }
    . . .
}
4) In the existing location / block, adjust the try_files list so that the control is passed on to the index.php file with request arguments.
server {
    . . .
    location / {
        #try_files $uri $uri/ =404;
        try_files $uri $uri/ /index.php$is_args$args;
    }
    . . .
}
5) After that, save and close the file.
6) You can check configuration for syntax errors through the following command:
sudo nginx -t
7) If there are no errors then you need to reload Nginx.
sudo systemctl reload nginx
After that, you are ready to download and set up WordPress.
Step 4 - Download WordPress
1) It is recommended to download the latest version of WordPress from their website to avoid any security issues. Change into a writable directory and then use the following command to download:
cd /tmp
curl -LO https://wordpress.org/latest.tar.gz
2) Create the WordPress directory structure by extracting the compressed file using the following command:
tar xzvf latest.tar.gz
3) Now, you need to move these files to your document root momentarily. Before that make sure to copy the sample configuration file to the filename that WordPress can read.
cp /tmp/wordpress/wp-config-sample.php /tmp/wordpress/wp-config.php
4) After that, copy the contents of your directory into the document root. Use -a to maintain the permissions and add a dot at the end of your source directory to copy everything including the hidden files.
sudo cp -a /tmp/wordpress/. /var/www/wordpress
5) After this is done successfully, you need to give ownership to www-data user and group. Nginx will use this user and group to read and write the WordPress files so that it can serve the pages and make automatic updates.
sudo chown -R www-data:www-data /var/www/wordpress
All your files are in the server’s document root and with correct ownership.
Step 5 - Set up the WordPress Configuration
After that, you are required to make changes to the main WordPress configuration file.
1) Now it is required to adjust some secret keys to provide security to the installation. WordPress itself provides a generator to come up with these keys and as these are to be used internally, you can have complex keys here. Use the following command to generate the required keys:
curl -s https://api.wordpress.org/secret-key/1.1/salt/
Output

define('AUTH_KEY',         '1jl/vqfs<XhdXoAPz9 DO NOT COPY THESE VALUES c_j{iwqD^<+c9.k<J@4H');
define('SECURE_AUTH_KEY',  'E2N-h2]Dcvp+aS/p7X DO NOT COPY THESE VALUES {Ka(f;rv?Pxf})CgLi-3');
define('LOGGED_IN_KEY',    'W(50,{W^,OPB%PB<JF DO NOT COPY THESE VALUES 2;y&,2m%3]R6DUth[;88');
define('NONCE_KEY',        'll,4UC)7ua+8<!4VM+ DO NOT COPY THESE VALUES #`DXF+[$atzM7 o^-C7g');
define('AUTH_SALT',        'koMrurzOA+|L_lG}kf DO NOT COPY THESE VALUES  07VC*Lj*lD&?3w!BT#-');
define('SECURE_AUTH_SALT', 'p32*p,]z%LZ+pAu:VY DO NOT COPY THESE VALUES C-?y+K0DK_+F|0h{!_xY');
define('LOGGED_IN_SALT',   'i^/G2W7!-1H2OQ+t$3 DO NOT COPY THESE VALUES t6**bRVFSD[Hi])-qS`|');
define('NONCE_SALT',       'Q6]U:K?j4L%Z]}h^q7 DO NOT COPY THESE VALUES 1% ^qUswWgn+6&xqHN&%');
2) After that, open the WordPress configuration file and replace the dummy values from the settings.
sudo nano /var/www/wordpress/wp-config.php
3) Now, you will see the following output, delete this section and add what you got as an output from previous the command.
. . .

define('AUTH_KEY',         'put your unique phrase here');
define('SECURE_AUTH_KEY',  'put your unique phrase here');
define('LOGGED_IN_KEY',    'put your unique phrase here');
define('NONCE_KEY',        'put your unique phrase here');
define('AUTH_SALT',        'put your unique phrase here');
define('SECURE_AUTH_SALT', 'put your unique phrase here');
define('LOGGED_IN_SALT',   'put your unique phrase here');
define('NONCE_SALT',       'put your unique phrase here');

. . .
4) Modify some of the database connection settings by adjusting the database name, the database user, and the associated password that you have configured within MySQL.
5) After that, change the method that WordPress should use to write the filesystem by adding it in the database connection settings.
. . .

define('DB_NAME', 'wordpress');

/** MySQL database username */
define('DB_USER', 'wordpressuser');

/** MySQL database password */
define('DB_PASSWORD', 'password');

. . .

define('FS_METHOD', 'direct');
6) Save and close the file.
7) Now create a soft link of wordpress.conf to sites-enabled directory
sudo ln -s /etc/nginx/sites-available/wordpress /etc/nginx/sites-enabled/
8) Unlink the default page of nginx and restart the nginx service.
sudo unlink /etc/nginx/sites-enabled/default
sudo systemctl reload nginx
Step 6 - Completing the Installation Process
After that, the server configuration is complete and now you can configure WordPress using a web interface.
1) Navigate to your server’s domain name in your web browser.
http://server_domain_or_IP
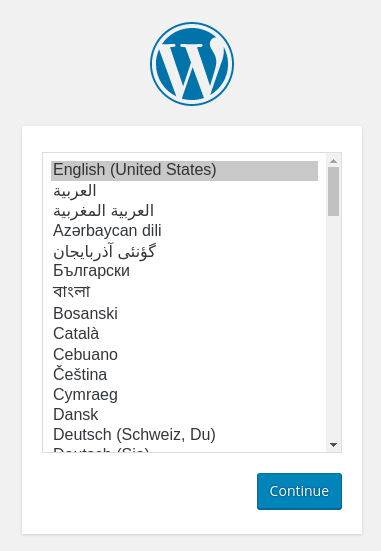
2) After that, you will be asked to select the language you want to use.
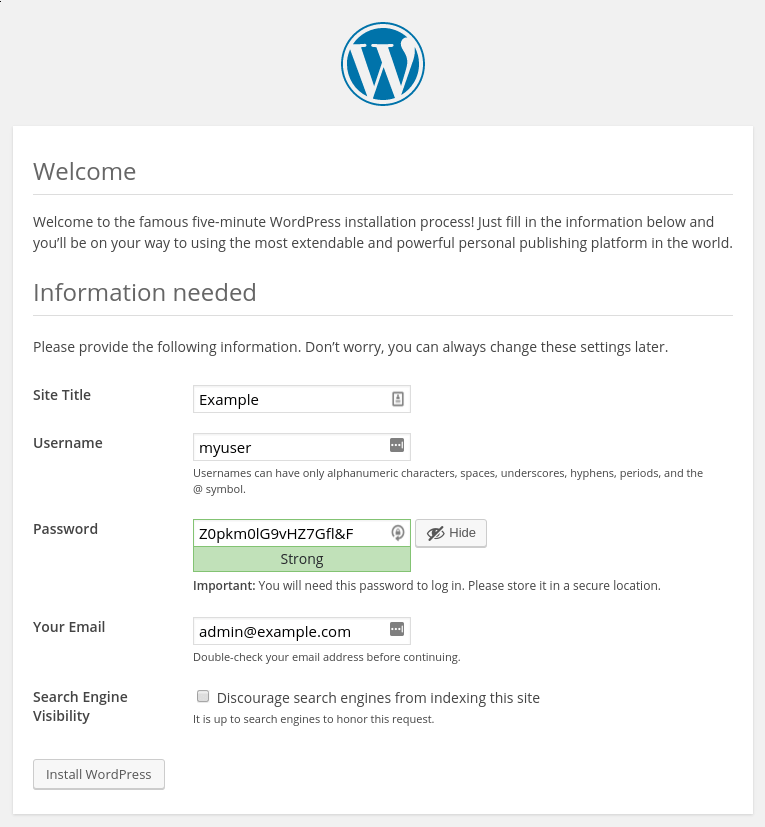
3) After that, it will take you to the main setup page. Now select a name for your WordPress site and choose a username (it is advisable not to take a username as “admin” keeping security in mind). It will generate a strong password automatically. You can either save this password or select an alternative strong password.
Now, enter your email and select if you want to stop search engines from indexing your site:
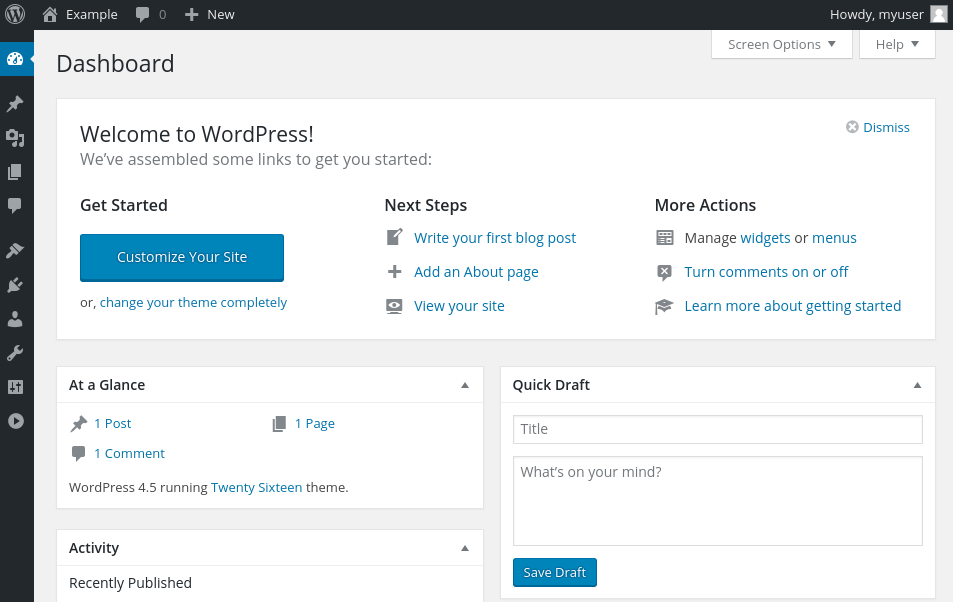
4) After that, you will get a prompt to log in.
5) Now, it will take you to the admin dashboard.
FAQs to Install WordPress with LEMP on Ubuntu 18.04
What is LEMP?
LEMP stands for Linux, Nginx, MySQL, and PHP. It is a popular software stack used to host dynamic websites and web applications.
Why should I choose LEMP for installing WordPress?
LEMP offers a lightweight and efficient setup for running WordPress. Nginx provides high-performance web server capabilities, while MySQL and PHP are commonly used for database and server-side scripting respectively.
What is the recommended way to install WordPress on Ubuntu 18.04?
The recommended way is to download the latest version of WordPress from the official website, extract the files, and then move them to the root directory of your Nginx server block.
How do I secure my WordPress installation?
To enhance security, you can take several measures such as using strong passwords, keeping WordPress and plugins up to date, limiting login attempts, and configuring a firewall. Additionally, enabling SSL/TLS encryption is highly recommended.
Are there any additional steps after installing WordPress with LEMP on Ubuntu 18.04?
After installation, you should complete the WordPress setup by accessing your domain in a web browser and following the on-screen instructions. You'll need to provide database information and create an admin account.
Can I use a different PHP version with WordPress?
Yes, you can use different PHP versions with WordPress. However, keep in mind that not all PHP versions may be compatible with the specific version of WordPress you are using. Ensure that the PHP version you intend to use is supported by WordPress and check for any PHP version-specific requirements or dependencies.
Can I use a different content management system (CMS) instead of WordPress with LEMP?
Yes, you can use a different CMS instead of WordPress with LEMP. The LEMP stack is versatile and can support various CMS options, such as Drupal and Joomla. However, different CMS platforms may have specific requirements and configurations, so make sure to consult their respective documentation for installation and setup instructions.
Conclusion
We hope this tutorial helped you to successfully install WordPress. To learn more about WordPress, visit Getting Started with WordPress and get acquainted with your new CMS.
If you have any queries, please leave a comment below, and we’ll be happy to respond to them for sure.
